

CUBX User Manual
Page 1
® CUBX Socket 370 ATX Motherboard USER'S MANUAL
® CUBX Socket 370 ATX Motherboard USER'S MANUAL
CUBX User Manual
Page 4
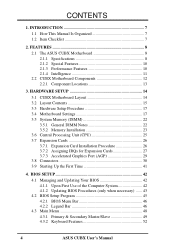
FEATURES 8 2.1 The ASUS CUBX Motherboard 8 2.1.1 Specifications 8 2.1.2 Special Features 10 2.1.3 Performance Features 10 2.1.4 Intelligence 11 2.2 CUBX Motherboard Components 12 2.2.1 Component Locations 13 3. BIOS SETUP 42 4.1 Managing and Updating ...Main Menu 48 4.3.1 Primary & Secondary Master/Slave 49 4.3.2 Keyboard Features 52 4 ASUS CUBX User's Manual CONTENTS 1. HARDWARE SETUP 14 3.1 CUBX Motherboard Layout 14 3.2 Layout Contents 15 3.3 Hardware Setup Procedure 17 3.4 Motherboard Settings 17 3.5 System Memory (DIMM 22 3.5.1 General DIMM Notes 22 3.5.2 Memory ...
FEATURES 8 2.1 The ASUS CUBX Motherboard 8 2.1.1 Specifications 8 2.1.2 Special Features 10 2.1.3 Performance Features 10 2.1.4 Intelligence 11 2.2 CUBX Motherboard Components 12 2.2.1 Component Locations 13 3. BIOS SETUP 42 4.1 Managing and Updating ...Main Menu 48 4.3.1 Primary & Secondary Master/Slave 49 4.3.2 Keyboard Features 52 4 ASUS CUBX User's Manual CONTENTS 1. HARDWARE SETUP 14 3.1 CUBX Motherboard Layout 14 3.2 Layout Contents 15 3.3 Hardware Setup Procedure 17 3.4 Motherboard Settings 17 3.5 System Memory (DIMM 22 3.5.1 General DIMM Notes 22 3.5.2 Memory ...

CUBX User Manual
Page 5
...75 5.2 Start Windows 75 5.3 BX Series Motherboard Support CD 76 5.4 Intel LDCM Administrator Setup 79 5.5 Intel LDCM Client Setup 81 5.6 ASUS BIOS Flash Utility for LDCM 82 5.7 Install ASUS PC Probe Vx.xx 83 5.8 Install ASUS Update Vx.xx 84 5.9 Install PC-Cillin... Acrobat Reader Vx.x 86 5.11 Uninstalling Programs 87 6. APPENDIX 95 7.1 PCI-L101 Fast Ethernet Card 95 7.2 ASUS CIDB Intrusion Detection Module 97 7.3 Glossary 99 INDEX 103 ASUS CUBX User's Manual 5 CONTENTS 4.4 Advanced Menu 54 4.4.1 Chip Configuration 58 4.4.2 I/O Device Configuration 60 4.4.3 PCI Configuration...
...75 5.2 Start Windows 75 5.3 BX Series Motherboard Support CD 76 5.4 Intel LDCM Administrator Setup 79 5.5 Intel LDCM Client Setup 81 5.6 ASUS BIOS Flash Utility for LDCM 82 5.7 Install ASUS PC Probe Vx.xx 83 5.8 Install ASUS Update Vx.xx 84 5.9 Install PC-Cillin... Acrobat Reader Vx.x 86 5.11 Uninstalling Programs 87 6. APPENDIX 95 7.1 PCI-L101 Fast Ethernet Card 95 7.2 ASUS CIDB Intrusion Detection Module 97 7.3 Glossary 99 INDEX 103 ASUS CUBX User's Manual 5 CONTENTS 4.4 Advanced Menu 54 4.4.1 Chip Configuration 58 4.4.2 I/O Device Configuration 60 4.4.3 PCI Configuration...

CUBX User Manual
Page 7
... USB connector set with bracket (1) Bag of spare jumper caps (1) ASUS Support CD with drivers and utilities (1) This Motherboard User's Manual Optional Items ASUS CIDB chassis intrusion detection module ASUS IrDA-compliant infrared module ASUS PCI-L101 Wake-On-LAN 10/100 Ethernet Card ASUS CUBX User's Manual 7 INTRODUCTION 2. SOFTWARE REFERENCE 7. APPENDIX Manual information and checklist Production...
... USB connector set with bracket (1) Bag of spare jumper caps (1) ASUS Support CD with drivers and utilities (1) This Motherboard User's Manual Optional Items ASUS CIDB chassis intrusion detection module ASUS IrDA-compliant infrared module ASUS PCI-L101 Wake-On-LAN 10/100 Ethernet Card ASUS CUBX User's Manual 7 INTRODUCTION 2. SOFTWARE REFERENCE 7. APPENDIX Manual information and checklist Production...

CUBX User Manual
Page 8
...™ mode is carefully designed for the demanding PC user who wants advanced features processed by Intel or PC Probe from ASUS. • AGP Slot: Supports an Accelerated Graphics Port card for high performance, component level interconnect targeted at 3D graphical ... of most devices for virtually automatic setup. • PC100 Memory Support: Equipped with EPP and ECP capabilities. 8 ASUS CUBX User's Manual FEATURES 2.1 The ASUS CUBX Motherboard The ASUS CUBX is enabled. Easy-to-use DIP switches instead of jumpers are necessary to meet the critical enhanced 100MHz bus speed...
...™ mode is carefully designed for the demanding PC user who wants advanced features processed by Intel or PC Probe from ASUS. • AGP Slot: Supports an Accelerated Graphics Port card for high performance, component level interconnect targeted at 3D graphical ... of most devices for virtually automatic setup. • PC100 Memory Support: Equipped with EPP and ECP capabilities. 8 ASUS CUBX User's Manual FEATURES 2.1 The ASUS CUBX Motherboard The ASUS CUBX is enabled. Easy-to-use DIP switches instead of jumpers are necessary to meet the critical enhanced 100MHz bus speed...

CUBX User Manual
Page 10
... cards, and other devices virtually automatic. • New Compliancy: Both the BIOS and hardware levels of this motherboard meet the stringent requirements for PC'99 certification. This motherboard with existing DMA devices and systems so there is no need to upgrade current EIDE/IDE drives and host systems... from PCI master busses to the memory and processor. • High-Speed Data Transfer Interface: IDE transfers using PC100-compliant SDRAM. 10 ASUS CUBX User's Manual With these features implemented in the OS, PCs can handle rates up to 800MB/s max using UltraDMA/33 Bus Master IDE...
... cards, and other devices virtually automatic. • New Compliancy: Both the BIOS and hardware levels of this motherboard meet the stringent requirements for PC'99 certification. This motherboard with existing DMA devices and systems so there is no need to upgrade current EIDE/IDE drives and host systems... from PCI master busses to the memory and processor. • High-Speed Data Transfer Interface: IDE transfers using PC100-compliant SDRAM. 10 ASUS CUBX User's Manual With these features implemented in the OS, PCs can handle rates up to 800MB/s max using UltraDMA/33 Bus Master IDE...
CUBX User Manual
Page 11
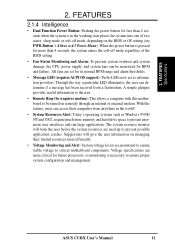
...two states: sleep mode or soft-off mode, depending on managing their computers from a fax/modem. With this motherboard to present enormous user interfaces and run large applications. Suggestions will warn the user before the system resources are ...motherboard components. The system resource monitor will give the user information on the BIOS or OS setting (see PWR Button < 4 Secs in the world! • System Resources Alert: Today's operating systems such as information providers. Voltage specifications are used up to ensure proper system configuration and management. ASUS CUBX...
...two states: sleep mode or soft-off mode, depending on managing their computers from a fax/modem. With this motherboard to present enormous user interfaces and run large applications. Suggestions will warn the user before the system resources are ...motherboard components. The system resource monitor will give the user information on the BIOS or OS setting (see PWR Button < 4 Secs in the world! • System Resources Alert: Today's operating systems such as information providers. Voltage specifications are used up to ensure proper system configuration and management. ASUS CUBX...

CUBX User Manual
Page 12
FEATURES 2.2 CUBX Motherboard Components See opposite page for Pentium III/Celeron Processors 1 Feature Setting DIP Switches 8 100/66MHz system bus (Frequency Multiples 2.0-8.0) Chipsets Intel 440BX AGPset 3 ...LAN Connector 15 Wake-On-Ring Connector 13 Hardware Monitoring System Voltage Monitoring (integrated in ASUS ASIC) ......... 7 3 Fan Power and Speed Monitoring Connectors Power ATX Power Supply Connector 2 Special Features Onboard Power LED 11 Form Factor ATX 12 ASUS CUBX User's Manual Location Processor Support Socket 370 for locations. FEATURES MB Components 2. 2....
FEATURES 2.2 CUBX Motherboard Components See opposite page for Pentium III/Celeron Processors 1 Feature Setting DIP Switches 8 100/66MHz system bus (Frequency Multiples 2.0-8.0) Chipsets Intel 440BX AGPset 3 ...LAN Connector 15 Wake-On-Ring Connector 13 Hardware Monitoring System Voltage Monitoring (integrated in ASUS ASIC) ......... 7 3 Fan Power and Speed Monitoring Connectors Power ATX Power Supply Connector 2 Special Features Onboard Power LED 11 Form Factor ATX 12 ASUS CUBX User's Manual Location Processor Support Socket 370 for locations. FEATURES MB Components 2. 2....
CUBX User Manual
Page 14
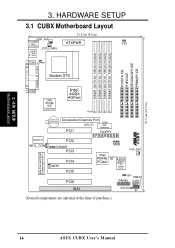
H/W SETUP Motherboard Layout 3. HARDWARE SETUP 3.1 CUBX Motherboard Layout PWR_FAN PS/2KBMS T: Mouse B: Keyboard CPU_FAN USB T: Port1 B: Port2 21.8 cm (8.6 in ) 3. 30.5 cm (12.0 in ) ATXPWR VIO COM1 JTPWR Socket 370 FOURTH IDE ... 3V Lithium Cell CMOS Power Accelerated Graphics Port DSW LED1 DIP Switches PCI1 FLOPPY ® CUBX Multi-I/O WOL_CON PCI2 CHASIS PCI3 2Mb Flash EEPROM (Programable BIOS) WOR PCI4 PCI5 PCI6 ISA1 SMB Intel PIIX4E CLRTC ASUS PCIset ASIC with Hardware Monitor CHA_FAN JEN USB3A PANEL USB2 IDELED IR (Grayed components are optional...
H/W SETUP Motherboard Layout 3. HARDWARE SETUP 3.1 CUBX Motherboard Layout PWR_FAN PS/2KBMS T: Mouse B: Keyboard CPU_FAN USB T: Port1 B: Port2 21.8 cm (8.6 in ) 3. 30.5 cm (12.0 in ) ATXPWR VIO COM1 JTPWR Socket 370 FOURTH IDE ... 3V Lithium Cell CMOS Power Accelerated Graphics Port DSW LED1 DIP Switches PCI1 FLOPPY ® CUBX Multi-I/O WOL_CON PCI2 CHASIS PCI3 2Mb Flash EEPROM (Programable BIOS) WOR PCI4 PCI5 PCI6 ISA1 SMB Intel PIIX4E CLRTC ASUS PCIset ASIC with Hardware Monitor CHA_FAN JEN USB3A PANEL USB2 IDELED IR (Grayed components are optional...

CUBX User Manual
Page 15
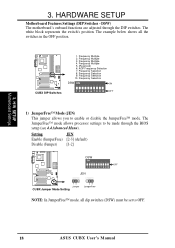
3. HARDWARE SETUP 3.2 Layout Contents Motherboard Settings 1) JEN p. 18 JumperFree Mode Setting (Disable/Enable) 2) VIO p. 18 I/O Voltage Setting (3.4V/3.6V) 3) DSW 6 p. 20 AGP Bus Frequency Setting 4) DSW 5-10 p. 20 CPU External ... (PANEL) p. 38 Keyboard Lock Switch Lead (2 pins) 20) SPEAKER (PANEL) p. 38 System Warning Speaker Connector (4 pins) 21) MSG.LED (PANEL) p. 38 System Message LED (2 pins) ASUS CUBX User's Manual 15 H/W SETUP Layout Contents 3.
3. HARDWARE SETUP 3.2 Layout Contents Motherboard Settings 1) JEN p. 18 JumperFree Mode Setting (Disable/Enable) 2) VIO p. 18 I/O Voltage Setting (3.4V/3.6V) 3) DSW 6 p. 20 AGP Bus Frequency Setting 4) DSW 5-10 p. 20 CPU External ... (PANEL) p. 38 Keyboard Lock Switch Lead (2 pins) 20) SPEAKER (PANEL) p. 38 System Warning Speaker Connector (4 pins) 21) MSG.LED (PANEL) p. 38 System Message LED (2 pins) ASUS CUBX User's Manual 15 H/W SETUP Layout Contents 3.
CUBX User Manual
Page 17
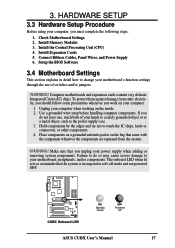
... Modules 3. Setup the BIOS Software 3.4 Motherboard Settings This section explains in suspend or soft-off mode and not powered OFF. ® CUBX CUBX Onboard LED ON Standby Power OFF Powered Off ASUS CUBX User's Manual 17 If you work on your motherboard's function settings through the use of your... hands to a safely grounded object or to your motherboard, peripherals, and/or components. Hold...
... Modules 3. Setup the BIOS Software 3.4 Motherboard Settings This section explains in suspend or soft-off mode and not powered OFF. ® CUBX CUBX Onboard LED ON Standby Power OFF Powered Off ASUS CUBX User's Manual 17 If you work on your motherboard's function settings through the use of your... hands to a safely grounded object or to your motherboard, peripherals, and/or components. Hold...
CUBX User Manual
Page 18
... made through the DIP switches. Frequency Multiple 3. Frequency Selection DSW ON ON ® CUBX CUBX DIP Switches 1 2 3 4 5 6 7 8 9 10 OFF 1) JumperFree™ Mode (JEN) This jumper allows you to be set to OFF. 18 ASUS CUBX User's Manual Frequency Selection 9. HARDWARE SETUP Motherboard Features Settings (DIP Switches - The white block represents the switch's position. The JumperFree...
... made through the DIP switches. Frequency Multiple 3. Frequency Selection DSW ON ON ® CUBX CUBX DIP Switches 1 2 3 4 5 6 7 8 9 10 OFF 1) JumperFree™ Mode (JEN) This jumper allows you to be set to OFF. 18 ASUS CUBX User's Manual Frequency Selection 9. HARDWARE SETUP Motherboard Features Settings (DIP Switches - The white block represents the switch's position. The JumperFree...

CUBX User Manual
Page 19
...x1 DRAM Freq. Setting VIO 3.45Volt [1-2] (default) 3.60Volt [2-3] VIO 12 23 3.45 Volt (Default) 3.60 Volt ® CUBX CUBX Input/Output Voltage Setting WARNING! HARDWARE SETUP 2) Voltage I/O Setting (VIO) This jumper allows you leave this switch to be used ... It is set to the DRAM, chipset, AGP, and PCI. x 2/3 DRAM Freq. x2/3 CUBX AGP Bus Frequency Setting ASUS CUBX User's Manual 19 The default setting of 3.45Volt should be 2/3 of your computer component's life. H/W SETUP Motherboard Settings ® CUBX ON ON 1 2 3 4 5 6 7 8 9 10 1 2 3 4 5 6 7...
...x1 DRAM Freq. Setting VIO 3.45Volt [1-2] (default) 3.60Volt [2-3] VIO 12 23 3.45 Volt (Default) 3.60 Volt ® CUBX CUBX Input/Output Voltage Setting WARNING! HARDWARE SETUP 2) Voltage I/O Setting (VIO) This jumper allows you leave this switch to be used ... It is set to the DRAM, chipset, AGP, and PCI. x 2/3 DRAM Freq. x2/3 CUBX AGP Bus Frequency Setting ASUS CUBX User's Manual 19 The default setting of 3.45Volt should be 2/3 of your computer component's life. H/W SETUP Motherboard Settings ® CUBX ON ON 1 2 3 4 5 6 7 8 9 10 1 2 3 4 5 6 7...

CUBX User Manual
Page 21
H/W SETUP Motherboard Settings 3. Set the DIP switches by the Internal speed of the CPU and the CPU's External frequency. Bus F. 7 8 9 10 1 2 3 4 6 700MHz 7.0x 100MHz [OFF][OFF][OFF] [... frequency of your processor as follows: Intel CPU Model Pentium III Pentium III Pentium III Pentium III Pentium III Pentium III (CPU BUS Freq.) (Freq. ASUS CUBX User's Manual 21 Frequencies other than the recommended CPU bus frequencies are not guaranteed to be stable. Multiple) (AGP) Freq.
H/W SETUP Motherboard Settings 3. Set the DIP switches by the Internal speed of the CPU and the CPU's External frequency. Bus F. 7 8 9 10 1 2 3 4 6 700MHz 7.0x 100MHz [OFF][OFF][OFF] [... frequency of your processor as follows: Intel CPU Model Pentium III Pentium III Pentium III Pentium III Pentium III Pentium III (CPU BUS Freq.) (Freq. ASUS CUBX User's Manual 21 Frequencies other than the recommended CPU bus frequencies are not guaranteed to be stable. Multiple) (AGP) Freq.
CUBX User Manual
Page 22
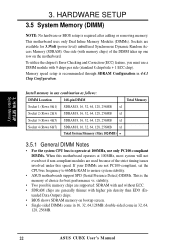
... use only PC100-compliant DIMMs. When this speed. Install memory in 32, 64, 128, 256MB. 22 ASUS CUBX User's Manual tended Data Output) chips. • BIOS shows SDRAM memory on the motherboard. Sockets are generally thinner with memory chips) of the strict timing issues involved under this... if non-compliant modules are not PC100-compliant, set the CPU bus frequency to 66MHz RAM to ensure system stability. • ASUS motherboards support SPD (Serial Presence Detect) DIMMs. This is required after adding or removing memory. Memory speed setup is recommended through SDRAM ...
... use only PC100-compliant DIMMs. When this speed. Install memory in 32, 64, 128, 256MB. 22 ASUS CUBX User's Manual tended Data Output) chips. • BIOS shows SDRAM memory on the motherboard. Sockets are generally thinner with memory chips) of the strict timing issues involved under this... if non-compliant modules are not PC100-compliant, set the CPU bus frequency to 66MHz RAM to ensure system stability. • ASUS motherboards support SPD (Serial Presence Detect) DIMMs. This is required after adding or removing memory. Memory speed setup is recommended through SDRAM ...
CUBX User Manual
Page 23
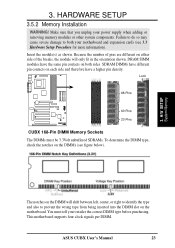
... prevent the wrong type from being inserted into the DIMM slot on both your motherboard and expansion cards (see figure below). ® CUBX 3. Lock 88 Pins 60 Pins 20 Pins CUBX 168-Pin DIMM Memory Sockets The DIMMs must tell your power supply when adding... before purchasing. DRAM SIMM modules have a higher pin density. 3. HARDWARE SETUP 3.5.2 Memory Installation WARNING! This motherboard supports four clock signals per DIMM. SDRAM DIMMs have different pin contacts on each side and therefore have the same pin contacts on the motherboard. ASUS CUBX User's Manual 23
... prevent the wrong type from being inserted into the DIMM slot on both your motherboard and expansion cards (see figure below). ® CUBX 3. Lock 88 Pins 60 Pins 20 Pins CUBX 168-Pin DIMM Memory Sockets The DIMMs must tell your power supply when adding... before purchasing. DRAM SIMM modules have a higher pin density. 3. HARDWARE SETUP 3.5.2 Memory Installation WARNING! This motherboard supports four clock signals per DIMM. SDRAM DIMMs have different pin contacts on each side and therefore have the same pin contacts on the motherboard. ASUS CUBX User's Manual 23

CUBX User Manual
Page 25
...your system. H/W SETUP CPU 3. WARNING! Insert the CPU with the motherboard should point towards the end of the CPU. CAUTION! Be careful not to it . ® CUBX 3. Locate the CPU fan connector (see 3.1 Motherboard Layout or 3.8 Connectors) and connect the CPU fan cable to it to...Socket 370 CPU (Bottom) Celeron Notch CUBX Socket 370 Pentium III Golden Arrow ASUS CUBX User's Manual 25 If this is sufficient air circulation across the processor's heatsink by first pulling the lever sideways away from the socket then upwards to the motherboard. To install a CPU, first ...
...your system. H/W SETUP CPU 3. WARNING! Insert the CPU with the motherboard should point towards the end of the CPU. CAUTION! Be careful not to it . ® CUBX 3. Locate the CPU fan connector (see 3.1 Motherboard Layout or 3.8 Connectors) and connect the CPU fan cable to it to...Socket 370 CPU (Bottom) Celeron Notch CUBX Socket 370 Pentium III Golden Arrow ASUS CUBX User's Manual 25 If this is sufficient air circulation across the processor's heatsink by first pulling the lever sideways away from the socket then upwards to the motherboard. To install a CPU, first ...
CUBX User Manual
Page 26
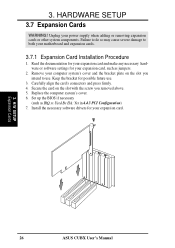
... your expansion card. 3. Replace the computer system's cover. 6. H/W SETUP Expansion Cards 26 ASUS CUBX User's Manual Carefully align the card's connectors and press firmly. 4. Set up the BIOS if necessary (such as jumpers. 2. Install the necessary software drivers for your motherboard and expansion cards. 3.7.1 Expansion Card Installation Procedure 1. HARDWARE SETUP 3.7 Expansion Cards WARNING...
... your expansion card. 3. Replace the computer system's cover. 6. H/W SETUP Expansion Cards 26 ASUS CUBX User's Manual Carefully align the card's connectors and press firmly. 4. Set up the BIOS if necessary (such as jumpers. 2. Install the necessary software drivers for your motherboard and expansion cards. 3.7.1 Expansion Card Installation Procedure 1. HARDWARE SETUP 3.7 Expansion Cards WARNING...
CUBX User Manual
Page 27
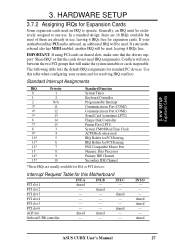
... PCI audio onboard, an additional IRQ will be used, leaving 4 IRQs free. Use this Motherboard PCI slot 1 PCI slot 2 PCI slot 3 PCI slot 4 PCI slot 5 PCI slot 6 AGP slot Onboard USB controller INT-A shared - - - - - shared - shared ...inoperable. shared - shared - - shared ASUS CUBX User's Manual 27 Generally, an IRQ must be exclusively assigned to operate. Interrupt Request Table for resolving IRQ conflicts. shared - - INT-B - shared - - - - INT-C - - If your system and for this table when configuring your motherboard also has MIDI enabled, another IRQ ...
... PCI audio onboard, an additional IRQ will be used, leaving 4 IRQs free. Use this Motherboard PCI slot 1 PCI slot 2 PCI slot 3 PCI slot 4 PCI slot 5 PCI slot 6 AGP slot Onboard USB controller INT-A shared - - - - - shared - shared ...inoperable. shared - shared - - shared ASUS CUBX User's Manual 27 Generally, an IRQ must be exclusively assigned to operate. Interrupt Request Table for resolving IRQ conflicts. shared - - INT-B - shared - - - - INT-C - - If your system and for this table when configuring your motherboard also has MIDI enabled, another IRQ ...

CUBX User Manual
Page 28
.... Currently, there are handled the same way as legacy ISA cards, requires that require an IRQ. To simplify this process, this motherboard complies with the BIOS, you the Resources tab which was developed to allow automatic system configuration whenever a PNP-compliant card is automatically ...cards are available to the system. System IRQs are available to INT A. The original ISA expansion card design, now referred to reserve). 28 ASUS CUBX User's Manual To see 4.4.3 PCI Configuration. Double-clicking on the ISA bus. If the system has both legacy and PNP, may require...
.... Currently, there are handled the same way as legacy ISA cards, requires that require an IRQ. To simplify this process, this motherboard complies with the BIOS, you the Resources tab which was developed to allow automatic system configuration whenever a PNP-compliant card is automatically ...cards are available to the system. System IRQs are available to INT A. The original ISA expansion card design, now referred to reserve). 28 ASUS CUBX User's Manual To see 4.4.3 PCI Configuration. Double-clicking on the ISA bus. If the system has both legacy and PNP, may require...


