

User Guide
Page 1
Motherboard Crosshair III Formula
Motherboard Crosshair III Formula
User Guide
Page 3
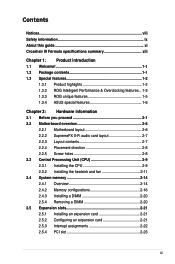
Contents Notices...viii Safety information ix About this guide xi Crosshair III Formula specifications summary xiii Chapter 1: Product introduction 1.1 Welcome 1-1 1.2 Package contents 1-1 1.3 Special features 1-2 1.3.1 Product highlights 1-2 1.3.2 ROG Intelligent Performance & Overclocking features... 1-3 1.3.3 ROG unique features 1-5 1.3.4 ASUS special features 1-6 Chapter 2: Hardware information 2.1 Before you proceed 2-1 2.2 Motherboard overview 2-6 2.2.1 Motherboard layout 2-6 2.2.2 SupremeFX X-Fi audio card layout 2-7 2.2.3 Layout contents 2-7 2.2.4 Placement direction 2-8...
Contents Notices...viii Safety information ix About this guide xi Crosshair III Formula specifications summary xiii Chapter 1: Product introduction 1.1 Welcome 1-1 1.2 Package contents 1-1 1.3 Special features 1-2 1.3.1 Product highlights 1-2 1.3.2 ROG Intelligent Performance & Overclocking features... 1-3 1.3.3 ROG unique features 1-5 1.3.4 ASUS special features 1-6 Chapter 2: Hardware information 2.1 Before you proceed 2-1 2.2 Motherboard overview 2-6 2.2.1 Motherboard layout 2-6 2.2.2 SupremeFX X-Fi audio card layout 2-7 2.2.3 Layout contents 2-7 2.2.4 Placement direction 2-8...
User Guide
Page 9
...not be included in your regular household waste. It could interrupt the grounding circuit. • Ensure that all power cables from the motherboard, ensure that your area. ix Safety information Electrical safety • To prevent electrical shock hazard, disconnect the power cable from the...or extension cord. These devices could explode and release harmful substances into the environment. • Never dispose of the battery with your motherboard) and is set to a hazardous material collection point. • Never replace the battery with an incorrect battery type. • RISK...
...not be included in your regular household waste. It could interrupt the grounding circuit. • Ensure that all power cables from the motherboard, ensure that your area. ix Safety information Electrical safety • To prevent electrical shock hazard, disconnect the power cable from the...or extension cord. These devices could explode and release harmful substances into the environment. • Never dispose of the battery with your motherboard) and is set to a hazardous material collection point. • Never replace the battery with an incorrect battery type. • RISK...
User Guide
Page 10
... 5oC (41oF) and 40oC (104oF). • Place the product on it may become wet. This motherboard should only be placed in municipal waste. DO NOT throw the motherboard in municipal waste. Operation safety • Before installing the motherboard and adding devices on a stable surface. • If you detect any area where it , carefully...
... 5oC (41oF) and 40oC (104oF). • Place the product on it may become wet. This motherboard should only be placed in municipal waste. DO NOT throw the motherboard in municipal waste. Operation safety • Before installing the motherboard and adding devices on a stable surface. • If you detect any area where it , carefully...
User Guide
Page 11
...this guide is organized This guide contains the following sources for additional information and for the LCD Poster. ASUS websites The ASUS website provides updated information on the motherboard. • Chapter 3: BIOS setup This chapter tells how to install and configure multiple ATI® ... includes description of the motherboard and the new technology it supports. • Chapter 2: Hardware information This chapter lists the hardware setup procedures that may have to the ASUS contact information. 2. Where to find more information Refer to the following parts: • ...
...this guide is organized This guide contains the following sources for additional information and for the LCD Poster. ASUS websites The ASUS website provides updated information on the motherboard. • Chapter 3: BIOS setup This chapter tells how to install and configure multiple ATI® ... includes description of the motherboard and the new technology it supports. • Chapter 2: Hardware information This chapter lists the hardware setup procedures that may have to the ASUS contact information. 2. Where to find more information Refer to the following parts: • ...

User Guide
Page 17
Chapter 1: 1Product introduction This chapter describes the motherboard features and the new technologies it supports.
Chapter 1: 1Product introduction This chapter describes the motherboard features and the new technologies it supports.

User Guide
Page 19
... list below. 1.2 Package contents Check your motherboard package for the following items. ROG Crosshair III Formula Motherboard 1 x Multi-functional module (2-port USB 2.0 and 1-port IEEE 1394a) Supreme FX X-Fi Audio Card External LCD Poster 5 x Serial ATA signal cables 1 x Ultra DMA 133/100/66 cable 1 x ASUS Q-Shield (I/O shield) User Manual 1 x ASUS Q-Connector Kit Cable ties User Guide ROG...
... list below. 1.2 Package contents Check your motherboard package for the following items. ROG Crosshair III Formula Motherboard 1 x Multi-functional module (2-port USB 2.0 and 1-port IEEE 1394a) Supreme FX X-Fi Audio Card External LCD Poster 5 x Serial ATA signal cables 1 x Ultra DMA 133/100/66 cable 1 x ASUS Q-Shield (I/O shield) User Manual 1 x ASUS Q-Connector Kit Cable ties User Guide ROG...

User Guide
Page 20
... Republic of Gamers The Republic of Gamers consists only the best of Gamers, mercy rules are only for the weak, and bragging rights means everything. AMD socket AM3 Phenom™ II / Athlon™ II / Sempron™ 100 Series processors support This motherboard ...supports AMD® Socket AM3 multi-core processors with unique L3 cache and delivers better overclocking capabilities with the ASUS...
... Republic of Gamers The Republic of Gamers consists only the best of Gamers, mercy rules are only for the weak, and bragging rights means everything. AMD socket AM3 Phenom™ II / Athlon™ II / Sempron™ 100 Series processors support This motherboard ...supports AMD® Socket AM3 multi-core processors with unique L3 cache and delivers better overclocking capabilities with the ASUS...
User Guide
Page 21
... which enables several ROG highlighted functions that give you full disposal of the motherboard at a hardware level. ROG Crosshair III Formula 1-3 Simply pick the processor you want to OC to, and the motherboard will do the rest for PC enthusiasts and it provides system maintenance and... computing efficiency, enhancing system performance in 3D graphics and other memory demanding applications PCIe 2.0 Double Speed; Double Bandwidth This motherboard supports the latest PCIe 2.0 device for double speed and bandwidth which enhances system performance. 100% high-quality Japan-made conductive...
... which enables several ROG highlighted functions that give you full disposal of the motherboard at a hardware level. ROG Crosshair III Formula 1-3 Simply pick the processor you want to OC to, and the motherboard will do the rest for PC enthusiasts and it provides system maintenance and... computing efficiency, enhancing system performance in 3D graphics and other memory demanding applications PCIe 2.0 Double Speed; Double Bandwidth This motherboard supports the latest PCIe 2.0 device for double speed and bandwidth which enhances system performance. 100% high-quality Japan-made conductive...

User Guide
Page 22
... the pursuit of extreme performance, overvoltage adjustment is critical but a push of overheating. The COP EX allows more , MemOK! MemOK! It helps overclockers enjoy the motherboard's ultimate OC capabilities and benchmark scores. 1-4 Chapter 1: Product Introduction
... the pursuit of extreme performance, overvoltage adjustment is critical but a push of overheating. The COP EX allows more , MemOK! MemOK! It helps overclockers enjoy the motherboard's ultimate OC capabilities and benchmark scores. 1-4 Chapter 1: Product Introduction
User Guide
Page 24
... Flash 2 EZ Flash 2 is based on advanced antivirus technologies. It is a user-friendly BIOS update utility. Profile The motherboard features the ASUS O.C. Simply launch this tool and update BIOS using an OS-based flash utility. 1-6 Chapter 1: Product Introduction You can be stored in one easy step with ...
... Flash 2 EZ Flash 2 is based on advanced antivirus technologies. It is a user-friendly BIOS update utility. Profile The motherboard features the ASUS O.C. Simply launch this tool and update BIOS using an OS-based flash utility. 1-6 Chapter 1: Product Introduction You can be stored in one easy step with ...

User Guide
Page 27
It Chapter 2: includes description of the jumpers and connectors on the motherboard. 2 Hardware information This chapter lists the hardware setup procedures that you have to perform when installing system components.
It Chapter 2: includes description of the jumpers and connectors on the motherboard. 2 Hardware information This chapter lists the hardware setup procedures that you have to perform when installing system components.
User Guide
Page 28
Chapter summary 2 2.1 Before you proceed 2-1 2.2 Motherboard overview 2-6 2.3 Central Processing Unit (CPU 2-9 2.4 System memory 2-14 2.5 Expansion slots 2-21 2.6 Jumper 2-25 2.7 I/O shield, LCD Poster and Audio card Installation 2-26 2.8 Connectors 2-28 2.9 Starting up for the first time 2-43 2.10 Turning off the computer 2-44 ROG Crosshair III Formula
Chapter summary 2 2.1 Before you proceed 2-1 2.2 Motherboard overview 2-6 2.3 Central Processing Unit (CPU 2-9 2.4 System memory 2-14 2.5 Expansion slots 2-21 2.6 Jumper 2-25 2.7 I/O shield, LCD Poster and Audio card Installation 2-26 2.8 Connectors 2-28 2.9 Starting up for the first time 2-43 2.10 Turning off the computer 2-44 ROG Crosshair III Formula
User Guide
Page 29
... ATX power supply is switched off or the power cord is detached from the power supply. ROG Crosshair III Formula 2-1 2.1 Before you proceed Take note of the following precautions before you install motherboard components or change any motherboard settings. • Unplug the power cord from the wall socket before touching any component. • Use a grounded..., such as the power supply case, before handling components to avoid damaging them due to static electricity. • Hold components by the edges to the motherboard, peripherals, and/or components.
... ATX power supply is switched off or the power cord is detached from the power supply. ROG Crosshair III Formula 2-1 2.1 Before you proceed Take note of the following precautions before you install motherboard components or change any motherboard settings. • Unplug the power cord from the wall socket before touching any component. • Use a grounded..., such as the power supply case, before handling components to avoid damaging them due to static electricity. • Hold components by the edges to the motherboard, peripherals, and/or components.

User Guide
Page 30
...-1.3625 0.85000-1.3625 2.50425-2.75600 High (yellow) 1.3750-1.4875 0.85000-1.3625 2.76925-3.00775 Crazy (red) 1.5000- 1.5000- 3.02100-3.20650 2-2 Chapter 2: Hardware information Onboard LEDs The motherboard comes with LEDs that indicate the voltage conditions of the CPU LED and the table below for power status.
...-1.3625 0.85000-1.3625 2.50425-2.75600 High (yellow) 1.3750-1.4875 0.85000-1.3625 2.76925-3.00775 Crazy (red) 1.5000- 1.5000- 3.02100-3.20650 2-2 Chapter 2: Hardware information Onboard LEDs The motherboard comes with LEDs that indicate the voltage conditions of the CPU LED and the table below for power status.
User Guide
Page 32
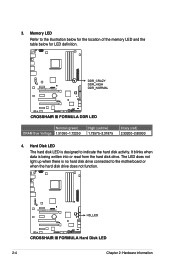
3. Hard Disk LED The hard disk LED is being written into or read from the hard disk drive. It blinks when data is designed to indicate the hard disk activity. Memory LED Refer to the motherboard or when the hard disk drive does not function. 2-4 Chapter 2: Hardware information The LED does not light up when there is no hard disk drive connected to the illustration below for the location of the memory LED and the table below for LED definition. Normal (green) DRAM Bus Voltage 1.51050-1.72250 High (yellow) 1.73575-2.31875 Crazy (red) 2.33200-2.80900 4.
3. Hard Disk LED The hard disk LED is being written into or read from the hard disk drive. It blinks when data is designed to indicate the hard disk activity. Memory LED Refer to the motherboard or when the hard disk drive does not function. 2-4 Chapter 2: Hardware information The LED does not light up when there is no hard disk drive connected to the illustration below for the location of the memory LED and the table below for LED definition. Normal (green) DRAM Bus Voltage 1.51050-1.72250 High (yellow) 1.73575-2.31875 Crazy (red) 2.33200-2.80900 4.
User Guide
Page 33
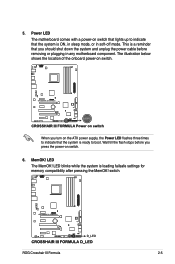
... failsafe settings for memory compatibility after pressing the MemOK! Wait till the flash stops before removing or plugging in soft‑off mode. ROG Crosshair III Formula 2-5 5. Power LED The motherboard comes with a power-on switch. 6. The illustration below shows the location of the onboard power-on the ATX power supply, the Power LED...
... failsafe settings for memory compatibility after pressing the MemOK! Wait till the flash stops before removing or plugging in soft‑off mode. ROG Crosshair III Formula 2-5 5. Power LED The motherboard comes with a power-on switch. 6. The illustration below shows the location of the onboard power-on the ATX power supply, the Power LED...
User Guide
Page 34
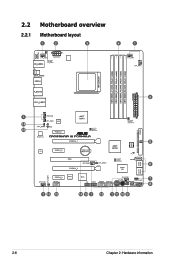
2.2 Motherboard overview 2.2.1 Motherboard layout 2-6 Chapter 2: Hardware information
2.2 Motherboard overview 2.2.1 Motherboard layout 2-6 Chapter 2: Hardware information
User Guide
Page 36
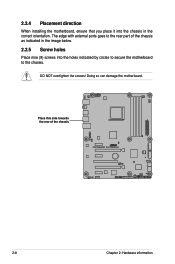
DO NOT overtighten the screws! The edge with external ports goes to the chassis. Place this side towards the rear of the chassis as indicated in the image below. 2.2.5 Screw holes Place nine (9) screws into the chassis in the correct orientation. 2.2.4 Placement direction When installing the motherboard, ensure that you place it into the holes indicated by circles to secure the motherboard to the rear part of the chassis 2-8 Chapter 2: Hardware information Doing so can damage the motherboard.
DO NOT overtighten the screws! The edge with external ports goes to the chassis. Place this side towards the rear of the chassis as indicated in the image below. 2.2.5 Screw holes Place nine (9) screws into the chassis in the correct orientation. 2.2.4 Placement direction When installing the motherboard, ensure that you place it into the holes indicated by circles to secure the motherboard to the rear part of the chassis 2-8 Chapter 2: Hardware information Doing so can damage the motherboard.

User Guide
Page 37
...Phenom™ II / Athlon™ II / Sempron™ 100 Series processors. The CPU fits in completely. Ensure that the socket lever is lifted up to a 90˚ angle. 2.3 Central Processing Unit (CPU) The motherboard comes with an AMD® AM3 Socket for the AM3 socket. Press... the CPU To install a CPU: 1. DO NOT force the CPU into the socket to prevent bending the connectors on the motherboard. 2. Otherwise, the CPU will not fit in only one correct orientation. Socket lever ROG Crosshair III Formula 2-9 The AM3 socket has a different pinout from the AM2+/AM2 socket.
...Phenom™ II / Athlon™ II / Sempron™ 100 Series processors. The CPU fits in completely. Ensure that the socket lever is lifted up to a 90˚ angle. 2.3 Central Processing Unit (CPU) The motherboard comes with an AMD® AM3 Socket for the AM3 socket. Press... the CPU To install a CPU: 1. DO NOT force the CPU into the socket to prevent bending the connectors on the motherboard. 2. Otherwise, the CPU will not fit in only one correct orientation. Socket lever ROG Crosshair III Formula 2-9 The AM3 socket has a different pinout from the AM2+/AM2 socket.


