
CM1855 User's Manual
Page 11
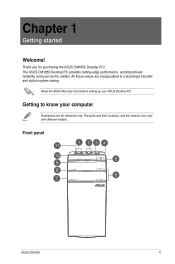
Read the ASUS Warranty Card before setting up your computer Illustrations are encapsulated in a stunningly futuristic and stylish system casing. Front panel ASUS CM1855 11 Thank you for reference only. Getting to know your ASUS Desktop PC. All these values are for purchasing the ASUS CM1855 Desktop PC! The ports and their locations, and the chassis color vary with different models. Chapter 1 Getting started Welcome! The ASUS CM1855 Desktop PC provides cutting-edge performance, uncompromised reliability, and user-centric utilities.
Read the ASUS Warranty Card before setting up your computer Illustrations are encapsulated in a stunningly futuristic and stylish system casing. Front panel ASUS CM1855 11 Thank you for reference only. Getting to know your ASUS Desktop PC. All these values are for purchasing the ASUS CM1855 Desktop PC! The ports and their locations, and the chassis color vary with different models. Chapter 1 Getting started Welcome! The ASUS CM1855 Desktop PC provides cutting-edge performance, uncompromised reliability, and user-centric utilities.
CM1855 User's Manual
Page 13
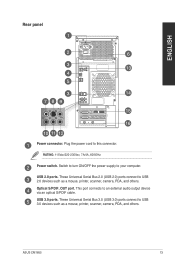
... port connects to USB 2.0 devices such as a mouse, printer, scanner, camera, PDA, and others . Switch to turn ON/OFF the power supply to this connector. ASUS CM1855 13 Power switch. Optical S/PDIF_OUT port. USB 3.0 ports. Plug the power cord to your computer. These Universal Serial Bus 3.0 (USB 3.0) ports connect to USB 3.0 devices...
... port connects to USB 2.0 devices such as a mouse, printer, scanner, camera, PDA, and others . Switch to turn ON/OFF the power supply to this connector. ASUS CM1855 13 Power switch. Optical S/PDIF_OUT port. USB 3.0 ports. Plug the power cord to your computer. These Universal Serial Bus 3.0 (USB 3.0) ports connect to USB 3.0 devices...
CM1855 User's Manual
Page 15
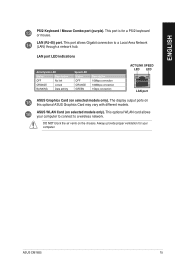
.... This optional WLAN card allows your computer. The display output ports on the chassis. DO NOT block the air vents on this optional ASUS Graphics Card may vary with different models. Always provide proper ventilation for a PS/2 keyboard or mouse. This port is for your computer...connect to a Local Area Network (LAN) through a network hub. LAN (RJ-45) port. ENGLISH PS/2 Keyboard / Mouse Combo port (purple). ASUS WLAN Card (on selected models only). LAN port LED indications Activity/Link LED Status Description OFF No link ORANGE Linked BLINKING Data activity Speed LED...
.... This optional WLAN card allows your computer. The display output ports on the chassis. DO NOT block the air vents on this optional ASUS Graphics Card may vary with different models. Always provide proper ventilation for a PS/2 keyboard or mouse. This port is for your computer...connect to a Local Area Network (LAN) through a network hub. LAN (RJ-45) port. ENGLISH PS/2 Keyboard / Mouse Combo port (purple). ASUS WLAN Card (on selected models only). LAN port LED indications Activity/Link LED Status Description OFF No link ORANGE Linked BLINKING Data activity Speed LED...
CM1855 User's Manual
Page 17
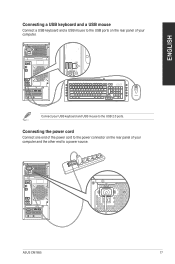
ENGLISH SPDIF OUT Connecting a USB keyboard and a USB mouse Connect a USB keyboard and a USB mouse to the USB ports on the rear panel of your computer. ` Connect your computer and the other end to the USB 2.0 ports. SPDIF OUT ASUS CM1855 17 Connecting the power cord Connect one end of the power cord to the power connector on the rear panel of your USB keyboard and USB mouse to a power source.
ENGLISH SPDIF OUT Connecting a USB keyboard and a USB mouse Connect a USB keyboard and a USB mouse to the USB ports on the rear panel of your computer. ` Connect your computer and the other end to the USB 2.0 ports. SPDIF OUT ASUS CM1855 17 Connecting the power cord Connect one end of the power cord to the power connector on the rear panel of your USB keyboard and USB mouse to a power source.
CM1855 User's Manual
Page 19
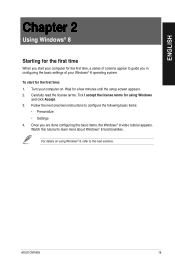
... for a few minutes until the setup screen appears. 2. ENGLISH Chapter 2 Using Windows® 8 Starting for the first time When you start for the first time: 1. ASUS CM1855 19 Wait for using Windows® 8, refer to guide you are done configuring the basic items, the Windows® 8 video tutorial appears. Turn your computer...
... for a few minutes until the setup screen appears. 2. ENGLISH Chapter 2 Using Windows® 8 Starting for the first time When you start for the first time: 1. ASUS CM1855 19 Wait for using Windows® 8, refer to guide you are done configuring the basic items, the Windows® 8 video tutorial appears. Turn your computer...
CM1855 User's Manual
Page 21
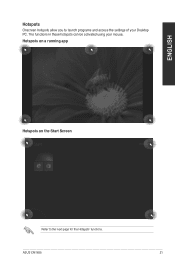
Hotspots on a running app Hotspots on the Start Screen Refer to launch programs and access the settings of your mouse. ASUS CM1855 21 The functions in these hotspots can be activated using your Desktop PC. ENGLISH Hotspots Onscreen hotspots allow you to the next page for the Hotspots' functions.
Hotspots on a running app Hotspots on the Start Screen Refer to launch programs and access the settings of your mouse. ASUS CM1855 21 The functions in these hotspots can be activated using your Desktop PC. ENGLISH Hotspots Onscreen hotspots allow you to the next page for the Hotspots' functions.
CM1855 User's Manual
Page 23
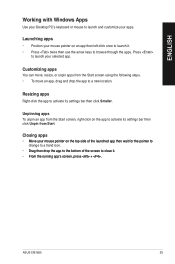
...;n�i�n�g��a�p�p�'�s�s�c�r�e�e�n��, �p�r�e�s�s���. ASUS CM1855 23 ENGLISH Working with Windows Apps Use your Desktop PC's keyboard or mouse to launch your selected app. Launching apps • Position your apps. Press...
...;n�i�n�g��a�p�p�'�s�s�c�r�e�e�n��, �p�r�e�s�s���. ASUS CM1855 23 ENGLISH Working with Windows Apps Use your Desktop PC's keyboard or mouse to launch your selected app. Launching apps • Position your apps. Press...
CM1855 User's Manual
Page 25
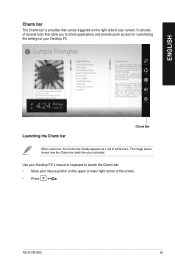
Use your Desktop PC's mouse or keyboard to share applications and provide quick access for customizing the settings of white icons. ASUS CM1855 25 ENGLISH Launching the Charm bar Charm Bar When called out, the Charm bar initially appears as a set of your screen. The image above shows ...
Use your Desktop PC's mouse or keyboard to share applications and provide quick access for customizing the settings of white icons. ASUS CM1855 25 ENGLISH Launching the Charm bar Charm Bar When called out, the Charm bar initially appears as a set of your screen. The image above shows ...
CM1855 User's Manual
Page 27
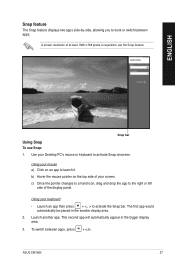
... automatically appear in the smaller display area. 2. Use your keyboard • Launch an app then press + < . > to activate the Snap bar. To switch between apps. ASUS CM1855 27 ENGLISH Snap bar Using Snap To use the Snap feature. c) Once the pointer changes to a hand icon, drag and drop the app to the...
... automatically appear in the smaller display area. 2. Use your keyboard • Launch an app then press + < . > to activate the Snap bar. To switch between apps. ASUS CM1855 27 ENGLISH Snap bar Using Snap To use the Snap feature. c) Once the pointer changes to a hand icon, drag and drop the app to the...
CM1855 User's Manual
Page 29
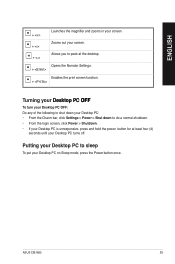
ASUS CM1855 29 Putting your Desktop PC to do a normal shutdown. • From the login screen, click Power > Shutdown. • If your Desktop PC is unresponsive, press ...
ASUS CM1855 29 Putting your Desktop PC to do a normal shutdown. • From the login screen, click Power > Shutdown. • If your Desktop PC is unresponsive, press ...
CM1855 User's Manual
Page 31
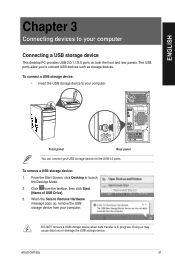
...; Insert the USB storage device to your computer Connecting a USB storage device This desktop PC provides USB 2.0/1.1/3.0 ports on both the front and rear panels. ASUS CM1855 31 When the Safe to the USB 3.0 ports. To remove a USB storage device: 1. DO NOT remove a USB storage device when data transfer is in progress...
...; Insert the USB storage device to your computer Connecting a USB storage device This desktop PC provides USB 2.0/1.1/3.0 ports on both the front and rear panels. ASUS CM1855 31 When the Safe to the USB 3.0 ports. To remove a USB storage device: 1. DO NOT remove a USB storage device when data transfer is in progress...

CM1855 User's Manual
Page 33
ENGLISH Connecting 4-channel Speakers Connecting 6-channel Speakers ASUS CM1855 33
ENGLISH Connecting 4-channel Speakers Connecting 6-channel Speakers ASUS CM1855 33
CM1855 User's Manual
Page 35
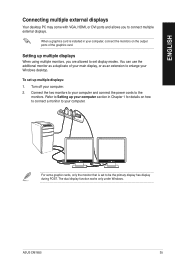
... works only under Windows. For some graphic cards, only the monitor that is installed in Chapter 1 for details on the output ports of your computer. ASUS CM1855 35 Connect the two monitors to your computer and connect the power cords to your main display, or as an extension to Setting up multiple...
... works only under Windows. For some graphic cards, only the monitor that is installed in Chapter 1 for details on the output ports of your computer. ASUS CM1855 35 Connect the two monitors to your computer and connect the power cords to your main display, or as an extension to Setting up multiple...
CM1855 User's Manual
Page 37
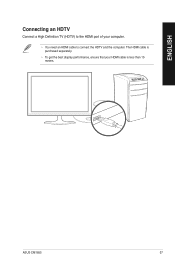
ENGLISH Connecting an HDTV Connect a High Definition TV (HDTV) to the HDMI port of your HDMI cable is purchased separately. • To get the best display performance, ensure that your computer. • You need an HDMI cable to connect the HDTV and the computer. The HDMI cable is less than 15 meters. ASUS CM1855 37
ENGLISH Connecting an HDTV Connect a High Definition TV (HDTV) to the HDMI port of your HDMI cable is purchased separately. • To get the best display performance, ensure that your computer. • You need an HDMI cable to connect the HDTV and the computer. The HDMI cable is less than 15 meters. ASUS CM1855 37
CM1855 User's Manual
Page 39
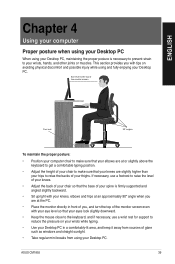
... slightly above the keyboard to get a comfortable typing position. • Adjust the height of your chair to your wrists, hands, and other joints or muscles. ASUS CM1855 39 ENGLISH Chapter 4 Using your computer Proper posture when using your Desktop PC When using your Desktop PC. This section provides you with your knees...
... slightly above the keyboard to get a comfortable typing position. • Adjust the height of your chair to your wrists, hands, and other joints or muscles. ASUS CM1855 39 ENGLISH Chapter 4 Using your computer Proper posture when using your Desktop PC When using your Desktop PC. This section provides you with your knees...

CM1855 User's Manual
Page 41
...;. Remove the disc from the AutoPlay window to access your mouse pointer over the lower-left hand corner of the following to open the tray. 2. ASUS CM1855 41 Place the disc to close it. 4. Push the tray to the optical drive with the label side facing up menu, click File Explorer, and...
...;. Remove the disc from the AutoPlay window to access your mouse pointer over the lower-left hand corner of the following to open the tray. 2. ASUS CM1855 41 Place the disc to close it. 4. Push the tray to the optical drive with the label side facing up menu, click File Explorer, and...
CM1855 User's Manual
Page 43
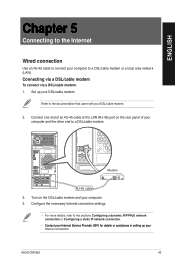
... (LAN). Turn on the rear panel of an RJ-45 cable to the LAN (RJ-45) port on the DSL/cable modem and your computer. 3. ASUS CM1855 43 ENGLISH Chapter 5 Connecting to the Internet Wired connection Use an RJ-45 cable to connect your computer to the sections Configuring a dynamic IP/PPPoE...
... (LAN). Turn on the rear panel of an RJ-45 cable to the LAN (RJ-45) port on the DSL/cable modem and your computer. 3. ASUS CM1855 43 ENGLISH Chapter 5 Connecting to the Internet Wired connection Use an RJ-45 cable to connect your computer to the sections Configuring a dynamic IP/PPPoE...
CM1855 User's Manual
Page 45
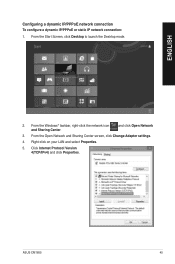
From the Open Network and Sharing Center screen, click Change Adapter settings. 4. and click Open Network 3. Click Internet Protocol Version 4(TCP/IPv4) and click Properties. From the Windows® taskbar, right-click the network icon and Sharing Center. Right-click on your LAN and select Properties. 5. ASUS CM1855 45 ENGLISH Configuring a dynamic IP/PPPoE network connection To configure a dynamic IP/PPPoE or static IP network connection: 1. From the Start Screen, click Desktop to launch the Desktop mode. 2.
From the Open Network and Sharing Center screen, click Change Adapter settings. 4. and click Open Network 3. Click Internet Protocol Version 4(TCP/IPv4) and click Properties. From the Windows® taskbar, right-click the network icon and Sharing Center. Right-click on your LAN and select Properties. 5. ASUS CM1855 45 ENGLISH Configuring a dynamic IP/PPPoE network connection To configure a dynamic IP/PPPoE or static IP network connection: 1. From the Start Screen, click Desktop to launch the Desktop mode. 2.

CM1855 User's Manual
Page 47
... the connection you just created. 13. Repeat steps 1 to 4 of the previous section Configuring a dynamic IP/PPPoE network connection. 2 Click Use the following IP address. 3. ASUS CM1855 47 ENGLISH 9. If needed, enter the preferred DNS Server address and alternative address. 5.
... the connection you just created. 13. Repeat steps 1 to 4 of the previous section Configuring a dynamic IP/PPPoE network connection. 2 Click Use the following IP address. 3. ASUS CM1855 47 ENGLISH 9. If needed, enter the preferred DNS Server address and alternative address. 5.
CM1855 User's Manual
Page 49
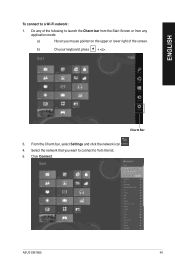
From the Charm bar, select Settings and click the network icon . 4. Charm Bar 3. Click Connect. Do any of the following to from any application mode: a) Hover you want to connect to launch the Charm bar from the Start Screen or from the list. 5. Select the network that you mouse pointer on the upper or lower right of the screen. ENGLISH To connect to a Wi-Fi network: 1. b) On your keyboard, press + . ASUS CM1855 49
From the Charm bar, select Settings and click the network icon . 4. Charm Bar 3. Click Connect. Do any of the following to from any application mode: a) Hover you want to connect to launch the Charm bar from the Start Screen or from the list. 5. Select the network that you mouse pointer on the upper or lower right of the screen. ENGLISH To connect to a Wi-Fi network: 1. b) On your keyboard, press + . ASUS CM1855 49


