
User Manual
Page 10
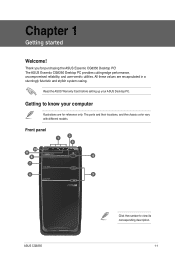
... user-centric utilities. The ports and their locations, and the chassis color vary with different models. All these values are for purchasing the ASUS Essentio CG8350 Desktop PC! Read the ASUS Warranty Card before setting up your computer Illustrations are encapsulated in a stunningly futuristic and stylish system casing. Chapter 1 Getting started Welcome! Thank...
... user-centric utilities. The ports and their locations, and the chassis color vary with different models. All these values are for purchasing the ASUS Essentio CG8350 Desktop PC! Read the ASUS Warranty Card before setting up your computer Illustrations are encapsulated in a stunningly futuristic and stylish system casing. Chapter 1 Getting started Welcome! Thank...

User Manual
Page 12
... ORANGE Linked BLINKING Data activity Speed LED Status OFF ORANGE GREEN Description 10Mbps connection 100Mbps connection 1Gbps connection ACT/LINK SPEED LED LED LAN port ASUS CG8350 1-3 These vents allow air ventilation. PS/2 Keyboard / Mouse Combo port (purple/green). These Universal Serial Bus 2.0 (USB 2.0) ports connect to this connector. 2. Plug the power...
... ORANGE Linked BLINKING Data activity Speed LED Status OFF ORANGE GREEN Description 10Mbps connection 100Mbps connection 1Gbps connection ACT/LINK SPEED LED LED LAN port ASUS CG8350 1-3 These vents allow air ventilation. PS/2 Keyboard / Mouse Combo port (purple/green). These Universal Serial Bus 2.0 (USB 2.0) ports connect to this connector. 2. Plug the power...

User Manual
Page 14
To connect an external monitor using the ASUS Graphics Card: 1. Connect a monitor to the display output port on the ASUS Graphics Card. 2. ASUS CG8350 1-5 Connecting an external monitor Using the ASUS Graphics Card (on selected models only) Connect your monitor to a display output port on the discrete ASUS Graphics Card. Plug the monitor to your computer. The...
To connect an external monitor using the ASUS Graphics Card: 1. Connect a monitor to the display output port on the ASUS Graphics Card. 2. ASUS CG8350 1-5 Connecting an external monitor Using the ASUS Graphics Card (on selected models only) Connect your monitor to a display output port on the discrete ASUS Graphics Card. Plug the monitor to your computer. The...

User Manual
Page 16
Connecting a USB keyboard and a USB mouse Connect a USB keyboard and a USB mouse to the USB ports on the rear panel of your computer and the other end to the power connector on the rear panel of your computer. ASUS CG8350 1-7 Connecting the power cord Connect one end of the power cord to a power source.
Connecting a USB keyboard and a USB mouse Connect a USB keyboard and a USB mouse to the USB ports on the rear panel of your computer and the other end to the power connector on the rear panel of your computer. ASUS CG8350 1-7 Connecting the power cord Connect one end of the power cord to a power source.
User Manual
Page 18
... Windows® 7 Starting for the first time When you start your computer for the first time, a series of your Windows® 7 operating system. Click Next. 5. ASUS CG8350 2-1 From the dropdown lists, select your language. To start using your date and time settings. Review your computer. You may now start for your computer.
... Windows® 7 Starting for the first time When you start your computer for the first time, a series of your Windows® 7 operating system. Click Next. 5. ASUS CG8350 2-1 From the dropdown lists, select your language. To start using your date and time settings. Review your computer. You may now start for your computer.

User Manual
Page 20
... constantly displayed on the taskbar. From the Windows® taskbar, click the Start icon to launch and manage programs or items installed on your computer. ASUS CG8350 2-3 You may pin programs that you to launch the Start menu. 2. To use the Getting Started item: 1. Launching a program from the taskbar To launch a program...
... constantly displayed on the taskbar. From the Windows® taskbar, click the Start icon to launch and manage programs or items installed on your computer. ASUS CG8350 2-3 You may pin programs that you to launch the Start menu. 2. To use the Getting Started item: 1. Launching a program from the taskbar To launch a program...

User Manual
Page 22
... default, the notification area shows these three icons: Action Center notification Click this icon to the section Using Windows® Action Center in this list. ASUS CG8350 2-5 Network connection This icon displays the connection status and signal strength of the wired or wireless network connection. For more details, refer to display all...
... default, the notification area shows these three icons: Action Center notification Click this icon to the section Using Windows® Action Center in this list. ASUS CG8350 2-5 Network connection This icon displays the connection status and signal strength of the wired or wireless network connection. For more details, refer to display all...

User Manual
Page 24
ASUS CG8350 2-7 Breadcrumb bar to launch Windows Explorer. Launch Windows Explorer. 2. Click Computer to launch the Start menu. From the navigation or view pane, browse for the ...
ASUS CG8350 2-7 Breadcrumb bar to launch Windows Explorer. Launch Windows Explorer. 2. Click Computer to launch the Start menu. From the navigation or view pane, browse for the ...

User Manual
Page 26
... the menu that appears, select Group by , then select your files: 1. Key in a name for the new folder. Adding a new folder To add a new folder: 1. ASUS CG8350 2-9 Right-click anywhere on the View pane, click New > Folder. From the menu that appears, select Sort by , then select your files: 1. From the toolbar...
... the menu that appears, select Group by , then select your files: 1. Key in a name for the new folder. Adding a new folder To add a new folder: 1. ASUS CG8350 2-9 Right-click anywhere on the View pane, click New > Folder. From the menu that appears, select Sort by , then select your files: 1. From the toolbar...

User Manual
Page 28
... Center, click the Notification icon , then click Open Action Center. 2. For more details, refer to the previous section Customizing icons and notifications in this chapter. ASUS CG8350 2-11
... Center, click the Notification icon , then click Open Action Center. 2. For more details, refer to the previous section Customizing icons and notifications in this chapter. ASUS CG8350 2-11

User Manual
Page 30
ASUS CG8350 2-13 When done, click Create Account. Setting up a user account: 1. Select Create a new account. 4. Select Manage another account. 3. Key in the name of the new user. 5. Setting up a user account To set up a user account and password You may create user accounts and passwords for people who will use your computer. From the Windows® taskbar, click > Getting Started > Add new users. 2. Select either Standard user or Administrator as the user type. 6.
ASUS CG8350 2-13 When done, click Create Account. Setting up a user account: 1. Select Create a new account. 4. Select Manage another account. 3. Key in the name of the new user. 5. Setting up a user account To set up a user account and password You may create user accounts and passwords for people who will use your computer. From the Windows® taskbar, click > Getting Started > Add new users. 2. Select either Standard user or Administrator as the user type. 6.

User Manual
Page 32
.... Click Agree & Activate. 3. Ensure that you with guides and answers in using the applications in Windows® 7 platform. Run the Trend Micro Internet Security application. 2. ASUS CG8350 2-15
.... Click Agree & Activate. 3. Ensure that you with guides and answers in using the applications in Windows® 7 platform. Run the Trend Micro Internet Security application. 2. ASUS CG8350 2-15

User Manual
Page 33
... the Safe to Remove Hardware message pops up, remove the USB storage device from the Windows notification area on both the front and rear panels. ASUS CG8350 3-1 The USB ports allow you to your computer. Front panel To remove a USB storage device: 1. DO NOT remove a USB storage device when data transfer is...
... the Safe to Remove Hardware message pops up, remove the USB storage device from the Windows notification area on both the front and rear panels. ASUS CG8350 3-1 The USB ports allow you to your computer. Front panel To remove a USB storage device: 1. DO NOT remove a USB storage device when data transfer is...

User Manual
Page 35
Connecting 4-channel Speakers Connecting 6-channel Speakers ASUS CG8350 3-3
Connecting 4-channel Speakers Connecting 6-channel Speakers ASUS CG8350 3-3
User Manual
Page 37
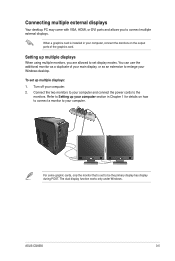
... may come with VGA, HDMI, or DVI ports and allows you are allowed to set display modes. The dual display function works only under Windows. ASUS CG8350 3-5 To set to be the primary display has display during POST. You can use the additional monitor as an extension to Setting up multiple displays...
... may come with VGA, HDMI, or DVI ports and allows you are allowed to set display modes. The dual display function works only under Windows. ASUS CG8350 3-5 To set to be the primary display has display during POST. You can use the additional monitor as an extension to Setting up multiple displays...

User Manual
Page 39
Connecting an HDTV Connect a High Definition TV (HDTV) to connect the HDTV and the computer. The HDMI cable is purchased separately. • To get the best display performance, ensure that your computer. • You need an HDMI cable to the HDMI port of your HDMI cable is less than 15 meters. ASUS CG8350 3-7
Connecting an HDTV Connect a High Definition TV (HDTV) to connect the HDTV and the computer. The HDMI cable is purchased separately. • To get the best display performance, ensure that your computer. • You need an HDMI cable to the HDMI port of your HDMI cable is less than 15 meters. ASUS CG8350 3-7
User Manual
Page 40
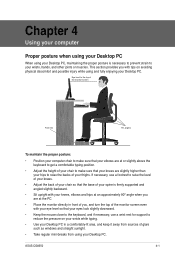
... even with tips on your wrists while typing. • Use your Desktop PC in front of you, and turn the top of your Desktop PC. ASUS CG8350 4-1 This section provides you are at or slightly above the keyboard to get a comfortable typing position. • Adjust the height of your chair to make...
... even with tips on your wrists while typing. • Use your Desktop PC in front of you, and turn the top of your Desktop PC. ASUS CG8350 4-1 This section provides you are at or slightly above the keyboard to get a comfortable typing position. • Adjust the height of your chair to make...

User Manual
Page 42
... the disc from the AutoPlay window to access your computer, click Windows® 7 Start button on it . 4. If AutoPlay is NOT enabled in your files. ASUS CG8350 4-3 Push the tray to open the tray. 2. Select a program from the disc tray. Using the optical drive 1 2 3 Inserting an optical disc To insert an optical...
... the disc from the AutoPlay window to access your computer, click Windows® 7 Start button on it . 4. If AutoPlay is NOT enabled in your files. ASUS CG8350 4-3 Push the tray to open the tray. 2. Select a program from the disc tray. Using the optical drive 1 2 3 Inserting an optical disc To insert an optical...

User Manual
Page 44
... your DSL/cable modem. 2. Refer to the documentation that came with your computer and the other end to a DSL/cable modem. Modem RJ-45 cable 3. ASUS CG8350 5-1 Connecting via a DSL/cable modem To connect via a DSL/cable modem: 1. Connect one end of an RJ-45 cable to the LAN (RJ-45) port...
... your DSL/cable modem. 2. Refer to the documentation that came with your computer and the other end to a DSL/cable modem. Modem RJ-45 cable 3. ASUS CG8350 5-1 Connecting via a DSL/cable modem To connect via a DSL/cable modem: 1. Connect one end of an RJ-45 cable to the LAN (RJ-45) port...

User Manual
Page 46
...select and launch a utility, to monitor the system, to update the motherboard BIOS, to display the system information, and to select a utility ASUS CG8350 6-1 Click to customize the interface settings Click to show the system information Click to update the motherboard BIOS Click to monitor sensors or CPU frequency...the settings of AI Suite II. The AI Suite II icon appears in -one interface that integrates several ASUS utilities and allows users to complete the installation. ASUS AI Suite II ASUS AI Suite II is an all-in the Windows® notification area. Refer to open the AI ...
...select and launch a utility, to monitor the system, to update the motherboard BIOS, to display the system information, and to select a utility ASUS CG8350 6-1 Click to customize the interface settings Click to show the system information Click to update the motherboard BIOS Click to monitor sensors or CPU frequency...the settings of AI Suite II. The AI Suite II icon appears in -one interface that integrates several ASUS utilities and allows users to complete the installation. ASUS AI Suite II ASUS AI Suite II is an all-in the Windows® notification area. Refer to open the AI ...


