
User Manual
Page 7
... connection of the monitor to the graphics card is no guarantee that may not cause harmful interference, and • This device must accept any interference received including interference that interference will not occur in the Radio Interference Regulations of the Canadian Department of the following two conditions: • This device may cause undesired operation. The use of shielded cables...
... connection of the monitor to the graphics card is no guarantee that may not cause harmful interference, and • This device must accept any interference received including interference that interference will not occur in the Radio Interference Regulations of the Canadian Department of the following two conditions: • This device may cause undesired operation. The use of shielded cables...
User Manual
Page 9
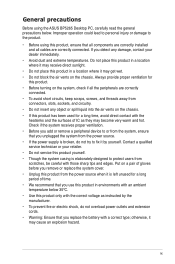
.... • Before you add or remove a peripheral device to or from the system, ensure that you use this product in environments with an ambient temperature below . Improper operation could lead to personal injury or damage to protect users from the power source. • If the power supply is elaborately designed to the product. • Before using the ASUS BP5265 Desktop PC, carefully read...
.... • Before you add or remove a peripheral device to or from the system, ensure that you use this product in environments with an ambient temperature below . Improper operation could lead to personal injury or damage to protect users from the power source. • If the power supply is elaborately designed to the product. • Before using the ASUS BP5265 Desktop PC, carefully read...
User Manual
Page 12
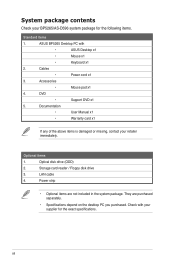
...; Mouse pad x1 4. Storage card reader / Floppy disk drive 3. xii Optional items 1. Check with • ASUS Desktop x1 • Mouse x1 • Keyboard x1 2. DVD • Support DVD x1 5. LAN cable 4. Power strip • Optional items are purchased separately. • Specifications depend on the desktop PC you purchased. They are not included in the system package. System package contents Check your BP5265/AS-D596 system package for the exact specifications. ASUS BP5265 Desktop PC...
...; Mouse pad x1 4. Storage card reader / Floppy disk drive 3. xii Optional items 1. Check with • ASUS Desktop x1 • Mouse x1 • Keyboard x1 2. DVD • Support DVD x1 5. LAN cable 4. Power strip • Optional items are purchased separately. • Specifications depend on the desktop PC you purchased. They are not included in the system package. System package contents Check your BP5265/AS-D596 system package for the exact specifications. ASUS BP5265 Desktop PC...
User Manual
Page 14
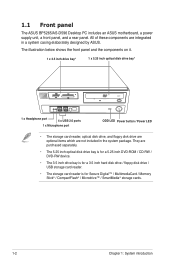
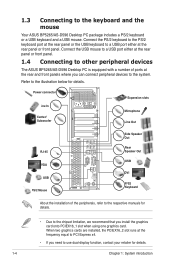
... CF MD 1 x Headphone port 4 x USB 2.0 ports 1 x Microphone port ODD LED Power button / Power LED • The storage card reader, optical disk drive, and floppy disk drive are optional items which are purchased separately. • The 5.25 inch optical disk drive bay is for a 5.25 inch DVD-ROM / CD-RW / DVD-RW device. • The 3.5 inch drive bay is for a 3.5 inch hard disk drive / floppy disk drive / USB storage card reader. • The storage card reader is for Secure Digital™ / MultimediaCard / Memory Stick® / CompactFlash®...
... CF MD 1 x Headphone port 4 x USB 2.0 ports 1 x Microphone port ODD LED Power button / Power LED • The storage card reader, optical disk drive, and floppy disk drive are optional items which are purchased separately. • The 5.25 inch optical disk drive bay is for a 5.25 inch DVD-ROM / CD-RW / DVD-RW device. • The 3.5 inch drive bay is for a 3.5 inch hard disk drive / floppy disk drive / USB storage card reader. • The storage card reader is for Secure Digital™ / MultimediaCard / Memory Stick® / CompactFlash®...
User Manual
Page 15
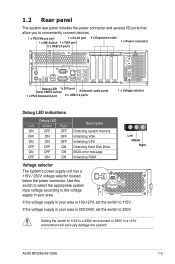
... voltage supply in your area. Setting the switch to conveniently connect devices. 1 x PS/2 Mouse port 1 x RJ-45 port 1 x ME Switch 1 x VGA port 2 x USB 2.0 ports 4 x Expansion slots 1 x Power connector 15 Debug LED 1x DVI port Clear CMOS button 8-channel audio ports 1 x PS/2 Keyboard port 2 x USB 2.0 ports 1 x Voltage selector Debug LED indications Debug LED Left Middle Right ON OFF OFF OFF ON OFF ON ON OFF OFF OFF ON ON OFF ON OFF ON ON Description Detecting system memory Initializing VGA Initializing CPU Detecting Hard Disk Drive BIOS error...
... voltage supply in your area. Setting the switch to conveniently connect devices. 1 x PS/2 Mouse port 1 x RJ-45 port 1 x ME Switch 1 x VGA port 2 x USB 2.0 ports 4 x Expansion slots 1 x Power connector 15 Debug LED 1x DVI port Clear CMOS button 8-channel audio ports 1 x PS/2 Keyboard port 2 x USB 2.0 ports 1 x Voltage selector Debug LED indications Debug LED Left Middle Right ON OFF OFF OFF ON OFF ON ON OFF OFF OFF ON ON OFF ON OFF ON ON Description Detecting system memory Initializing VGA Initializing CPU Detecting Hard Disk Drive BIOS error...
User Manual
Page 16
When two graphics cards are installed, the PCIEX16_2 slot runs at the rear and front panels where you install the graphics card onto PCIEX16_1 slot when using one graphics card. Power connector Line In Center/ Subwoofer 15 Expansion slots Microphone Line Out RJ-45 VGA USB PS/2 Mouse Side Speaker Out Rear Speaker Out USB DVI P/S2 Keyboard About the installation of ports at the frequency equal to PCI Express x4. • If you need to use dual-display function, contact your retailer for...
When two graphics cards are installed, the PCIEX16_2 slot runs at the rear and front panels where you install the graphics card onto PCIEX16_1 slot when using one graphics card. Power connector Line In Center/ Subwoofer 15 Expansion slots Microphone Line Out RJ-45 VGA USB PS/2 Mouse Side Speaker Out Rear Speaker Out USB DVI P/S2 Keyboard About the installation of ports at the frequency equal to PCI Express x4. • If you need to use dual-display function, contact your retailer for...
User Manual
Page 21
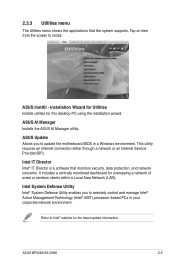
... to remotely control and manage Intel® Active Management Technology (Intel® AMT) processor-based PCs in a Windows environment. Intel System Defense Utility Intel® System Defense Utility enables you to install. Installation Wizard for Utilities Installs utilities for this desktop PC using the installation wizard. ASUS Update Allows you to Intel® website for overseeing a network of wired or wireless clients within a Local Area Network (LAN). This utility requires an Internet connection either through a network or an Internet Service...
... to remotely control and manage Intel® Active Management Technology (Intel® AMT) processor-based PCs in a Windows environment. Intel System Defense Utility Intel® System Defense Utility enables you to install. Installation Wizard for Utilities Installs utilities for this desktop PC using the installation wizard. ASUS Update Allows you to Intel® website for overseeing a network of wired or wireless clients within a Local Area Network (LAN). This utility requires an Internet connection either through a network or an Internet Service...
User Manual
Page 33
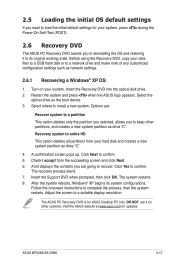
... system reboots, Windows® XP begins its original working state. Options are going to its system configurations. Before using the Recovery DVD, copy your data files to a USB flash disk or to keep other systems. Visit the ASUS website at www.asus.com for ASUS Desktop PC only. A list displays the contents you are : Recover system to a partition This option deletes only the partition you selected, allows you to a network drive and make...
... system reboots, Windows® XP begins its original working state. Options are going to its system configurations. Before using the Recovery DVD, copy your data files to a USB flash disk or to keep other systems. Visit the ASUS website at www.asus.com for ASUS Desktop PC only. A list displays the contents you are : Recover system to a partition This option deletes only the partition you selected, allows you to a network drive and make...
User Manual
Page 36
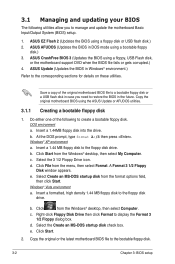
... floppy disk into the drive. Select the 3 1/2 Floppy Drive icon. e. d. e. 3.1 Managing and updating your BIOS The following to restore the BIOS in case you to the corresponding sections for details on these utilities. Copy the original motherboard BIOS using a floppy, USB Flash disk, or the motherboard support DVD when the BIOS file fails or gets corrupted.) 4. DOS environment a. b. Click File from the format options field, then click Start. At the DOS prompt, type...
... floppy disk into the drive. Select the 3 1/2 Floppy Drive icon. e. d. e. 3.1 Managing and updating your BIOS The following to restore the BIOS in case you to the corresponding sections for details on these utilities. Copy the original motherboard BIOS using a floppy, USB Flash disk, or the motherboard support DVD when the BIOS file fails or gets corrupted.) 4. DOS environment a. b. Click File from the format options field, then click Start. At the DOS prompt, type...
User Manual
Page 37
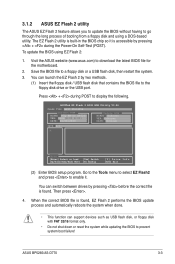
... to download the latest BIOS file for the motherboard. 2. Press + during the Power-On Self-Test (POST). ASUSTek EZ Flash 2 BIOS ROM Utility V3.26 FLASH TYPE: MXIC 25L1605A Current ROM BOARD: P5Q-EM-DO BP5265 VER: 0106(H:00 B:00) DATE: 04/08/2009 Update ROM BOARD: Unknown VER: Unknown DATE: Unknown PATH: A:\ A: Note [Enter] Select or Load [Tab] Switch [Up/Down/Home/End] Move [B] Backup [V] Drive Info [ESC] Exit (2) Enter BIOS setup...
... to download the latest BIOS file for the motherboard. 2. Press + during the Power-On Self-Test (POST). ASUSTek EZ Flash 2 BIOS ROM Utility V3.26 FLASH TYPE: MXIC 25L1605A Current ROM BOARD: P5Q-EM-DO BP5265 VER: 0106(H:00 B:00) DATE: 04/08/2009 Update ROM BOARD: Unknown VER: Unknown DATE: Unknown PATH: A:\ A: Note [Enter] Select or Load [Tab] Switch [Up/Down/Home/End] Move [B] Backup [V] Drive Info [ESC] Exit (2) Enter BIOS setup...
User Manual
Page 40
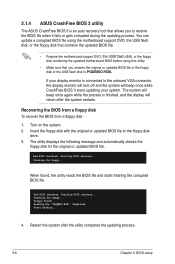
... BIOS 3 starts updating your display monitor is connected to the onboard VGA connector, the display monitor will turn-off and the system will return after the utility completes the updating process. 3-6 Chapter 3: BIOS setup When found ! Reading file "P5QEMDO.ROM". Completed. The utility displays the following message and automatically checks the floppy disk for the original or updated BIOS file. Start flashing... 4. Starting BIOS recovery... Floppy found , the utility reads the BIOS file and starts flashing the corrupted BIOS file. 3.1.4 ASUS CrashFree BIOS 3 utility...
... BIOS 3 starts updating your display monitor is connected to the onboard VGA connector, the display monitor will turn-off and the system will return after the utility completes the updating process. 3-6 Chapter 3: BIOS setup When found ! Reading file "P5QEMDO.ROM". Completed. The utility displays the following message and automatically checks the floppy disk for the original or updated BIOS file. Start flashing... 4. Starting BIOS recovery... Floppy found , the utility reads the BIOS file and starts flashing the corrupted BIOS file. 3.1.4 ASUS CrashFree BIOS 3 utility...
User Manual
Page 42
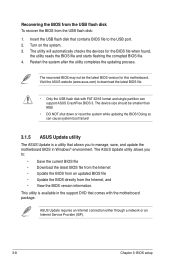
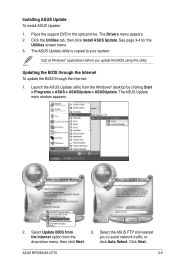
... a network or an Internet Service Provider (ISP). 3-8 Chapter 3: BIOS setup Doing so can cause system boot failure! 3.1.5 ASUS Update utility The ASUS Update is available in Windows® environment. The utility will automatically checks the devices for this motherboard. Visit the ASUS website (www.asus.com) to : • Save the current BIOS file • Download the latest BIOS file from the Internet • Update the BIOS from an updated BIOS file • Update the BIOS directly from the USB flash disk...
... a network or an Internet Service Provider (ISP). 3-8 Chapter 3: BIOS setup Doing so can cause system boot failure! 3.1.5 ASUS Update utility The ASUS Update is available in Windows® environment. The utility will automatically checks the devices for this motherboard. Visit the ASUS website (www.asus.com) to : • Save the current BIOS file • Download the latest BIOS file from the Internet • Update the BIOS from an updated BIOS file • Update the BIOS directly from the USB flash disk...
User Manual
Page 43
... install ASUS Update: 1. The ASUS Update utility is copied to avoid network traffic, or drop‑down menu, then click Next. Quit all Windows® applications before you to your system. Launch the ASUS Update utility from 3. Select Update BIOS from the Windows® desktop by clicking Start > Programs > ASUS > ASUSUpdate > ASUSUpdate. Select the ASUS FTP site nearest the Internet option from the you update the BIOS using this utility. See page 3-4 for the Utilities screen menu. 3. The Drivers menu...
... install ASUS Update: 1. The ASUS Update utility is copied to avoid network traffic, or drop‑down menu, then click Next. Quit all Windows® applications before you to your system. Launch the ASUS Update utility from 3. Select Update BIOS from the Windows® desktop by clicking Start > Programs > ASUS > ASUSUpdate > ASUSUpdate. Select the ASUS FTP site nearest the Internet option from the you update the BIOS using this utility. See page 3-4 for the Utilities screen menu. 3. The Drivers menu...
User Manual
Page 45
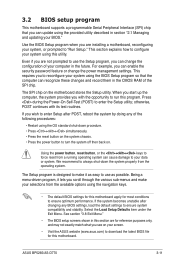
... available options using the navigation keys. • The default BIOS settings for most conditions to "Run Setup." For example, you with its test routines. Using the power button, reset button, or the ++ keys to configure your system using this section are for reference purposes only, and may not exactly match what you see on the motherboard stores the Setup utility. ASUS BP5265/AS-D770 3-11 This requires you to use as possible. Use the BIOS Setup...
... available options using the navigation keys. • The default BIOS settings for most conditions to "Run Setup." For example, you with its test routines. Using the power button, reset button, or the ++ keys to configure your system using this section are for reference purposes only, and may not exactly match what you see on the motherboard stores the Setup utility. ASUS BP5265/AS-D770 3-11 This requires you to use as possible. Use the BIOS Setup...
User Manual
Page 49
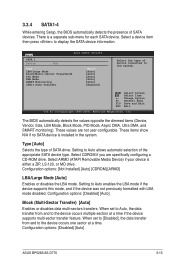
... monitoring). Type [Auto] Selects the type of device connected to the device occurs one sector at a time if the device supports multi-sector transfer feature. Configuration options: [Disabled] [Auto] ASUS BP5265/AS-D770 3-15 Select a device item then press to Auto enables the LBA mode if the device supports this mode, and if the device was not previously formatted with LBA mode disabled. Main SATA 1 Device : N/A BIOS SETUP UTILITY Type LBA/Large Mode Block(Multi-Sector Transfer)M PIO Mode DMA Mode...
... monitoring). Type [Auto] Selects the type of device connected to the device occurs one sector at a time if the device supports multi-sector transfer feature. Configuration options: [Disabled] [Auto] ASUS BP5265/AS-D770 3-15 Select a device item then press to Auto enables the LBA mode if the device supports this mode, and if the device was not previously formatted with LBA mode disabled. Main SATA 1 Device : N/A BIOS SETUP UTILITY Type LBA/Large Mode Block(Multi-Sector Transfer)M PIO Mode DMA Mode...
User Manual
Page 50
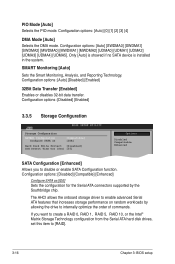
... the onboard storage driver to [RAID]. 3-16 Chapter 3: BIOS setup Configuration options: [Auto] [Disabled] [Enabled] 32Bit Data Transfer [Enabled] Enables or disables 32-bit data transfer. If you to internally optimize the order of commands. Configuration options: [Disabled] [Enabled] 3.3.5 Storage Configuration Storage Configuration SATA#1 Configuration Configure SATA as [IDE] Sets the configuration for the Serial ATA connectors supported by allowing the drive to disable or enable SATA Configuration function. PIO Mode [Auto] Selects the PIO mode. Configuration options: [Auto...
... the onboard storage driver to [RAID]. 3-16 Chapter 3: BIOS setup Configuration options: [Auto] [Disabled] [Enabled] 32Bit Data Transfer [Enabled] Enables or disables 32-bit data transfer. If you to internally optimize the order of commands. Configuration options: [Disabled] [Enabled] 3.3.5 Storage Configuration Storage Configuration SATA#1 Configuration Configure SATA as [IDE] Sets the configuration for the Serial ATA connectors supported by allowing the drive to disable or enable SATA Configuration function. PIO Mode [Auto] Selects the PIO mode. Configuration options: [Auto...
User Manual
Page 52
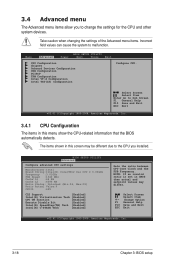
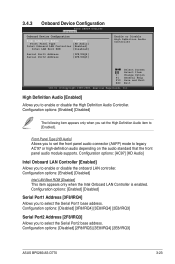
... [Enabled] Execute Disable Bit [Enabled] Intel(R) SpeedStep(TM) Tech [Enabled] Intel(R) C-STATE Tech [Enabled] Sets the ratio between CPU Core Clock and the FSB Frequency. Change Option F1 General Help F10 Save and Exit ESC Exit v02.61 (C)Copyright 1985-2008, American Megatrends, Inc. 3-18 Chapter 3: BIOS setup 3.4 Advanced menu The Advanced menu items allow you installed. Main Advanced BIOS SETUP UTILITY Power Boot Tools Exit CPU Configuration Chipset Onboard Devices Configuration USB Configuration PCIPnP...
... [Enabled] Execute Disable Bit [Enabled] Intel(R) SpeedStep(TM) Tech [Enabled] Intel(R) C-STATE Tech [Enabled] Sets the ratio between CPU Core Clock and the FSB Frequency. Change Option F1 General Help F10 Save and Exit ESC Exit v02.61 (C)Copyright 1985-2008, American Megatrends, Inc. 3-18 Chapter 3: BIOS setup 3.4 Advanced menu The Advanced menu items allow you installed. Main Advanced BIOS SETUP UTILITY Power Boot Tools Exit CPU Configuration Chipset Onboard Devices Configuration USB Configuration PCIPnP...
User Manual
Page 57
... Audio [Enabled] Allows you to enable or disable the High Definition Audio Controller. Change Option F1 General Help F10 Save and Exit ESC Exit v02.61 (C)Copyright 1985-2008, American Megatrends, Inc. Configuration options: [AC97] [HD Audio] Intel Onboard LAN Controller [Enabled] Allows you to enable or disable the onboard LAN controller. 3.4.3 Onboard Device Configuration BIOS SETUP UTILITY Advanced Onboard Device Configuration High Definition Audio [Enabled] Front Panel Type [HD Audio] Intel Onboard LAN Controller [Enabled] Intel LAN Boot ROM [Disabled] Serial...
... Audio [Enabled] Allows you to enable or disable the High Definition Audio Controller. Change Option F1 General Help F10 Save and Exit ESC Exit v02.61 (C)Copyright 1985-2008, American Megatrends, Inc. Configuration options: [AC97] [HD Audio] Intel Onboard LAN Controller [Enabled] Allows you to enable or disable the onboard LAN controller. 3.4.3 Onboard Device Configuration BIOS SETUP UTILITY Advanced Onboard Device Configuration High Definition Audio [Enabled] Front Panel Type [HD Audio] Intel Onboard LAN Controller [Enabled] Intel LAN Boot ROM [Disabled] Serial...
User Manual
Page 68
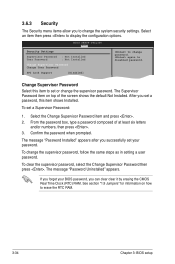
... change password. After you set your BIOS password, you can clear clear it by erasing the CMOS Real Time Clock (RTC) RAM. From the password box, type a password composed of the screen shows the default Not Installed. Confirm the password when prompted. The message "Password Uninstalled" appears. 3.6.3 Security The Security menu items allow you to disabled password. BIOS SETUP UTILITY Boot Security Settings Supervisor Password : Not Installed User Password : Not Installed Change Supervisor Password Change User Password SPI Lock Support [Disabled] to set a Supervisor Password...
... change password. After you set your BIOS password, you can clear clear it by erasing the CMOS Real Time Clock (RTC) RAM. From the password box, type a password composed of the screen shows the default Not Installed. Confirm the password when prompted. The message "Password Uninstalled" appears. 3.6.3 Security The Security menu items allow you to disabled password. BIOS SETUP UTILITY Boot Security Settings Supervisor Password : Not Installed User Password : Not Installed Change Supervisor Password Change User Password SPI Lock Support [Disabled] to set a Supervisor Password...
User Manual
Page 69
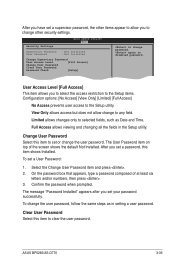
... ASUS BP5265/AS-D770 3-35 The message "Password Installed" appears after you to select the access restriction to the Setup items. Configuration options: [No Access] [View Only] [Limited] [Full Access] No Access prevents user access to the Setup utility. To change the user password. again to any field. To set a User Password: 1. Confirm the password when prompted. Select the Change User Password item and press . 2. User Access Level [Full Access] This item allows you set your password successfully. Security Settings BIOS SETUP UTILITY Boot Supervisor Password...
... ASUS BP5265/AS-D770 3-35 The message "Password Installed" appears after you to select the access restriction to the Setup items. Configuration options: [No Access] [View Only] [Limited] [Full Access] No Access prevents user access to the Setup utility. To change the user password. again to any field. To set a User Password: 1. Confirm the password when prompted. Select the Change User Password item and press . 2. User Access Level [Full Access] This item allows you set your password successfully. Security Settings BIOS SETUP UTILITY Boot Supervisor Password...


