
A8V-X User's Manual for English Edition
Page 3
... viii Conventions used in this guide ix Typography ix A8V-X specifications summary x Chapter 1: Product introduction 1.1 Welcome 1-2 1.2 Package contents 1-2 1.3 Special features 1-3 1.3.1 Product highlights 1-3 1.3.2 Innovative ASUS features 1-5 1.4 Before you proceed 1-6 1.5 Motherboard overview 1-7 1.5.1 Placement direction 1-7 1.5.2 Screw holes 1-7 1.5.3 Motherboard layout 1-8 1.6 Central Processing Unit (CPU 1-9 1.6.1 Overview 1-9 1.6.2 Installling the CPU 1-9 1.6.3 Installing the heatsink and fan 1-11 1.7 System memory...
... viii Conventions used in this guide ix Typography ix A8V-X specifications summary x Chapter 1: Product introduction 1.1 Welcome 1-2 1.2 Package contents 1-2 1.3 Special features 1-3 1.3.1 Product highlights 1-3 1.3.2 Innovative ASUS features 1-5 1.4 Before you proceed 1-6 1.5 Motherboard overview 1-7 1.5.1 Placement direction 1-7 1.5.2 Screw holes 1-7 1.5.3 Motherboard layout 1-8 1.6 Central Processing Unit (CPU 1-9 1.6.1 Overview 1-9 1.6.2 Installling the CPU 1-9 1.6.3 Installing the heatsink and fan 1-11 1.7 System memory...

A8V-X User's Manual for English Edition
Page 4
...22 1.10.2 Internal connectors 1-23 Chapter 2: BIOS setup 2.1 Managing and updating your BIOS 2-2 2.1.1 Creating a bootable floppy disk 2-2 2.1.2 ASUS EZ Flash utility 2-3 2.1.3 AFUDOS utility 2-4 2.1.4 ASUS CrashFree BIOS 2 utility 2-6 2.1.5 ASUS Update utility 2-8 2.2 BIOS setup program 2-11 2.2.1 BIOS menu screen 2-12 2.2.2 Menu bar 2-12 2.2.3 Navigation keys 2-12 2.2.4 Menu items 2-... Master/Slave 2-15 2.3.5 System Information 2-16 2.4 Advanced menu 2-17 2.4.1 JumperFree Configuration 2-17 2.4.2 USB Configuration 2-18 2.4.3 CPU Configuration 2-19 iv
...22 1.10.2 Internal connectors 1-23 Chapter 2: BIOS setup 2.1 Managing and updating your BIOS 2-2 2.1.1 Creating a bootable floppy disk 2-2 2.1.2 ASUS EZ Flash utility 2-3 2.1.3 AFUDOS utility 2-4 2.1.4 ASUS CrashFree BIOS 2 utility 2-6 2.1.5 ASUS Update utility 2-8 2.2 BIOS setup program 2-11 2.2.1 BIOS menu screen 2-12 2.2.2 Menu bar 2-12 2.2.3 Navigation keys 2-12 2.2.4 Menu items 2-... Master/Slave 2-15 2.3.5 System Information 2-16 2.4 Advanced menu 2-17 2.4.1 JumperFree Configuration 2-17 2.4.2 USB Configuration 2-18 2.4.3 CPU Configuration 2-19 iv

A8V-X User's Manual for English Edition
Page 10
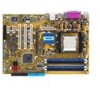
A8V-X specifications summary CPU Chipset System Bus Memory Expansion slots Storage Audio LAN USB Special features Socket 939 for up to four IDE devices - 4 x Serial ATA (3Gb/s) with RAID 0, ... Audio Sensing and Enumeration Technology Realtek RTL8201CL 10/100 LAN controller Supports up to 8 USB 2.0 ports ASUS C.P.R. ASUS JumperFree ASUS CrashFree BIOS 2 ASUS MyLogo SFS (Stepless Frequency Selection): FSB tuning from 200MHz up to 300MHz at 1MHz increment ASUS EZ Flash (continued on the next page) x Technology Northbridge: VIA® K8T800 Pro Southbridge: VIA®...
A8V-X specifications summary CPU Chipset System Bus Memory Expansion slots Storage Audio LAN USB Special features Socket 939 for up to four IDE devices - 4 x Serial ATA (3Gb/s) with RAID 0, ... Audio Sensing and Enumeration Technology Realtek RTL8201CL 10/100 LAN controller Supports up to 8 USB 2.0 ports ASUS C.P.R. ASUS JumperFree ASUS CrashFree BIOS 2 ASUS MyLogo SFS (Stepless Frequency Selection): FSB tuning from 200MHz up to 300MHz at 1MHz increment ASUS EZ Flash (continued on the next page) x Technology Northbridge: VIA® K8T800 Pro Southbridge: VIA®...

A8V-X User's Manual for English Edition
Page 11
xi A8V-X specifications summary Rear panel BIOS features Internal connectors Power Requirement Form ...Mb Flash ROM, AMI BIOS, PnP, DMI2.0, WfM2.0, SM BIOS 2.3 1 x Floppy disk drive connector 2 x IDE connectors 4 x Serial ATA connectors 1 x CPU fan connector 1 x Chassis fan connector 1 x Coaxial S/PDIF port 1 x 20-pin ATX power connector 1 x 4-pin ATX 12 V power connector 2 x...12 V 2.0 compliant ATX form factor: 12 in x 8.3 in (30.5 cm x 21.0 cm) Device drivers ASUS PC Probe ASUS Live Update Utility Antivirus software (OEM version) Wfm2.0, DMI 2.0, WOL by PME, WOR by PME, PXE, RPL *...
xi A8V-X specifications summary Rear panel BIOS features Internal connectors Power Requirement Form ...Mb Flash ROM, AMI BIOS, PnP, DMI2.0, WfM2.0, SM BIOS 2.3 1 x Floppy disk drive connector 2 x IDE connectors 4 x Serial ATA connectors 1 x CPU fan connector 1 x Chassis fan connector 1 x Coaxial S/PDIF port 1 x 20-pin ATX power connector 1 x 4-pin ATX 12 V power connector 2 x...12 V 2.0 compliant ATX form factor: 12 in x 8.3 in (30.5 cm x 21.0 cm) Device drivers ASUS PC Probe ASUS Live Update Utility Antivirus software (OEM version) Wfm2.0, DMI 2.0, WOL by PME, WOR by PME, PXE, RPL *...
A8V-X User's Manual for English Edition
Page 15
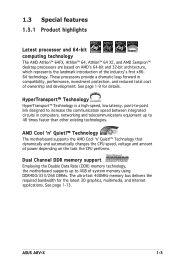
ASUS A8V-X 1-3 See page 1-13. These processors provide a dramatic leap forward in computers, ...8482; 64, Athlon™ 64 X2, and AMD Sempron™ desktop processors are based on the task the CPU performs. Dual Channel DDR memory support Employing the Double Data Rate (DDR) memory technology, the motherboard supports up to...8482; Technology The motherboard supports the AMD Cool ʻnʼ Quiet!™ Technology that dynamically and automatically changes the CPU speed, voltage and amount of power depending on AMDʼs 64-bit and 32-bit architecture, which represents the ...
ASUS A8V-X 1-3 See page 1-13. These processors provide a dramatic leap forward in computers, ...8482; 64, Athlon™ 64 X2, and AMD Sempron™ desktop processors are based on the task the CPU performs. Dual Channel DDR memory support Employing the Double Data Rate (DDR) memory technology, the motherboard supports up to...8482; Technology The motherboard supports the AMD Cool ʻnʼ Quiet!™ Technology that dynamically and automatically changes the CPU speed, voltage and amount of power depending on AMDʼs 64-bit and 32-bit architecture, which represents the ...

A8V-X User's Manual for English Edition
Page 17
... open the system chassis and clear the RTC data. This protection eliminates the need to buy a replacement ROM chip. ASUS A8V-X 1-5 See details on page 2-31. 1.3.2 Innovative ASUS features CrashFree BIOS 2 This feature allows you to use a DOS-based utility or boot from the support CD in ... disk. See section "2.5.4 Hardware Monitor" on page 2-6. Simply shut down and reboot the system, and the BIOS automatically restores the CPU previous setting for details. The system fan rotations per minute (RPM) is monitored by the ASIC (integrated in the ITE Super I/O) to overclocking...
... open the system chassis and clear the RTC data. This protection eliminates the need to buy a replacement ROM chip. ASUS A8V-X 1-5 See details on page 2-31. 1.3.2 Innovative ASUS features CrashFree BIOS 2 This feature allows you to use a DOS-based utility or boot from the support CD in ... disk. See section "2.5.4 Hardware Monitor" on page 2-6. Simply shut down and reboot the system, and the BIOS automatically restores the CPU previous setting for details. The system fan rotations per minute (RPM) is monitored by the ASIC (integrated in the ITE Super I/O) to overclocking...

A8V-X User's Manual for English Edition
Page 21
... on the motherboard. ® A8V-X CPU Socket 939 Before installing the CPU, make sure that the socket box is facing towards you and the load lever is on the socket to ensure correct installation. Gold triangle 1.6.2 Installling the CPU To install a CPU: 1. This mark should match a speci&#...64-bit wide data paths. 1.6 Central Processing Unit (CPU) 1.6.1 Overview The motherboard comes with a surface mount 939-pin Zero Insertion Force (ZIF) socket designed for the AMD Athlon™ 64FX, AMD Athlon™ 64 X2, AMD Athlon 64™ or AMD Sempron™ processor. A8V-X ASUS A8V-X 1-9
... on the motherboard. ® A8V-X CPU Socket 939 Before installing the CPU, make sure that the socket box is facing towards you and the load lever is on the socket to ensure correct installation. Gold triangle 1.6.2 Installling the CPU To install a CPU: 1. This mark should match a speci&#...64-bit wide data paths. 1.6 Central Processing Unit (CPU) 1.6.1 Overview The motherboard comes with a surface mount 939-pin Zero Insertion Force (ZIF) socket designed for the AMD Athlon™ 64FX, AMD Athlon™ 64 X2, AMD Athlon 64™ or AMD Sempron™ processor. A8V-X ASUS A8V-X 1-9

A8V-X User's Manual for English Edition
Page 22
...176;-100° angle. The lever clicks on the side tab to 90°-100° angle, otherwise the CPU does not fit in place, push down the socket lever to secure the CPU. 2. Make sure that the socket lever is in completely. 3. Unlock the socket by pressing the lever sideways, ...then lift it fits in one correct orientation. DO NOT force the CPU into the socket until it up to indicate that the CPU corner with the gold triangle matches the socket corner with a small triangle. 4. When the...
...176;-100° angle. The lever clicks on the side tab to 90°-100° angle, otherwise the CPU does not fit in place, push down the socket lever to secure the CPU. 2. Make sure that the socket lever is in completely. 3. Unlock the socket by pressing the lever sideways, ...then lift it fits in one correct orientation. DO NOT force the CPU into the socket until it up to indicate that the CPU corner with the gold triangle matches the socket corner with a small triangle. 4. When the...
A8V-X User's Manual for English Edition
Page 23
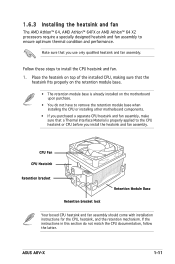
... base is properly applied to remove the retention module base when installing the CPU or installing other motherboard components. • If you purchased a separate CPU heatsink and fan assembly, make sure that you install the heatsink and fan assembly. ASUS A8V-X 1-11 1.6.3 Installing the heatsink and fan The AMD Athlon™ 64, AMD Athlon...
... base is properly applied to remove the retention module base when installing the CPU or installing other motherboard components. • If you purchased a separate CPU heatsink and fan assembly, make sure that you install the heatsink and fan assembly. ASUS A8V-X 1-11 1.6.3 Installing the heatsink and fan The AMD Athlon™ 64, AMD Athlon...
A8V-X User's Manual for English Edition
Page 24
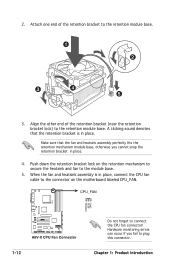
... bracket (near the retention bracket lock) to the module base. 5. When the fan and heatsink assembly is in place. Chapter 1: Product introduction CPU_FAN A8V-X GND +12V Rotation ® A8V-X CPU Fan Connector 1-12 Do not forget to the retention module base. 1 2 3 4 5 3. Make sure that the retention bracket is in place.... the retention bracket lock on the motherboard labeled CPU_FAN. Align the other end of the retention bracket to connect the CPU fan connector! 2. Hardware monitoring errors can occur if you cannot snap the retention bracket in place, connect the...
... bracket (near the retention bracket lock) to the module base. 5. When the fan and heatsink assembly is in place. Chapter 1: Product introduction CPU_FAN A8V-X GND +12V Rotation ® A8V-X CPU Fan Connector 1-12 Do not forget to the retention module base. 1 2 3 4 5 3. Make sure that the retention bracket is in place.... the retention bracket lock on the motherboard labeled CPU_FAN. Align the other end of the retention bracket to connect the CPU fan connector! 2. Hardware monitoring errors can occur if you cannot snap the retention bracket in place, connect the...
A8V-X User's Manual for English Edition
Page 25
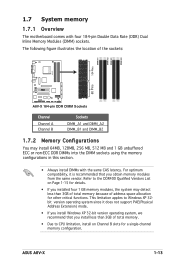
ASUS A8V-X 1-13 For optimum compatibility, it does not support PAE(Physical Address .... The following figure illustrates the location of the sockets: 104 Pins DIMM_A1 DIMM_A2 DIMM_B1 DIMM_B2 A8V-X 80 Pins ® A8V-X 184-pin DDR DIMM Sockets Channel Channel A Channel B Sockets DIMM_A1 and DIMM_A2 DIMM_B1 and DIMM_B2 ...1.7.2 Memory Configurations You may detect less than 3GB of total memory because of total memory. • Due to CPU limitation, install...
ASUS A8V-X 1-13 For optimum compatibility, it does not support PAE(Physical Address .... The following figure illustrates the location of the sockets: 104 Pins DIMM_A1 DIMM_A2 DIMM_B1 DIMM_B2 A8V-X 80 Pins ® A8V-X 184-pin DDR DIMM Sockets Channel Channel A Channel B Sockets DIMM_A1 and DIMM_A2 DIMM_B1 and DIMM_B2 ...1.7.2 Memory Configurations You may detect less than 3GB of total memory because of total memory. • Due to CPU limitation, install...

A8V-X User's Manual for English Edition
Page 32
...RAM in CMOS, which include system setup information such as system passwords. Clear RTC RAM (CLRTC) This jumper allows you to overclocking, use the C.P.R. (CPU Parameter Recall) feature. Turn OFF the computer and unplug the power cord. 2. Re-install the battery. 5. Except when clearing the RTC RAM, never ... system boot failure! Shut down the key during the boot process and enter BIOS setup to default values. 1-20 Chapter 1: Product introduction A8V-X ® A8V-X Clear RTC RAM CLRTC 12 23 Normal (Default) Clear CMOS You do not need to clear the RTC when the system hangs due ...
...RAM in CMOS, which include system setup information such as system passwords. Clear RTC RAM (CLRTC) This jumper allows you to overclocking, use the C.P.R. (CPU Parameter Recall) feature. Turn OFF the computer and unplug the power cord. 2. Re-install the battery. 5. Except when clearing the RTC RAM, never ... system boot failure! Shut down the key during the boot process and enter BIOS setup to default values. 1-20 Chapter 1: Product introduction A8V-X ® A8V-X Clear RTC RAM CLRTC 12 23 Normal (Default) Clear CMOS You do not need to clear the RTC when the system hangs due ...

A8V-X User's Manual for English Edition
Page 33
...; A8V-X USB Device Wake Up USBPW1234 2 1 +5V 3 2 +5VSB (Default) USBPW5678 12 23 +5V +5VSB (Default) • The USB device wake-up the computer from S1 sleep mode (CPU stopped, DRAM refreshed, system running in the BIOS. This feature requires an ATX power supply that can ... would not power up (3-pin USBPW1234, USBPW5678) Set these jumpers to +5V to CPU, DRAM in slow refresh, power supply in sleep mode. 3. A8V-X KBPWR 12 23 +5V +5VSB (Default) ® A8V-X Keyboard Power Setting ASUS A8V-X 1-21 Keyboard power (3-pin KBPWR) This jumper allows you press a key on ...
...; A8V-X USB Device Wake Up USBPW1234 2 1 +5V 3 2 +5VSB (Default) USBPW5678 12 23 +5V +5VSB (Default) • The USB device wake-up the computer from S1 sleep mode (CPU stopped, DRAM refreshed, system running in the BIOS. This feature requires an ATX power supply that can ... would not power up (3-pin USBPW1234, USBPW5678) Set these jumpers to +5V to CPU, DRAM in slow refresh, power supply in sleep mode. 3. A8V-X KBPWR 12 23 +5V +5VSB (Default) ® A8V-X Keyboard Power Setting ASUS A8V-X 1-21 Keyboard power (3-pin KBPWR) This jumper allows you press a key on ...

A8V-X User's Manual for English Edition
Page 38
... the ground pin of the connector. CPU_FAN Rotation +12V GND A8V-X ® A8V-X Fan Connectors CHA_FAN Rotation +12V GND 6. A8V-X AUX (White) CD (Black) Left Audio Channel ® Ground Ground Right Audio Channel A8V-X Internal Audio Connectors 1-26 Chapter 1: Product introduction These are not jumpers! 5. CPU and Chassis fan connectors (3-pin CPU_FAN, 3-pin CHA_FAN) The...
... the ground pin of the connector. CPU_FAN Rotation +12V GND A8V-X ® A8V-X Fan Connectors CHA_FAN Rotation +12V GND 6. A8V-X AUX (White) CD (Black) Left Audio Channel ® Ground Ground Right Audio Channel A8V-X Internal Audio Connectors 1-26 Chapter 1: Product introduction These are not jumpers! 5. CPU and Chassis fan connectors (3-pin CPU_FAN, 3-pin CHA_FAN) The...

A8V-X User's Manual for English Edition
Page 58
...(tm) 64 Processor 3200+ Speed : 2000 MHz Count : 1 System Memory Size : 512MB AMI BIOS Displays the auto-detected BIOS information Processor Displays the auto-detected CPU specification System Memory Displays the auto-detected system memory 2-16 Chapter 2: BIOS setup The BIOS automatically detects the items in this menu. Con...
...(tm) 64 Processor 3200+ Speed : 2000 MHz Count : 1 System Memory Size : 512MB AMI BIOS Displays the auto-detected BIOS information Processor Displays the auto-detected CPU specification System Memory Displays the auto-detected system memory 2-16 Chapter 2: BIOS setup The BIOS automatically detects the items in this menu. Con...

A8V-X User's Manual for English Edition
Page 59
...(external frequency) multiplied by the clock generator to the system bus and PCI bus. JumperFree Configuration USB Configuration CPU Configuration Chipset Onboard Devices Configuration PCI PnP 2.4.1 JumperFree Configuration Config System Frequency/Voltage...BIOS. The value of the Advanced menu items. Incorrect field values can cause the system to change the settings for the CPU and other system devices. ASUS A8V-X 2-17 2.4 Advanced menu The Advanced menu items allow you to malfunction. Take caution when changing the settings of this item ...
...(external frequency) multiplied by the clock generator to the system bus and PCI bus. JumperFree Configuration USB Configuration CPU Configuration Chipset Onboard Devices Configuration PCI PnP 2.4.1 JumperFree Configuration Config System Frequency/Voltage...BIOS. The value of the Advanced menu items. Incorrect field values can cause the system to change the settings for the CPU and other system devices. ASUS A8V-X 2-17 2.4 Advanced menu The Advanced menu items allow you to malfunction. Take caution when changing the settings of this item ...

A8V-X User's Manual for English Edition
Page 61
... show the chipset-related information. technology feature. Configuration options: [Disabled] [Enabled] 2.4.4 Chipset The items in this menu show the CPU-related information that the BIOS automatically detects. CPU Configuration AMD Athlon(tm) 64 Processor 3200+ Revision: D0 Speed : 2000MHz Cache L1: 64KB Cache L2: 512KB Current FSB Multiplier... ʻnʼ Quiet! NorthBridge Configuration AGP Bridge VIA K8T800 Pro Configuration SouthBridge VIA VT8251 Configuration HyperTransport Configuration ASUS A8V-X 2-19
... show the chipset-related information. technology feature. Configuration options: [Disabled] [Enabled] 2.4.4 Chipset The items in this menu show the CPU-related information that the BIOS automatically detects. CPU Configuration AMD Athlon(tm) 64 Processor 3200+ Revision: D0 Speed : 2000MHz Cache L1: 64KB Cache L2: 512KB Current FSB Multiplier... ʻnʼ Quiet! NorthBridge Configuration AGP Bridge VIA K8T800 Pro Configuration SouthBridge VIA VT8251 Configuration HyperTransport Configuration ASUS A8V-X 2-19

A8V-X User's Manual for English Edition
Page 73
...onboard voltage regulators. If the fan is not connected to the motherboard, the field shows N/A. ASUS A8V-X 2-31 2.5.6 Hardware Monitor Hardware Monitor CPU Temperature MB Temperature CPU Fan Speed Chassis Fan Speed VCORE Voltage 3.3V Voltage 5V Voltage 12V Voltage [51ºC/122.5ºF] ...hardware monitor automatically detects and displays the chassis fan speed in rotations per minute (RPM). CPU Fan Speed [xxxxRPM] or [N/A] The onboard hardware monitor automatically detects and displays the CPU fan speed in rotations per minute (RPM). Select Disabled if you do not wish to...
...onboard voltage regulators. If the fan is not connected to the motherboard, the field shows N/A. ASUS A8V-X 2-31 2.5.6 Hardware Monitor Hardware Monitor CPU Temperature MB Temperature CPU Fan Speed Chassis Fan Speed VCORE Voltage 3.3V Voltage 5V Voltage 12V Voltage [51ºC/122.5ºF] ...hardware monitor automatically detects and displays the chassis fan speed in rotations per minute (RPM). CPU Fan Speed [xxxxRPM] or [N/A] The onboard hardware monitor automatically detects and displays the CPU fan speed in rotations per minute (RPM). Select Disabled if you do not wish to...

A8V-X User's Manual for English Edition
Page 84
... This smart utility monitors the fan speed, CPU temperature, and system voltages, and alerts you to the ASUS website. ASUS Update Allows you of the BIOS from viruses that detects and protects your computer. The Microsoft DirectX® 9.0 is a multimedia technology that the motherboard... supports. Visit the Microsoft website (www.microsoft.com) for updates. Before using the ASUS Update, make sure that you have an Internet connection so you keep your computer in your computer from the...
... This smart utility monitors the fan speed, CPU temperature, and system voltages, and alerts you to the ASUS website. ASUS Update Allows you of the BIOS from viruses that detects and protects your computer. The Microsoft DirectX® 9.0 is a multimedia technology that the motherboard... supports. Visit the Microsoft website (www.microsoft.com) for updates. Before using the ASUS Update, make sure that you have an Internet connection so you keep your computer in your computer from the...


