
K8 series Quick Setup Guide
Page 5
... disk signal cable Power cable Power cable SATA signal cable 5 English Mount the drives in the chassis. 3. If installing SATA hard disk drives, connect the SATA signal cable and power cable. If installing IDE hard disk drives, connect the IDE signal cable and power cable. 5. Check the label on ...the same cable, set one device as "Master" and the other as "Slave." 4 Install hard disk and floppy drives 1. If installing two IDE hard disk drives on the IDE device for...
... disk signal cable Power cable Power cable SATA signal cable 5 English Mount the drives in the chassis. 3. If installing SATA hard disk drives, connect the SATA signal cable and power cable. If installing IDE hard disk drives, connect the IDE signal cable and power cable. 5. Check the label on ...the same cable, set one device as "Master" and the other as "Slave." 4 Install hard disk and floppy drives 1. If installing two IDE hard disk drives on the IDE device for...

K8 series Quick Setup Guide
Page 6
English 5 Connect drive signal cables 1. If you 're using IDE hard disk drives, connect the IDE signal cable. Make sure the side of the cable with the colored stripe is plugged into pin 1 of the IDE connector. 3. If the connector doesn't fit, try reversing it. Make sure the side of the cable with the colored stripe is plugged into pin 1 of the floppy disk connector. 2. The SATA connector fits only in one orientation. If you are using SATA hard disk drives, connect the SATA signal cable. Floppy disk IDE Serial ATA 6 Connect the floppy disk signal cable.
English 5 Connect drive signal cables 1. If you 're using IDE hard disk drives, connect the IDE signal cable. Make sure the side of the cable with the colored stripe is plugged into pin 1 of the IDE connector. 3. If the connector doesn't fit, try reversing it. Make sure the side of the cable with the colored stripe is plugged into pin 1 of the floppy disk connector. 2. The SATA connector fits only in one orientation. If you are using SATA hard disk drives, connect the SATA signal cable. Floppy disk IDE Serial ATA 6 Connect the floppy disk signal cable.

K8 series Quick Setup Guide
Page 10
... • Make sure that you encounter any of the following conditions when powering up , but no display Memory error Floppy disk error Hard disk drive or CD-ROM drive error CMOS error 10 POSSIBLE SOLUTIONS • Check the power cord and make sure it is turned up. • Shutdown the computer,... expansion slot. • Check the memory modules and make sure they are of the monitor, peripherals and system. If necessary, format your hard disk drive and install an operating system. To restore all BIOS settings to the default value, press and select Yes. English Power Up 10 Turn on...
... • Make sure that you encounter any of the following conditions when powering up , but no display Memory error Floppy disk error Hard disk drive or CD-ROM drive error CMOS error 10 POSSIBLE SOLUTIONS • Check the power cord and make sure it is turned up. • Shutdown the computer,... expansion slot. • Check the memory modules and make sure they are of the monitor, peripherals and system. If necessary, format your hard disk drive and install an operating system. To restore all BIOS settings to the default value, press and select Yes. English Power Up 10 Turn on...

A8V Deluxe User's Manual
Page 44
...) or secondary IDE connector, then connect the gray connector to the UltraDMA slave device (hard disk drive) and the black connector to the UltraDMA master device. • Follow the hard disk drive documentation when setting the device in master or slave mode. • Pin 20 on the...provided UltraDMA IDE hard disk ribbon cable. This prevents incorrect orientation when you connect the cables. PRI_IDE SEC_IDE NOTE: Orient the red markings (usually zigzag) on the IDE ribbon cable to match the covered hole on each IDE connector is removed to PIN 1. ® A8V A8V Deluxe IDE Connectors PIN...
...) or secondary IDE connector, then connect the gray connector to the UltraDMA slave device (hard disk drive) and the black connector to the UltraDMA master device. • Follow the hard disk drive documentation when setting the device in master or slave mode. • Pin 20 on the...provided UltraDMA IDE hard disk ribbon cable. This prevents incorrect orientation when you connect the cables. PRI_IDE SEC_IDE NOTE: Orient the red markings (usually zigzag) on the IDE ribbon cable to match the covered hole on each IDE connector is removed to PIN 1. ® A8V A8V Deluxe IDE Connectors PIN...

A8V Deluxe User's Manual
Page 47
ASUS A8V Deluxe motherboard 2-25 If you want to section "5.6.2 Promise® RAID Configurations" for details on SATA RAID configuration. SATA_RAID1 GND RSATA_RXN2 RSATA_RXP2 GND RSATA_TXN2 RSATA_TXP2 GND ® A8V A8V Deluxe SATA RAID Connectors GND RSATA_RXN1 RSATA_RXP1 GND RSATA_TXN1 RSATA_TXP1 GND SATA_RAID2 • ... (PRI_RAID). RAID Serial ATA connectors (7-pin SATA_RAID1, SATA_RAID2) These Serial ATA connectors support SATA hard disks that you can configure as an independent drive, set the Operation Mode to IDE Mode under the Advanced menu. • To create a...
ASUS A8V Deluxe motherboard 2-25 If you want to section "5.6.2 Promise® RAID Configurations" for details on SATA RAID configuration. SATA_RAID1 GND RSATA_RXN2 RSATA_RXP2 GND RSATA_TXN2 RSATA_TXP2 GND ® A8V A8V Deluxe SATA RAID Connectors GND RSATA_RXN1 RSATA_RXP1 GND RSATA_TXN1 RSATA_TXP1 GND SATA_RAID2 • ... (PRI_RAID). RAID Serial ATA connectors (7-pin SATA_RAID1, SATA_RAID2) These Serial ATA connectors support SATA hard disks that you can configure as an independent drive, set the Operation Mode to IDE Mode under the Advanced menu. • To create a...

A8V Deluxe User's Manual
Page 60
... is properly connected to the purple PS/2 connector on the rear panel. • See section "2.7.1 Rear panel connectors" for assistance. No IDE hard disk detected • Make sure you apply power to one of the connector. See section "4.4.6 Speech Configuration". 3-4 Chapter 3: Powering up System... Check CPU fan if it is not defective. • Call ASUS technical support for the location of the IDE connectors on the motherboard. See the "ASUS contact information" on after you have connected an IDE hard disk drive to the system. • Make sure that your power supply ...
... is properly connected to the purple PS/2 connector on the rear panel. • See section "2.7.1 Rear panel connectors" for assistance. No IDE hard disk detected • Make sure you apply power to one of the connector. See section "4.4.6 Speech Configuration". 3-4 Chapter 3: Powering up System... Check CPU fan if it is not defective. • Call ASUS technical support for the location of the IDE connectors on the motherboard. See the "ASUS contact information" on after you have connected an IDE hard disk drive to the system. • Make sure that your power supply ...

A8V Deluxe User's Manual
Page 79
...the device supports multi-sector transfer feature. These items show N/A if no IDE device is either a ZIP, LS-120, or MO drive. Primary IDE Master Device : Hard Disk Vendor : ST320413A Size : 20.0GB LBA Mode : Supported Block Mode : 16 Sectors PIO Mode : Supported Async DMA : ...drive. Select ARMD (ATAPI Removable Media Device) if your device is installed in the system. When set to Disabled, the data transfer from and to the device occurs multiple sectors at a time. Select CDROM if you are not user-configurable. Configuration options: [Disabled] [Auto] ASUS A8V Deluxe...
...the device supports multi-sector transfer feature. These items show N/A if no IDE device is either a ZIP, LS-120, or MO drive. Primary IDE Master Device : Hard Disk Vendor : ST320413A Size : 20.0GB LBA Mode : Supported Block Mode : 16 Sectors PIO Mode : Supported Async DMA : ...drive. Select ARMD (ATAPI Removable Media Device) if your device is installed in the system. When set to Disabled, the data transfer from and to the device occurs multiple sectors at a time. Select CDROM if you are not user-configurable. Configuration options: [Disabled] [Auto] ASUS A8V Deluxe...
A8V Deluxe User's Manual
Page 126
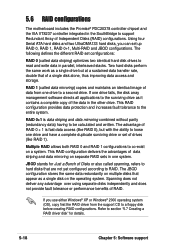
...and RAID 1 configurations to section "5.7 Creating a RAID driver disk" for Just a Bunch of Disks or also called spanning, refers to hard disks that of drives (like RAID 0), but at a sustained data transfer rate, double that are not yet configured according to RAID. Spanning does not deliver... data mirroring combined without parity (redundancy data) having to be calculated and written. RAID 1 (called data striping) optimizes two identical hard disk drives to the entire system. RAID 0+1 is fast data access (like RAID 1). Refer to co-exist on a system. Using four Serial ATA...
...and RAID 1 configurations to section "5.7 Creating a RAID driver disk" for Just a Bunch of Disks or also called spanning, refers to hard disks that of drives (like RAID 0), but at a sustained data transfer rate, double that are not yet configured according to RAID. Spanning does not deliver... data mirroring combined without parity (redundancy data) having to be calculated and written. RAID 1 (called data striping) optimizes two identical hard disk drives to the entire system. RAID 0+1 is fast data access (like RAID 1). Refer to co-exist on a system. Using four Serial ATA...

A8V Deluxe User's Manual
Page 127
...you are creating a RAID 0+1 array for protection, you can use four new drives or use an existing drive and three new drives. Install the hard disks into the drive bays. 2. Connect the Serial ATA power cable to Advanced > Onboard Devices ...hard disks The motherboard supports UltraDMA 133/100/66 and Serial ATA hard disk drives. Connect the power cable to the Advanced > Onboard Devices Configuration and make sure the Onboard Promise Controller item is Enabled. 7. Install the Serial ATA hard disks into the drive bays. 3. Connect the Serial ATA signal cables. 3. ASUS A8V Deluxe...
...you are creating a RAID 0+1 array for protection, you can use four new drives or use an existing drive and three new drives. Install the hard disks into the drive bays. 2. Connect the Serial ATA power cable to Advanced > Onboard Devices ...hard disks The motherboard supports UltraDMA 133/100/66 and Serial ATA hard disk drives. Connect the power cable to the Advanced > Onboard Devices Configuration and make sure the Onboard Promise Controller item is Enabled. 7. Install the Serial ATA hard disks into the drive bays. 3. Connect the Serial ATA signal cables. 3. ASUS A8V Deluxe...

A8V Deluxe User's Manual
Page 128
FastBuild (tm) Utility 2.00 (c) 2002-2005 Promise Technology, Inc. [ Main Menu ] Auto Setup 1 ] View Drive Assignments . . . . [ 2 ] Define Array 3 ] Delete Array 4 ] Rebuild Array 5 ] [ Keys Available ] Press 1..5 to display the FastBuild™ utility main menu. Press to select Option [ESC]... systems. Entering the MBFastBuild™ utility 1. All Rights Reserved. If this is the first time you boot the system with the new hard disks installed and connected to the FastTrak 378 Quick Start Guide and SATA Quick Start Guide in the support CD for detailed information on the...
FastBuild (tm) Utility 2.00 (c) 2002-2005 Promise Technology, Inc. [ Main Menu ] Auto Setup 1 ] View Drive Assignments . . . . [ 2 ] Define Array 3 ] Delete Array 4 ] Rebuild Array 5 ] [ Keys Available ] Press 1..5 to display the FastBuild™ utility main menu. Press to select Option [ESC]... systems. Entering the MBFastBuild™ utility 1. All Rights Reserved. If this is the first time you boot the system with the new hard disks installed and connected to the FastTrak 378 Quick Start Guide and SATA Quick Start Guide in the support CD for detailed information on the...

A8V Deluxe User's Manual
Page 129
.... The OS will treat the RAID 0 array as a single hard drive. 6. During the OS installation, the system prompts you have formatted the arrayed drives, install an operating system (OS). During the boot process, the MBFastTrak378 BIOS checks and displays the disk array information. 5. ASUS A8V Deluxe motherboard 5-21 After making a selection, press to select Auto Setup...
.... The OS will treat the RAID 0 array as a single hard drive. 6. During the OS installation, the system prompts you have formatted the arrayed drives, install an operating system (OS). During the boot process, the MBFastTrak378 BIOS checks and displays the disk array information. 5. ASUS A8V Deluxe motherboard 5-21 After making a selection, press to select Auto Setup...

A8V Deluxe User's Manual
Page 131
... keys to move to use an existing drive that already contains data and/or is the bootable drive in the array has the same or larger capacity as the existing drive. After you will use the arrow keys to install a new hard drive. Press to select Auto Setup. 2. Abort ASUS A8V Deluxe motherboard 5-23 Use the FDISK utility...
... keys to move to use an existing drive that already contains data and/or is the bootable drive in the array has the same or larger capacity as the existing drive. After you will use the arrow keys to install a new hard drive. Press to select Auto Setup. 2. Abort ASUS A8V Deluxe motherboard 5-23 Use the FDISK utility...

A8V Deluxe User's Manual
Page 132
... to enter the FastBuild™ Main Menu. 3. Rebuild Array (5): This command restores the array and system data after faults on the hard disks. During the OS installation, the system prompts you to the main menu. 9. Press to reconfigure the system. Press to return to view... the drive assignments of the defunct hard disk. 4. When complete, the utility prompts that your Security array has been created. 10. The malfunctioning array is deleted by mistake...
... to enter the FastBuild™ Main Menu. 3. Rebuild Array (5): This command restores the array and system data after faults on the hard disks. During the OS installation, the system prompts you to the main menu. 9. Press to reconfigure the system. Press to return to view... the drive assignments of the defunct hard disk. 4. When complete, the utility prompts that your Security array has been created. 10. The malfunctioning array is deleted by mistake...

A8V Deluxe User's Manual
Page 133
... Total Drv 4 Status Critical Stripe Block: Not Available Gigabyte Boundary: ON [ Select Drive for the duration of the task. 9. ASUS A8V Deluxe motherboard 5-25 Confirm the command to reboot the system. Controller Configuration (6): This command shows... the default for Controller Configuration. The default value is [Enabled]. When completed, the utility prompts you to copy data from the intact source hard disk into a new replacement hard...
... Total Drv 4 Status Critical Stripe Block: Not Available Gigabyte Boundary: ON [ Select Drive for the duration of the task. 9. ASUS A8V Deluxe motherboard 5-25 Confirm the command to reboot the system. Controller Configuration (6): This command shows... the default for Controller Configuration. The default value is [Enabled]. When completed, the utility prompts you to copy data from the intact source hard disk into a new replacement hard...

A8V Deluxe User's Manual
Page 134
... functions. : ↑, ↓ : : : View Array/Disk Status Move to next item Enter : Confirm the selection ESC : Exit Channel Drive Name Array Name Mode Size(GB) Status Serial_Ch0 Master XXXXXXXXXXX ARRAY 0 SATA 999.99 XXXXXXX Serial_Ch1 Master XXXXXXXXXXX ARRAY 0 SATA 999.99 XXXXXXX On ...Select Boot Array Serial Number View Create a RAID array with two independent Serial ATA channels. It supports RAID 0 and RAID 1 with the hard disks attached to VIA RAID controller F1 : View Array/Disk Status ↑,↓ : Move to the next item Confirm the selection Exit ...
... functions. : ↑, ↓ : : : View Array/Disk Status Move to next item Enter : Confirm the selection ESC : Exit Channel Drive Name Array Name Mode Size(GB) Status Serial_Ch0 Master XXXXXXXXXXX ARRAY 0 SATA 999.99 XXXXXXX Serial_Ch1 Master XXXXXXXXXXX ARRAY 0 SATA 999.99 XXXXXXX On ...Select Boot Array Serial Number View Create a RAID array with two independent Serial ATA channels. It supports RAID 0 and RAID 1 with the hard disks attached to VIA RAID controller F1 : View Array/Disk Status ↑,↓ : Move to the next item Confirm the selection Exit ...

A8V Deluxe User's Manual
Page 135
... create array menu, select Array Mode, then press . The main menu items on the upper-left corner of the screen are replaced with the hard disks attached to VIA RAID controller F1 : View Array/Disk Status ↑,↓ : Move to step 5. 3. RAID 0 for performance RAID ...Ver 1.xx Auto Setup For Data Security Array Mode RAID 1 (Mirroring) Select Disk Drives Start Create Process Create a RAID array with create array menu options. Auto create array will destroy all data on a pop-up menu. The supported RAID configurations appear on disks, Continue? (Y/N) ASUS A8V Deluxe motherboard 5-27
... create array menu, select Array Mode, then press . The main menu items on the upper-left corner of the screen are replaced with the hard disks attached to VIA RAID controller F1 : View Array/Disk Status ↑,↓ : Move to step 5. 3. RAID 0 for performance RAID ...Ver 1.xx Auto Setup For Data Security Array Mode RAID 1 (Mirroring) Select Disk Drives Start Create Process Create a RAID array with create array menu options. Auto create array will destroy all data on a pop-up menu. The supported RAID configurations appear on disks, Continue? (Y/N) ASUS A8V Deluxe motherboard 5-27

A8V Deluxe User's Manual
Page 136
...menu. 4K TIP: For server systems, use of valid array block sizes are displayed on a pop-up menu. Use arrow keys to set up hard disk for audio and 32K video editing, a higher array block size is recommended. Press to confirm or to return to the configuration options. Press... to confirm or to return to the configuration options. 9. Use arrow keys to select disk drive, then press to step 9. 5. For multimedia 16K computer systems used mainly for RAID system. Continue? (Y/N) 8. If you selected , proceed to mark ...
...menu. 4K TIP: For server systems, use of valid array block sizes are displayed on a pop-up menu. Use arrow keys to set up hard disk for audio and 32K video editing, a higher array block size is recommended. Press to confirm or to return to the configuration options. Press... to confirm or to return to the configuration options. 9. Use arrow keys to select disk drive, then press to step 9. 5. For multimedia 16K computer systems used mainly for RAID system. Continue? (Y/N) 8. If you selected , proceed to mark ...

A8V Deluxe User's Manual
Page 137
...Setup for Data Security or manually configure the RAID array for data protection Press Yes(Y) to mirror after creation? (Y/N) 8. Select Select Disk Drives, then press . An asterisk appears before a selected drive. 7. ASUS A8V Deluxe motherboard 5-29 From this point, you select , the following confirmation message appears. Select Auto Setup for RAID system. Auto create array... configuration options. 11. Select Start Create Process and press to main menu. If you want to step 6. 4. Duplicating... Press to go back to setup hard disk for Data Security and press .
...Setup for Data Security or manually configure the RAID array for data protection Press Yes(Y) to mirror after creation? (Y/N) 8. Select Select Disk Drives, then press . An asterisk appears before a selected drive. 7. ASUS A8V Deluxe motherboard 5-29 From this point, you select , the following confirmation message appears. Select Auto Setup for RAID system. Auto create array... configuration options. 11. Select Start Create Process and press to main menu. If you want to step 6. 4. Duplicating... Press to go back to setup hard disk for Data Security and press .

A8V User Manual
Page 129
...] Mode Stripe Spare Drive 0 Drive(s) Used in Array 2 Array Disk Capacity (size in MB 8650 [ Keys Available ] [ ] Up [ ] Down [ , ,Space] Change Option [ESC] Exit [CTRL-Y] Save 2. Once the array is created, use the FDISK utility to select Auto Setup. ASUS A8V Deluxe motherboard 5-21 During ... 0 array (Performance) 1. In the FastBuild™ utility main menu, press to format the array as a single drive unit. The following screen appears. The OS will treat the RAID 0 array as a single hard drive. 6. During the OS installation, the system prompts you have formatted the arrayed...
...] Mode Stripe Spare Drive 0 Drive(s) Used in Array 2 Array Disk Capacity (size in MB 8650 [ Keys Available ] [ ] Up [ ] Down [ , ,Space] Change Option [ESC] Exit [CTRL-Y] Save 2. Once the array is created, use the FDISK utility to select Auto Setup. ASUS A8V Deluxe motherboard 5-21 During ... 0 array (Performance) 1. In the FastBuild™ utility main menu, press to format the array as a single drive unit. The following screen appears. The OS will treat the RAID 0 array as a single hard drive. 6. During the OS installation, the system prompts you have formatted the arrayed...

A8V User Manual
Page 131
... to another? (Yes/No) Y - The following message appears: Do you want to save your system, make sure that the new hard drive you have formatted the arrayed drives, install an operating system (OS). Abort ASUS A8V Deluxe motherboard 5-23 Press to continue? (Yes/No) Y - Continue N - The following message appears: Start to section "5.7 Creating a RAID driver disk...
... to another? (Yes/No) Y - The following message appears: Do you want to save your system, make sure that the new hard drive you have formatted the arrayed drives, install an operating system (OS). Abort ASUS A8V Deluxe motherboard 5-23 Press to continue? (Yes/No) Y - Continue N - The following message appears: Start to section "5.7 Creating a RAID driver disk...


