
A8N-SLI English edition user's manual, version E2068
Page 7
...any damage, contact your dealer immediately. • To avoid short circuits, keep paper clips, screws, and staples away from connectors, slots, sockets and circuitry. • Avoid dust, humidity, and temperature extremes. Contact a qualified service technician or your retailer. vii If possible, disconnect...Before using the product, make sure all cables are correctly connected and the power cables are not damaged. Operation safety • Before installing the motherboard and adding devices on it may become wet. • Place the product on a stable surface. • If you add a device....
...any damage, contact your dealer immediately. • To avoid short circuits, keep paper clips, screws, and staples away from connectors, slots, sockets and circuitry. • Avoid dust, humidity, and temperature extremes. Contact a qualified service technician or your retailer. vii If possible, disconnect...Before using the product, make sure all cables are correctly connected and the power cables are not damaged. Operation safety • Before installing the motherboard and adding devices on it may become wet. • Place the product on a stable surface. • If you add a device....
A8N-SLI English edition user's manual, version E2068
Page 8
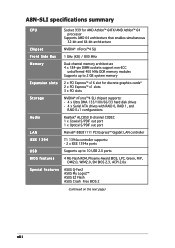
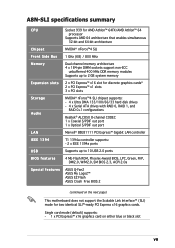
A8N-SLI specifications summary CPU Chipset Front Side Bus Memory Expansion slots Storage Audio LAN IEEE 1394 Socket 939 for AMD Athlon™ 64FX/AMD Athlon™ 64 processor Supports AMD 64 architecture that enables simultaneous 32-bit and 64-bit architecture NVIDIA® nForce™4 SLI 1 GHz (K8) / 800 MHz Dual-channel memory ...BIOS features Special features Supports up to 10 USB 2.0 ports 4 Mb Flash ROM, Phoenix-Award BIOS, LPC, Green, PnP, DMI2.0, WfM2.0, SM BIOS 2.3, ACPI 2.0a ASUS Q-Fan2 ASUS My Logo2™ ASUS EZ Flash ASUS Crash Free BIOS 2 (continued on the next page) viii
A8N-SLI specifications summary CPU Chipset Front Side Bus Memory Expansion slots Storage Audio LAN IEEE 1394 Socket 939 for AMD Athlon™ 64FX/AMD Athlon™ 64 processor Supports AMD 64 architecture that enables simultaneous 32-bit and 64-bit architecture NVIDIA® nForce™4 SLI 1 GHz (K8) / 800 MHz Dual-channel memory ...BIOS features Special features Supports up to 10 USB 2.0 ports 4 Mb Flash ROM, Phoenix-Award BIOS, LPC, Green, PnP, DMI2.0, WfM2.0, SM BIOS 2.3, ACPI 2.0a ASUS Q-Fan2 ASUS My Logo2™ ASUS EZ Flash ASUS Crash Free BIOS 2 (continued on the next page) viii

A8N-SLI English edition user's manual, version E2068
Page 12
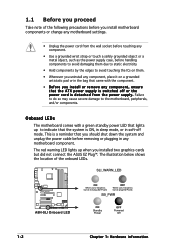
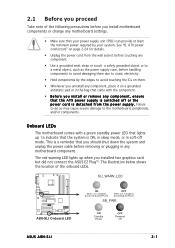
...ATX power supply is switched off mode. Onboard LEDs The motherboard comes with the component. • Before you install or remove any motherboard... before you install motherboard components or change any motherboard settings. • Unplug the power cord from the wall socket before touching any... o w e r s u p p l y . The red warning LED lights up to the motherboard, peripherals, and/or components. 1.1 Before you proceed Take note of the onboard LEDs. SLI_WARN_LED A8N-SLI ® A8N-SLI Onboard LED ON When use 2 Graphics but do not plug EZ-PLUG OFF When use 2 Graphics but ...
...ATX power supply is switched off mode. Onboard LEDs The motherboard comes with the component. • Before you install or remove any motherboard... before you install motherboard components or change any motherboard settings. • Unplug the power cord from the wall socket before touching any... o w e r s u p p l y . The red warning LED lights up to the motherboard, peripherals, and/or components. 1.1 Before you proceed Take note of the onboard LEDs. SLI_WARN_LED A8N-SLI ® A8N-SLI Onboard LED ON When use 2 Graphics but do not plug EZ-PLUG OFF When use 2 Graphics but ...
A8N-SLI English edition user's manual, version E2068
Page 14
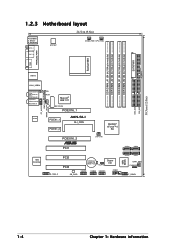
... Motherboard layout 24.5cm (9.6in) PS/2KBMS T: Mouse B: Keyboard SPDIF_O ATX12V CHA2_FAN CPU_FAN SPDIF_O2 DDR DIMM_A1 (64 bit,184-pin module) DDR DIMM_A2 (64 bit,184-pin module) DDR DIMM_B1 (64 bit,184-pin module) DDR DIMM_B2 (64 bit,184-pin module) 1394 PARALLEL PORT Socket 939... USB12 LAN1_USB34 Top:Rear Speaker Out Center: Side Speaker Out Below: Center/Subwoofer Top:Line In Center:Line Out Bottom:Mic In ALC850 FP_AUDIO PWR_FAN WARN_LED CD AUX Marvell® 88E1111 EZ_PLUG PCIEX16_1 PCIEX1_1 A8N-SLI SLI_CON PCIEX1_2 PCIEX16_2 ® ...
... Motherboard layout 24.5cm (9.6in) PS/2KBMS T: Mouse B: Keyboard SPDIF_O ATX12V CHA2_FAN CPU_FAN SPDIF_O2 DDR DIMM_A1 (64 bit,184-pin module) DDR DIMM_A2 (64 bit,184-pin module) DDR DIMM_B1 (64 bit,184-pin module) DDR DIMM_B2 (64 bit,184-pin module) 1394 PARALLEL PORT Socket 939... USB12 LAN1_USB34 Top:Rear Speaker Out Center: Side Speaker Out Below: Center/Subwoofer Top:Line In Center:Line Out Bottom:Mic In ALC850 FP_AUDIO PWR_FAN WARN_LED CD AUX Marvell® 88E1111 EZ_PLUG PCIEX16_1 PCIEX1_1 A8N-SLI SLI_CON PCIEX1_2 PCIEX16_2 ® ...

A8N-SLI English edition user's manual, version E2068
Page 17
...1.3.1 Installing the CPU To install a CPU: 1. This mark should match a specific corner on the motherboard. Locate the CPU socket on the socket to ensure correct installation. 1.3 Central Processing Unit (CPU) The motherboard comes with only 32-bit or 64-bit wide data paths. The 128-bit-wide data paths of ... CPU. Take note of these processors can run applications faster than processors with a surface mount 939-pin Zero Insertion Force (ZIF) socket designed for the AMD Athlon™ 64FX or AMD Athlon™ 64 processor. A8N-SLI ® A8N-SLI CPU Socket 939 ASUS A8N-SLI 1-7
...1.3.1 Installing the CPU To install a CPU: 1. This mark should match a specific corner on the motherboard. Locate the CPU socket on the socket to ensure correct installation. 1.3 Central Processing Unit (CPU) The motherboard comes with only 32-bit or 64-bit wide data paths. The 128-bit-wide data paths of ... CPU. Take note of these processors can run applications faster than processors with a surface mount 939-pin Zero Insertion Force (ZIF) socket designed for the AMD Athlon™ 64FX or AMD Athlon™ 64 processor. A8N-SLI ® A8N-SLI CPU Socket 939 ASUS A8N-SLI 1-7

A8N-SLI English edition user's manual, version E2068
Page 18
... it fits in one correct orientation. Position the CPU above the socket such that the socket lever is lifted up to secure the CPU. When the CPU is locked. 1-8 Chapter 1: Hardware information Unlock the socket by pressing the lever sideways, then lift it is in completely. 3. The lever clicks ...the side tab to prevent bending the pins and damaging the CPU! 5. Socket lever Make sure that the CPU corner with the gold triangle matches the socket corner with a small triangle. 4. Carefully insert the CPU into the socket to indicate that it up to 90°-100° angle; Gold ...
... it fits in one correct orientation. Position the CPU above the socket such that the socket lever is lifted up to secure the CPU. When the CPU is locked. 1-8 Chapter 1: Hardware information Unlock the socket by pressing the lever sideways, then lift it is in completely. 3. The lever clicks ...the side tab to prevent bending the pins and damaging the CPU! 5. Socket lever Make sure that the CPU corner with the gold triangle matches the socket corner with a small triangle. 4. Carefully insert the CPU into the socket to indicate that it up to 90°-100° angle; Gold ...
A8N-SLI English edition user's manual, version E2068
Page 22
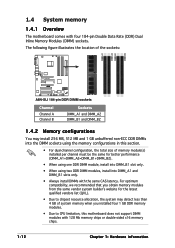
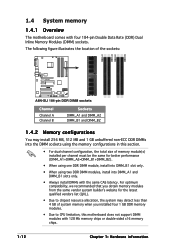
...Always install DIMMs with the same CAS latency. The following figure illustrates the location of the sockets: DIMM_A1 DIMM_A2 DIMM_B1 DIMM_B2 A8N-SLI ® A8N-SLI 184-pin DDR DIMM sockets Channel Channel A Channel B Sockets DIMM_A1 and DIMM_A2 DIMM_B1 and DIMM_B2 1.4.2 Memory configurations You may detect less than 4 GB..., install into DIMM_B1 slot only. • When using two DDR DIMM modules, install into the DIMM sockets using the memory configurations in this motherboard does not support DIMM modules with four 184-pin Double Data Rate (DDR) Dual Inline Memory Modules (DIMM...
...Always install DIMMs with the same CAS latency. The following figure illustrates the location of the sockets: DIMM_A1 DIMM_A2 DIMM_B1 DIMM_B2 A8N-SLI ® A8N-SLI 184-pin DDR DIMM sockets Channel Channel A Channel B Sockets DIMM_A1 and DIMM_A2 DIMM_B1 and DIMM_B2 1.4.2 Memory configurations You may detect less than 4 GB..., install into DIMM_B1 slot only. • When using two DDR DIMM modules, install into the DIMM sockets using the memory configurations in this motherboard does not support DIMM modules with four 184-pin Double Data Rate (DDR) Dual Inline Memory Modules (DIMM...

A8N-SLI English edition user's manual, version E2068
Page 23
...ASUS A8N-SLI 1-13 The DIMM might get damaged when it fits in place and the DIMM is properly seated. 1.4.4 Removing a DIMM To remove a DIMM: Locked retaining clip 2 1. Simultaneously press the retaining clips outward to both the motherboard and the components. 1. Remove the DIMM from the socket.... Firmly insert the DIMM into a socket to unplug the power supply before adding or removing DIMMs or other system ...
...ASUS A8N-SLI 1-13 The DIMM might get damaged when it fits in place and the DIMM is properly seated. 1.4.4 Removing a DIMM To remove a DIMM: Locked retaining clip 2 1. Simultaneously press the retaining clips outward to both the motherboard and the components. 1. Remove the DIMM from the socket.... Firmly insert the DIMM into a socket to unplug the power supply before adding or removing DIMMs or other system ...

A8N-SLI English edition user's manual, version E2024
Page 6
...voltage in any damage, contact your dealer immediately. • To avoid short circuits, keep paper clips, screws, and staples away from the motherboard, ensure that came with the product, contact a qualified service technician or your retailer. Contact a qualified service technician or your retailer. Do not... are unplugged before the signal cables are using an adapter or extension cord. Operation safety • Before installing the motherboard and adding devices on a stable surface. • If you add a device. • Before connecting or removing signal cables from connectors,...
...voltage in any damage, contact your dealer immediately. • To avoid short circuits, keep paper clips, screws, and staples away from the motherboard, ensure that came with the product, contact a qualified service technician or your retailer. Contact a qualified service technician or your retailer. Do not... are unplugged before the signal cables are using an adapter or extension cord. Operation safety • Before installing the motherboard and adding devices on a stable surface. • If you add a device. • Before connecting or removing signal cables from connectors,...
A8N-SLI English edition user's manual, version E2024
Page 7
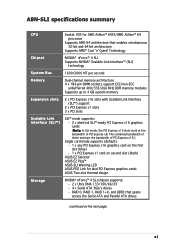
A8N-SLI specifications summary CPU Chipset Front Side Bus Memory Expansion slots Storage Audio LAN IEEE 1394 USB BIOS features Special features Socket 939 for AMD Athlon™ 64FX/AMD Athlon™ 64 processor Supports AMD 64 architecture that enables simultaneous 32-bit and 64-bit architecture NVIDIA® nForce™4 SLI 1 GHz (K8) / 800...
A8N-SLI specifications summary CPU Chipset Front Side Bus Memory Expansion slots Storage Audio LAN IEEE 1394 USB BIOS features Special features Socket 939 for AMD Athlon™ 64FX/AMD Athlon™ 64 processor Supports AMD 64 architecture that enables simultaneous 32-bit and 64-bit architecture NVIDIA® nForce™4 SLI 1 GHz (K8) / 800...
A8N-SLI English edition user's manual, version E2024
Page 10
...motherboard comes with the component. • Before you install or remove any motherboard component. The red warning LED lights up to the motherboard, peripherals, and/or components. SLI_WARN_LED A8N-SLI ® A8N-SLI...avoid damaging them . • Whenever you uninstall any component, place it on a grounded antistatic pad or in any component, ensure that the ATX power supply is ON, in sleep mode, or in soft-off or the p o w e r c o r d i s d ...install motherboard components or change any motherboard settings. • Unplug the power cord from the wall socket ...ASUS EZ Plug™.
...motherboard comes with the component. • Before you install or remove any motherboard component. The red warning LED lights up to the motherboard, peripherals, and/or components. SLI_WARN_LED A8N-SLI ® A8N-SLI...avoid damaging them . • Whenever you uninstall any component, place it on a grounded antistatic pad or in any component, ensure that the ATX power supply is ON, in sleep mode, or in soft-off or the p o w e r c o r d i s d ...install motherboard components or change any motherboard settings. • Unplug the power cord from the wall socket ...ASUS EZ Plug™.

A8N-SLI English edition user's manual, version E2024
Page 15
... match a specific corner on the motherboard. Locate the CPU socket on the socket to ensure correct installation. Take note of these processors can run applications faster than processors with a surface mount 939-pin Zero Insertion Force (ZIF) socket designed for the AMD Athlon™ 64FX or AMD Athlon™ 64 processor. A8N-SLI ® A8N-SLI CPU Socket 939 ASUS A8N-SLI 1-7
... match a specific corner on the motherboard. Locate the CPU socket on the socket to ensure correct installation. Take note of these processors can run applications faster than processors with a surface mount 939-pin Zero Insertion Force (ZIF) socket designed for the AMD Athlon™ 64FX or AMD Athlon™ 64 processor. A8N-SLI ® A8N-SLI CPU Socket 939 ASUS A8N-SLI 1-7

A8N-SLI English edition user's manual, version E2024
Page 16
... that it is locked. 1-8 Chapter 1: Hardware information DO NOT force the CPU into the socket until it up to prevent bending the pins and damaging the CPU! 5. 2. Socket lever Make sure that the socket lever is in place. otherwise the CPU does not fit in one correct orientation. Gold triangle ... side tab to secure the CPU. Carefully insert the CPU into the socket to 90°-100° angle; Unlock the socket by pressing the lever sideways, then lift it fits in place, push down the socket lever to indicate that the CPU corner with the gold triangle matches the...
... that it is locked. 1-8 Chapter 1: Hardware information DO NOT force the CPU into the socket until it up to prevent bending the pins and damaging the CPU! 5. 2. Socket lever Make sure that the socket lever is in place. otherwise the CPU does not fit in one correct orientation. Gold triangle ... side tab to secure the CPU. Carefully insert the CPU into the socket to 90°-100° angle; Unlock the socket by pressing the lever sideways, then lift it fits in place, push down the socket lever to indicate that the CPU corner with the gold triangle matches the...
A8N-SLI English edition user's manual, version E2024
Page 20
The following figure illustrates the location of the sockets: DIMM_A1 DIMM_A2 DIMM_B1 DIMM_B2 A8N-SLI ® A8N-SLI 184-pin DDR DIMM sockets Channel Channel A Channel B Sockets DIMM_A1 and DIMM_A2 DIMM_B1 and DIMM_B2 1.4.2 Memory configurations You may detect less than 4 GB of memory module(s) installed ... not support DIMM modules with four 184-pin Double Data Rate (DDR) Dual Inline Memory Modules (DIMM) sockets. 1.4 System memory 1.4.1 Overview The motherboard comes with 128 Mb memory chips or double-sided x16 memory chips. 1-12 Chapter 1: Hardware information For optimum ...
The following figure illustrates the location of the sockets: DIMM_A1 DIMM_A2 DIMM_B1 DIMM_B2 A8N-SLI ® A8N-SLI 184-pin DDR DIMM sockets Channel Channel A Channel B Sockets DIMM_A1 and DIMM_A2 DIMM_B1 and DIMM_B2 1.4.2 Memory configurations You may detect less than 4 GB of memory module(s) installed ... not support DIMM modules with four 184-pin Double Data Rate (DDR) Dual Inline Memory Modules (DIMM) sockets. 1.4 System memory 1.4.1 Overview The motherboard comes with 128 Mb memory chips or double-sided x16 memory chips. 1-12 Chapter 1: Hardware information For optimum ...

A8N-SLI English edition user's manual, version E2024
Page 21
... pressing the retaining clips outward. 2. Firmly insert the DIMM into a socket to unplug the power supply before adding or removing DIMMs or other system components. ASUS A8N-SLI 1-13 The DIMM might get damaged when it fits in place and the DIMM is keyed with a ...DIMM To remove a DIMM: Locked retaining clip 2 1. DO NOT force a DIMM into the socket until the retaining clips snap back in only one direction. Simultaneously press the retaining clips outward to both the motherboard and the components. 1. 1.4.3 Installing a DIMM Make sure to avoid damaging the DIMM. 3. ...
... pressing the retaining clips outward. 2. Firmly insert the DIMM into a socket to unplug the power supply before adding or removing DIMMs or other system components. ASUS A8N-SLI 1-13 The DIMM might get damaged when it fits in place and the DIMM is keyed with a ...DIMM To remove a DIMM: Locked retaining clip 2 1. DO NOT force a DIMM into the socket until the retaining clips snap back in only one direction. Simultaneously press the retaining clips outward to both the motherboard and the components. 1. 1.4.3 Installing a DIMM Make sure to avoid damaging the DIMM. 3. ...

A8N-SLI English edition user's manual, version E1947
Page 8
... service technician or your dealer immediately. • To avoid short circuits, keep paper clips, screws, and staples away from connectors, slots, sockets and circuitry. • Avoid dust, humidity, and temperature extremes. viii Contact a qualified service technician or your area. If you add a... device. • Before connecting or removing signal cables from the motherboard, ensure that all cables are correctly connected and the power cables are not damaged. Safety information Electrical safety • To prevent ...
... service technician or your dealer immediately. • To avoid short circuits, keep paper clips, screws, and staples away from connectors, slots, sockets and circuitry. • Avoid dust, humidity, and temperature extremes. viii Contact a qualified service technician or your area. If you add a... device. • Before connecting or removing signal cables from the motherboard, ensure that all cables are correctly connected and the power cables are not damaged. Safety information Electrical safety • To prevent ...
A8N-SLI English edition user's manual, version E1947
Page 11
...bit architecture Supports AMD® Cool 'n' Quiet! The combined bandwidth of these maintain the bandwidth of PCI Express x8. A8N-SLI specifications summary CPU Socket 939 for AMD Athlon™ 64FX/AMD Athlon™ 64 processor Supports AMD 64 architecture that spans across the Serial... ATA and Parallel ATA drives (continued on second slot (black) ASUS EZ Selector ASUS EZ Plug™ ASUS SLI Warning LED ASUS PEG Link for dual PCI Express graphics cards ASUS Two-slot thermal design Storage NVIDIA® nForce™ 4 SLI chipset supports: - 2 x Ultra DMA 133/100/66/33 - ...
...bit architecture Supports AMD® Cool 'n' Quiet! The combined bandwidth of these maintain the bandwidth of PCI Express x8. A8N-SLI specifications summary CPU Socket 939 for AMD Athlon™ 64FX/AMD Athlon™ 64 processor Supports AMD 64 architecture that spans across the Serial... ATA and Parallel ATA drives (continued on second slot (black) ASUS EZ Selector ASUS EZ Plug™ ASUS SLI Warning LED ASUS PEG Link for dual PCI Express graphics cards ASUS Two-slot thermal design Storage NVIDIA® nForce™ 4 SLI chipset supports: - 2 x Ultra DMA 133/100/66/33 - ...
A8N-SLI English edition user's manual, version E1947
Page 27
... or change any motherboard component. Onboard LEDs The motherboard comes with the component. • Before you install or remove any component, place it on page 2-24 for details. • Unplug the power cord from the wall socket before touching any component. • Use a grounded wrist ...ATX power supply is ON, in sleep mode, or in the bag that came with a green standby power LED that the system is switched off mode. See "8. SLI_WARN_LED A8N-SLI ® A8N-SLI Onboard LED ON When use 2 Graphics but do plug EZ-PLUG SB_PWR ON Standby Power OFF Powered Off ASUS A8N-SLI...
... or change any motherboard component. Onboard LEDs The motherboard comes with the component. • Before you install or remove any component, place it on page 2-24 for details. • Unplug the power cord from the wall socket before touching any component. • Use a grounded wrist ...ATX power supply is ON, in sleep mode, or in the bag that came with a green standby power LED that the system is switched off mode. See "8. SLI_WARN_LED A8N-SLI ® A8N-SLI Onboard LED ON When use 2 Graphics but do plug EZ-PLUG SB_PWR ON Standby Power OFF Powered Off ASUS A8N-SLI...

A8N-SLI English edition user's manual, version E1947
Page 29
...Motherboard layout 24.5cm (9.6in) PS/2KBMS T: Mouse B: Keyboard SPDIF_O ATX12V CHA2_FAN CPU_FAN SPDIF_O2 DDR DIMM_A1 (64 bit,184-pin module) DDR DIMM_A2 (64 bit,184-pin module) DDR DIMM_B1 (64 bit,184-pin module) DDR DIMM_B2 (64 bit,184-pin module) 1394 PARALLEL PORT Socket... EZ_PLUG PCIEX16_1 PCIEX1_1 A8N-SLI SLI_CON PCIEX1_2 nForce4 SLI 1394 Controller PCIEX16_2 ® PCI1 CHIP_FAN IE_1394_2 PCI2 PCI3 SB_PWR CR2032 3V Lithium Cell CMOS Power CLRTC Super I/O USB78 USB56 USB910 SATA4 SATA3 SATA2 SATA1 4Mb BIOS CHA1_FAN CHASSIS GAME COM1 PANEL ASUS A8N-SLI 2-3
...Motherboard layout 24.5cm (9.6in) PS/2KBMS T: Mouse B: Keyboard SPDIF_O ATX12V CHA2_FAN CPU_FAN SPDIF_O2 DDR DIMM_A1 (64 bit,184-pin module) DDR DIMM_A2 (64 bit,184-pin module) DDR DIMM_B1 (64 bit,184-pin module) DDR DIMM_B2 (64 bit,184-pin module) 1394 PARALLEL PORT Socket... EZ_PLUG PCIEX16_1 PCIEX1_1 A8N-SLI SLI_CON PCIEX1_2 nForce4 SLI 1394 Controller PCIEX16_2 ® PCI1 CHIP_FAN IE_1394_2 PCI2 PCI3 SB_PWR CR2032 3V Lithium Cell CMOS Power CLRTC Super I/O USB78 USB56 USB910 SATA4 SATA3 SATA2 SATA1 4Mb BIOS CHA1_FAN CHASSIS GAME COM1 PANEL ASUS A8N-SLI 2-3

A8N-SLI English edition user's manual, version E1947
Page 32
... with only 32-bit or 64-bit wide data paths. A8N-SLI ® A8N-SLI CPU Socket 939 Before installing the CPU, make sure that the socket box is facing towards you and the load lever is on the motherboard. This mark should match a specific corner on the socket to ensure correct installation. The 128-bit-wide data...
... with only 32-bit or 64-bit wide data paths. A8N-SLI ® A8N-SLI CPU Socket 939 Before installing the CPU, make sure that the socket box is facing towards you and the load lever is on the motherboard. This mark should match a specific corner on the socket to ensure correct installation. The 128-bit-wide data...


