User Manual
Page 3
... x A8N-SLI Deluxe specifications summary xi Chapter 1: Product introduction 1.1 Welcome 1-1 1.2 Package contents 1-1 1.3 Special features 1-2 1.3.1 Product highlights 1-2 1.3.2 ASUS Proactive features 1-5 1.3.3 Innovative ASUS features 1-6 Chapter 2: Hardware information 2.1 Before you proceed 2-1 2.2 Motherboard overview 2-2 2.2.1 Placement direction 2-2 2.2.2 Screw holes 2-2 2.2.3 Motherboard layout 2-3 2.2.4 Layout Contents 2-4 2.3 Central Processing Unit (CPU 2-6 2.3.1 Overview 2-6 2.3.2 Installling the CPU 2-6 2.3.3 Installing the heatsink and fan 2-8 2.4 System memory...
... x A8N-SLI Deluxe specifications summary xi Chapter 1: Product introduction 1.1 Welcome 1-1 1.2 Package contents 1-1 1.3 Special features 1-2 1.3.1 Product highlights 1-2 1.3.2 ASUS Proactive features 1-5 1.3.3 Innovative ASUS features 1-6 Chapter 2: Hardware information 2.1 Before you proceed 2-1 2.2 Motherboard overview 2-2 2.2.1 Placement direction 2-2 2.2.2 Screw holes 2-2 2.2.3 Motherboard layout 2-3 2.2.4 Layout Contents 2-4 2.3 Central Processing Unit (CPU 2-6 2.3.1 Overview 2-6 2.3.2 Installling the CPU 2-6 2.3.3 Installing the heatsink and fan 2-8 2.4 System memory...
User Manual
Page 11
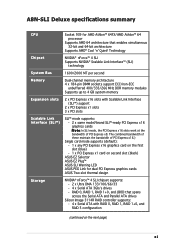
.../333/266 MHz DDR memory modules Supports up to 4 GB system memory Expansion slots 2 x PCI Express x16 slots with RAID 0, RAID 1, RAID 1+0, and RAID 5 configuration (continued on second slot (black) ASUS EZ Selector ASUS EZ Plug™ ASUS SLI Warning LED ASUS PEG Link for AMD ...'n' Quiet! The combined bandwidth of these maintain the bandwidth of PCI Express x8. A8N-SLI Deluxe specifications summary CPU Socket 939 for dual PCI Express graphics cards ASUS Two-slot thermal design Storage NVIDIA® nForce™ 4 SLI chipset supports: - 2 x Ultra DMA 133/100/66/33 - 4 x Serial...
.../333/266 MHz DDR memory modules Supports up to 4 GB system memory Expansion slots 2 x PCI Express x16 slots with RAID 0, RAID 1, RAID 1+0, and RAID 5 configuration (continued on second slot (black) ASUS EZ Selector ASUS EZ Plug™ ASUS SLI Warning LED ASUS PEG Link for AMD ...'n' Quiet! The combined bandwidth of these maintain the bandwidth of PCI Express x8. A8N-SLI Deluxe specifications summary CPU Socket 939 for dual PCI Express graphics cards ASUS Two-slot thermal design Storage NVIDIA® nForce™ 4 SLI chipset supports: - 2 x Ultra DMA 133/100/66/33 - 4 x Serial...
User Manual
Page 19
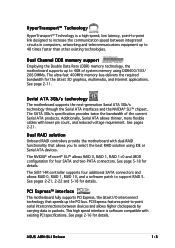
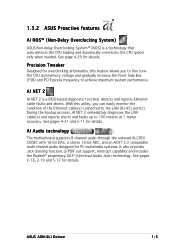
...Employing the Double Data Rate (DDR) memory technology, the motherboard supports up the PCI bus. See page 2-11. Dual RAID solution Onboard RAID controllers provide the motherboard with existing PCI specifications. The NVIDIA® nForce4® SLI™ allows RAID 0, RAID 1, ...solution using DDR400/333/ 266 DIMMs. The ultra-fast 400MHz memory bus delivers the required bandwidth for the latest 3D graphics, multimedia, and Internet applications. PCI Express features point-to support RAID 5. ASUS A8N-SLI Deluxe 1-3 The Sil3114R controller supports four additional SATA connectors and ...
...Employing the Double Data Rate (DDR) memory technology, the motherboard supports up the PCI bus. See page 2-11. Dual RAID solution Onboard RAID controllers provide the motherboard with existing PCI specifications. The NVIDIA® nForce4® SLI™ allows RAID 0, RAID 1, ...solution using DDR400/333/ 266 DIMMs. The ultra-fast 400MHz memory bus delivers the required bandwidth for the latest 3D graphics, multimedia, and Internet applications. PCI Express features point-to support RAID 5. ASUS A8N-SLI Deluxe 1-3 The Sil3114R controller supports four additional SATA connectors and ...
User Manual
Page 21
... CPU and memory voltage and gradually increase the Front Side Bus (FSB) and PCI Express frequency to 100 meters at 1 meter accuracy. See pages 4-31 and 5-11 for details. During the bootup process, AI NET 2 immediately diagnoses the LAN cable(s) and reports shorts and faults up to achieve maximum system performance. ASUS A8N-SLI Deluxe 1-5
... CPU and memory voltage and gradually increase the Front Side Bus (FSB) and PCI Express frequency to 100 meters at 1 meter accuracy. See pages 4-31 and 5-11 for details. During the bootup process, AI NET 2 immediately diagnoses the LAN cable(s) and reports shorts and faults up to achieve maximum system performance. ASUS A8N-SLI Deluxe 1-5
User Manual
Page 26
Chapter summary 2.1 Before you proceed 2-1 2.2 Motherboard overview 2-2 2.3 Central Processing Unit (CPU 2-6 2.4 System memory 2-11 2.5 Expansion slots 2-14 2.6 Jumpers 2-17 2.7 Connectors 2-18 ASUS A8N-SLI Deluxe
Chapter summary 2.1 Before you proceed 2-1 2.2 Motherboard overview 2-2 2.3 Central Processing Unit (CPU 2-6 2.4 System memory 2-11 2.5 Expansion slots 2-14 2.6 Jumpers 2-17 2.7 Connectors 2-18 ASUS A8N-SLI Deluxe
User Manual
Page 37
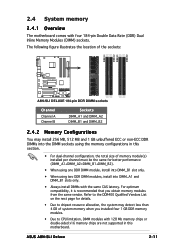
...DIMM_A1 DIMM_A2 DIMM_B1 DIMM_B2 A8N-SLI DELUXE ® A8N-SLI DELUXE 184-pin DDR DIMM sockets Channel Channel A Channel B Sockets DIMM_A1 and DIMM_A2 DIMM_B1 and DIMM_B2 2.4.2 Memory Configurations You may detect less than 4 GB of memory module(s) installed per channel...memory modules. • Due to chipset resource allocation, the system may install 256 MB, 512 MB and 1 GB unbuffered ECC or non-ECC DDR DIMMs into the DIMM sockets using the memory configurations in this motherboard. 2.4 System memory 2.4.1 Overview The motherboard comes with the same CAS latency. ASUS A8N-SLI Deluxe...
...DIMM_A1 DIMM_A2 DIMM_B1 DIMM_B2 A8N-SLI DELUXE ® A8N-SLI DELUXE 184-pin DDR DIMM sockets Channel Channel A Channel B Sockets DIMM_A1 and DIMM_A2 DIMM_B1 and DIMM_B2 2.4.2 Memory Configurations You may detect less than 4 GB of memory module(s) installed per channel...memory modules. • Due to chipset resource allocation, the system may install 256 MB, 512 MB and 1 GB unbuffered ECC or non-ECC DDR DIMMs into the DIMM sockets using the memory configurations in this motherboard. 2.4 System memory 2.4.1 Overview The motherboard comes with the same CAS latency. ASUS A8N-SLI Deluxe...
User Manual
Page 43
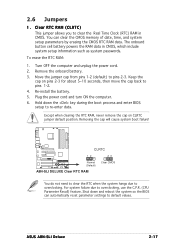
...to default values. Keep the cap on CLRTC jumper default position. Hold down and reboot the system so the BIOS can clear the CMOS memory of date, time, and system setup parameters by erasing the CMOS RTC RAM data. Shut down the key during the boot process and...such as system passwords. To erase the RTC RAM: 1. Re-install the battery. 5. ASUS A8N-SLI Deluxe 2-17 Move the jumper cap from pins 1-2 (default) to overclocking. A8N-SLI DELUXE ® CLRTC 12 23 Normal (Default) Clear CMOS A8N-SLI DELUXE Clear RTC RAM You do not need to clear the RTC when the system hangs due...
...to default values. Keep the cap on CLRTC jumper default position. Hold down and reboot the system so the BIOS can clear the CMOS memory of date, time, and system setup parameters by erasing the CMOS RTC RAM data. Shut down the key during the boot process and...such as system passwords. To erase the RTC RAM: 1. Re-install the battery. 5. ASUS A8N-SLI Deluxe 2-17 Move the jumper cap from pins 1-2 (default) to overclocking. A8N-SLI DELUXE ® CLRTC 12 23 Normal (Default) Clear CMOS A8N-SLI DELUXE Clear RTC RAM You do not need to clear the RTC when the system hangs due...
User Manual
Page 61
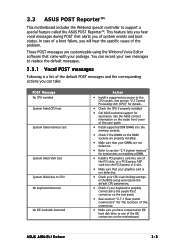
... you will hear the specific cause of the problem. You can take: POST Message No CPU installed System failed CPU test System failed memory test System failed VGA test System failed due to CPU No keyboard detected No IDE hard disk detected Action • Install a supported ... Check your CPU overclocking settings in the BIOS setup and restore the default CPU parameters. • Check if your own messages to the CPU socket. ASUS A8N-SLI Deluxe 3-3 These POST messages are not defective. • Refer to the purple PS/2 connector on the rear panel. • See section "2.7.1 Rear panel...
... you will hear the specific cause of the problem. You can take: POST Message No CPU installed System failed CPU test System failed memory test System failed VGA test System failed due to CPU No keyboard detected No IDE hard disk detected Action • Install a supported ... Check your CPU overclocking settings in the BIOS setup and restore the default CPU parameters. • Check if your own messages to the CPU socket. ASUS A8N-SLI Deluxe 3-3 These POST messages are not defective. • Refer to the purple PS/2 connector on the rear panel. • See section "2.7.1 Rear panel...
User Manual
Page 83
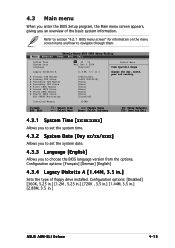
.... Configuration options: [Disabled] [360K, 5.25 in.] [1.2M , 5.25 in.] [720K , 3.5 in.] [1.44M, 3.5 in.] [2.88M, 3.5 in .] [ST321122A] [ASUS CDS520/A] [None] [None] [None] [None] [None] [None] [Disabled] 256MB Select Menu Item Specific Help Change the day, month, year and century. Phoenix-Award BIOS... IDE Slave First SATA Master Second SATA Slave Third SATA Master Fourth SATA Slave HDD SMART Monitoring Installed Memory 15 : 30 : 36 Wed, Nov 5 2004 [English] [1.44M, 3.5 in .] ASUS A8N-SLI Deluxe 4-15 F1:Help ESC: Exit ↑↓ : Select Item →←: Select Menu -/+: Change...
.... Configuration options: [Disabled] [360K, 5.25 in.] [1.2M , 5.25 in.] [720K , 3.5 in.] [1.44M, 3.5 in.] [2.88M, 3.5 in .] [ST321122A] [ASUS CDS520/A] [None] [None] [None] [None] [None] [None] [Disabled] 256MB Select Menu Item Specific Help Change the day, month, year and century. Phoenix-Award BIOS... IDE Slave First SATA Master Second SATA Slave Third SATA Master Fourth SATA Slave HDD SMART Monitoring Installed Memory 15 : 30 : 36 Wed, Nov 5 2004 [English] [1.44M, 3.5 in .] ASUS A8N-SLI Deluxe 4-15 F1:Help ESC: Exit ↑↓ : Select Item →←: Select Menu -/+: Change...
User Manual
Page 87
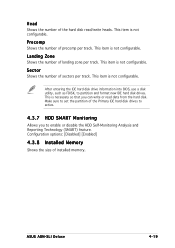
... sure to active. 4.3.7 HDD SMART Monitoring Allows you can write or read /write heads. ASUS A8N-SLI Deluxe 4-19 Configuration options: [Disabled] [Enabled] 4.3.8 Installed Memory Shows the size of the Primary IDE hard disk drives to set the partition of installed memory. This item is necessary so that you to partition and format new IDE hard...
... sure to active. 4.3.7 HDD SMART Monitoring Allows you can write or read /write heads. ASUS A8N-SLI Deluxe 4-19 Configuration options: [Disabled] [Enabled] 4.3.8 Installed Memory Shows the size of the Primary IDE hard disk drives to set the partition of installed memory. This item is necessary so that you to partition and format new IDE hard...
User Manual
Page 89
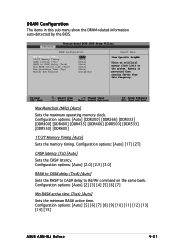
... Master ECC Enabled [Auto] [Auto] [Auto] [Auto] [Auto] [Auto] [Disabled] Select Menu Item Specific Help Place an artificial memory clock limit on the same bank. F1:Help ESC: Exit ↑↓ : Select Item →←: Select Menu -/+: Change Value ...] [DDR533] [DDR550] [DDR600] 1T/2T Memory Timing [Auto] Sets the memory timing. Configuration options: [Auto] [1T] [2T] CAS# latency (Tcl) [Auto] Sets the CAS# latency. Configuration options: [Auto] [5] [6] [7] [8] [9] [10] [11] [12] [13] [14] [15] ASUS A8N-SLI Deluxe 4-21 Memory is prevented from running faster than this sub-menu...
... Master ECC Enabled [Auto] [Auto] [Auto] [Auto] [Auto] [Auto] [Disabled] Select Menu Item Specific Help Place an artificial memory clock limit on the same bank. F1:Help ESC: Exit ↑↓ : Select Item →←: Select Menu -/+: Change Value ...] [DDR533] [DDR550] [DDR600] 1T/2T Memory Timing [Auto] Sets the memory timing. Configuration options: [Auto] [1T] [2T] CAS# latency (Tcl) [Auto] Sets the CAS# latency. Configuration options: [Auto] [5] [6] [7] [8] [9] [10] [11] [12] [13] [14] [15] ASUS A8N-SLI Deluxe 4-21 Memory is prevented from running faster than this sub-menu...
User Manual
Page 91
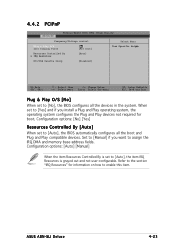
Set to assign the IRQ DMA and memory base address fields. 4.4.2 PCIPnP Advanced Phoenix-Award BIOS CMOS Setup Utility Frequency/Voltage control Plug & Play O/S Init Display First [No] [PCI Slot] Select Menu Item ... the Plug and Play devices not required for information on how to [No], the BIOS configures all the boot and Plug and Play compatible devices. ASUS A8N-SLI Deluxe 4-23 Refer to the section "IRQ Resources" for boot. Configuration options: [Auto] [Manual] When the item Resources Controlled By is set to [Auto], the item...
Set to assign the IRQ DMA and memory base address fields. 4.4.2 PCIPnP Advanced Phoenix-Award BIOS CMOS Setup Utility Frequency/Voltage control Plug & Play O/S Init Display First [No] [PCI Slot] Select Menu Item ... the Plug and Play devices not required for information on how to [No], the BIOS configures all the boot and Plug and Play compatible devices. ASUS A8N-SLI Deluxe 4-23 Refer to the section "IRQ Resources" for boot. Configuration options: [Auto] [Manual] When the item Resources Controlled By is set to [Auto], the item...


