User Manual
Page 3
... this guide is organized ix Where to find more information ix Conventions used in this guide x Typography x A8N-SLI Deluxe specifications summary xi Chapter 1: Product introduction 1.1 Welcome 1-1 1.2 Package contents 1-1 1.3 Special features 1-2 1.3.1 Product highlights 1-2 1.3.2 ASUS Proactive features 1-5 1.3.3 Innovative ASUS features 1-6 Chapter 2: Hardware information 2.1 Before you proceed 2-1 2.2 Motherboard overview 2-2 2.2.1 Placement direction 2-2 2.2.2 Screw holes 2-2 2.2.3 Motherboard layout 2-3 2.2.4 Layout Contents...
... this guide is organized ix Where to find more information ix Conventions used in this guide x Typography x A8N-SLI Deluxe specifications summary xi Chapter 1: Product introduction 1.1 Welcome 1-1 1.2 Package contents 1-1 1.3 Special features 1-2 1.3.1 Product highlights 1-2 1.3.2 ASUS Proactive features 1-5 1.3.3 Innovative ASUS features 1-6 Chapter 2: Hardware information 2.1 Before you proceed 2-1 2.2 Motherboard overview 2-2 2.2.1 Placement direction 2-2 2.2.2 Screw holes 2-2 2.2.3 Motherboard layout 2-3 2.2.4 Layout Contents...
User Manual
Page 11
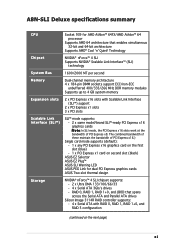
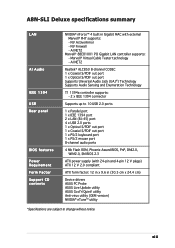
...PCI Express x16 slots with RAID 0, RAID 1, RAID 1+0, and RAID 5 configuration (continued on second slot (black) ASUS EZ Selector ASUS EZ Plug™ ASUS SLI Warning LED ASUS PEG Link for AMD Athlon™ 64FX/AMD Athlon™ 64 processor Supports AMD 64 architecture that enables simultaneous 32...first slot (blue) - 1 x PCI Express x1 card on the next page) xi A8N-SLI Deluxe specifications summary CPU Socket 939 for dual PCI Express graphics cards ASUS Two-slot thermal design Storage NVIDIA® nForce™ 4 SLI chipset supports: - 2 x Ultra DMA 133/100/66/33 - 4 x Serial ATA...
...PCI Express x16 slots with RAID 0, RAID 1, RAID 1+0, and RAID 5 configuration (continued on second slot (black) ASUS EZ Selector ASUS EZ Plug™ ASUS SLI Warning LED ASUS PEG Link for AMD Athlon™ 64FX/AMD Athlon™ 64 processor Supports AMD 64 architecture that enables simultaneous 32...first slot (blue) - 1 x PCI Express x1 card on the next page) xi A8N-SLI Deluxe specifications summary CPU Socket 939 for dual PCI Express graphics cards ASUS Two-slot thermal design Storage NVIDIA® nForce™ 4 SLI chipset supports: - 2 x Ultra DMA 133/100/66/33 - 4 x Serial ATA...
User Manual
Page 12
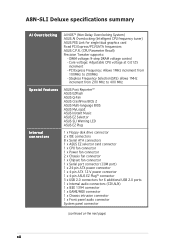
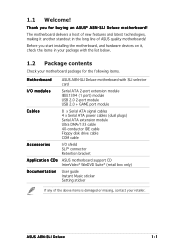
A8N-SLI Deluxe specifications summary AI Overclocking Special features Internal connectors AI NOS™ (Non-Delay Overclocking System) ASUS AI Overclocking (Intelligent CPU frequency tuner) ASUS PEG Link for 6 additional USB 2.0 ports 1 x Internal audio connectors (CD\AUX) 1 x IEEE 1394 connector 1 x GAME/MIDI connector 1 x Chassis intrusion connector 1 x Front panel audio connector System ...
A8N-SLI Deluxe specifications summary AI Overclocking Special features Internal connectors AI NOS™ (Non-Delay Overclocking System) ASUS AI Overclocking (Intelligent CPU frequency tuner) ASUS PEG Link for 6 additional USB 2.0 ports 1 x Internal audio connectors (CD\AUX) 1 x IEEE 1394 connector 1 x GAME/MIDI connector 1 x Chassis intrusion connector 1 x Front panel audio connector System ...
User Manual
Page 13
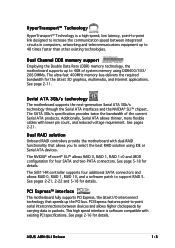
...Phoenix-Award BIOS, PnP, DMI2.0, WfM2.0, SM BIOS 2.3 ATX power supply (with external Marvell® PHY supports: - NV ActiveArmor - A8N-SLI Deluxe specifications summary LAN AI Audio IEEE 1394 USB Rear panel BIOS features Power Requirement Form Factor Support CD contents NVIDIA® nForce™ 4 ...12 V plugs) ATX 12 V 2.0 compliant ATX form factor: 12 in x 9.6 in (30.5 cm x 24.4 cm) Device drivers ASUS PC Probe ASUS Live Update utility ASUS Cool'n'Quiet! AI NET2 Realtek® ALC850 8-channel CODEC 1 x Coaxial S/PDIF out port 1 x Optical S/PDIF out port Supports Universal ...
...Phoenix-Award BIOS, PnP, DMI2.0, WfM2.0, SM BIOS 2.3 ATX power supply (with external Marvell® PHY supports: - NV ActiveArmor - A8N-SLI Deluxe specifications summary LAN AI Audio IEEE 1394 USB Rear panel BIOS features Power Requirement Form Factor Support CD contents NVIDIA® nForce™ 4 ...12 V plugs) ATX 12 V 2.0 compliant ATX form factor: 12 in x 9.6 in (30.5 cm x 24.4 cm) Device drivers ASUS PC Probe ASUS Live Update utility ASUS Cool'n'Quiet! AI NET2 Realtek® ALC850 8-channel CODEC 1 x Coaxial S/PDIF out port 1 x Optical S/PDIF out port Supports Universal ...
User Manual
Page 17
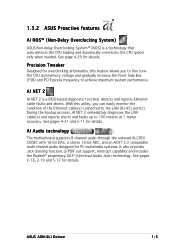
... technologies, making it , check the items in the long line of the above items is damaged or missing, contact your retailer. ASUS A8N-SLI Deluxe 1-1 Before you for the following items. Motherboard ASUS A8N-SLI Deluxe motherboard with SLI selector card I/O modules Serial ATA 2-port extension module IEEE1394 (1 port) module USB 2.0 2-port module USB 2.0 + GAME port module Cables 8 x Serial...
... technologies, making it , check the items in the long line of the above items is damaged or missing, contact your retailer. ASUS A8N-SLI Deluxe 1-1 Before you for the following items. Motherboard ASUS A8N-SLI Deluxe motherboard with SLI selector card I/O modules Serial ATA 2-port extension module IEEE1394 (1 port) module USB 2.0 2-port module USB 2.0 + GAME port module Cables 8 x Serial...
User Manual
Page 19
...pages 2-21, 2-22 and 5-18 for details. PCI Express features point-to-point serial interconnections between integrated circuits in packets. ASUS A8N-SLI Deluxe 1-3 PCI Express™ interface The motherboard fully supports PCI Express, the latest I/O interconnect technology that allows you to support ...supports the next-generation Serial ATA 3Gb/s technology through the Serial ATA interfaces and the NVIDIA® SLI™ chipset. The NVIDIA® nForce4® SLI™ allows RAID 0, RAID 1, RAID 1+0 and JBOD configuration for details. Dual RAID solution Onboard...
...pages 2-21, 2-22 and 5-18 for details. PCI Express features point-to-point serial interconnections between integrated circuits in packets. ASUS A8N-SLI Deluxe 1-3 PCI Express™ interface The motherboard fully supports PCI Express, the latest I/O interconnect technology that allows you to support ...supports the next-generation Serial ATA 3Gb/s technology through the Serial ATA interfaces and the NVIDIA® SLI™ chipset. The NVIDIA® nForce4® SLI™ allows RAID 0, RAID 1, RAID 1+0 and JBOD configuration for details. Dual RAID solution Onboard...
User Manual
Page 21
See page 4-29 for details. ASUS A8N-SLI Deluxe 1-5 Precision Tweaker Designed for overclocking aficionados, this utility, you to fine tune the CPU and memory voltage and gradually increase the Front Side Bus (FSB) ... ALC850 CODEC with 16-bit DAC, a stereo 16-bit ADC, and an AC97 2.3 compatible multi-channel audio designed for details. 1.3.2 ASUS Proactive features AI NOS™ (Non-Delay Overclocking System) ASUS Non-delay Overclocking System™ (NOS) is a BIOS-based diagnostic tool that auto-detects the CPU loading and dynamically overclocks the...
See page 4-29 for details. ASUS A8N-SLI Deluxe 1-5 Precision Tweaker Designed for overclocking aficionados, this utility, you to fine tune the CPU and memory voltage and gradually increase the Front Side Bus (FSB) ... ALC850 CODEC with 16-bit DAC, a stereo 16-bit ADC, and an AC97 2.3 compatible multi-channel audio designed for details. 1.3.2 ASUS Proactive features AI NOS™ (Non-Delay Overclocking System) ASUS Non-delay Overclocking System™ (NOS) is a BIOS-based diagnostic tool that auto-detects the CPU loading and dynamically overclocks the...
User Manual
Page 23
... you to playback audio files even without booting the system to Windows™. ASUS Instant Music This unique feature allows you to configure easier and faster. ASUS A8N-SLI Deluxe 1-7 See pages 4-34. ASUS Multi-language BIOS The multi-language BIOS allows you to select the language of... your system with customizable boot logos. See page 4-15 for details. ASUS MyLogo2™ This new feature present in...
... you to playback audio files even without booting the system to Windows™. ASUS Instant Music This unique feature allows you to configure easier and faster. ASUS A8N-SLI Deluxe 1-7 See pages 4-34. ASUS Multi-language BIOS The multi-language BIOS allows you to select the language of... your system with customizable boot logos. See page 4-15 for details. ASUS MyLogo2™ This new feature present in...
User Manual
Page 26
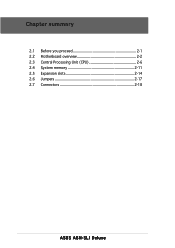
Chapter summary 2.1 Before you proceed 2-1 2.2 Motherboard overview 2-2 2.3 Central Processing Unit (CPU 2-6 2.4 System memory 2-11 2.5 Expansion slots 2-14 2.6 Jumpers 2-17 2.7 Connectors 2-18 ASUS A8N-SLI Deluxe
Chapter summary 2.1 Before you proceed 2-1 2.2 Motherboard overview 2-2 2.3 Central Processing Unit (CPU 2-6 2.4 System memory 2-11 2.5 Expansion slots 2-14 2.6 Jumpers 2-17 2.7 Connectors 2-18 ASUS A8N-SLI Deluxe

User Manual
Page 27
... 2 Graphics but do not plug EZ-PLUG OFF When use 2 Graphics but did not connect the ASUS EZ Plug™. Failure to do plug EZ-PLUG SB_PWR A8N-SLI DELUXE Onboard LED ON Standby Power OFF Powered Off ASUS A8N-SLI Deluxe 2-1 Onboard LEDs The motherboard comes with the component. • Before you install or remove any motherboard...
... 2 Graphics but do not plug EZ-PLUG OFF When use 2 Graphics but did not connect the ASUS EZ Plug™. Failure to do plug EZ-PLUG SB_PWR A8N-SLI DELUXE Onboard LED ON Standby Power OFF Powered Off ASUS A8N-SLI Deluxe 2-1 Onboard LEDs The motherboard comes with the component. • Before you install or remove any motherboard...
User Manual
Page 28
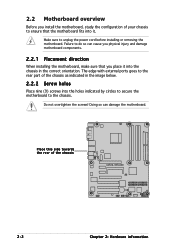
... Before you place it . Failure to unplug the power cord before installing or removing the motherboard. Place this side towards the rear of the chassis A8N-SLI DELUXE 2-2 Chapter 2: Hardware information Make sure to do so can damage the motherboard.
... Before you place it . Failure to unplug the power cord before installing or removing the motherboard. Place this side towards the rear of the chassis A8N-SLI DELUXE 2-2 Chapter 2: Hardware information Make sure to do so can damage the motherboard.
User Manual
Page 31
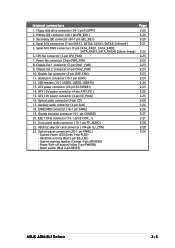
... RESET) Page 2-20 2-20 2-20 2-21 2-22 2-23 2-23 2-23 2-23 2-23 2-24 2-24 2-25 2-25 2-25 2-26 2-26 2-26 2-27 2-27 2-28 2-28 2-29 ASUS A8N-SLI Deluxe 2-5 System warning speaker (Orange 4-pin SPEAKER) - Auxiliary audio connector (4-pin AUX) 18. Front panel audio connector (10-1 pin FP_AUDIO) 22. System panel connectors (20-1 pin...
... RESET) Page 2-20 2-20 2-20 2-21 2-22 2-23 2-23 2-23 2-23 2-23 2-24 2-24 2-25 2-25 2-25 2-26 2-26 2-26 2-27 2-27 2-28 2-28 2-29 ASUS A8N-SLI Deluxe 2-5 System warning speaker (Orange 4-pin SPEAKER) - Auxiliary audio connector (4-pin AUX) 18. Front panel audio connector (10-1 pin FP_AUDIO) 22. System panel connectors (20-1 pin...
User Manual
Page 32
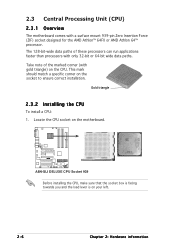
... a specific corner on the motherboard. Gold triangle 2.3.2 Installling the CPU To install a CPU: 1. Locate the CPU socket on the socket to ensure correct installation. A8N-SLI DELUXE ® A8N-SLI DELUXE CPU Socket 939 Before installing the CPU, make sure that the socket box is facing towards you and the load lever is on the CPU...
... a specific corner on the motherboard. Gold triangle 2.3.2 Installling the CPU To install a CPU: 1. Locate the CPU socket on the socket to ensure correct installation. A8N-SLI DELUXE ® A8N-SLI DELUXE CPU Socket 939 Before installing the CPU, make sure that the socket box is facing towards you and the load lever is on the CPU...
User Manual
Page 33
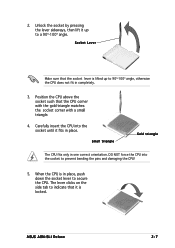
... with the gold triangle matches the socket corner with a small triangle. 4. Unlock the socket by pressing the lever sideways, then lift it fits in completely. 3. ASUS A8N-SLI Deluxe 2-7 Socket Lever Make sure that the socket lever is locked. Carefully insert the CPU into the socket to 90°-100° angle, otherwise the...
... with the gold triangle matches the socket corner with a small triangle. 4. Unlock the socket by pressing the lever sideways, then lift it fits in completely. 3. ASUS A8N-SLI Deluxe 2-7 Socket Lever Make sure that the socket lever is locked. Carefully insert the CPU into the socket to 90°-100° angle, otherwise the...
User Manual
Page 35
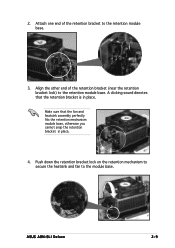
Make sure that the retention bracket is in place. 4. ASUS A8N-SLI Deluxe 2-9 A clicking sound denotes that the fan and heatsink assembly perfectly fits the retention mechanism module base, otherwise you cannot snap the retention bracket in place. Attach one end of the retention bracket (near the retention bracket lock) to the retention module base. 3. Align the other end of the retention bracket to the retention module base. Push down the retention bracket lock on the retention mechanism to secure the heatsink and fan to the module base. 2.
Make sure that the retention bracket is in place. 4. ASUS A8N-SLI Deluxe 2-9 A clicking sound denotes that the fan and heatsink assembly perfectly fits the retention mechanism module base, otherwise you cannot snap the retention bracket in place. Attach one end of the retention bracket (near the retention bracket lock) to the retention module base. 3. Align the other end of the retention bracket to the retention module base. Push down the retention bracket lock on the retention mechanism to secure the heatsink and fan to the module base. 2.
User Manual
Page 36
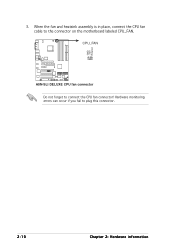
CPU_FAN A8N-SLI DELUXE ® A8N-SLI DELUXE CPU fan connector Do not forget to plug this connector. 2-10 Chapter 2: Hardware information Hardware monitoring errors can occur if you fail to connect the CPU fan connector! GND +12V Rotation 3. When the fan and heatsink assembly is in place, connect the CPU fan cable to the connector on the motherboard labeled CPU_FAN.
CPU_FAN A8N-SLI DELUXE ® A8N-SLI DELUXE CPU fan connector Do not forget to plug this connector. 2-10 Chapter 2: Hardware information Hardware monitoring errors can occur if you fail to connect the CPU fan connector! GND +12V Rotation 3. When the fan and heatsink assembly is in place, connect the CPU fan cable to the connector on the motherboard labeled CPU_FAN.
User Manual
Page 37
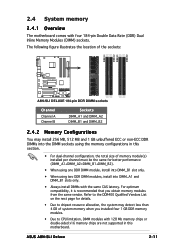
...configurations in this section. • For dual-channel configuration, the total size of the sockets: DIMM_A1 DIMM_A2 DIMM_B1 DIMM_B2 A8N-SLI DELUXE ® A8N-SLI DELUXE 184-pin DDR DIMM sockets Channel Channel A Channel B Sockets DIMM_A1 and DIMM_A2 DIMM_B1 and DIMM_B2 2.4.2 Memory Configurations You may... obtain memory modules from the same vendor. 2.4 System memory 2.4.1 Overview The motherboard comes with the same CAS latency. ASUS A8N-SLI Deluxe 2-11 The following figure illustrates the location of memory module(s) installed per channel must be the same for details. &#...
...configurations in this section. • For dual-channel configuration, the total size of the sockets: DIMM_A1 DIMM_A2 DIMM_B1 DIMM_B2 A8N-SLI DELUXE ® A8N-SLI DELUXE 184-pin DDR DIMM sockets Channel Channel A Channel B Sockets DIMM_A1 and DIMM_A2 DIMM_B1 and DIMM_B2 2.4.2 Memory Configurations You may... obtain memory modules from the same vendor. 2.4 System memory 2.4.1 Overview The motherboard comes with the same CAS latency. ASUS A8N-SLI Deluxe 2-11 The following figure illustrates the location of memory module(s) installed per channel must be the same for details. &#...
User Manual
Page 39
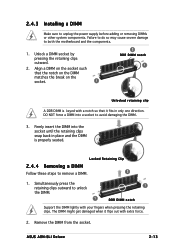
.... 1 2 DDR DIMM notch 1 Unlocked retaining clip A DDR DIMM is keyed with a notch so that it flips out with your fingers when pressing the retaining clips. ASUS A8N-SLI Deluxe 2-13 Failure to do so may cause severe damage to avoid damaging the DIMM. 3. Firmly insert the DIMM into a socket to both the motherboard and...
.... 1 2 DDR DIMM notch 1 Unlocked retaining clip A DDR DIMM is keyed with a notch so that it flips out with your fingers when pressing the retaining clips. ASUS A8N-SLI Deluxe 2-13 Failure to do so may cause severe damage to avoid damaging the DIMM. 3. Firmly insert the DIMM into a socket to both the motherboard and...
User Manual
Page 41
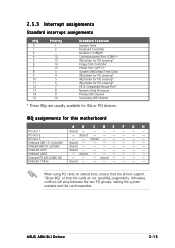
... the drivers support "Share IRQ" or that the cards do not need IRQ assignments. Onboard USB 1.0 controller shared - - -- - - - Onboard LAN1 shared - - -- - - - Onboard USB 2.0 controller shared - - -- - - - ASUS A8N-SLI Deluxe 2-15 shared - - - - - - Onboard PCI SATA RAID (SI) -- - Onboard 1394a shared - - -- - - - 2.5.3 Interrupt assignments Standard interrupt assignments IRQ Priority 0 1 1 2 2 - 4 12 5 13 6 14 7 15 8 3 9 4 10 5 11 6 12 7 13...
... the drivers support "Share IRQ" or that the cards do not need IRQ assignments. Onboard USB 1.0 controller shared - - -- - - - Onboard LAN1 shared - - -- - - - Onboard USB 2.0 controller shared - - -- - - - ASUS A8N-SLI Deluxe 2-15 shared - - - - - - Onboard PCI SATA RAID (SI) -- - Onboard 1394a shared - - -- - - - 2.5.3 Interrupt assignments Standard interrupt assignments IRQ Priority 0 1 1 2 2 - 4 12 5 13 6 14 7 15 8 3 9 4 10 5 11 6 12 7 13...
User Manual
Page 43
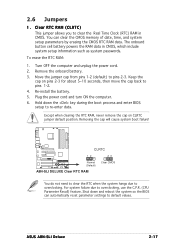
... the system so the BIOS can clear the CMOS memory of date, time, and system setup parameters by erasing the CMOS RTC RAM data. ASUS A8N-SLI Deluxe 2-17 Move the jumper cap from pins 1-2 (default) to overclocking, use the C.P.R. (CPU Parameter Recall) feature. The onboard button cell ...battery powers the RAM data in CMOS. A8N-SLI DELUXE ® CLRTC 12 23 Normal (Default) Clear CMOS A8N-SLI DELUXE Clear RTC RAM You do not need to clear the RTC when the system hangs due to clear the Real Time...
... the system so the BIOS can clear the CMOS memory of date, time, and system setup parameters by erasing the CMOS RTC RAM data. ASUS A8N-SLI Deluxe 2-17 Move the jumper cap from pins 1-2 (default) to overclocking, use the C.P.R. (CPU Parameter Recall) feature. The onboard button cell ...battery powers the RAM data in CMOS. A8N-SLI DELUXE ® CLRTC 12 23 Normal (Default) Clear CMOS A8N-SLI DELUXE Clear RTC RAM You do not need to clear the RTC when the system hangs due to clear the Real Time...


