User Guide for English Edition
Page 4
... Customizing apps on the Start Screen 12 Accessing All Apps 13 Charm bar...15 Inside the Charm bar 16 Snap feature...17 Wi-Fi connection 18 Disabling Airplane mode 18 Enabling Wi-Fi 18 Function keys...20 Function keys for ASUS Apps 21 Featured ASUS Apps 22 LifeFrame...22 Power4Gear Hybrid 24 USB Charger 26 Instant On...28 Remove everything and reinstall Windows 29 Shutting down...
... Customizing apps on the Start Screen 12 Accessing All Apps 13 Charm bar...15 Inside the Charm bar 16 Snap feature...17 Wi-Fi connection 18 Disabling Airplane mode 18 Enabling Wi-Fi 18 Function keys...20 Function keys for ASUS Apps 21 Featured ASUS Apps 22 LifeFrame...22 Power4Gear Hybrid 24 USB Charger 26 Instant On...28 Remove everything and reinstall Windows 29 Shutting down...
User Guide for English Edition
Page 5
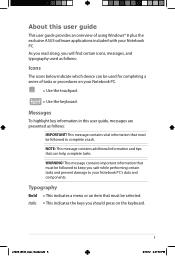
... icons, messages, and typography used for completing a series of using Windows® 8 plus the exclusive ASUS software applications included with your Notebook PC. = Use the touchpad. = Use the keyboard. This message contains important information that must be used as follows: IMPORTANT! Typography Bold = This indicates a menu or an item that can be selected. Messages To highlight key information in this user guide This user guide provides an overview of...
... icons, messages, and typography used for completing a series of using Windows® 8 plus the exclusive ASUS software applications included with your Notebook PC. = Use the touchpad. = Use the keyboard. This message contains important information that must be used as follows: IMPORTANT! Typography Bold = This indicates a menu or an item that can be selected. Messages To highlight key information in this user guide This user guide provides an overview of...
User Guide for English Edition
Page 7
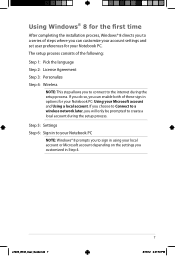
... so, you can customize your account settings and set user preferences for your Notebook PC: Using your Notebook PC. If you choose to Connect to a wireless network later, you to connect to the internet during the setup process. Using Windows® 8 for the first time After completing the installation process, Windows® 8 directs you to a series of steps where you can enable both of these sign in Step...
... so, you can customize your account settings and set user preferences for your Notebook PC: Using your Notebook PC. If you choose to Connect to a wireless network later, you to connect to the internet during the setup process. Using Windows® 8 for the first time After completing the installation process, Windows® 8 directs you to a series of steps where you can enable both of these sign in Step...

User Guide for English Edition
Page 8
... Press the power button on the keyboard to proceed. 3. NOTE: Steps 2-4 are also applicable when restarting your Notebook PC . 2. Sign in to the following steps: 1. The Windows® 8 lock screen appears after the Notebook PC boots up Windows® 8 To access Windows® 8 from Shut Down, Sleep, or Hibernate mode, refer to Windows® 8. The Start screen appears next, indicating that you have successfully signed in using your local...
... Press the power button on the keyboard to proceed. 3. NOTE: Steps 2-4 are also applicable when restarting your Notebook PC . 2. Sign in to the following steps: 1. The Windows® 8 lock screen appears after the Notebook PC boots up Windows® 8 To access Windows® 8 from Shut Down, Sleep, or Hibernate mode, refer to Windows® 8. The Start screen appears next, indicating that you have successfully signed in using your local...
User Guide for English Edition
Page 9
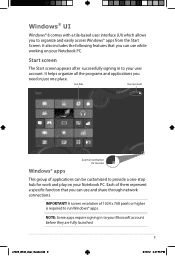
live tiles This group of them represent a specific function that you to organize and easily access Windows® apps from the Start Screen. IMPORTANT! It also includes the following features that you need in to run Windows® apps. Start screen The Start screen appears after successfully signing in /out button for work and play on your Notebook PC. It helps organize all the programs and...
live tiles This group of them represent a specific function that you to organize and easily access Windows® apps from the Start Screen. IMPORTANT! It also includes the following features that you need in to run Windows® apps. Start screen The Start screen appears after successfully signing in /out button for work and play on your Notebook PC. It helps organize all the programs and...

User Guide for English Edition
Page 10
... Start screen. Hover your mouse pointer to launch the Charm bar. 10 e7495_Win8_User_Guide.indd 10 8/13/12 2:47:56 PM Hover your mouse pointer until it changes to a hand icon. Drag then drop the app to a new location. The functions in these hotspots can be activated using the touchpad. Hotspots Onscreen hotspots allow you to launch programs and access the settings of your mouse...
... Start screen. Hover your mouse pointer to launch the Charm bar. 10 e7495_Win8_User_Guide.indd 10 8/13/12 2:47:56 PM Hover your mouse pointer until it changes to a hand icon. Drag then drop the app to a new location. The functions in these hotspots can be activated using the touchpad. Hotspots Onscreen hotspots allow you to launch programs and access the settings of your mouse...
User Guide for English Edition
Page 12
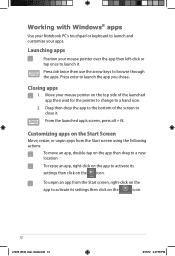
...click on the app to activate its settings then click on the icon. From the launched app's screen, press alt + f4. Press tab twice then use the arrow keys to launch the app you chose. To unpin an app from the Start screen using the following actions: To ...Start screen, right-click on the app to activate its settings then click on the icon. 12 e7495_Win8_User_Guide.indd 12 8/13/12 2:47:58 PM Press enter to browse through the apps. Move your mouse pointer on the app then drag to a new location. Working with Windows® apps Use your Notebook PC's touchpad or keyboard...
...click on the app to activate its settings then click on the icon. From the launched app's screen, press alt + f4. Press tab twice then use the arrow keys to launch the app you chose. To unpin an app from the Start screen using the following actions: To ...Start screen, right-click on the app to activate its settings then click on the icon. 12 e7495_Win8_User_Guide.indd 12 8/13/12 2:47:58 PM Press enter to browse through the apps. Move your mouse pointer on the app then drag to a new location. Working with Windows® apps Use your Notebook PC's touchpad or keyboard...
User Guide for English Edition
Page 13
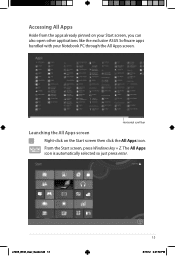
e7495_Win8_User_Guide.indd 13 13 8/13/12 2:47:59 PM Accessing All Apps Aside from the apps already pinned on the Start screen then click the All Apps icon. From the Start screen, press Windows key + Z. The All Apps icon is automatically selected so just press enter. Horizontal scroll bar Launching the All Apps screen Right-click on your Start screen, you can also open other applications like the exclusive ASUS Software apps bundled with your Notebook PC through the All Apps screen.
e7495_Win8_User_Guide.indd 13 13 8/13/12 2:47:59 PM Accessing All Apps Aside from the apps already pinned on the Start screen then click the All Apps icon. From the Start screen, press Windows key + Z. The All Apps icon is automatically selected so just press enter. Horizontal scroll bar Launching the All Apps screen Right-click on your Start screen, you can also open other applications like the exclusive ASUS Software apps bundled with your Notebook PC through the All Apps screen.
User Guide for English Edition
Page 15
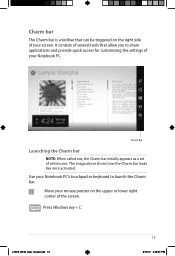
...: When called out, the Charm bar initially appears as a set of your Notebook PC's touchpad or keyboard to launch the Charm bar. Use your Notebook PC. Press Windows key + C. The image above shows how the Charm bar looks like once activated. Move your mouse pointer on the right side of your screen. e7495_Win8_User_Guide.indd 15 15 8/13/12 2:48:01 PM...
...: When called out, the Charm bar initially appears as a set of your Notebook PC's touchpad or keyboard to launch the Charm bar. Use your Notebook PC. Press Windows key + C. The image above shows how the Charm bar looks like once activated. Move your mouse pointer on the right side of your screen. e7495_Win8_User_Guide.indd 15 15 8/13/12 2:48:01 PM...
User Guide for English Edition
Page 16
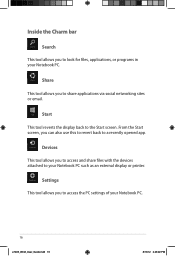
... Notebook PC. From the Start screen, you to a recently opened app. Start This tool reverts the display back to your Notebook PC. 16 e7495_Win8_User_Guide.indd 16 8/13/12 2:48:02 PM Settings This tool allows you can also use this to revert back to access the PC settings of your Notebook PC such as an external display or printer. Devices This tool allows you to access...
... Notebook PC. From the Start screen, you to a recently opened app. Start This tool reverts the display back to your Notebook PC. 16 e7495_Win8_User_Guide.indd 16 8/13/12 2:48:02 PM Settings This tool allows you can also use this to revert back to access the PC settings of your Notebook PC such as an external display or printer. Devices This tool allows you to access...
User Guide for English Edition
Page 17
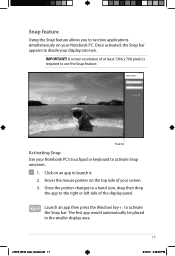
... simultaneously on your Notebook PC's touchpad or keyboard to activate Snap onscreen. 1. Snap bar Activating Snap Use your Notebook PC. Launch an app then press the Windows key + . The first app would automatically be placed in the smaller display area. IMPORTANT! Hover the mouse pointer on an app to the right or left side of the display panel. A screen resolution of your display into two...
... simultaneously on your Notebook PC's touchpad or keyboard to activate Snap onscreen. 1. Snap bar Activating Snap Use your Notebook PC. Launch an app then press the Windows key + . The first app would automatically be placed in the smaller display area. IMPORTANT! Hover the mouse pointer on an app to the right or left side of the display panel. A screen resolution of your display into two...
User Guide for English Edition
Page 18
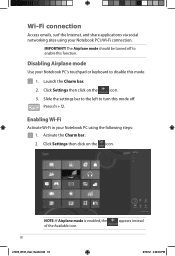
.... 2. Disabling Airplane mode Use your Notebook PC's touchpad or keyboard to enable this mode. 1. Slide the settings bar to the left to turn this mode off to disable this function. Press fn + f2. appears instead 18 e7495_Win8_User_Guide.indd 18 8/13/12 2:48:04 PM Enabling Wi-Fi Activate Wi-Fi in your Notebook PC's Wi-Fi connection. Wi-Fi connection Access emails, surf the Internet, and share applications via social networking...
.... 2. Disabling Airplane mode Use your Notebook PC's touchpad or keyboard to enable this mode. 1. Slide the settings bar to the left to turn this mode off to disable this function. Press fn + f2. appears instead 18 e7495_Win8_User_Guide.indd 18 8/13/12 2:48:04 PM Enabling Wi-Fi Activate Wi-Fi in your Notebook PC's Wi-Fi connection. Wi-Fi connection Access emails, surf the Internet, and share applications via social networking...
User Guide for English Edition
Page 20
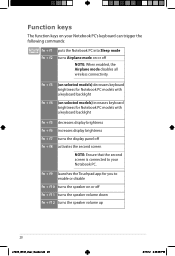
Function keys The function keys on your Notebook PC. fn + f9 launches the Touchpad app for Notebook PC models with a keyboard backlight fn + f5 decreases display brightness fn + f6 increases display brightness fn + f7 turns the display panel off NOTE: When enabled, the Airplane mode disables all wireless connectivity. fn + f3 (on selected models) decreases keyboard brightness for Notebook PC models with a keyboard backlight fn + f4 (on selected models) increases keyboard brightness for you to enable or disable fn + f10 turns the speaker on...
Function keys The function keys on your Notebook PC. fn + f9 launches the Touchpad app for Notebook PC models with a keyboard backlight fn + f5 decreases display brightness fn + f6 increases display brightness fn + f7 turns the display panel off NOTE: When enabled, the Airplane mode disables all wireless connectivity. fn + f3 (on selected models) decreases keyboard brightness for Notebook PC models with a keyboard backlight fn + f4 (on selected models) increases keyboard brightness for you to enable or disable fn + f10 turns the speaker on...
User Guide for English Edition
Page 21
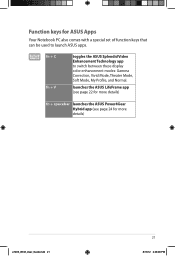
fn + C fn + V toggles the ASUS Splendid Video Enhancement Technology app to launch ASUS apps. Function keys for more details) e7495_Win8_User_Guide.indd 21 21 8/13/12 2:48:09 PM launches the ASUS LifeFrame app (see page 22 for more details) fn + spacebar launches the ASUS Power4Gear Hybrid app (see page 24 for ASUS Apps Your Notebook PC also comes with a special set of function keys that can be used to switch between these display color enhancement modes: Gamma Correction, Vivid Mode, Theater Mode, Soft Mode, My Profile, and Normal.
fn + C fn + V toggles the ASUS Splendid Video Enhancement Technology app to launch ASUS apps. Function keys for more details) e7495_Win8_User_Guide.indd 21 21 8/13/12 2:48:09 PM launches the ASUS LifeFrame app (see page 22 for more details) fn + spacebar launches the ASUS Power4Gear Hybrid app (see page 24 for ASUS Apps Your Notebook PC also comes with a special set of function keys that can be used to switch between these display color enhancement modes: Gamma Correction, Vivid Mode, Theater Mode, Soft Mode, My Profile, and Normal.
User Guide for English Edition
Page 22
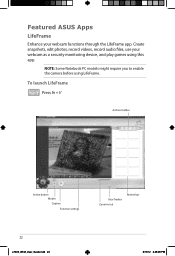
NOTE: Some Notebook PC models might require you to enable the camera before using this app. To launch LifeFrame Press fn + V Archive toolbar Action button Modes Capture Function settings Face Tracker Zoom in/out Review bar 22 e7495_Win8_User_Guide.indd 22 8/13/12 2:48:09 PM Featured ASUS Apps LifeFrame Enhance your webcam as a security monitoring device, and play games using LifeFrame. Create snapshots, edit photos, record videos, record audio files, use your webcam functions through the LifeFrame app.
NOTE: Some Notebook PC models might require you to enable the camera before using this app. To launch LifeFrame Press fn + V Archive toolbar Action button Modes Capture Function settings Face Tracker Zoom in/out Review bar 22 e7495_Win8_User_Guide.indd 22 8/13/12 2:48:09 PM Featured ASUS Apps LifeFrame Enhance your webcam as a security monitoring device, and play games using LifeFrame. Create snapshots, edit photos, record videos, record audio files, use your webcam functions through the LifeFrame app.
User Guide for English Edition
Page 24
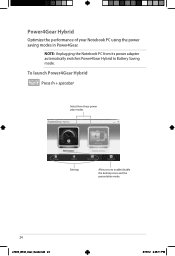
NOTE: Unplugging the Notebook PC from these power plan modes. Settings Allows you to Battery Saving mode. To launch Power4Gear Hybrid Press fn + spacebar Select from its power adapter automatically switches Power4Gear Hybrid to enable/disable the desktop icons and the presentation mode. 24 e7495_Win8_User_Guide.indd 24 8/13/12 2:48:11 PM Power4Gear Hybrid Optimize the performance of your Notebook PC using the power saving modes in Power4Gear.
NOTE: Unplugging the Notebook PC from these power plan modes. Settings Allows you to Battery Saving mode. To launch Power4Gear Hybrid Press fn + spacebar Select from its power adapter automatically switches Power4Gear Hybrid to enable/disable the desktop icons and the presentation mode. 24 e7495_Win8_User_Guide.indd 24 8/13/12 2:48:11 PM Power4Gear Hybrid Optimize the performance of your Notebook PC using the power saving modes in Power4Gear.
User Guide for English Edition
Page 26
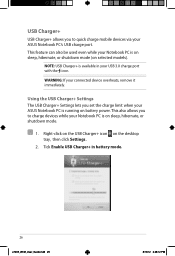
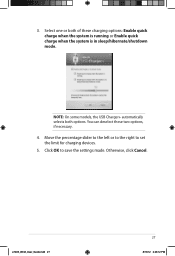
WARNING: If your ASUS Notebook PC is running on sleep, hibernate, or shutdown mode. 1. Using the USB Charger+ Settings The USB Charger+ Settings lets you set the charge limit when your connected device overheats, remove it immediately. This feature can also be used even while your Notebook PC is on battery power. Tick Enable USB Charger+ in your ASUS Notebook PC's USB charge port. This also allows you to quick charge mobile devices via your USB 3.0 charge port with the icon. Right...
WARNING: If your ASUS Notebook PC is running on sleep, hibernate, or shutdown mode. 1. Using the USB Charger+ Settings The USB Charger+ Settings lets you set the charge limit when your connected device overheats, remove it immediately. This feature can also be used even while your Notebook PC is on battery power. Tick Enable USB Charger+ in your ASUS Notebook PC's USB charge port. This also allows you to quick charge mobile devices via your USB 3.0 charge port with the icon. Right...
User Guide for English Edition
Page 27
Select one or both options. You can deselect these charging options: Enable quick charge when the system is running or Enable quick charge when the system is in sleep/hibernate/shutdown mode. Otherwise, click Cancel. NOTE: On some models, the USB Charger+ automatically selects both of these two options, if necessary. 4. Click OK to set the limit for charging devices. 5. Move the percentage slider to the left or to the right to save the settings made. e7495_Win8_User_Guide.indd 27 27 8/13/12 2:48:12 PM 3.
Select one or both options. You can deselect these charging options: Enable quick charge when the system is running or Enable quick charge when the system is in sleep/hibernate/shutdown mode. Otherwise, click Cancel. NOTE: On some models, the USB Charger+ automatically selects both of these two options, if necessary. 4. Click OK to set the limit for charging devices. 5. Move the percentage slider to the left or to the right to save the settings made. e7495_Win8_User_Guide.indd 27 27 8/13/12 2:48:12 PM 3.
User Guide for English Edition
Page 28
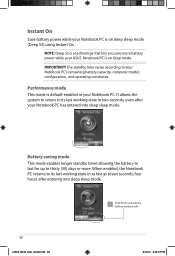
... entered into deep sleep mode. The standby time varies according to activate the battery saving mode. 28 e7495_Win8_User_Guide.indd 28 8/13/12 2:48:13 PM Performance mode This mode is on deep sleep mode (Deep S3) using Instant On. Click this to your Notebook PC. It allows the system to return to its last working state in your Notebook PC's remaining battery capacity, computer model, configuration, and operating...
... entered into deep sleep mode. The standby time varies according to activate the battery saving mode. 28 e7495_Win8_User_Guide.indd 28 8/13/12 2:48:13 PM Performance mode This mode is on deep sleep mode (Deep S3) using Instant On. Click this to your Notebook PC. It allows the system to return to its last working state in your Notebook PC's remaining battery capacity, computer model, configuration, and operating...
User Guide for English Edition
Page 29
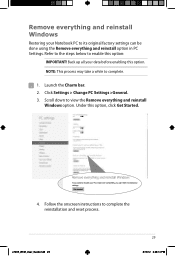
... Notebook PC to complete the reinstallation and reset process. Click Settings > Change PC Settings >General. 3. Remove everything and reinstall Windows Restoring your data before enabling this option: IMPORTANT! Follow the onscreen instructions to its original factory settings can be done using the Remove everything and reinstall Windows option. Scroll down to complete. 1. e7495_Win8_User_Guide.indd 29 29 8/13/12 2:48:14 PM Refer to the steps below to enable this option...
... Notebook PC to complete the reinstallation and reset process. Click Settings > Change PC Settings >General. 3. Remove everything and reinstall Windows Restoring your data before enabling this option: IMPORTANT! Follow the onscreen instructions to its original factory settings can be done using the Remove everything and reinstall Windows option. Scroll down to complete. 1. e7495_Win8_User_Guide.indd 29 29 8/13/12 2:48:14 PM Refer to the steps below to enable this option...


