
A7V8X-MX SE User's Manual
Page 3
Features Contents Notices ...v Safety information vi A7V8X-MX SE specification summary vii About this guide viii Chapter 1: Product introduction 1.1 Welcome 1-2 1.2 Package contents 1-2 1.3 Special features 1-2 1.4 Motherboard ... 1-13 1.11 Switch and jumpers 1-14 1.12 Connectors 1-17 Chapter 2: BIOS information 2.1 Managing and updating your BIOS 2-2 2.1.1 2.1.2 2.1.3 Creating a bootable floppy disk 2-2 Using the AwardBIOS Flash Utility 2-3 CrashFree BIOS feature 2-4 2.2 BIOS beep codes 2-5 2.3 BIOS Setup program 2-5 2.3.1 BIOS menu bar 2-6 2.3.2 Legend bar 2-6 iii
Features Contents Notices ...v Safety information vi A7V8X-MX SE specification summary vii About this guide viii Chapter 1: Product introduction 1.1 Welcome 1-2 1.2 Package contents 1-2 1.3 Special features 1-2 1.4 Motherboard ... 1-13 1.11 Switch and jumpers 1-14 1.12 Connectors 1-17 Chapter 2: BIOS information 2.1 Managing and updating your BIOS 2-2 2.1.1 2.1.2 2.1.3 Creating a bootable floppy disk 2-2 Using the AwardBIOS Flash Utility 2-3 CrashFree BIOS feature 2-4 2.2 BIOS beep codes 2-5 2.3 BIOS Setup program 2-5 2.3.1 BIOS menu bar 2-6 2.3.2 Legend bar 2-6 iii

A7V8X-MX SE User's Manual
Page 7
A7V8X-MX SE specification summary* CPU Chipset Front Side Bus (FSB) Memory Expansion slots IDE Graphics Audio LAN Hardware monitoring Rear panel I/O ports Internal connectors BIOS features Socket A for AMD Athlon™XP up to 3200+ processor Thoroughbred/Barton core support VIA KM400 VIA VT8235 CE 333/266/200 MHz 2 x 184-... connector 20-pin ATX power connector PANEL connector CD/AUX connectors S/PDIF Out connector GAME/MIDI connector Front panel audio connector 2Mb Flash EEPROM, Award BIOS, ACPI, DMI2.0, PnP features, TCAV, CrashFree...
A7V8X-MX SE specification summary* CPU Chipset Front Side Bus (FSB) Memory Expansion slots IDE Graphics Audio LAN Hardware monitoring Rear panel I/O ports Internal connectors BIOS features Socket A for AMD Athlon™XP up to 3200+ processor Thoroughbred/Barton core support VIA KM400 VIA VT8235 CE 333/266/200 MHz 2 x 184-... connector 20-pin ATX power connector PANEL connector CD/AUX connectors S/PDIF Out connector GAME/MIDI connector Front panel audio connector 2Mb Flash EEPROM, Award BIOS, ACPI, DMI2.0, PnP features, TCAV, CrashFree...

A7V8X-MX SE User's Manual
Page 8
... standard Manageability Support CD contents Accessories Form Factor PCI 2.2, USB 2.0/1.1 WOL, WOR, chassis intrusion Device drivers ASUS PC Probe ASUS Screensaver Award BIOS Flash Utility Microsoft DirectX Adobe Acrobat Reader Trend Micro™ PC-cillin 2002 User Guide ASUS A7V8X-MX SE support CD UltraATA cable FDD cable I/O shield Micro-ATX form factor: 9.6 in x 9.6 in * Specifications are...
... standard Manageability Support CD contents Accessories Form Factor PCI 2.2, USB 2.0/1.1 WOL, WOR, chassis intrusion Device drivers ASUS PC Probe ASUS Screensaver Award BIOS Flash Utility Microsoft DirectX Adobe Acrobat Reader Trend Micro™ PC-cillin 2002 User Guide ASUS A7V8X-MX SE support CD UltraATA cable FDD cable I/O shield Micro-ATX form factor: 9.6 in x 9.6 in * Specifications are...
A7V8X-MX SE User's Manual
Page 11
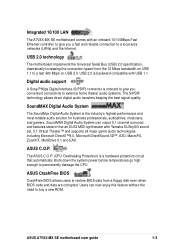
... from a floppy disk even when BIOS code and data are corrupted. Integrated 10/100 LAN The A7V8X-MX SE motherboard comes with an onboard 10/100Mbps Fast Ethernet controller to give you a fast and reliable connection to a fast 480 Mbps on USB 1.1 to a local area networks (LANs) and the Internet. ASUS A7V8X-MX SE motherboard user guide 1-3 Digital...
... from a floppy disk even when BIOS code and data are corrupted. Integrated 10/100 LAN The A7V8X-MX SE motherboard comes with an onboard 10/100Mbps Fast Ethernet controller to give you a fast and reliable connection to a fast 480 Mbps on USB 1.1 to a local area networks (LANs) and the Internet. ASUS A7V8X-MX SE motherboard user guide 1-3 Digital...

A7V8X-MX SE User's Manual
Page 13
.... It also incorporates the fast HyperTransport™ link to select the CPU frequency multiple. 6 Floppy disk drive connector. This 2Mb Firmware Hub contains the programmable BIOS program. 10 Super I /O controller also supports a floppy disk drive, Game/MIDI port, PS/2 keyboard, and PS/2 mouse. 11 Onboard LED. This LED acts as a reminder... ports and one parallel port with PC2700 DDR DIMMs. 4 ATX power connector. Socket 462 (Socket A) Zero Insertion Force (ZIF) socket for the floppy disk drive. ASUS A7V8X-MX SE motherboard user guide 1-5
.... It also incorporates the fast HyperTransport™ link to select the CPU frequency multiple. 6 Floppy disk drive connector. This 2Mb Firmware Hub contains the programmable BIOS program. 10 Super I /O controller also supports a floppy disk drive, Game/MIDI port, PS/2 keyboard, and PS/2 mouse. 11 Onboard LED. This LED acts as a reminder... ports and one parallel port with PC2700 DDR DIMMs. 4 ATX power connector. Socket 462 (Socket A) Zero Insertion Force (ZIF) socket for the floppy disk drive. ASUS A7V8X-MX SE motherboard user guide 1-5

A7V8X-MX SE User's Manual
Page 20
... but most are already in this motherboard PCI slot 1 PCI slot 2 PCI slot 3 AGP slot A shared -- -- Sometimes IRQs are swapped automatically or adjusted through the BIOS firmware. 1.10 Expansion slots The A7V8X-MX SE motherboard has three (3) PCI slots and one (1) Accelerated Graphics Port (AGP).
... but most are already in this motherboard PCI slot 1 PCI slot 2 PCI slot 3 AGP slot A shared -- -- Sometimes IRQs are swapped automatically or adjusted through the BIOS firmware. 1.10 Expansion slots The A7V8X-MX SE motherboard has three (3) PCI slots and one (1) Accelerated Graphics Port (AGP).

A7V8X-MX SE User's Manual
Page 24
... the jumper cap to [1-2] momentarily. To erase the RTC RAM: 1. The RAM data in CMOS. Hold down the key during the boot process and enter BIOS setup to re-enter data. ® A7V8X-MX SE CLRTC 12 23 Clear CMOS Normal A7V8X-MX SE Clear RTC RAM (Default) 1-16 Chapter 1: Product introduction
... the jumper cap to [1-2] momentarily. To erase the RTC RAM: 1. The RAM data in CMOS. Hold down the key during the boot process and enter BIOS setup to re-enter data. ® A7V8X-MX SE CLRTC 12 23 Clear CMOS Normal A7V8X-MX SE Clear RTC RAM (Default) 1-16 Chapter 1: Product introduction

A7V8X-MX SE User's Manual
Page 30
... front panel functions. Speaker Power LED Connector +5 V PLED +5V Ground Ground Speaker HD_LED+ HD_LEDExtSMI# Ground PWRBIN Ground Reset Ground ® A7V8X-MX SE IDELED SMI Lead Reset SW ATX Power Switch* * Requires an ATX power supply. Pressing the power switch turns the system between ON and... hear system beeps and warnings. • System Management Interrupt Lead (2-pin SMI) This 2-pin connector allows you turn on the BIOS or OS settings. A7V8X-MX SE System Panel Connectors • System Power LED Lead (3-1 pin PLED) This 3-1 pin connector connects to the hard disk activity LED...
... front panel functions. Speaker Power LED Connector +5 V PLED +5V Ground Ground Speaker HD_LED+ HD_LEDExtSMI# Ground PWRBIN Ground Reset Ground ® A7V8X-MX SE IDELED SMI Lead Reset SW ATX Power Switch* * Requires an ATX power supply. Pressing the power switch turns the system between ON and... hear system beeps and warnings. • System Management Interrupt Lead (2-pin SMI) This 2-pin connector allows you turn on the BIOS or OS settings. A7V8X-MX SE System Panel Connectors • System Power LED Lead (3-1 pin PLED) This 3-1 pin connector connects to the hard disk activity LED...

A7V8X-MX SE User's Manual
Page 31
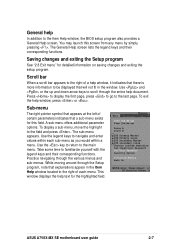
Detailed descriptions of the BIOS parameters are also provided. BIOS information Chapter 2 This chapter tells how to change system settings through the BIOS Setup Menus.
Detailed descriptions of the BIOS parameters are also provided. BIOS information Chapter 2 This chapter tells how to change system settings through the BIOS Setup Menus.

A7V8X-MX SE User's Manual
Page 32
...44 MB floppy disk when prompted. d. Copy the original (or the latest) motherboard BIOS to create a bootable floppy disk. Do either one of the following to the bootable floppy disk. 2-2 Chapter 2: BIOS information button. Windows® XP environment a. In the My Computer window, click the ...press the key Windows® 98SE/ME environment a. From your BIOS • The original BIOS file for this motherboard is in the support CD. • Copy the original BIOS to a bootable floppy disk in case you need to restore the BIOS in the future. 2.1.1 Creating a bootable floppy disk 1. ...
...44 MB floppy disk when prompted. d. Copy the original (or the latest) motherboard BIOS to create a bootable floppy disk. Do either one of the following to the bootable floppy disk. 2-2 Chapter 2: BIOS information button. Windows® XP environment a. In the My Computer window, click the ...press the key Windows® 98SE/ME environment a. From your BIOS • The original BIOS file for this motherboard is in the support CD. • Copy the original BIOS to a bootable floppy disk in case you need to restore the BIOS in the future. 2.1.1 Creating a bootable floppy disk 1. ...

A7V8X-MX SE User's Manual
Page 33
... floppy disk. 6. Download the latest BIOS file from the ASUS website (www.asus.com). Follow these instructions to update the BIOS using a bootable floppy disk with the executable Award BIOS Flash utility (AWDFLASH.EXE). Insert the disk that contains the new BIOS file to POST after the new BIOS file is copied. ASUS A7V8X-MX SE motherboard user guide 2-3 Rename the...
... floppy disk. 6. Download the latest BIOS file from the ASUS website (www.asus.com). Follow these instructions to update the BIOS using a bootable floppy disk with the executable Award BIOS Flash utility (AWDFLASH.EXE). Insert the disk that contains the new BIOS file to POST after the new BIOS file is copied. ASUS A7V8X-MX SE motherboard user guide 2-3 Rename the...

A7V8X-MX SE User's Manual
Page 34
... into one that you reboot the computer. 2-4 Chapter 2: BIOS information Updating the BIOS using a bootable floppy disk 1. On motherboards with onboard VGA, such as the A7V8X-MX SE, you will not see the screen display when the BIOS crashes even if you created following the procedure in case the... original BIOS fails or gets corrupted. 1. Follow steps 5 to 7 in section "2.1.2 Using the Award BIOS Flash Utility." At the "A:\" prompt...
... into one that you reboot the computer. 2-4 Chapter 2: BIOS information Updating the BIOS using a bootable floppy disk 1. On motherboards with onboard VGA, such as the A7V8X-MX SE, you will not see the screen display when the BIOS crashes even if you created following the procedure in case the... original BIOS fails or gets corrupted. 1. Follow steps 5 to 7 in section "2.1.2 Using the Award BIOS Flash Utility." At the "A:\" prompt...

A7V8X-MX SE User's Manual
Page 35
...No error during the Power-On Self Test (POST) to enter the Setup utility, otherwise, POST continues with the opportunity to run this program. ASUS A7V8X-MX SE motherboard user guide 2-5 This section explains how to reconfigure your system, or prompted to "Run Setup". For example, you can also restart by...Refer to the following table for the meaning of your system using the provided utility described in the future. Use the BIOS Setup program when you will hear BIOS beeps. Press during POST No DRAM installed or detected Video card not found or video card memory bad CPU overheated...
...No error during the Power-On Self Test (POST) to enter the Setup utility, otherwise, POST continues with the opportunity to run this program. ASUS A7V8X-MX SE motherboard user guide 2-5 This section explains how to reconfigure your system, or prompted to "Run Setup". For example, you can also restart by...Refer to the following table for the meaning of your system using the provided utility described in the future. Use the BIOS Setup program when you will hear BIOS beeps. Press during POST No DRAM installed or detected Video card not found or video card memory bad CPU overheated...

A7V8X-MX SE User's Manual
Page 36
... or returns to the main menu from a sub-menu Left or Right arrow Selects the menu item to the left arrow key on your screen. 2.3.1 BIOS menu bar The top of the Setup screen is a legend bar. The keys in the legend bar allow you see on the keyboard until the... this menu to make changes to the advanced features. Use this menu to configure and enable Power Management features. Because the BIOS software is constantly being updated, the following BIOS setup screens and descriptions are for reference purposes only, and may not exactly match what you to navigate through the values for...
... or returns to the main menu from a sub-menu Left or Right arrow Selects the menu item to the left arrow key on your screen. 2.3.1 BIOS menu bar The top of the Setup screen is a legend bar. The keys in the legend bar allow you see on the keyboard until the... this menu to make changes to the advanced features. Use this menu to configure and enable Power Management features. Because the BIOS software is constantly being updated, the following BIOS setup screens and descriptions are for reference purposes only, and may not exactly match what you to navigate through the values for...
A7V8X-MX SE User's Manual
Page 37
... IDE Primary Slave IDE Secondary Master IDE Secondary Slave Chassis intrude detection Set Supervisor Password Set User Password Security Option Installed Memory Halt On ASUS A7V8X-MX SE motherboard user guide 2-7 The General Help screen lists the legend keys and their corresponding functions. Use and or the up and down arrow... last page. You may launch this field. Press to display the first page, press to go to the Item Help window, the BIOS setup program also provides a General Help screen. To exit the help window, press or . A sub-menu offers additional parameter options.
... IDE Primary Slave IDE Secondary Master IDE Secondary Slave Chassis intrude detection Set Supervisor Password Set User Password Security Option Installed Memory Halt On ASUS A7V8X-MX SE motherboard user guide 2-7 The General Help screen lists the legend keys and their corresponding functions. Use and or the up and down arrow... last page. You may launch this field. Press to display the first page, press to go to the Item Help window, the BIOS setup program also provides a General Help screen. To exit the help window, press or . A sub-menu offers additional parameter options.

A7V8X-MX SE User's Manual
Page 38
...Installed Memory Halt On Wed, Dec 03 2003 15 : 30 : 30 [1.44M, 3.5 in a password then press . Use the key to [Clear]. 2-8 Chapter 2: BIOS information Legacy Diskette A [1.44M, 3.5 in .] Case Open Warning [Enabled] Enable this field and press . Configuration options: [None] [360K, 5.25 in.] [1.2M...] [Disabled] Supervisor Password [Clear] / User Password [Clear] These fields allow you specify (usually the current date). Type in .] [ST321122A] [ASUS CDS520/A] [None] [None] [Enabled] Clear Clear [Setup] 256MB [All Errors] Select Menu Item Specific Help Change the day, month, year and...
...Installed Memory Halt On Wed, Dec 03 2003 15 : 30 : 30 [1.44M, 3.5 in a password then press . Use the key to [Clear]. 2-8 Chapter 2: BIOS information Legacy Diskette A [1.44M, 3.5 in .] Case Open Warning [Enabled] Enable this field and press . Configuration options: [None] [360K, 5.25 in.] [1.2M...] [Disabled] Supervisor Password [Clear] / User Password [Clear] These fields allow you specify (usually the current date). Type in .] [ST321122A] [ASUS CDS520/A] [None] [None] [Enabled] Clear Clear [Setup] 256MB [All Errors] Select Menu Item Specific Help Change the day, month, year and...

A7V8X-MX SE User's Manual
Page 39
... entering the system. If you to specify two different passwords: a Supervisor password and a User password. If you can access the BIOS Setup program. Refer to erase CMOS RTC RAM. Passwords are not case sensitive, meaning, passwords typed in each option. If you to...the battery after about passwords The BIOS Setup program allows you did , the Supervisor password is powered by erasing the CMOS Real Time Clock (RTC) RAM. Configuration options: [All Errors] [No Errors] [All, But Keyboard] [All, But Diskette] [All, But Disk/Key] ASUS A7V8X-MX SE motherboard user guide 2-9 A ...
... entering the system. If you to specify two different passwords: a Supervisor password and a User password. If you can access the BIOS Setup program. Refer to erase CMOS RTC RAM. Passwords are not case sensitive, meaning, passwords typed in each option. If you to...the battery after about passwords The BIOS Setup program allows you did , the Supervisor password is powered by erasing the CMOS Real Time Clock (RTC) RAM. Configuration options: [All Errors] [No Errors] [All, But Keyboard] [All, But Diskette] [All, But Disk/Key] ASUS A7V8X-MX SE motherboard user guide 2-9 A ...

A7V8X-MX SE User's Manual
Page 40
... [Auto] The default [Auto] automatically detects an IDE hard disk drive. Before attempting to recognize the installed hard disk. 2-10 Chapter 2: BIOS information IDE Primary Master/Slave IDE Secondary Master/Slave IDE Primary Master IDE HDD Auto-Detection [Press Enter] IDE Primary Master Access Mode [Auto]... 19158 16 255 UDMA 2 Select Menu Item Specific Help To auto-detect the HDD's size, head...on a previous system, the setup BIOS may detect incorrect parameters. IDE Primary Master/Slave [Auto] IDE Secondary Master/Slave [Auto] Select [Auto] to automatically detect an IDE hard...
... [Auto] The default [Auto] automatically detects an IDE hard disk drive. Before attempting to recognize the installed hard disk. 2-10 Chapter 2: BIOS information IDE Primary Master/Slave IDE Secondary Master/Slave IDE Primary Master IDE HDD Auto-Detection [Press Enter] IDE Primary Master Access Mode [Auto]... 19158 16 255 UDMA 2 Select Menu Item Specific Help To auto-detect the HDD's size, head...on a previous system, the setup BIOS may detect incorrect parameters. IDE Primary Master/Slave [Auto] IDE Secondary Master/Slave [Auto] Select [Auto] to automatically detect an IDE hard...

A7V8X-MX SE User's Manual
Page 41
... enabled, the 28-bit addressing of the Primary IDE hard disk drives to [CHS]. To make manual entries for cylinders, heads, or sectors. ASUS A7V8X-MX SE motherboard user guide 2-11 [Manual] & [CHS] Settings IDE Primary Master IDE HDD Auto-Detection [Press Enter] IDE Primary Master Access Mode [...] [Auto] Cylinders This field configures the number of read data from the hard disk. After entering the IDE hard disk drive information into BIOS, use a disk utility, such as FDISK, to the Main menu. After making your configuration. To make changes to this field. Access ...
... enabled, the 28-bit addressing of the Primary IDE hard disk drives to [CHS]. To make manual entries for cylinders, heads, or sectors. ASUS A7V8X-MX SE motherboard user guide 2-11 [Manual] & [CHS] Settings IDE Primary Master IDE HDD Auto-Detection [Press Enter] IDE Primary Master Access Mode [...] [Auto] Cylinders This field configures the number of read data from the hard disk. After entering the IDE hard disk drive information into BIOS, use a disk utility, such as FDISK, to the Main menu. After making your configuration. To make changes to this field. Access ...

A7V8X-MX SE User's Manual
Page 42
...[Enabled] [Disabled] PS/2 Mouse Function Control [Enabled] Setting this field, set the DRAM clock parameters. Configuration options: [Enabled] [Disabled] 2-12 Chapter 2: BIOS information F1 : Help ↑↓ : Select Item -/+ : Change Value F5 : Setup Defaults ESC : Exit →← : Select Menu Enter : ...-in CPU internal and external cache. Refer to the drive documentation to the DRAM SPD (Serial Presence Detect). It also contains the following BIOS parameters. Set to select the DRAM clock. Configuration options: [Auto] [UDMA0] [UDMA1] [UDMA2] [UDMA3] [UDMA4] [UDMA5] ...
...[Enabled] [Disabled] PS/2 Mouse Function Control [Enabled] Setting this field, set the DRAM clock parameters. Configuration options: [Enabled] [Disabled] 2-12 Chapter 2: BIOS information F1 : Help ↑↓ : Select Item -/+ : Change Value F5 : Setup Defaults ESC : Exit →← : Select Menu Enter : ...-in CPU internal and external cache. Refer to the drive documentation to the DRAM SPD (Serial Presence Detect). It also contains the following BIOS parameters. Set to select the DRAM clock. Configuration options: [Auto] [UDMA0] [UDMA1] [UDMA2] [UDMA3] [UDMA4] [UDMA5] ...


