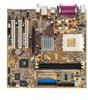

A7V8X-MX SE User's Manual
Page 32
... "Create an MS-DOS Startup Disk" in the floppy disk drive. 2.1 Managing and updating your Windows desktop, click Start, point to the bootable floppy disk. 2-2 Chapter 2: BIOS information b. button. Windows® XP environment a. d. Do either one of the following to create a bootable floppy disk.... Double-click Add/Remove Programs icon from the Control Panel window. Insert a new 1.44 MB floppy disk in the Format Options field, then click Start. 2. e. c. b. From the Menu bar, click File...
... "Create an MS-DOS Startup Disk" in the floppy disk drive. 2.1 Managing and updating your Windows desktop, click Start, point to the bootable floppy disk. 2-2 Chapter 2: BIOS information b. button. Windows® XP environment a. d. Do either one of the following to create a bootable floppy disk.... Double-click Add/Remove Programs icon from the Control Panel window. Insert a new 1.44 MB floppy disk in the Format Options field, then click Start. 2. e. c. b. From the Menu bar, click File...
A7V8X-MX SE User's Manual
Page 37
...explanations appear in the window. Date (mm:dd:yy) Time (hh:mm:ss) Drive A Drive B IDE Primary Master IDE Primary Slave IDE Secondary Master IDE Secondary Slave Chassis intrude detection Set Supervisor Password Set User Password Security Option Installed Memory Halt On ASUS A7V8X-MX SE motherboard user guide 2-7...right pointer symbol that a sub-menu exists for detailed information on saving changes and exiting the setup program. To exit the help window, it indicates that there is more information to navigate and enter values within each menu. While moving around through the Setup program...
...explanations appear in the window. Date (mm:dd:yy) Time (hh:mm:ss) Drive A Drive B IDE Primary Master IDE Primary Slave IDE Secondary Master IDE Secondary Slave Chassis intrude detection Set Supervisor Password Set User Password Security Option Installed Memory Halt On ASUS A7V8X-MX SE motherboard user guide 2-7...right pointer symbol that a sub-menu exists for detailed information on saving changes and exiting the setup program. To exit the help window, it indicates that there is more information to navigate and enter values within each menu. While moving around through the Setup program...

A7V8X-MX SE User's Manual
Page 57
... than system date, system time, and password, the BIOS asks for each of the parameters on even when the PC is turned off. ASUS A7V8X-MX SE motherboard user guide 2-27 Configuration options: [Enabled] [Disabled] 2.8 Exit menu Save & Exit Setup Exit Without Saving Load Optimized Defaults Discard ...changes to the non-volatile RAM. Select [Yes] to CMOS and exits the BIOS setup. When you select this option, a confirmation window appears. Load Optimized Defaults This option allows you to use the 16 IRQs only. When you select this option or if you press ,...
... than system date, system time, and password, the BIOS asks for each of the parameters on even when the PC is turned off. ASUS A7V8X-MX SE motherboard user guide 2-27 Configuration options: [Enabled] [Disabled] 2.8 Exit menu Save & Exit Setup Exit Without Saving Load Optimized Defaults Discard ...changes to the non-volatile RAM. Select [Yes] to CMOS and exits the BIOS setup. When you select this option, a confirmation window appears. Load Optimized Defaults This option allows you to use the 16 IRQs only. When you select this option or if you press ,...

A7V8X-MX SE User's Manual
Page 58
Discard Changes This option allows you to discard the selections you select this option, a confirmation appears. Select [Yes] to save changes to other menus and make further changes. Save Changes This option saves your selections without exiting the Setup program. After selecting this option, a confirmation window appears. You can then return to the non-volatile RAM. 2-28 Chapter 2: BIOS information After you made and restore the previously saved values. Select [Yes] to discard any changes and load the previously saved values.
Discard Changes This option allows you to discard the selections you select this option, a confirmation appears. Select [Yes] to save changes to other menus and make further changes. Save Changes This option saves your selections without exiting the Setup program. After selecting this option, a confirmation window appears. You can then return to the non-volatile RAM. 2-28 Chapter 2: BIOS information After you made and restore the previously saved values. Select [Yes] to discard any changes and load the previously saved values.

A7V8X-MX SE User's Manual
Page 60
...utility drivers that enhance the motherboard features. The contents of the support CD to your hardware. 3.1 Installing an operating system This motherboard supports Windows® 98SE/ME/2000/XP as well as Linux Red Hat, SuSE, TurboLinux and Caldera operating systems (OS). Because motherboard settings and ... in your computer, browse the contents of the support CD are subject to run the CD. 3-2 Chapter 3: Software support Visit the ASUS website for general reference only. Double-click the ASSETUP.EXE to change at any time without notice. Always install the latest OS version ...
...utility drivers that enhance the motherboard features. The contents of the support CD to your hardware. 3.1 Installing an operating system This motherboard supports Windows® 98SE/ME/2000/XP as well as Linux Red Hat, SuSE, TurboLinux and Caldera operating systems (OS). Because motherboard settings and ... in your computer, browse the contents of the support CD are subject to run the CD. 3-2 Chapter 3: Software support Visit the ASUS website for general reference only. Double-click the ASSETUP.EXE to change at any time without notice. Always install the latest OS version ...


