Motherboard DIY Troubleshooting Guide
Page 4
... Is Organized 7 1.2 Item Checklist 7 2. FEATURES 8 2.1 The ASUS A7V-M 8 2.1.1 Specifications 8 2.1.2 Special Features 10 2.1.3 Performance Features 10 2.1.4 Intelligence 11 2.2 Motherboard Components 12 2.2.1 Component Locations 13 3. BIOS SETUP 43 4.1 Managing and...51 4.3.2 Keyboard Features 54 4 ASUS A7V-M User's Manual HARDWARE SETUP 14 3.1 Motherboard Layout 14 3.2 Layout Contents 15 3.3 Hardware Setup Procedure 17 3.4 Motherboard Settings 17 3.5 System Memory (DIMM 21 3.5.1 General DIMM Notes 21 3.5.2 Memory Installation 22 3.6 Central Processing Unit (...
... Is Organized 7 1.2 Item Checklist 7 2. FEATURES 8 2.1 The ASUS A7V-M 8 2.1.1 Specifications 8 2.1.2 Special Features 10 2.1.3 Performance Features 10 2.1.4 Intelligence 11 2.2 Motherboard Components 12 2.2.1 Component Locations 13 3. BIOS SETUP 43 4.1 Managing and...51 4.3.2 Keyboard Features 54 4 ASUS A7V-M User's Manual HARDWARE SETUP 14 3.1 Motherboard Layout 14 3.2 Layout Contents 15 3.3 Hardware Setup Procedure 17 3.4 Motherboard Settings 17 3.5 System Memory (DIMM 21 3.5.1 General DIMM Notes 21 3.5.2 Memory Installation 22 3.6 Central Processing Unit (...
Motherboard DIY Troubleshooting Guide
Page 5
SOFTWARE SETUP 79 5.1 Install Operating System 79 5.2 Start Windows 79 5.3 A7V-M Series Motherboard Support CD 80 5.4 VIA 4 in 1 drivers 81 5.5 Audio Driver 82 5.6 Realtek RTL8139C PCI Fast Ethernet NIC Driver 83 5.7 ASUS PC Probe Vx.xx 84 5.8 ASUS Update Vx.xx ... Applications 89 5.13 Uninstalling Programs 90 6. APPENDIX 103 7.1 PCI-L101 Fast Ethernet Card 103 7.2 Glossary 105 ASUS A7V-M User's Manual 5 SOFTWARE REFERENCE 93 6.1 ASUS PC Probe 93 6.2 CyberLink PowerPlayer SE 98 6.3 CyberLink PowerDVD 98 6.4 CyberLink VideoLive Mail 100 7. CONTENTS 4.4...
SOFTWARE SETUP 79 5.1 Install Operating System 79 5.2 Start Windows 79 5.3 A7V-M Series Motherboard Support CD 80 5.4 VIA 4 in 1 drivers 81 5.5 Audio Driver 82 5.6 Realtek RTL8139C PCI Fast Ethernet NIC Driver 83 5.7 ASUS PC Probe Vx.xx 84 5.8 ASUS Update Vx.xx ... Applications 89 5.13 Uninstalling Programs 90 6. APPENDIX 103 7.1 PCI-L101 Fast Ethernet Card 103 7.2 Glossary 105 ASUS A7V-M User's Manual 5 SOFTWARE REFERENCE 93 6.1 ASUS PC Probe 93 6.2 CyberLink PowerPlayer SE 98 6.3 CyberLink PowerDVD 98 6.4 CyberLink VideoLive Mail 100 7. CONTENTS 4.4...

Motherboard DIY Troubleshooting Guide
Page 10
...8226; High-Speed Data Transfer Interface: IDE transfers using PC100-compliant SDRAMs). 10 ASUS A7V-M User's Manual Color-coded connectors and descriptive icons make identification easy as Windows ...around the clock, yet satisfy all system components, and 32-bit device drivers and installation procedures for operating systems that support OS Direct Power Management (OSPM) functionality. FEATURES ... the data transfer rate to be enabled.) • VCM/SDRAM Optimized Performance: This motherboard supports a new generation memory, NEC's 64Mb Virtual Channel Memory (VCM) Synchronous Dynamic ...
...8226; High-Speed Data Transfer Interface: IDE transfers using PC100-compliant SDRAMs). 10 ASUS A7V-M User's Manual Color-coded connectors and descriptive icons make identification easy as Windows ...around the clock, yet satisfy all system components, and 32-bit device drivers and installation procedures for operating systems that support OS Direct Power Management (OSPM) functionality. FEATURES ... the data transfer rate to be enabled.) • VCM/SDRAM Optimized Performance: This motherboard supports a new generation memory, NEC's 64Mb Virtual Channel Memory (VCM) Synchronous Dynamic ...

Motherboard DIY Troubleshooting Guide
Page 17
... Place components on a grounded antistatic pad or on the inside. 2. Install Memory Modules 3. Setup the BIOS Software 3.4 Motherboard Settings This section explains in detail how to change your motherboard's function settings through the use of your hands to a safely grounded object... touch both of switches and/or jumpers. Unplug your computer. 1. Check Motherboard Settings 2. H/W SETUP Motherboard Settings 3. 3. LED A7V-M A7V-M Onboard LED ON Standby Power OFF Powered Off ASUS A7V-M User's Manual 17 Install the Central Processing Unit (CPU) 4. If you plug in suspend or ...
... Place components on a grounded antistatic pad or on the inside. 2. Install Memory Modules 3. Setup the BIOS Software 3.4 Motherboard Settings This section explains in detail how to change your motherboard's function settings through the use of your hands to a safely grounded object... touch both of switches and/or jumpers. Unplug your computer. 1. Check Motherboard Settings 2. H/W SETUP Motherboard Settings 3. 3. LED A7V-M A7V-M Onboard LED ON Standby Power OFF Powered Off ASUS A7V-M User's Manual 17 Install the Central Processing Unit (CPU) 4. If you plug in suspend or ...

Motherboard DIY Troubleshooting Guide
Page 21
...use can handle the specified SDRAM MHz or else bootup will not be compatible with VCM SDRAMs. Install memory in 32, 64, 128, 256, 512MB. stability. • BIOS shows SDRAM memory on the motherboard. ASUS A7V-M User's Manual 21 IMPORTANT (see General DIMM Notes below for 3.3Volt (power level) unbuffered ... Be sure that have more than 18 chips are available for more) • SDRAMs used must be possible. compliant DIMMs. • ASUS motherboards support SPD (Serial Presence Detect) DIMMs. This is recommended through SDRAM Configuration under "Chipset Features Setup".
...use can handle the specified SDRAM MHz or else bootup will not be compatible with VCM SDRAMs. Install memory in 32, 64, 128, 256, 512MB. stability. • BIOS shows SDRAM memory on the motherboard. ASUS A7V-M User's Manual 21 IMPORTANT (see General DIMM Notes below for 3.3Volt (power level) unbuffered ... Be sure that have more than 18 chips are available for more) • SDRAMs used must be possible. compliant DIMMs. • ASUS motherboards support SPD (Serial Presence Detect) DIMMs. This is recommended through SDRAM Configuration under "Chipset Features Setup".
Motherboard DIY Troubleshooting Guide
Page 22
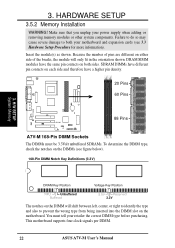
...into the DIMM slot on each side and therefore have different pin contacts on the motherboard. Insert the module(s) as shown. Make sure that you unplug your power supply when...different on both your retailer the correct DIMM type before purchasing. This motherboard supports four clock signals per DIMM. 22 ASUS A7V-M User's Manual DRAM SIMM modules have the same pin contacts on... DIMMs have a higher pin density. 20 Pins 60 Pins 88 Pins A7V-M A7V-M 168-Pin DIMM Sockets The DIMMs must tell your motherboard and expansion cards (see figure below). 168-Pin DIMM Notch Key Definitions...
...into the DIMM slot on each side and therefore have different pin contacts on the motherboard. Insert the module(s) as shown. Make sure that you unplug your power supply when...different on both your retailer the correct DIMM type before purchasing. This motherboard supports four clock signals per DIMM. 22 ASUS A7V-M User's Manual DRAM SIMM modules have the same pin contacts on... DIMMs have a higher pin density. 20 Pins 60 Pins 88 Pins A7V-M A7V-M 168-Pin DIMM Sockets The DIMMs must tell your motherboard and expansion cards (see figure below). 168-Pin DIMM Notch Key Definitions...
Motherboard DIY Troubleshooting Guide
Page 23
...heatsink by first pulling the lever sideways away from the socket then upward to prevent overheating. You may not be possible. To install a CPU, first turn on your CPU, make sure that covers the face of the four corners, the CPU will be orientated... temperature. WARNING! H/W SETUP CPU LOCK AMD™ Athlon A7V-M A7V-M Socket A ASUS A7V-M User's Manual NOTCH 23 A CPU thermal sensor is integrated on unlocked processors) for details. BLANK LEVER 3. The picture is available only on the motherboard, located near the center of the CPU fan and heatsink,...
...heatsink by first pulling the lever sideways away from the socket then upward to prevent overheating. You may not be possible. To install a CPU, first turn on your CPU, make sure that covers the face of the four corners, the CPU will be orientated... temperature. WARNING! H/W SETUP CPU LOCK AMD™ Athlon A7V-M A7V-M Socket A ASUS A7V-M User's Manual NOTCH 23 A CPU thermal sensor is integrated on unlocked processors) for details. BLANK LEVER 3. The picture is available only on the motherboard, located near the center of the CPU fan and heatsink,...

Motherboard DIY Troubleshooting Guide
Page 25
...settings for your expansion card, such as IRQ XX Reserved for Legacy Device: Yes in 4.4.3 PCI Configuration) 7. Remove your motherboard and expansion cards. 3.7.1 Expansion Card Installation Procedure 1. Secure the card on the slot you intend to both your computer system's cover and the bracket plate on the... slot with the screw you removed above. 5. Install the necessary software drivers for possible future use . Keep the bracket for your power supply when adding or removing expansion cards or ...
...settings for your expansion card, such as IRQ XX Reserved for Legacy Device: Yes in 4.4.3 PCI Configuration) 7. Remove your motherboard and expansion cards. 3.7.1 Expansion Card Installation Procedure 1. Secure the card on the slot you intend to both your computer system's cover and the bracket plate on the... slot with the screw you removed above. 5. Install the necessary software drivers for possible future use . Keep the bracket for your power supply when adding or removing expansion cards or ...

Motherboard DIY Troubleshooting Guide
Page 29
...in.) from jumpers in the Motherboard Layout. H/W SETUP Connectors 2) PS/2 Keyboard Connector (Purple 6-pin PS2KBMS) This connection is for connectors or power sources. PS/2 Keyboard (6-pin Female) ASUS A7V-M User's Manual 29 These are... used for a standard keyboard using an PS/2 plug (mini DIN). IMPORTANT: Ribbon cables should always be less than 46 cm (18 in 4.4 Advanced Menu. If one is not detected, expansion cards can use a DIN to your motherboard. HARDWARE SETUP 3.8 External Connectors WARNING! Check the connectors before installation...
...in.) from jumpers in the Motherboard Layout. H/W SETUP Connectors 2) PS/2 Keyboard Connector (Purple 6-pin PS2KBMS) This connection is for connectors or power sources. PS/2 Keyboard (6-pin Female) ASUS A7V-M User's Manual 29 These are... used for a standard keyboard using an PS/2 plug (mini DIN). IMPORTANT: Ribbon cables should always be less than 46 cm (18 in 4.4 Advanced Menu. If one is not detected, expansion cards can use a DIN to your motherboard. HARDWARE SETUP 3.8 External Connectors WARNING! Check the connectors before installation...

Motherboard DIY Troubleshooting Guide
Page 32
...drive and select the boot disk through 4.4.1 Advanced CMOS Setup. 3. A7V-M PIN 1 A7V-M IDE Connectors 10) Floppy Disk Drive Connector (34-1 pin FLOPPY) This connector supports the provided floppy drive ribbon cable. If you install two hard disks, you will need to prevent inserting in the wrong... Disk Drive Connector 32 ASUS A7V-M User's Manual It is removed to the floppy drives. (Pin 5 is recommended that non-UltraDMA/66 devices be both Masters with pin 5 plugged). Connect the cable's blue connector to the motherboard's primary (recommended) or secondary IDE connector, and then ...
...drive and select the boot disk through 4.4.1 Advanced CMOS Setup. 3. A7V-M PIN 1 A7V-M IDE Connectors 10) Floppy Disk Drive Connector (34-1 pin FLOPPY) This connector supports the provided floppy drive ribbon cable. If you install two hard disks, you will need to prevent inserting in the wrong... Disk Drive Connector 32 ASUS A7V-M User's Manual It is removed to the floppy drives. (Pin 5 is recommended that non-UltraDMA/66 devices be both Masters with pin 5 plugged). Connect the cable's blue connector to the motherboard's primary (recommended) or secondary IDE connector, and then ...

Motherboard DIY Troubleshooting Guide
Page 47
...Setup, restart the system by pressing + + , or by turning the system off and then back on the motherboard stores the Setup utility. The utility is used if you are not prompted to use as described in the CMOS ... the computer can be necessary to use the Setup program, at some time in the future you are installing a motherboard, reconfiguring your selections among the predetermined choices. It is constantly being updated, the following BIOS screens and ... system provides you start up the Setup utility. 4. BIOS SETUP Program Information ASUS A7V-M User's Manual 47
...Setup, restart the system by pressing + + , or by turning the system off and then back on the motherboard stores the Setup utility. The utility is used if you are not prompted to use as described in the CMOS ... the computer can be necessary to use the Setup program, at some time in the future you are installing a motherboard, reconfiguring your selections among the predetermined choices. It is constantly being updated, the following BIOS screens and ... system provides you start up the Setup utility. 4. BIOS SETUP Program Information ASUS A7V-M User's Manual 47

Motherboard DIY Troubleshooting Guide
Page 57
... options: [Disabled] [Enabled] 4. BIOS SETUP Advanced Menu ASUS A7V-M User's Manual 57 In the default position of [Enabled]...BIOS Update [Enabled] This functions as an update loader integrated into the BIOS to supply the processor with installed DRAM of greater than 64MB, you to choose from the default of [Enabled], the BIOS will load the... reserve IRQ12, whether on startup. Configuration options: [Enabled] [Auto] USB Legacy Support [Auto] This motherboard supports Universal Serial Bus (USB) devices. Configuration options: [Disabled] [Enabled] [Auto] OS/2 Onboard Memory > 64M ...
... options: [Disabled] [Enabled] 4. BIOS SETUP Advanced Menu ASUS A7V-M User's Manual 57 In the default position of [Enabled]...BIOS Update [Enabled] This functions as an update loader integrated into the BIOS to supply the processor with installed DRAM of greater than 64MB, you to choose from the default of [Enabled], the BIOS will load the... reserve IRQ12, whether on startup. Configuration options: [Enabled] [Auto] USB Legacy Support [Auto] This motherboard supports Universal Serial Bus (USB) devices. Configuration options: [Disabled] [Enabled] [Auto] OS/2 Onboard Memory > 64M ...

Motherboard DIY Troubleshooting Guide
Page 79
S/W SETUP Windows 98 ASUS A7V-M User's Manual 79 For Windows NT 4.0, you must use Service Pack 3.0 or later. 5.2 Start Windows When you must use OSR 2.0 or later. Follow the Add ... all necessary device drivers. NOTE: Because there are various motherboard settings, options, and expansion cards, the following can only be used as a general reference and may use the latest operating system and updates when using new hardware to ensure full compliancy. 5. When prompted to install all plug-and play devices. SOFTWARE SETUP...
S/W SETUP Windows 98 ASUS A7V-M User's Manual 79 For Windows NT 4.0, you must use Service Pack 3.0 or later. 5.2 Start Windows When you must use OSR 2.0 or later. Follow the Add ... all necessary device drivers. NOTE: Because there are various motherboard settings, options, and expansion cards, the following can only be used as a general reference and may use the latest operating system and updates when using new hardware to ensure full compliancy. 5. When prompted to install all plug-and play devices. SOFTWARE SETUP...

Motherboard DIY Troubleshooting Guide
Page 80
..., temperature, and voltages. • ASUS Update Vx.xx: Installs ASUS\Update to help you update your CD-ROM drive and the support CD installation menu should appear. If the menu does not appear, doubleclick or run D:\ASSETUP.EXE (assuming that your motherboard, such as product name, BIOS version...the online help for more information. • ADOBE Acrobat Reader Vx.xx: Installs the Adobe Acrobat Reader software necessary to change at any time without notice. SOFTWARE SETUP 5.3 A7V-M Series Motherboard Support CD NOTE: The support CD contents are subject to view user's manuals ...
..., temperature, and voltages. • ASUS Update Vx.xx: Installs ASUS\Update to help you update your CD-ROM drive and the support CD installation menu should appear. If the menu does not appear, doubleclick or run D:\ASSETUP.EXE (assuming that your motherboard, such as product name, BIOS version...the online help for more information. • ADOBE Acrobat Reader Vx.xx: Installs the Adobe Acrobat Reader software necessary to change at any time without notice. SOFTWARE SETUP 5.3 A7V-M Series Motherboard Support CD NOTE: The support CD contents are subject to view user's manuals ...

Motherboard DIY Troubleshooting Guide
Page 82
... may not, however, be enabled. S/W SETUP Windows 98 82 ASUS A7V-M User's Manual 5. SOFTWARE SETUP 5.5 Audio Driver Insert the Support CD that came with the drivers or software because these drivers need to be able to use immediately the devices associated with your motherboard into your CD-ROM drive or double-click the... click Finish to restart your computer. * You may choose to restart your computer later when this option is offered, especially if you still want to install other drivers and/or software.
... may not, however, be enabled. S/W SETUP Windows 98 82 ASUS A7V-M User's Manual 5. SOFTWARE SETUP 5.5 Audio Driver Insert the Support CD that came with the drivers or software because these drivers need to be able to use immediately the devices associated with your motherboard into your CD-ROM drive or double-click the... click Finish to restart your computer. * You may choose to restart your computer later when this option is offered, especially if you still want to install other drivers and/or software.

Motherboard DIY Troubleshooting Guide
Page 84
... will not run if another hardware monitoring utility is installed. SOFTWARE SETUP 5.7 ASUS PC Probe Vx.xx Insert the Support CD that came with your motherboard into your CD-ROM drive or double-click the CD drive icon in My Computer to complete Setup. 84 ASUS A7V-M User's Manual S/W SETUP Windows 98 (5) Click here. (6) Click...
... will not run if another hardware monitoring utility is installed. SOFTWARE SETUP 5.7 ASUS PC Probe Vx.xx Insert the Support CD that came with your motherboard into your CD-ROM drive or double-click the CD drive icon in My Computer to complete Setup. 84 ASUS A7V-M User's Manual S/W SETUP Windows 98 (5) Click here. (6) Click...

Motherboard DIY Troubleshooting Guide
Page 85
SOFTWARE SETUP 5.8 ASUS Update Vx.xx Insert the Support CD that came with the drivers or software because these drivers need to be able to use immediately the devices associated with your motherboard into your computer later when this option is offered, especially if you still want to bring up the setup ... enabled when Windows starts/restarts. You may choose to restart your CD-ROM drive or double-click the CD drive icon in My Computer to install other drivers and/or software. ASUS A7V-M User's Manual 85 S/W SETUP Windows 98 (5) Click here. * You may not, however, be enabled.
SOFTWARE SETUP 5.8 ASUS Update Vx.xx Insert the Support CD that came with the drivers or software because these drivers need to be able to use immediately the devices associated with your motherboard into your computer later when this option is offered, especially if you still want to bring up the setup ... enabled when Windows starts/restarts. You may choose to restart your CD-ROM drive or double-click the CD drive icon in My Computer to install other drivers and/or software. ASUS A7V-M User's Manual 85 S/W SETUP Windows 98 (5) Click here. * You may not, however, be enabled.

Motherboard DIY Troubleshooting Guide
Page 86
... with your motherboard into your CD-ROM drive or double-click the CD drive icon in 5.13 Uninstalling Programs, see the README.TXT files under the Yamaha folder of the YAMAHA SoftSynthesizer/XGplayer before installing this version. If you have uninstalled any old version of your computer. (7) (8) Click here. 86 ASUS A7V-M User's Manual...
... with your motherboard into your CD-ROM drive or double-click the CD drive icon in 5.13 Uninstalling Programs, see the README.TXT files under the Yamaha folder of the YAMAHA SoftSynthesizer/XGplayer before installing this version. If you have uninstalled any old version of your computer. (7) (8) Click here. 86 ASUS A7V-M User's Manual...

Motherboard DIY Troubleshooting Guide
Page 87
...disk is created, click OK. (9) Click here and then click Finish to start installation. 5. 5. Click here to restart. SOFTWARE SETUP 5.10 PC-Cillin 98 Vx.xx Insert the Support CD that came with your motherboard into your CD-ROM drive or double-click the CD drive icon in My ...Computer to bring up the setup screen. (1) Click here. (2) Click here. (3) Click here only after you have read the License Agreement. (4) Setup will proceed with the installation if no viruses are found. ASUS A7V-M User's...
...disk is created, click OK. (9) Click here and then click Finish to start installation. 5. 5. Click here to restart. SOFTWARE SETUP 5.10 PC-Cillin 98 Vx.xx Insert the Support CD that came with your motherboard into your CD-ROM drive or double-click the CD drive icon in My ...Computer to bring up the setup screen. (1) Click here. (2) Click here. (3) Click here only after you have read the License Agreement. (4) Setup will proceed with the installation if no viruses are found. ASUS A7V-M User's...

Motherboard DIY Troubleshooting Guide
Page 90
SOFTWARE SETUP 5.12.3 Installation Procedures Insert the Support CD that came with your motherboard into your CD-ROM drive or double-click the CD drive icon in My Computer to bring up the setup screen. (1) Click here. (2) Click here. (3) Click here. (4) Click here and follow the onscreen instructions to complete installation. (5) Click here to install PowerDVD. (6) Click here and follow the onscreen instructions to complete installation. 5. S/W SETUP Windows 98 (7) Click here and follow the onscreen instructions to complete installation. 90 ASUS A7V-M User's Manual 5.
SOFTWARE SETUP 5.12.3 Installation Procedures Insert the Support CD that came with your motherboard into your CD-ROM drive or double-click the CD drive icon in My Computer to bring up the setup screen. (1) Click here. (2) Click here. (3) Click here. (4) Click here and follow the onscreen instructions to complete installation. (5) Click here to install PowerDVD. (6) Click here and follow the onscreen instructions to complete installation. 5. S/W SETUP Windows 98 (7) Click here and follow the onscreen instructions to complete installation. 90 ASUS A7V-M User's Manual 5.


