
Motherboard DIY Troubleshooting Guide
Page 2
...be reproduced, transmitted, transcribed, stored in a retrieval system, or translated into any language in writing by ASUS; Product Name: ASUS A7V-M Manual Revision: 1.01 E603 Release Date: October 2000 2 ASUS A7V-M User's Manual or (2) the serial number of the product is authorized in any form or by any... IN THIS MANUAL, INCLUDING THE PRODUCTS AND SOFTWARE DESCRIBED IN IT. For previous or updated manuals, BIOS, drivers, or product release information, contact ASUS at http://www.asus.com.tw or through any means, except documentation kept by the digit before and after the period ...
...be reproduced, transmitted, transcribed, stored in a retrieval system, or translated into any language in writing by ASUS; Product Name: ASUS A7V-M Manual Revision: 1.01 E603 Release Date: October 2000 2 ASUS A7V-M User's Manual or (2) the serial number of the product is authorized in any form or by any... IN THIS MANUAL, INCLUDING THE PRODUCTS AND SOFTWARE DESCRIBED IN IT. For previous or updated manuals, BIOS, drivers, or product release information, contact ASUS at http://www.asus.com.tw or through any means, except documentation kept by the digit before and after the period ...
Motherboard DIY Troubleshooting Guide
Page 4
... the First Time 41 4. FEATURES 8 2.1 The ASUS A7V-M 8 2.1.1 Specifications 8 2.1.2 Special Features 10 2.1.3 Performance Features 10 2.1.4 Intelligence 11 2.2 Motherboard Components 12 2.2.1 Component Locations 13 3. CONTENTS 1. BIOS SETUP 43 4.1 Managing and Updating Your BIOS 43 4.1.1 Upon First Use of the Computer System 43 4.1.2 Updating BIOS Procedures 44 4.2 BIOS Setup Program 47 4.2.1 BIOS Menu Bar 48 4.2.2 Legend Bar 48 4.3 Main...
... the First Time 41 4. FEATURES 8 2.1 The ASUS A7V-M 8 2.1.1 Specifications 8 2.1.2 Special Features 10 2.1.3 Performance Features 10 2.1.4 Intelligence 11 2.2 Motherboard Components 12 2.2.1 Component Locations 13 3. CONTENTS 1. BIOS SETUP 43 4.1 Managing and Updating Your BIOS 43 4.1.1 Upon First Use of the Computer System 43 4.1.2 Updating BIOS Procedures 44 4.2 BIOS Setup Program 47 4.2.1 BIOS Menu Bar 48 4.2.2 Legend Bar 48 4.3 Main...
Motherboard DIY Troubleshooting Guide
Page 7
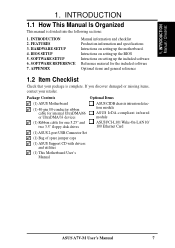
...information and specifications Intructions on setting up the motherboard. SOFTWARE REFERENCE 7. 1. INTRODUCTION Manual / Checklist 1. BIOS SETUP 5. Intructions on setting up the BIOS Intructions on setting up the included software Reference material for one 5.25" and two 3.5" floppy disk drives...Items ASUS CIDB chassis intrusion detection module ASUS IrDA-compliant infrared module ASUS PCI-L101 Wake-On-LAN 10/ 100 Ethernet Card (1) ASUS 2-port USB Connector Set (1) Bag of spare jumper caps (1) ASUS Support CD with drivers and utilities (1) This Motherboard User's Manual ASUS A7V-M ...
...information and specifications Intructions on setting up the motherboard. SOFTWARE REFERENCE 7. 1. INTRODUCTION Manual / Checklist 1. BIOS SETUP 5. Intructions on setting up the BIOS Intructions on setting up the included software Reference material for one 5.25" and two 3.5" floppy disk drives...Items ASUS CIDB chassis intrusion detection module ASUS IrDA-compliant infrared module ASUS PCI-L101 Wake-On-LAN 10/ 100 Ethernet Card (1) ASUS 2-port USB Connector Set (1) Bag of spare jumper caps (1) ASUS Support CD with drivers and utilities (1) This Motherboard User's Manual ASUS A7V-M ...

Motherboard DIY Troubleshooting Guide
Page 8
...ROM, CD-ROM, CDR/RW, LS-120, and Tape Backup drives. • Wake-On-LAN Connector: Supports Wake-On-LAN activity through BIOS setup when JumperFree™ mode is optimized to deliver enhanced AMD Athlon™/Duron™ processor system performance. • "Super South" South ... 128, 256, or 512MB) or NEC's VC133-compliant Virtual Channel (VC) SDRAM up to 1GB. AC97 audio; and PCI 2.2. FEATURES 2.1 The ASUS A7V-M The ASUS A7V-M motherboard is a new DRAM core architecture that support four ATA66/33 devices on two channels. complies with support for 4X, 2X, and 1X AGP ...
...ROM, CD-ROM, CDR/RW, LS-120, and Tape Backup drives. • Wake-On-LAN Connector: Supports Wake-On-LAN activity through BIOS setup when JumperFree™ mode is optimized to deliver enhanced AMD Athlon™/Duron™ processor system performance. • "Super South" South ... 128, 256, or 512MB) or NEC's VC133-compliant Virtual Channel (VC) SDRAM up to 1GB. AC97 audio; and PCI 2.2. FEATURES 2.1 The ASUS A7V-M The ASUS A7V-M motherboard is a new DRAM core architecture that support four ATA66/33 devices on two channels. complies with support for 4X, 2X, and 1X AGP ...
Motherboard DIY Troubleshooting Guide
Page 9
2. FEATURES Specifications 2. ASUS A7V-M User's Manual 9 FEATURES • Wake-On-Ring Connector: Supports Wake-On...peripherals, personal gadgets, or an optional remote controller. • Desktop Management Interface (DMI): Supports DMI through BIOS, which can support Bus Master PCI cards, such as SCSI or LAN cards (PCI supports up to 133MB/s...one parallel port with EPP and ECP capabilities. • Enhanced ACPI & Anti-Boot Virus Protection: Programmable BIOS (Flash EEPROM), offering enhanced ACPI for virtually automatic setup. • Concurrent PCI: Concurrent PCI allows multiple ...
2. FEATURES Specifications 2. ASUS A7V-M User's Manual 9 FEATURES • Wake-On-Ring Connector: Supports Wake-On...peripherals, personal gadgets, or an optional remote controller. • Desktop Management Interface (DMI): Supports DMI through BIOS, which can support Bus Master PCI cards, such as SCSI or LAN cards (PCI supports up to 133MB/s...one parallel port with EPP and ECP capabilities. • Enhanced ACPI & Anti-Boot Virus Protection: Programmable BIOS (Flash EEPROM), offering enhanced ACPI for virtually automatic setup. • Concurrent PCI: Concurrent PCI allows multiple ...

Motherboard DIY Troubleshooting Guide
Page 10
...BIOS: Supports optional ASUS SCSI controller cards through the onboard SYMBIOS firmware. 2.1.3 Performance Features • Concurrent PCI: Concurrent PCI allows multiple PCI transfers from PCI master busses to the memory and processor. • High-Speed Data Transfer Interface: IDE transfers using PC100-compliant SDRAMs). 10 ASUS A7V... which is compatible to make identification easy as Windows 98 must be used. • Easy Installation: Incorporates BIOS that support OS Direct Power Management (OSPM) functionality. FEATURES 2.1.2 Special Features • ACPI Ready: Advanced ...
...BIOS: Supports optional ASUS SCSI controller cards through the onboard SYMBIOS firmware. 2.1.3 Performance Features • Concurrent PCI: Concurrent PCI allows multiple PCI transfers from PCI master busses to the memory and processor. • High-Speed Data Transfer Interface: IDE transfers using PC100-compliant SDRAMs). 10 ASUS A7V... which is compatible to make identification easy as Windows 98 must be used. • Easy Installation: Incorporates BIOS that support OS Direct Power Management (OSPM) functionality. FEATURES 2.1.2 Special Features • ACPI Ready: Advanced ...

Motherboard DIY Troubleshooting Guide
Page 11
... 4.5 Power Menu). This function reduces both energy consumption and system noise, and is kept in memory on the BIOS or OS setting (see PWR Button < 4 Secs in sleep mode. All fans are more protection. ASUS A7V-M User's Manual 11 With this benefit on managing their computers from their limited resources more efficiently. •...
... 4.5 Power Menu). This function reduces both energy consumption and system noise, and is kept in memory on the BIOS or OS setting (see PWR Button < 4 Secs in sleep mode. All fans are more protection. ASUS A7V-M User's Manual 11 With this benefit on managing their computers from their limited resources more efficiently. •...
Motherboard DIY Troubleshooting Guide
Page 14
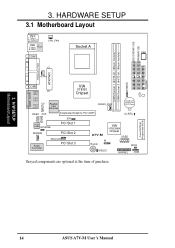
... Lithium Cell CMOS Power CLRTC JEN Audio Codec HPHONE PCI Slot 1 MODEM PCI Slot 2 Audio Controller WOLCON PCI Slot 3 VIA VT82C686A Chipset A7V-M USB2 IR Buzzer WOR IDELED HPANEL SMB Grayed components are optional at the time of purchase. H/W SETUP Motherboard Layout 14 ASUS A7V-M User's Manual Flash EEPROM (Programable BIOS) 3. CHASS LED FLOPPY 3.
... Lithium Cell CMOS Power CLRTC JEN Audio Codec HPHONE PCI Slot 1 MODEM PCI Slot 2 Audio Controller WOLCON PCI Slot 3 VIA VT82C686A Chipset A7V-M USB2 IR Buzzer WOR IDELED HPANEL SMB Grayed components are optional at the time of purchase. H/W SETUP Motherboard Layout 14 ASUS A7V-M User's Manual Flash EEPROM (Programable BIOS) 3. CHASS LED FLOPPY 3.

Motherboard DIY Troubleshooting Guide
Page 17
...from the system. 5. WARNING! Failure to do not have one, touch both of switches and/or jumpers. LED A7V-M A7V-M Onboard LED ON Standby Power OFF Powered Off ASUS A7V-M User's Manual 17 Computer motherboards and expansion cards contain very delicate Integrated Circuit (IC) chips. Unplug your computer.... hands to a safely grounded object or to your power supply when adding or removing system components. 3. Setup the BIOS Software 3.4 Motherboard Settings This section explains in or remove the ATX power connector on the inside. 2. H/W SETUP Motherboard Settings 3.
...from the system. 5. WARNING! Failure to do not have one, touch both of switches and/or jumpers. LED A7V-M A7V-M Onboard LED ON Standby Power OFF Powered Off ASUS A7V-M User's Manual 17 Computer motherboards and expansion cards contain very delicate Integrated Circuit (IC) chips. Unplug your computer.... hands to a safely grounded object or to your power supply when adding or removing system components. 3. Setup the BIOS Software 3.4 Motherboard Settings This section explains in or remove the ATX power connector on the inside. 2. H/W SETUP Motherboard Settings 3.
Motherboard DIY Troubleshooting Guide
Page 18
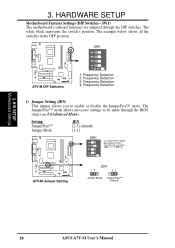
... to enable or disable the JumperFree™ mode. SW1) The motherboard's onboard functions are adjusted through the BIOS setup (see 4.4 Advanced Menu). The white block represents the switch's position. Setting JumperFree™ Jumper Mode JEN... the OFF position. SW1 O1 2 3 4 N A7V-M A7V-M DIP Switches 1. HARDWARE SETUP Motherboard Features Settings (DIP Switches - Frequency Selection 4. OFF: 3) O1 2 3 4 N A7V-M A7V-M Jumper Setting JEN 12 23 Jumper Mode JumperFree™ (Default) 18 ASUS A7V-M User's Manual H/W SETUP Motherboard Settings 3. 3. Frequency...
... to enable or disable the JumperFree™ mode. SW1) The motherboard's onboard functions are adjusted through the BIOS setup (see 4.4 Advanced Menu). The white block represents the switch's position. Setting JumperFree™ Jumper Mode JEN... the OFF position. SW1 O1 2 3 4 N A7V-M A7V-M DIP Switches 1. HARDWARE SETUP Motherboard Features Settings (DIP Switches - Frequency Selection 4. OFF: 3) O1 2 3 4 N A7V-M A7V-M Jumper Setting JEN 12 23 Jumper Mode JumperFree™ (Default) 18 ASUS A7V-M User's Manual H/W SETUP Motherboard Settings 3. 3. Frequency...
Motherboard DIY Troubleshooting Guide
Page 20
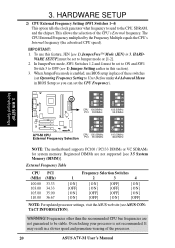
... 4.4 Advanced Menu in a slower speed and premature wearing of the processor. 20 ASUS A7V-M User's Manual H/W SETUP Motherboard Settings CPU 100.00MHz PCI 33.33MHz 103.00MHz 34.33MHz ON 1234 ON 1234 A7V-M A7V-M CPU External Frequency Selection CPU 105.00MHz PCI 35.00MHz 110.00MHz 36.67MHz ... in 3. HARD- This allows the selection of these switches (set the CPU Frequency). IMPORTANT: 1. ON 1234 ON 1234 3. It may result in BIOS Setup so you can set Operating Frequency Setting to Jumper mode or [1-2]. 2. External Frequency Table CPU (MHz) 100.00 103.00 105.00 110...
... 4.4 Advanced Menu in a slower speed and premature wearing of the processor. 20 ASUS A7V-M User's Manual H/W SETUP Motherboard Settings CPU 100.00MHz PCI 33.33MHz 103.00MHz 34.33MHz ON 1234 ON 1234 A7V-M A7V-M CPU External Frequency Selection CPU 105.00MHz PCI 35.00MHz 110.00MHz 36.67MHz ... in 3. HARD- This allows the selection of these switches (set the CPU Frequency). IMPORTANT: 1. ON 1234 ON 1234 3. It may result in BIOS Setup so you can set Operating Frequency Setting to Jumper mode or [1-2]. 2. External Frequency Table CPU (MHz) 100.00 103.00 105.00 110...

Motherboard DIY Troubleshooting Guide
Page 21
...tion. • DO NOT attempt to mix PC133 SDRAMs with VCM SDRAMs. Install memory in 16, 32, 64,128, 256MB; stability. • BIOS shows SDRAM memory on bootup screen. • Single-sided DIMMs come in 32, 64, 128, 256, 512MB. Be sure that have more than ... 100MHz/133MHz, use can handle the specified SDRAM MHz or else bootup will not be compatible with memory chips) of choice for best performance vs. ASUS A7V-M User's Manual 21 HARDWARE SETUP 3.5 System Memory (DIMM) This motherboard uses only Dual Inline Memory Modules (DIMMs). H/W SETUP System Memory 3.5.1 General DIMM Notes ...
...tion. • DO NOT attempt to mix PC133 SDRAMs with VCM SDRAMs. Install memory in 16, 32, 64,128, 256MB; stability. • BIOS shows SDRAM memory on bootup screen. • Single-sided DIMMs come in 32, 64, 128, 256, 512MB. Be sure that have more than ... 100MHz/133MHz, use can handle the specified SDRAM MHz or else bootup will not be compatible with memory chips) of choice for best performance vs. ASUS A7V-M User's Manual 21 HARDWARE SETUP 3.5 System Memory (DIMM) This motherboard uses only Dual Inline Memory Modules (DIMMs). H/W SETUP System Memory 3.5.1 General DIMM Notes ...

Motherboard DIY Troubleshooting Guide
Page 25
... Carefully align the card's connectors and press firmly. 4. Secure the card on the slot you removed above. 5. H/W SETUP Expansion Cards ASUS A7V-M User's Manual 25 Remove your computer system's cover and the bracket plate on the slot with the screw you intend to both your expansion...expansion card, such as IRQ XX Reserved for your power supply when adding or removing expansion cards or other system components. Set up the BIOS if necessary (such as jumpers. 2. Replace the computer system's cover. 6. 3. HARDWARE SETUP 3.7 Expansion Cards WARNING! Install the necessary ...
... Carefully align the card's connectors and press firmly. 4. Secure the card on the slot you removed above. 5. H/W SETUP Expansion Cards ASUS A7V-M User's Manual 25 Remove your computer system's cover and the bracket plate on the slot with the screw you intend to both your expansion...expansion card, such as IRQ XX Reserved for your power supply when adding or removing expansion cards or other system components. Set up the BIOS if necessary (such as jumpers. 2. Replace the computer system's cover. 6. 3. HARDWARE SETUP 3.7 Expansion Cards WARNING! Install the necessary ...

Motherboard DIY Troubleshooting Guide
Page 32
... connected to PIN 1 A7V-M PIN 1 A7V-M Floppy Disk Drive Connector 32 ASUS A7V-M User's Manual one operating system on an IDE drive and another on the UltraDMA/66 cable is removed to Slave mode by setting its jumper accordingly. A7V-M PIN 1 A7V-M IDE Connectors 10) ...Floppy Disk Drive Connector (34-1 pin FLOPPY) This connector supports the provided floppy drive ribbon cable. BIOS...
... connected to PIN 1 A7V-M PIN 1 A7V-M Floppy Disk Drive Connector 32 ASUS A7V-M User's Manual one operating system on an IDE drive and another on the UltraDMA/66 cable is removed to Slave mode by setting its jumper accordingly. A7V-M PIN 1 A7V-M IDE Connectors 10) ...Floppy Disk Drive Connector (34-1 pin FLOPPY) This connector supports the provided floppy drive ribbon cable. BIOS...

Motherboard DIY Troubleshooting Guide
Page 40
... of rebooting to prolong the life of certain components when the system is in the ON mode for rebooting your power switch. H/W SETUP Connectors 40 ASUS A7V-M User's Manual The system power LED shows the status of the system's power. 26) System Management Interrupt Lead (2-pin SMI) This allows the user to... this lead. Pressing the button once will allow you may require one or two presses depending on and blinks when it is not in the BIOS but the keyboard will allow wake-up (the SMI lead cannot wake up the system). 3.
... of rebooting to prolong the life of certain components when the system is in the ON mode for rebooting your power switch. H/W SETUP Connectors 40 ASUS A7V-M User's Manual The system power LED shows the status of the system's power. 26) System Management Interrupt Lead (2-pin SMI) This allows the user to... this lead. Pressing the button once will allow you may require one or two presses depending on and blinks when it is not in the BIOS but the keyboard will allow wake-up (the SMI lead cannot wake up the system). 3.

Motherboard DIY Troubleshooting Guide
Page 41
.... Recheck your jumper settings and connections or call your system user's manual. 4. While the tests are running at a lower frequency ASUS A7V-M User's Manual 41 Award BIOS Beep Codes Beep One short beep when displaying logo Long beeps in an endless loop One long beep followed by three short beeps...Meaning No error during POST No DRAM installed or detected Video card not found or video card memory bad CPU overheated System running , the BIOS will alarm beeps or additional messages will light when the ATX power switch is equipped with ). 3. For ATX power supplies, you turn ...
.... Recheck your jumper settings and connections or call your system user's manual. 4. While the tests are running at a lower frequency ASUS A7V-M User's Manual 41 Award BIOS Beep Codes Beep One short beep when displaying logo Long beeps in an endless loop One long beep followed by three short beeps...Meaning No error during POST No DRAM installed or detected Video card not found or video card memory bad CPU overheated System running , the BIOS will alarm beeps or additional messages will light when the ATX power switch is equipped with ). 3. For ATX power supplies, you turn ...

Motherboard DIY Troubleshooting Guide
Page 42
.... 3. If you can now safely turn off the power switch. BIOS SETUP. * Powering Off your computer: You must first exit or shut down your operating system before switching off after exiting or shutting down your computer" will not appear when shutting down to enter BIOS setup. H/W SETUP Powering Up 42 ASUS A7V-M User's Manual 3.
.... 3. If you can now safely turn off the power switch. BIOS SETUP. * Powering Off your computer: You must first exit or shut down your operating system before switching off after exiting or shutting down your computer" will not appear when shutting down to enter BIOS setup. H/W SETUP Powering Up 42 ASUS A7V-M User's Manual 3.

Motherboard DIY Troubleshooting Guide
Page 43
...BAT & CONFIG.SYS to the just created boot disk. BIOS SETUP Updating BIOS IMPORTANT! It will not work with DOS prompt in Windows and will not work with a Flash Memory Writer utility (AFLASH.EXE) to reinstall the BIOS later. ASUS A7V-M User's Manual 43 AFLASH.EXE is recommended that updates ...the BIOS by the Flash Memory Writer utility. It is a Flash Memory Writer utility that you boot from the...
...BAT & CONFIG.SYS to the just created boot disk. BIOS SETUP Updating BIOS IMPORTANT! It will not work with DOS prompt in Windows and will not work with a Flash Memory Writer utility (AFLASH.EXE) to reinstall the BIOS later. ASUS A7V-M User's Manual 43 AFLASH.EXE is recommended that updates ...the BIOS by the Flash Memory Writer utility. It is a Flash Memory Writer utility that you boot from the...

Motherboard DIY Troubleshooting Guide
Page 44
...) and save to File from the disk you created earlier. 2. Boot from the Main menu and press . BIOS SETUP Updating BIOS 44 ASUS A7V-M User's Manual Only update your BIOS if you have problems with your motherboard and you know that the new BIOS revision will solve your problems. Careless updating can result in your new...
...) and save to File from the disk you created earlier. 2. Boot from the Main menu and press . BIOS SETUP Updating BIOS 44 ASUS A7V-M User's Manual Only update your BIOS if you have problems with your motherboard and you know that the new BIOS revision will solve your problems. Careless updating can result in your new...

Motherboard DIY Troubleshooting Guide
Page 45
... may not be displayed. 4. If the Flash Memory Writer utility was not able to successfully update a complete BIOS file, your system will be able to boot up . ASUS A7V-M User's Manual 45 4. The boot block will prevent your system from booting up. Follow the onscreen instructions to... program the new BIOS information into the flash ROM. WARNING! The utility starts to continue. When the programming is...
... may not be displayed. 4. If the Flash Memory Writer utility was not able to successfully update a complete BIOS file, your system will be able to boot up . ASUS A7V-M User's Manual 45 4. The boot block will prevent your system from booting up. Follow the onscreen instructions to... program the new BIOS information into the flash ROM. WARNING! The utility starts to continue. When the programming is...


