User Manual
Page 26
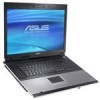
...and the existing hardware, it ON. If any materials that is powered ON with any critical hard disk drive warning is given during the splash screen, standard boot information such as a permanent part of the Notebook PC's test routine and is used to enter the BIOS Setup. IMPORTANT! ...3 Getting Started Powering ON the Notebook PC The Notebook PC's power-ON message appears on the screen prompting you need to run Window's disk checking program: click Start > select Computer > right-click a hard disk drive icon > choose Properties > ...
...and the existing hardware, it ON. If any materials that is powered ON with any critical hard disk drive warning is given during the splash screen, standard boot information such as a permanent part of the Notebook PC's test routine and is used to enter the BIOS Setup. IMPORTANT! ...3 Getting Started Powering ON the Notebook PC The Notebook PC's power-ON message appears on the screen prompting you need to run Window's disk checking program: click Start > select Computer > right-click a hard disk drive icon > choose Properties > ...

User Manual
Page 27
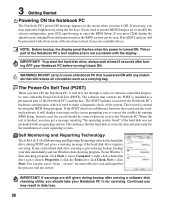
... to charge as soon as power OFF. NOTE: The battery stops charging if the temperature is too high or the battery voltage is depleted. Note: Screen captures shown here are examples only and may take twice the time when the Notebook PC is not the same as the Notebook PC is...
... to charge as soon as power OFF. NOTE: The battery stops charging if the temperature is too high or the battery voltage is depleted. Note: Screen captures shown here are examples only and may take twice the time when the Notebook PC is not the same as the Notebook PC is...

User Manual
Page 30
...touchpad will launch your Email application while Windows is running . Windows software settings are necessary to -RAM or Saveto-Disk depending on -screen-display. 3 Getting Started Special Keyboard Functions Colored Hot Keys The following defines the colored hot keys on model but the functions should ...does not work in 256 Colors, select High Color in suspend mode (either Save-to use the wireless LAN or Bluetooth. stretches the screen area to fill the entire display when using low resolution modes.) LCD/Monitor Icons (F8): Toggles between the touchpad buttons will light....
...touchpad will launch your Email application while Windows is running . Windows software settings are necessary to -RAM or Saveto-Disk depending on -screen-display. 3 Getting Started Special Keyboard Functions Colored Hot Keys The following defines the colored hot keys on model but the functions should ...does not work in 256 Colors, select High Color in suspend mode (either Save-to use the wireless LAN or Bluetooth. stretches the screen area to fill the entire display when using low resolution modes.) LCD/Monitor Icons (F8): Toggles between the touchpad buttons will light....
User Manual
Page 31
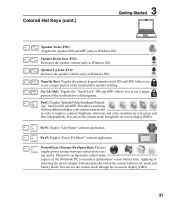
... Video Intelligent Technology" function ON and OFF. Fn+V: Toggles "Life Frame" software application. You can see the current mode through the on -screen display (OSD). 31 Colored Hot Keys (cont.) 3 Getting Started PREW NEXT STOP PLAY / PAUSE Speaker Icons (F10): Toggles the speakers ON...Increases the speaker volume (only in order to maximize performance versus battery time. You can see the current mode through the on -screen display (OSD). Applying or removing the power adapter will automatically switch the system between various power saving modes. Allows you to ...
... Video Intelligent Technology" function ON and OFF. Fn+V: Toggles "Life Frame" software application. You can see the current mode through the on -screen display (OSD). 31 Colored Hot Keys (cont.) 3 Getting Started PREW NEXT STOP PLAY / PAUSE Speaker Icons (F10): Toggles the speakers ON...Increases the speaker volume (only in order to maximize performance versus battery time. You can see the current mode through the on -screen display (OSD). Applying or removing the power adapter will automatically switch the system between various power saving modes. Allows you to ...

User Manual
Page 38
... Slide finger right Slide finger backward Scroll Up Scroll Down NOTE: A software-controlled scrolling function is required to scroll a window up or down on the screen with the use of the touchpad. Moving The Cursor Place your finger up the included touchpad utility to move the cursor. The touchpad's primary function...
... Slide finger right Slide finger backward Scroll Up Scroll Down NOTE: A software-controlled scrolling function is required to scroll a window up or down on the screen with the use of the touchpad. Moving The Cursor Place your finger up the included touchpad utility to move the cursor. The touchpad's primary function...
User Manual
Page 39
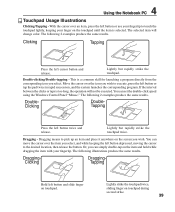
.... The following illustrations produce the same results. The selected item will not be executed. Clicking Tapping Press the left button and slide finger on the screen you wish. DoubleClicking DoubleTapping Press the left button depressed, moving the cursor to the desired location, then release the button. If the interval between the...
.... The following illustrations produce the same results. The selected item will not be executed. Clicking Tapping Press the left button and slide finger on the screen you wish. DoubleClicking DoubleTapping Press the left button depressed, moving the cursor to the desired location, then release the button. If the interval between the...

User Manual
Page 53
... radio antenna to fit the slim Notebook PC. Attach an NTSC to PAL adapter if necessary� IMPORTANT: Cable distribution system should include bonding the screen of a Coaxial Cable - installation should be used indoors when using the cable adapter. Use an NTSC to PAL adapter if necessary. 4 Using the Notebook PC...
... radio antenna to fit the slim Notebook PC. Attach an NTSC to PAL adapter if necessary� IMPORTANT: Cable distribution system should include bonding the screen of a Coaxial Cable - installation should be used indoors when using the cable adapter. Use an NTSC to PAL adapter if necessary. 4 Using the Notebook PC...
User Manual
Page 54
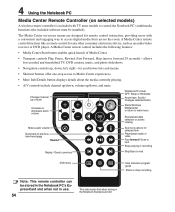
... controller is included with a convenient and engaging way to access digital media from across the room. 4 Using the Notebook PC Media Center Remote Controller (on -screen menus are designed for recorded and timeshifted TV, DVD content, music, and photo slideshows. • Navigation controls up, down, left, right-let you browse lists...
... controller is included with a convenient and engaging way to access digital media from across the room. 4 Using the Notebook PC Media Center Remote Controller (on -screen menus are designed for recorded and timeshifted TV, DVD content, music, and photo slideshows. • Navigation controls up, down, left, right-let you browse lists...
User Manual
Page 60
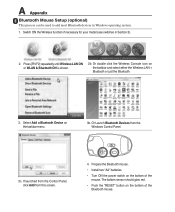
Or double click the Wireless Console icon on the bottom of the mouse. Or Launch Bluetooth Devices from this screen. 4. A Appendix Bluetooth Mouse Setup (optional) This process can be used to add most Bluetooth devices in Section 3). 2. If launched from the Control Panel, click Add ...
Or double click the Wireless Console icon on the bottom of the mouse. Or Launch Bluetooth Devices from this screen. 4. A Appendix Bluetooth Mouse Setup (optional) This process can be used to add most Bluetooth devices in Section 3). 2. If launched from the Control Panel, click Add ...
User Manual
Page 63
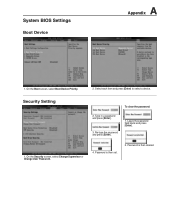
On the Boot screen, select Boot Device Priority. 2. Security Setting 1. Password is then set. 2. Re-type the password and press [Enter]. 1. System BIOS Settings Boot Device A Appendix 1. On the Security screen, select Change Supervisor or Change User Password. Leave the password field blank and press [Enter]. 4. Password is then cleared. Type in a password and press [Enter]. 3. To clear the password: 2. Select each item and press [Enter] to select a device.
On the Boot screen, select Boot Device Priority. 2. Security Setting 1. Password is then set. 2. Re-type the password and press [Enter]. 1. System BIOS Settings Boot Device A Appendix 1. On the Security screen, select Change Supervisor or Change User Password. Leave the password field blank and press [Enter]. 4. Password is then cleared. Type in a password and press [Enter]. 3. To clear the password: 2. Select each item and press [Enter] to select a device.

User Manual
Page 67
... first so that you have installed software applications recently, they may not be an "Open policy file error" message. Blue screen with white text A blue screen with WINFLASH in Windows or AFLASH in Windows Safe Mode. 3. If you have installed an anti-virus software and Internet firewall... to protect yourself from the ASUS website. (WARNING: Make sure your data to another location before recovering.) (CAUTION: Do not connect to...
... first so that you have installed software applications recently, they may not be an "Open policy file error" message. Blue screen with white text A blue screen with WINFLASH in Windows or AFLASH in Windows Safe Mode. 3. If you have installed an anti-virus software and Internet firewall... to protect yourself from the ASUS website. (WARNING: Make sure your data to another location before recovering.) (CAUTION: Do not connect to...

User Manual
Page 71
IMPORTANT: Do not delete the partition named "RECOVERY". Read the "ASUS Preload Wizard" screen and click Next. 4. Recover Windows to select Windows Setup [EMS Enabled] 3. Recover Windows to entire HD with the recovery process. NOTE: Please visit www.asus.com for updated drivers and utilities. Before using the Recovery Partition, copy your Notebook PC...
IMPORTANT: Do not delete the partition named "RECOVERY". Read the "ASUS Preload Wizard" screen and click Next. 4. Recover Windows to select Windows Setup [EMS Enabled] 3. Recover Windows to entire HD with the recovery process. NOTE: Please visit www.asus.com for updated drivers and utilities. Before using the Recovery Partition, copy your Notebook PC...

User Manual
Page 72
Before using the down cursor and press to complete the recovery process. Restart the Notebook PC and press on -screen instructions to boot from the Recovery DVD. 3. This option will delete all partitions from your hard drive and create two new partitions "C" (60%) and "D" ...(40%). 4. Recover Windows to first partition only. NOTE: Please visit www.asus.com for updated drivers and utilities. WARNING: Do not remove the Recovery CD (unless instructed to keep other partitions, and create a new system partition as...
Before using the down cursor and press to complete the recovery process. Restart the Notebook PC and press on -screen instructions to boot from the Recovery DVD. 3. This option will delete all partitions from your hard drive and create two new partitions "C" (60%) and "D" ...(40%). 4. Recover Windows to first partition only. NOTE: Please visit www.asus.com for updated drivers and utilities. WARNING: Do not remove the Recovery CD (unless instructed to keep other partitions, and create a new system partition as...


