
User Guide
Page 1
Motherboard A58M-A/USB3
Motherboard A58M-A/USB3
User Guide
Page 3
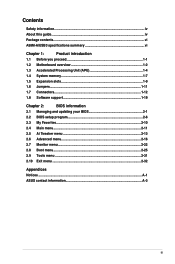
Contents Safety information...iv About this guide...iv Package contents...vi A58M-A/USB3 specifications summary vi Chapter 1: Product introduction 1.1 Before you proceed 1-1 1.2 Motherboard overview 1-2 1.3 Accelerated Processing Unit (APU 1-4 1.4 System memory 1-7 1.5 Expansion slots 1-9 1.6 Jumpers...1-11 1.7 Connectors 1-12 1.8 Software support 1-19 Chapter 2: BIOS information 2.1 Managing... 2-13 2.6 Advanced menu 2-16 2.7 Monitor menu 2-22 2.8 Boot menu...2-25 2.9 Tools menu 2-31 2.10 Exit menu...2-32 Appendices Notices...A-1 ASUS contact information A-3 iii
Contents Safety information...iv About this guide...iv Package contents...vi A58M-A/USB3 specifications summary vi Chapter 1: Product introduction 1.1 Before you proceed 1-1 1.2 Motherboard overview 1-2 1.3 Accelerated Processing Unit (APU 1-4 1.4 System memory 1-7 1.5 Expansion slots 1-9 1.6 Jumpers...1-11 1.7 Connectors 1-12 1.8 Software support 1-19 Chapter 2: BIOS information 2.1 Managing... 2-13 2.6 Advanced menu 2-16 2.7 Monitor menu 2-22 2.8 Boot menu...2-25 2.9 Tools menu 2-31 2.10 Exit menu...2-32 Appendices Notices...A-1 ASUS contact information A-3 iii

User Guide
Page 4
... a qualified service technician or your retailer. Contact a qualified service technician or your retailer. iv Operation safety • Before installing the motherboard and adding devices on a stable surface. • If you detect any area where it may become wet. • Place the product...grounding circuit. • Ensure that all cables are correctly connected and the power cables are also provided. Detailed descriptions of the motherboard and the new technology it supports. • Chapter 2: BIOS information This chapter tells how to change system settings through the ...
... a qualified service technician or your retailer. Contact a qualified service technician or your retailer. iv Operation safety • Before installing the motherboard and adding devices on a stable surface. • If you detect any area where it may become wet. • Place the product...grounding circuit. • Ensure that all cables are correctly connected and the power cables are also provided. Detailed descriptions of the motherboard and the new technology it supports. • Chapter 2: BIOS information This chapter tells how to change system settings through the ...
User Guide
Page 6
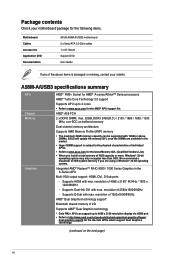
...2G Supports AMD® Dual Graphics technology * Only FM2+ APU can be supported with max. Package contents Check your retailer. A58M-A/USB3 specifications summary APU Chipset Memory Graphics AMD® FM2+ Socket for AMD® A-series/Athlon™ Series processors AMD®... 16GB or above items is subject to the physical characteristics of individual APUs. • Refer to www.asus.com for the following items. Motherboard Cables Accessories Application DVD Documentation ASUS A58M-A/USB3 motherboard 2 x Serial ATA 3.0 Gb/s cables 1 x I/O Shield Support DVD User Guide If any of...
...2G Supports AMD® Dual Graphics technology * Only FM2+ APU can be supported with max. Package contents Check your retailer. A58M-A/USB3 specifications summary APU Chipset Memory Graphics AMD® FM2+ Socket for AMD® A-series/Athlon™ Series processors AMD®... 16GB or above items is subject to the physical characteristics of individual APUs. • Refer to www.asus.com for the following items. Motherboard Cables Accessories Application DVD Documentation ASUS A58M-A/USB3 motherboard 2 x Serial ATA 3.0 Gb/s cables 1 x I/O Shield Support DVD User Guide If any of...

User Guide
Page 9
... power supply case, to avoid damaging them due to static electricity. • Hold components by the edges to the motherboard, peripherals, or components. Product introduction 1 1.1 Before you proceed Take note of the following precautions before you install motherboard components or change any motherboard settings. • Unplug the power cord from the power supply. ASUS A58M-A/USB3 1-1
... power supply case, to avoid damaging them due to static electricity. • Hold components by the edges to the motherboard, peripherals, or components. Product introduction 1 1.1 Before you proceed Take note of the following precautions before you install motherboard components or change any motherboard settings. • Unplug the power cord from the power supply. ASUS A58M-A/USB3 1-1

User Guide
Page 10
... holes Place six screws into the holes indicated by circles to secure the motherboard to the rear part of the chassis A58M-A/USB3 1-2 Chapter 1: Product introduction Doing so can cause you physical injury and damage motherboard components. 1.2.1 Placement direction When installing the motherboard, ensure that you place it . The edge with external ports goes to...
... holes Place six screws into the holes indicated by circles to secure the motherboard to the rear part of the chassis A58M-A/USB3 1-2 Chapter 1: Product introduction Doing so can cause you physical injury and damage motherboard components. 1.2.1 Placement direction When installing the motherboard, ensure that you place it . The edge with external ports goes to...
User Guide
Page 11
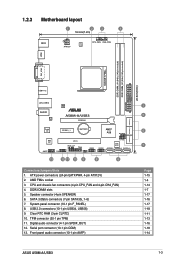
1.2.3 Motherboard layout 1 2 3 4 18.3cm(7.2in) KBMS ATX12V DIGI +VRM CPU_FAN CHA_FAN HDMI DDR3 DIMM_A1 (64bit, 240-pin module) DDR3 DIMM_B1 (64bit, 240-pin module) SOCKET FM2+ DVI_VGA 22.6cm(8.9in) USB1112 EATXPWR LAN_USB12 AUDIO 8111 GR ASM 1042 A58M-A/USB3 PCIEX16 ...(10-1 pin AAFP) SATA3G_4 SATA3G_5 SATA3G_6 1 5 6 7 Page 1-15 1-4 1-14 1-7 1-17 1-16 1-17 1-18 1-11 1-13 1-16 1-18 1-14 ASUS A58M-A/USB3 1-3 System panel connector (10-1 pin F_PANEL) 8. AMD FM2+ socket 3. ATX power connectors (24-pin EATXPWR, 4-pin ATX12V) 2. SATA 3.0Gb/s connectors (7-pin SATA3G_1...
1.2.3 Motherboard layout 1 2 3 4 18.3cm(7.2in) KBMS ATX12V DIGI +VRM CPU_FAN CHA_FAN HDMI DDR3 DIMM_A1 (64bit, 240-pin module) DDR3 DIMM_B1 (64bit, 240-pin module) SOCKET FM2+ DVI_VGA 22.6cm(8.9in) USB1112 EATXPWR LAN_USB12 AUDIO 8111 GR ASM 1042 A58M-A/USB3 PCIEX16 ...(10-1 pin AAFP) SATA3G_4 SATA3G_5 SATA3G_6 1 5 6 7 Page 1-15 1-4 1-14 1-7 1-17 1-16 1-17 1-18 1-11 1-13 1-16 1-18 1-14 ASUS A58M-A/USB3 1-3 System panel connector (10-1 pin F_PANEL) 8. AMD FM2+ socket 3. ATX power connectors (24-pin EATXPWR, 4-pin ATX12V) 2. SATA 3.0Gb/s connectors (7-pin SATA3G_1...

User Guide
Page 12
1.3 Accelerated Processing Unit (APU) This motherboard comes with an FM2+ socket designed for the FM2+ socket. DO NOT force the APU into the socket to prevent bending the pins and damaging the APU! 1.3.1 Installing the APU 1 2 1-4 Chapter 1: Product introduction The APU fits in only one correct orientation. A58M-A/USB3 A58M-A/USB3 CPU socket FM2+ Ensure that you use an APU designed for AMD® A-series / Athlon™ series accelerated processors with AMD® Radeon™ R/HD 8000/7000 series graphics.
1.3 Accelerated Processing Unit (APU) This motherboard comes with an FM2+ socket designed for the FM2+ socket. DO NOT force the APU into the socket to prevent bending the pins and damaging the APU! 1.3.1 Installing the APU 1 2 1-4 Chapter 1: Product introduction The APU fits in only one correct orientation. A58M-A/USB3 A58M-A/USB3 CPU socket FM2+ Ensure that you use an APU designed for AMD® A-series / Athlon™ series accelerated processors with AMD® Radeon™ R/HD 8000/7000 series graphics.

User Guide
Page 15
... Channel B. Install a maximum of 512Mb (64MB) chips or less. • The maximum 32GB memory capacity can be supported with the same CAS latency. ASUS A58M-A/USB3 1-7 1.4 System memory 1.4.1 Overview The motherboard comes with less power consumption. A DDR3 module has the same physical dimensions as a DDR2 DIMM but is then mapped for better performance with...
... Channel B. Install a maximum of 512Mb (64MB) chips or less. • The maximum 32GB memory capacity can be supported with the same CAS latency. ASUS A58M-A/USB3 1-7 1.4 System memory 1.4.1 Overview The motherboard comes with less power consumption. A DDR3 module has the same physical dimensions as a DDR2 DIMM but is then mapped for better performance with...
User Guide
Page 17
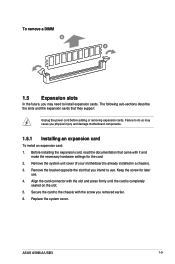
Remove the system unit cover (if your motherboard is completely seated on the slot. 5. Align the card connector with it and make the necessary hardware settings for later use . ASUS A58M-A/USB3 1-9 Unplug the power cord before adding or removing expansion cards. Failure to do so may..., read the documentation that they support. Replace the system cover. Secure the card to the chassis with the screw you physical injury and damage motherboard components. 1.5.1 Installing an expansion card To install an expansion card: 1. Keep the screw for the card. 2. To remove a DIMM B ...
Remove the system unit cover (if your motherboard is completely seated on the slot. 5. Align the card connector with it and make the necessary hardware settings for later use . ASUS A58M-A/USB3 1-9 Unplug the power cord before adding or removing expansion cards. Failure to do so may..., read the documentation that they support. Replace the system cover. Secure the card to the chassis with the screw you physical injury and damage motherboard components. 1.5.1 Installing an expansion card To install an expansion card: 1. Keep the screw for the card. 2. To remove a DIMM B ...

User Guide
Page 18
... expansion card. SATA controller - - - See Chapter 2 for information on the system and change the necessary BIOS settings, if any. Install the software drivers for this motherboard A B C D E F G H PCIEx16_1 - - PCIEx1_1 shared - - - - - - - On Chip USB EHCI 1/2/3 - shared - - - - - 1-10 Chapter 1: Product introduction PCI1 slot - - - - shared - - - - - shared...and other cards that comply with PCI specifications. 1.5.4 PCI Express x1 slot This motherboard supports PCI Express 2.0 x1 network cards, SCSI cards, and other cards that comply with...
... expansion card. SATA controller - - - See Chapter 2 for information on the system and change the necessary BIOS settings, if any. Install the software drivers for this motherboard A B C D E F G H PCIEx16_1 - - PCIEx1_1 shared - - - - - - - On Chip USB EHCI 1/2/3 - shared - - - - - 1-10 Chapter 1: Product introduction PCI1 slot - - - - shared - - - - - shared...and other cards that comply with PCI specifications. 1.5.4 PCI Express x1 slot This motherboard supports PCI Express 2.0 x1 network cards, SCSI cards, and other cards that comply with...

User Guide
Page 22
... either High Definition Audio or AC`97 audio standard. Connect one end of the motherboard high-definition audio capability. • If you want to connect a high definition ... 2. CPU_FAN CHA_FAN A58M-A/USB3 A58M-A/USB3 Fan connectors DO NOT forget to connect the fan cables to this connector. Insufficient air flow inside the system may damage the motherboard components. Front panel...Line out_L PORT1 L PORT1 R PORT2 R SENSE_SEND PORT2 L A58M-A/USB3 HD-audio-compliant Legacy AC'97 pin definition compliant definition A58M-A/USB3 Front panel audio connector • We recommend that the ...
... either High Definition Audio or AC`97 audio standard. Connect one end of the motherboard high-definition audio capability. • If you want to connect a high definition ... 2. CPU_FAN CHA_FAN A58M-A/USB3 A58M-A/USB3 Fan connectors DO NOT forget to connect the fan cables to this connector. Insufficient air flow inside the system may damage the motherboard components. Front panel...Line out_L PORT1 L PORT1 R PORT2 R SENSE_SEND PORT2 L A58M-A/USB3 HD-audio-compliant Legacy AC'97 pin definition compliant definition A58M-A/USB3 Front panel audio connector • We recommend that the ...

User Guide
Page 26
... 9. USB56 USB34 USB+5V USB_P5USB_P5+ GND NC USB+5V USB_P3USB_P3+ GND NC A58M-A/USB3 PIN 1 PIN 1 USB+5V USB_P6USB_P6+ GND USB+5V USB_P4USB_P4+ GND A58M-A/USB3 USB2.0 connectors Never connect a 1394 cable to 480Mbps connection speed. Doing so will damage the motherboard! Connect the USB module cable to any of these connectors, then install the... (COM) port. Serial port connector (10-1 pin COM) This connector is for USB 2.0 ports. COM RXD DTR DSR CTS PIN 1 DCD TXD GND RTS RI A58M-A/USB3 A58M-A/USB3 Serial port connectors The COM module is purchased separately. 10.
... 9. USB56 USB34 USB+5V USB_P5USB_P5+ GND NC USB+5V USB_P3USB_P3+ GND NC A58M-A/USB3 PIN 1 PIN 1 USB+5V USB_P6USB_P6+ GND USB+5V USB_P4USB_P4+ GND A58M-A/USB3 USB2.0 connectors Never connect a 1394 cable to 480Mbps connection speed. Doing so will damage the motherboard! Connect the USB module cable to any of these connectors, then install the... (COM) port. Serial port connector (10-1 pin COM) This connector is for USB 2.0 ports. COM RXD DTR DSR CTS PIN 1 DCD TXD GND RTS RI A58M-A/USB3 A58M-A/USB3 Serial port connectors The COM module is purchased separately. 10.
User Guide
Page 27
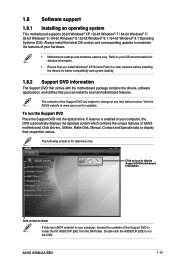
...only. To run the DVD. Click Drivers, Utilities, Make Disk, Manual, Contact and Specials tabs to avail all motherboard features. ASUS A58M-A/USB3 1-19 Always install the latest OS version and corresponding updates to maximize the features of the Support DVD are subject to...versions before installing the drivers for better compatibility and system stability. 1.8.2 Support DVD information The Support DVD that comes with the motherboard package contains the drivers, software applications, and utilities that you can install to display their respective menus. Click an icon to display ...
...only. To run the DVD. Click Drivers, Utilities, Make Disk, Manual, Contact and Specials tabs to avail all motherboard features. ASUS A58M-A/USB3 1-19 Always install the latest OS version and corresponding updates to maximize the features of the Support DVD are subject to...versions before installing the drivers for better compatibility and system stability. 1.8.2 Support DVD information The Support DVD that comes with the motherboard package contains the drivers, software applications, and utilities that you can install to display their respective menus. Click an icon to display ...
User Guide
Page 29
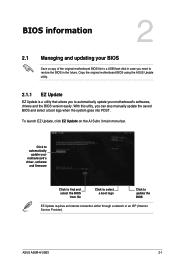
...saved BIOS and select a boot logo when the system goes into POST. ASUS A58M-A/USB3 2-1 BIOS information 2 2.1 Managing and updating your motherboard's softwares, drivers and the BIOS version easily. Click to automatically update your motherboard's driver, software and firmware Click to find and select the BIOS from... a boot logo Click to automatically update your BIOS Save a copy of the original motherboard BIOS file to a USB flash disk in the future. Copy the original motherboard BIOS using the ASUS Update utility. 2.1.1 EZ Update EZ Update is a utility that allows you to update...
...saved BIOS and select a boot logo when the system goes into POST. ASUS A58M-A/USB3 2-1 BIOS information 2 2.1 Managing and updating your motherboard's softwares, drivers and the BIOS version easily. Click to automatically update your motherboard's driver, software and firmware Click to find and select the BIOS from... a boot logo Click to automatically update your BIOS Save a copy of the original motherboard BIOS file to a USB flash disk in the future. Copy the original motherboard BIOS using the ASUS Update utility. 2.1.1 EZ Update EZ Update is a utility that allows you to update...
User Guide
Page 31
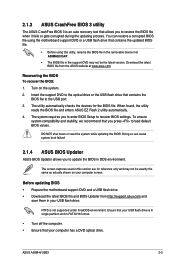
...the system while updating the BIOS! Before updating BIOS • Prepare the motherboard support DVD and a USB flash drive. • Download the latest BIOS file and BIOS Updater from the ASUS website at www.asus.com. To ensure system compatibility and stability, we recommend that your USB flash... format. • Turn off the computer. • Ensure that you to update the BIOS in your computer has a DVD optical drive. ASUS A58M-A/USB3 2-3 The utility automatically checks the devices for reference only and may not be exactly the same as actually shown on the system. 2. When ...
...the system while updating the BIOS! Before updating BIOS • Prepare the motherboard support DVD and a USB flash drive. • Download the latest BIOS file and BIOS Updater from the ASUS website at www.asus.com. To ensure system compatibility and stability, we recommend that your USB flash... format. • Turn off the computer. • Ensure that you to update the BIOS in your computer has a DVD optical drive. ASUS A58M-A/USB3 2-3 The utility automatically checks the devices for reference only and may not be exactly the same as actually shown on the system. 2. When ...

User Guide
Page 34
Entering BIOS Setup after POST To enter BIOS Setup after changing any BIOS setting, try to clear the CMOS and reset the motherboard to update the BIOS or configure its routines. If the system becomes unstable after POST: • Press ++ simultaneously. • Press the reset button on the ... BIOS screens include navigation keys and brief online help to ensure optimum performance. BIOS menu screen The BIOS setup program can cause damage to your motherboard if you want to use the mouse to control the BIOS setup program. • The default BIOS settings for this...
Entering BIOS Setup after POST To enter BIOS Setup after changing any BIOS setting, try to clear the CMOS and reset the motherboard to update the BIOS or configure its routines. If the system becomes unstable after POST: • Press ++ simultaneously. • Press the reset button on the ... BIOS screens include navigation keys and brief online help to ensure optimum performance. BIOS menu screen The BIOS setup program can cause damage to your motherboard if you want to use the mouse to control the BIOS setup program. • The default BIOS settings for this...

User Guide
Page 41
Scroll down to malfunction. 2.5 Ai Tweaker menu The Ai Tweaker menu items allow you installed on the motherboard. The configuration options for this section vary depending on the CPU and DIMM model you to configure overclocking-related items. Be cautious when changing the settings of the Ai Tweaker menu items. Incorrect field values can cause the system to display the following items: ASUS A58M-A/USB3 2-13
Scroll down to malfunction. 2.5 Ai Tweaker menu The Ai Tweaker menu items allow you installed on the motherboard. The configuration options for this section vary depending on the CPU and DIMM model you to configure overclocking-related items. Be cautious when changing the settings of the Ai Tweaker menu items. Incorrect field values can cause the system to display the following items: ASUS A58M-A/USB3 2-13

User Guide
Page 51
...adjust the maximum CPU fan duty cycle. When the CPU temperature reaches the upper limit, the CPU fan will operate at the maximum duty cycle. ASUS A58M-A/USB3 2-23 Enables the CPU Q-Fan control feature. Configuration options: [Ignore] [200 RPM] [300 RPM] [400 RPM] [500 RPM] [... onboard hardware monitor automatically detects and displays the CPU / chassis fan speeds in rotations per minute (RPM). The values range from 20% to the motherboard, the field shows N/A. 2.7.3 [Disabled] [Enabled] CPU Q-Fan Control [Enabled] Disables the CPU Q-Fan control feature. When the CPU temperature is...
...adjust the maximum CPU fan duty cycle. When the CPU temperature reaches the upper limit, the CPU fan will operate at the maximum duty cycle. ASUS A58M-A/USB3 2-23 Enables the CPU Q-Fan control feature. Configuration options: [Ignore] [200 RPM] [300 RPM] [400 RPM] [500 RPM] [... onboard hardware monitor automatically detects and displays the CPU / chassis fan speeds in rotations per minute (RPM). The values range from 20% to the motherboard, the field shows N/A. 2.7.3 [Disabled] [Enabled] CPU Q-Fan Control [Enabled] Disables the CPU Q-Fan control feature. When the CPU temperature is...

User Guide
Page 62
DO NOT throw the motherboard in different regions. This symbol of the crossed out wheeled bin indicates that the battery should not be able to responsibly recycle our products, batteries, ... emissions from our commitment to the highest standards for protecting our environment. This product has been designed to be placed in municipal waste. ASUS Recycling/Takeback Services ASUS recycling and takeback programs come from digital apparatus set out in the Radio Interference Regulations of the Canadian Department of Chemicals) regulatory framework, we...
DO NOT throw the motherboard in different regions. This symbol of the crossed out wheeled bin indicates that the battery should not be able to responsibly recycle our products, batteries, ... emissions from our commitment to the highest standards for protecting our environment. This product has been designed to be placed in municipal waste. ASUS Recycling/Takeback Services ASUS recycling and takeback programs come from digital apparatus set out in the Radio Interference Regulations of the Canadian Department of Chemicals) regulatory framework, we...


