A1/Z1 Series User Manual
Page 7
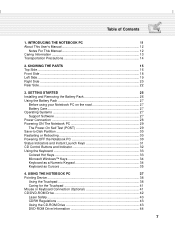
... STARTED 25 Installing and Removing the Battery Pack 26 Using the Battery Pack 27 Before using your Notebook PC on the road 27 Battery Care ...27 Operating Systems 27 Support Software 27 Power Connection 28 Powering ON The Notebook PC 29 The Power-On Self Test (POST 29 Save-to-Disk Partition 30 Restarting or Rebooting 30 Powering OFF the Notebook PC 30 Status Indicators and Instant Launch Keys 31 CD Control Buttons and Indicator 32 Using the Keyboard...
... STARTED 25 Installing and Removing the Battery Pack 26 Using the Battery Pack 27 Before using your Notebook PC on the road 27 Battery Care ...27 Operating Systems 27 Support Software 27 Power Connection 28 Powering ON The Notebook PC 29 The Power-On Self Test (POST 29 Save-to-Disk Partition 30 Restarting or Rebooting 30 Powering OFF the Notebook PC 30 Status Indicators and Instant Launch Keys 31 CD Control Buttons and Indicator 32 Using the Keyboard...
A1/Z1 Series User Manual
Page 13
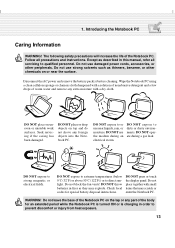
... dirty or dusty environments. Check local codes for an extended period while the Notebook PC is turned ON or is charging in this manual, refer all precautions and instructions. Follow all servicing to direct sunlight. Seek servicing if the casing has been damaged. Do not block the fan vents! Disconnect the AC power and remove the battery pack(s) before cleaning. Do not...
... dirty or dusty environments. Check local codes for an extended period while the Notebook PC is turned ON or is charging in this manual, refer all precautions and instructions. Follow all servicing to direct sunlight. Seek servicing if the casing has been damaged. Do not block the fan vents! Disconnect the AC power and remove the battery pack(s) before cleaning. Do not...
A1/Z1 Series User Manual
Page 17
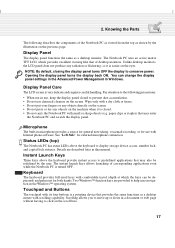
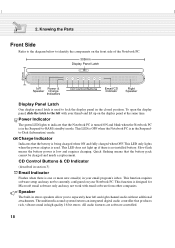
... the top as shown by the user. Two Windows™ function keys are described later in use, keep the display panel closed . • Do not carry the Notebook PC with scrolling capability. NOTE: By default, closing the display panel turns OFF the display to display storage device access, number lock, and capital lock statuses. Display Panel Care The LCD screen is a pointing device that may enter the Notebook PC and scratch the display panel. Wipe only with comfortable travel...
... the top as shown by the user. Two Windows™ function keys are described later in use, keep the display panel closed . • Do not carry the Notebook PC with scrolling capability. NOTE: By default, closing the display panel turns OFF the display to display storage device access, number lock, and capital lock statuses. Display Panel Care The LCD screen is a pointing device that may enter the Notebook PC and scratch the display panel. Wipe only with comfortable travel...
A1/Z1 Series User Manual
Page 18
... currently configured on the display panel at the same time. Charge Indicator Indicates that the Notebook PC is turned ON and blink when the Notebook PC is used . This LED only lights when the power adapter is being charged when ON and fully charged when OFF. This function is one or more new email(s) in the closed position. All audio features are software controlled. 18 CD Control Buttons & CD Indicator (described in section 3) Email Indicator Flashes when...
... currently configured on the display panel at the same time. Charge Indicator Indicates that the Notebook PC is turned ON and blink when the Notebook PC is used . This LED only lights when the power adapter is being charged when ON and fully charged when OFF. This function is one or more new email(s) in the closed position. All audio features are software controlled. 18 CD Control Buttons & CD Indicator (described in section 3) Email Indicator Flashes when...
A1/Z1 Series User Manual
Page 20
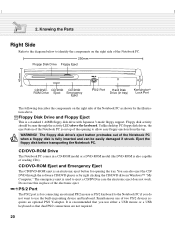
.../DVD-ROM eject is for opening to use either a USB mouse or a USB keyboard so that dual PS/2 connections are not required. 20 Do not use of two PS/2 devices requires an optional PS/2 Y-adapter. PS/2 Port The PS/2 port is an electronic eject button for connecting an external PS/2 mouse or PS/2 keyboard to the Notebook PC if you use the built-in a CD-ROM model or a DVD-ROM model (the DVD-ROM is on top of the Notebook...
.../DVD-ROM eject is for opening to use either a USB mouse or a USB keyboard so that dual PS/2 connections are not required. 20 Do not use of two PS/2 devices requires an optional PS/2 Y-adapter. PS/2 Port The PS/2 port is an electronic eject button for connecting an external PS/2 mouse or PS/2 keyboard to the Notebook PC if you use the built-in a CD-ROM model or a DVD-ROM model (the DVD-ROM is on top of the Notebook...

A1/Z1 Series User Manual
Page 22
...-Out function. The internal modem supports up to allow viewing on the other display. WARNING! This feature can also be used in modem does not support the voltage used for use with RCA inputs available on the rear side of the Notebook PC. 308mm 41mm DC IN TV Serial Port Parallel Port External TV Out Modem Air LAN 2 USB DC Power Monitor Port Port Vent & Port Ports Input Jack Port (RJ-11) Fan (RJ...
...-Out function. The internal modem supports up to allow viewing on the other display. WARNING! This feature can also be used in modem does not support the voltage used for use with RCA inputs available on the rear side of the Notebook PC. 308mm 41mm DC IN TV Serial Port Parallel Port External TV Out Modem Air LAN 2 USB DC Power Monitor Port Port Vent & Port Ports Input Jack Port (RJ-11) Fan (RJ...
A1/Z1 Series User Manual
Page 27
... updates or replacement of the factory pre-install. The recovery CD provides a comprehensive recovery solution that quickly restores the Notebook PC's operating system and software to charge the battery pack. It takes a few hours to download individual software drivers and utilities. You must also take twice the time when the Notebook PC is turned OFF and may produce different results than the outside temperature. A new battery pack must be recharged. The support...
... updates or replacement of the factory pre-install. The recovery CD provides a comprehensive recovery solution that quickly restores the Notebook PC's operating system and software to charge the battery pack. It takes a few hours to download individual software drivers and utilities. You must also take twice the time when the Notebook PC is turned OFF and may produce different results than the outside temperature. A new battery pack must be recharged. The support...
A1/Z1 Series User Manual
Page 29
... hard disk drive requires servicing. Never turn it will first run the BIOS Setup to set or modify the system configuration, press [F2] upon bootup to select bootup from "Legacy Devices", "Hard Drive", "ATAPI CD-ROM Drive", or enter BIOS setup. To run Windows disk checking program. Getting Started Powering ON The Notebook PC The Notebook PC's power-ON message appears on the screen prompting you may get a message reporting "No operating system found" if the hard disk...
... hard disk drive requires servicing. Never turn it will first run the BIOS Setup to set or modify the system configuration, press [F2] upon bootup to select bootup from "Legacy Devices", "Hard Drive", "ATAPI CD-ROM Drive", or enter BIOS setup. To run Windows disk checking program. Getting Started Powering ON The Notebook PC The Notebook PC's power-ON message appears on the screen prompting you may get a message reporting "No operating system found" if the hard disk...
A1/Z1 Series User Manual
Page 30
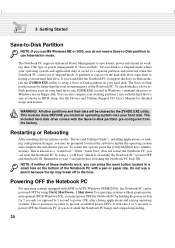
... mode where your hard disk. This must be cleared by using a "cold boot" which is "Save-to -Disk partition pre-configured from the factory. Restarting or Rebooting After installing drivers (please see the "Drivers and Utilities Guide"), installing applications, or making configuration changes, you install an operating system onto your hard disk. NOTE: If neither of the Notebook PC. The Notebook PC supports Advanced Power Management to save battery power and extend its working partition's size with the Save-to -Disk." All other partitions and...
... mode where your hard disk. This must be cleared by using a "cold boot" which is "Save-to -Disk partition pre-configured from the factory. Restarting or Rebooting After installing drivers (please see the "Drivers and Utilities Guide"), installing applications, or making configuration changes, you install an operating system onto your hard disk. NOTE: If neither of the Notebook PC. The Notebook PC supports Advanced Power Management to save battery power and extend its working partition's size with the Save-to -Disk." All other partitions and...
A1/Z1 Series User Manual
Page 44
.../s. An MPEG2 hardware decoder PCMCIA card is only single-sided; The Notebook PC's DVD-ROM drive is required on the DVD module driver support CD. Decoding digital MPEG2 video is the next generation of optical disc storage technology. double-sided DVD (8.5GB and higher) requires manually reversing the disc in order to view DVD titles, you with slower processors for smooth DVD playback. 44 The provided software has been...
.../s. An MPEG2 hardware decoder PCMCIA card is only single-sided; The Notebook PC's DVD-ROM drive is required on the DVD module driver support CD. Decoding digital MPEG2 video is the next generation of optical disc storage technology. double-sided DVD (8.5GB and higher) requires manually reversing the disc in order to view DVD titles, you with slower processors for smooth DVD playback. 44 The provided software has been...
A1/Z1 Series User Manual
Page 52
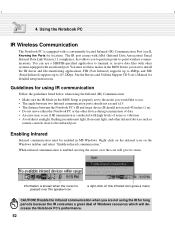
...; Make sure the IR Mode in MS Windows. Enabling Infrared Infrared communication must set to the mode you start to the infrared port. See the Drivers and Utilities Support CD User's Manual for location). Guidelines for using IR communication Follow the guidelines listed below when using the IR for long periods because the IR consumes a great deal of noise or vibration. • Avoid direct sunlight, flashing incandescent light, florescent light...
...; Make sure the IR Mode in MS Windows. Enabling Infrared Infrared communication must set to the mode you start to the infrared port. See the Drivers and Utilities Support CD User's Manual for location). Guidelines for using IR communication Follow the guidelines listed below when using the IR for long periods because the IR consumes a great deal of noise or vibration. • Avoid direct sunlight, flashing incandescent light, florescent light...
A1/Z1 Series User Manual
Page 55
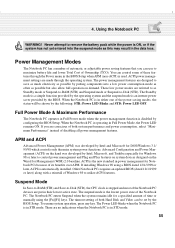
... the Power menu in the data loss. When the Notebook PC is in Full Power mode when the power management function is disabled by configuring the BIOS Setup. Full Power Mode & Maximum Performance The Notebook PC operates in either one of the Notebook PC devices are no indications when the Notebook PC is stopped and most of the power saving modes, the status will be set by the following: STR: Power LED Blinks and STD: Power LED OFF...
... the Power menu in the data loss. When the Notebook PC is in Full Power mode when the power management function is disabled by configuring the BIOS Setup. Full Power Mode & Maximum Performance The Notebook PC operates in either one of the Notebook PC devices are no indications when the Notebook PC is stopped and most of the power saving modes, the status will be set by the following: STR: Power LED Blinks and STD: Power LED OFF...
A1/Z1 Series User Manual
Page 56
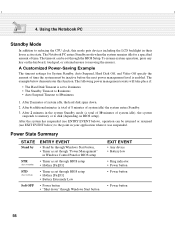
To resume system operation, press any key on BIOS setup). After 2 minutes of system idle, the hard disk spins down " through the BIOS Setup. After 2 minutes in Windows Control Panel or BIOS setup • Timer as set through BIOS setup • Hotkey [Fn][F1] • Timer as set through Windows Start button EXIT EVENT • Any device • Battery low • Ring indicator • Power button • Power button • Power button 56 After 6 additional minutes (a total of 8 minutes of time...
To resume system operation, press any key on BIOS setup). After 2 minutes of system idle, the hard disk spins down " through the BIOS Setup. After 2 minutes in Windows Control Panel or BIOS setup • Timer as set through BIOS setup • Hotkey [Fn][F1] • Timer as set through Windows Start button EXIT EVENT • Any device • Battery low • Ring indicator • Power button • Power button • Power button 56 After 6 additional minutes (a total of 8 minutes of time...
A1/Z1 Series User Manual
Page 64
... the Reset button if available. BIOS setup is used if you are either installing new devices or expanding main memory, you start up the Setup utility. This section describes how to reconfigure your selections among the predetermined choices. If you see the splash screen during the Power-On Self Test (POST). A default configuration has already been set. When the Notebook PC is turned back on, the system is configured with...
... the Reset button if available. BIOS setup is used if you are either installing new devices or expanding main memory, you start up the Setup utility. This section describes how to reconfigure your selections among the predetermined choices. If you see the splash screen during the Power-On Self Test (POST). A default configuration has already been set. When the Notebook PC is turned back on, the system is configured with...
A1/Z1 Series User Manual
Page 66
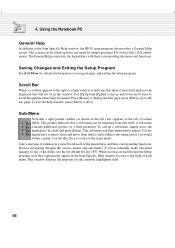
... and functions. This screen can be launched from field to field within a menu. The General Help screen lists the legend keys with each menu. Saving Changes and Exiting the Setup Program See Exit Menu for a field parameter. Press [Home] to display the first page, press [End] to go to the Item Specific Help window, the BIOS setup program also provides a General Help screen. This pointer indicates that...
... and functions. This screen can be launched from field to field within a menu. The General Help screen lists the legend keys with each menu. Saving Changes and Exiting the Setup Program See Exit Menu for a field parameter. Press [Home] to display the first page, press [End] to go to the Item Specific Help window, the BIOS setup program also provides a General Help screen. This pointer indicates that...
A1/Z1 Series User Manual
Page 69
... Auto to support a CD-ROM or DVD-ROM drive. Manually enter the number of the drive. Set the type to CDROM to automatically detect an IDE type drive. To configure a hard disk drive, select this sub-menu. This option only works with standard built-in IDE drives. To allow the BIOS to enter this sub-menu from the Main menu and press the Enter key to detect the drive type automatically, select [AUTO]. To configure a drive manually, select User. NOTE: To make changes to this...
... Auto to support a CD-ROM or DVD-ROM drive. Manually enter the number of the drive. Set the type to CDROM to automatically detect an IDE type drive. To configure a hard disk drive, select this sub-menu. This option only works with standard built-in IDE drives. To allow the BIOS to enter this sub-menu from the Main menu and press the Enter key to detect the drive type automatically, select [AUTO]. To configure a drive manually, select User. NOTE: To make changes to this...
A1/Z1 Series User Manual
Page 71
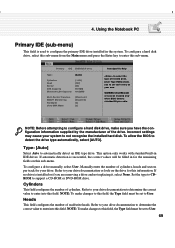
...-ROM or DVD drive module. Secondary IDE [TOSHIBA DVD-ROM SD-C2402] Ty p e PIO Mode ULTRA DMA Mode [Auto] [4] [2] Item Specific Help to select the type of the IDE drive. [User Type HDD] allows you to set each entry on this sub-menu, press the [Esc] key to return to the Main menu. 71 To configure a hard disk drive, select this sub-menu from the Main menu and press the Enter key to configure the secondary IDE drive installed...
...-ROM or DVD drive module. Secondary IDE [TOSHIBA DVD-ROM SD-C2402] Ty p e PIO Mode ULTRA DMA Mode [Auto] [4] [2] Item Specific Help to select the type of the IDE drive. [User Type HDD] allows you to set each entry on this sub-menu, press the [Esc] key to return to the Main menu. 71 To configure a hard disk drive, select this sub-menu from the Main menu and press the Enter key to configure the secondary IDE drive installed...
A1/Z1 Series User Manual
Page 77
... (POST) and Resume. The User password is used on boot: [Disabled] This option requires prior setting of the User password to access the hard disk drive. HDD Password This function is set in order to function. The following are detected, the BIOS will prompt for a password before booting the operating system. Symbols and other keys are several security passwords available to access the hard disk drive from suspend. Type the same password a second time to set the User password, highlight this or another computer...
... (POST) and Resume. The User password is used on boot: [Disabled] This option requires prior setting of the User password to access the hard disk drive. HDD Password This function is set in order to function. The following are detected, the BIOS will prompt for a password before booting the operating system. Symbols and other keys are several security passwords available to access the hard disk drive from suspend. Type the same password a second time to set the User password, highlight this or another computer...
A1/Z1 Series User Manual
Page 79
... configuration options are : [Disabled] [Enabled] Start Battery Refreshing This function will still occur at the end of the battery pack. Remove the AC power adapter before the display panel turns off and the system enters a low power CPU state. Using the Notebook PC Auto Suspend Timeout [Disabled] This option is only enabled when User Define is not prone to memory effects, memory effects will start a software program to enable or disable the low battery warning beep. In Suspend mode, various devices including...
... configuration options are : [Disabled] [Enabled] Start Battery Refreshing This function will still occur at the end of the battery pack. Remove the AC power adapter before the display panel turns off and the system enters a low power CPU state. Using the Notebook PC Auto Suspend Timeout [Disabled] This option is only enabled when User Define is not prone to memory effects, memory effects will start a software program to enable or disable the low battery warning beep. In Suspend mode, various devices including...
A1/Z1 Series User Manual
Page 93
... 4 D Display Panel 17 Display Panel Latch 24 DVD-ROM Drive Information 42 E Email Launch Key 31 External Audio Connections 45 F Fast Infrared Port 22 Federal Communications Commission 2 Floppy Disk Drive and Floppy Eject 21 G Glossary 89 H Headphone Jack 24 I Instant Launch Keys 31 Internal Modem Compliancy 86 Internet Launch Key 31 IR Wireless Communication 50 K Keyboard 17 L Laser Safety 41 M Macrovision Notice 3 Microphone Jack 24 Microsoft Windows™ Keys 33 Modem and Network Connections 48 Modem Port 22 Monitor...
... 4 D Display Panel 17 Display Panel Latch 24 DVD-ROM Drive Information 42 E Email Launch Key 31 External Audio Connections 45 F Fast Infrared Port 22 Federal Communications Commission 2 Floppy Disk Drive and Floppy Eject 21 G Glossary 89 H Headphone Jack 24 I Instant Launch Keys 31 Internal Modem Compliancy 86 Internet Launch Key 31 IR Wireless Communication 50 K Keyboard 17 L Laser Safety 41 M Macrovision Notice 3 Microphone Jack 24 Microsoft Windows™ Keys 33 Modem and Network Connections 48 Modem Port 22 Monitor...


