User Manual
Page 1
LED TV Monitor T1 Series User's Manual E
LED TV Monitor T1 Series User's Manual E

User Manual
Page 2
...purchaser for identification or explanation and to the owners' benefit, without intent to infringe. or (2) the serial number of ASUSTeK COMPUTER INC. ("ASUS"). IN NO EVENT SHALL ASUS, ITS DIRECTORS, OFFICERS, EMPLOYEES OR AGENTS BE LIABLE FOR ANY INDIRECT, SPECIAL, INCIDENTAL, OR CONSEQUENTIAL DAMAGES (INCLUDING DAMAGES FOR LOSS OF PROFITS... BEEN ADVISED OF THE POSSIBILITY OF SUCH DAMAGES ARISING FROM ANY DEFECT OR ERROR IN THIS MANUAL OR PRODUCT. ii ASUS LED TV Monitor T1 Series No part of this manual may or may be extended if: (1) the product is repaired, modified or altered, unless such...
...purchaser for identification or explanation and to the owners' benefit, without intent to infringe. or (2) the serial number of ASUSTeK COMPUTER INC. ("ASUS"). IN NO EVENT SHALL ASUS, ITS DIRECTORS, OFFICERS, EMPLOYEES OR AGENTS BE LIABLE FOR ANY INDIRECT, SPECIAL, INCIDENTAL, OR CONSEQUENTIAL DAMAGES (INCLUDING DAMAGES FOR LOSS OF PROFITS... BEEN ADVISED OF THE POSSIBILITY OF SUCH DAMAGES ARISING FROM ANY DEFECT OR ERROR IN THIS MANUAL OR PRODUCT. ii ASUS LED TV Monitor T1 Series No part of this manual may or may be extended if: (1) the product is repaired, modified or altered, unless such...
User Manual
Page 3
... 15 2.10 Programme List 15 3.1 On-Screen Display (OSD) Menu 16 3.1.1 How to reconfigure 16 3.1.2 OSD menu introduction 16 3.2 Specifications Summary 24 3.3 Troubleshooting (FAQ 27 ASUS LED TV Monitor T1 Series iii
... 15 2.10 Programme List 15 3.1 On-Screen Display (OSD) Menu 16 3.1.1 How to reconfigure 16 3.1.2 OSD menu introduction 16 3.2 Specifications Summary 24 3.3 Troubleshooting (FAQ 27 ASUS LED TV Monitor T1 Series iii

User Manual
Page 4
...energy efficiency. This class B digital apparatus complies with FCC regulations. This equipment has been tested and found to radio communications. iv ASUS LED TV Monitor T1 Series Canadian Department of Communications Statement This digital apparatus does not exceed the Class B limits for compliance could void the user... that to which the receiver is required to the graphics card is connected. ▪ Consult the dealer or an experienced radio/TV technician for connection of shielding cables for help. If this unit not expressly approved by one or more of the FCC Rules....
...energy efficiency. This class B digital apparatus complies with FCC regulations. This equipment has been tested and found to radio communications. iv ASUS LED TV Monitor T1 Series Canadian Department of Communications Statement This digital apparatus does not exceed the Class B limits for compliance could void the user... that to which the receiver is required to the graphics card is connected. ▪ Consult the dealer or an experienced radio/TV technician for connection of shielding cables for help. If this unit not expressly approved by one or more of the FCC Rules....
User Manual
Page 5
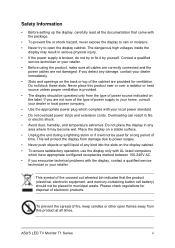
... a qualified service technician or your local power standard. ▪ Do not overload power strips and extension cords. If you encounter technical problems with your retailer. ASUS LED TV Monitor T1 Series v Do not place the display in municipal waste. This will not be used for disposal of fire, keep candles or other open...
... a qualified service technician or your local power standard. ▪ Do not overload power strips and extension cords. If you encounter technical problems with your retailer. ASUS LED TV Monitor T1 Series v Do not place the display in municipal waste. This will not be used for disposal of fire, keep candles or other open...

User Manual
Page 6
...disconnect the cables and power cord. Never spray cleaner directly on the desktop pattern you use due to the nature of the display. vi ASUS LED TV Monitor T1 Series When lifting or carrying the display, grasp the edges of the fluorescent light. Clean the display surface with the display:... ▪ The screen may be removed with a cloth dampened with the LED. The following symptoms are normal with a lint-free, non-abrasive cloth. CAUTION: Information to prevent damage to the components when trying to aid ...
...disconnect the cables and power cord. Never spray cleaner directly on the desktop pattern you use due to the nature of the display. vi ASUS LED TV Monitor T1 Series When lifting or carrying the display, grasp the edges of the fluorescent light. Clean the display surface with the display:... ▪ The screen may be removed with a cloth dampened with the LED. The following symptoms are normal with a lint-free, non-abrasive cloth. CAUTION: Information to prevent damage to the components when trying to aid ...

User Manual
Page 7
These documents are not part of the standard package. ASUS websites The ASUS websites worldwide provide updated information on ASUS hardware and software products. Optional documentation Your product package may include optional documentation that may have been added by your dealer. Refer to the following sources for additional information and for product and software updates. 1. ASUS LED TV Monitor T1 Series vii Where to find more information Refer to http://www.asus.com 2.
These documents are not part of the standard package. ASUS websites The ASUS websites worldwide provide updated information on ASUS hardware and software products. Optional documentation Your product package may include optional documentation that may have been added by your dealer. Refer to the following sources for additional information and for product and software updates. 1. ASUS LED TV Monitor T1 Series vii Where to find more information Refer to http://www.asus.com 2.
User Manual
Page 8
...- V Olsinach 2300/75, 10000 Prague, Czech Republic Tel: +420 274 774 872 Fax: +420 274 774 889 ▪ ASUS Polska SP. Tel: +36 1 505 45 61 Fax: +36 1 505 45 63 viii ASUS LED TV Monitor T1 Series Fr / 9 - 17h) Fax:+49 2102 9599-11 (24h) ▪ ASUSTeK Italy srl Via Piero Gobetti 2/B...Focus 31, West Wing, Mark Road, Hemel Hempstead, HP2 7BW, UK Tel: +44 1442 202 700 Fax: +44 1442 245 882 ▪ ASUS IBERICA S.L. C/ Plomo 5-7, 08038 Barcelona, Spain Tel: +34 902 889688 ▪ ASUS Nordic AB Finlandsgatan 16, 4 Tr., 16474 Kista, Sweden Tel: +46 8 5889 8900 Fax: +46 8 5889 8999 ▪...
...- V Olsinach 2300/75, 10000 Prague, Czech Republic Tel: +420 274 774 872 Fax: +420 274 774 889 ▪ ASUS Polska SP. Tel: +36 1 505 45 61 Fax: +36 1 505 45 63 viii ASUS LED TV Monitor T1 Series Fr / 9 - 17h) Fax:+49 2102 9599-11 (24h) ▪ ASUSTeK Italy srl Via Piero Gobetti 2/B...Focus 31, West Wing, Mark Road, Hemel Hempstead, HP2 7BW, UK Tel: +44 1442 202 700 Fax: +44 1442 245 882 ▪ ASUS IBERICA S.L. C/ Plomo 5-7, 08038 Barcelona, Spain Tel: +34 902 889688 ▪ ASUS Nordic AB Finlandsgatan 16, 4 Tr., 16474 Kista, Sweden Tel: +46 8 5889 8900 Fax: +46 8 5889 8999 ▪...
User Manual
Page 9
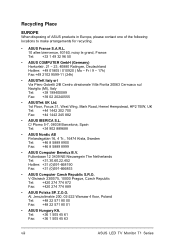
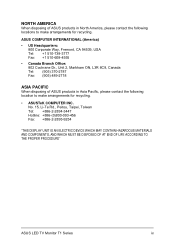
...MUST BE DISPOSED OF AT END OF LIFE ACCORDING TO THE PROPER PROCEDURE" ASUS LED TV Monitor T1 Series ix NORTH AMERICA When disposing of ASUS products in North America, please contact the following location to make arrangements for recycling. ASUS COMPUTER INTERNATIONAL (America) ▪ US Headquarters: 800 Corporate Way, Fremont... Dr., Unit 2, Markham ON, L3R 8C9, Canada Tel: (905) 370-2787 Fax: (905) 489-2718 ASIA PACIFIC When disposing of ASUS products in Asia Pacific, please contact the following locations to make arrangements for recycling. ▪ ASUSTeK COMPUTER INC.
...MUST BE DISPOSED OF AT END OF LIFE ACCORDING TO THE PROPER PROCEDURE" ASUS LED TV Monitor T1 Series ix NORTH AMERICA When disposing of ASUS products in North America, please contact the following location to make arrangements for recycling. ASUS COMPUTER INTERNATIONAL (America) ▪ US Headquarters: 800 Corporate Way, Fremont... Dr., Unit 2, Markham ON, L3R 8C9, Canada Tel: (905) 370-2787 Fax: (905) 489-2718 ASIA PACIFIC When disposing of ASUS products in Asia Pacific, please contact the following locations to make arrangements for recycling. ▪ ASUSTeK COMPUTER INC.

User Manual
Page 10
x ASUS LED TV Monitor T1 Series
x ASUS LED TV Monitor T1 Series
User Manual
Page 11
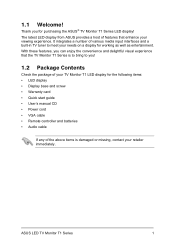
... Series is to bring to you can enjoy the convenience and delightful visual experience that enhance your needs on a display for purchasing the ASUS® TV Monitor T1 Series LED display! It integrates a number of the above items is damaged or missing, contact your retailer immediately. With these features, you ! 1.2 Package Contents Check... CD ▪ Power cord ▪ VGA cable ▪ Remote controller and batteries ▪ Audio cable If any of various media input interfaces and a built-in TV tuner to meet your viewing experience. ASUS LED TV Monitor T1 Series 1 1.1 Welcome!
... Series is to bring to you can enjoy the convenience and delightful visual experience that enhance your needs on a display for purchasing the ASUS® TV Monitor T1 Series LED display! It integrates a number of the above items is damaged or missing, contact your retailer immediately. With these features, you ! 1.2 Package Contents Check... CD ▪ Power cord ▪ VGA cable ▪ Remote controller and batteries ▪ Audio cable If any of various media input interfaces and a built-in TV tuner to meet your viewing experience. ASUS LED TV Monitor T1 Series 1 1.1 Welcome!

User Manual
Page 12
The colour of the power indicator is as the below table. Remote receiver ▪ The display receives the signal from the remote controller here. 2 ASUS LED TV Monitor T1 Series Status Blue Red Description On Stand-by . 1.3 Display Introduction 1.3.1 Front view 1. ▪ ▪ Power button and power indicator Press this button to turn the display on, off, or stand-by 2.
The colour of the power indicator is as the below table. Remote receiver ▪ The display receives the signal from the remote controller here. 2 ASUS LED TV Monitor T1 Series Status Blue Red Description On Stand-by . 1.3 Display Introduction 1.3.1 Front view 1. ▪ ▪ Power button and power indicator Press this button to turn the display on, off, or stand-by 2.

User Manual
Page 13
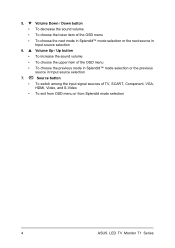
... right item of the OSD menu ▪ To choose the previous mode in Splendid™ mode selection or the previous source in Input source selection ASUS LED TV Monitor T1 Series 3 1.3.2 Top view 1. / / Splendid / Auto Adjust / Enter button ▪ To switch among preset Standard, Theatre, Game, and Scenery video modes of Splendid™...
... right item of the OSD menu ▪ To choose the previous mode in Splendid™ mode selection or the previous source in Input source selection ASUS LED TV Monitor T1 Series 3 1.3.2 Top view 1. / / Splendid / Auto Adjust / Enter button ▪ To switch among preset Standard, Theatre, Game, and Scenery video modes of Splendid™...
User Manual
Page 14
... in Splendid™ mode selection or the previous source in Input source selection 7. ▪ ▪ Source button To switch among the input signal sources of TV, SCART, Component, VGA, HDMI, Video, and S-Video To exit from OSD menu or from Splendid mode selection...
... in Splendid™ mode selection or the previous source in Input source selection 7. ▪ ▪ Source button To switch among the input signal sources of TV, SCART, Component, VGA, HDMI, Video, and S-Video To exit from OSD menu or from Splendid mode selection...
User Manual
Page 16
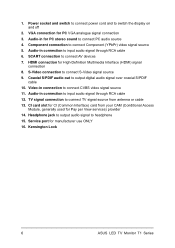
...in connection to switch the display on and off 2. Coaxial S/PDIF audio-out to connect TV signal source from your CAM (Conditional Access Module, generally used for manufacturer use ONLY 16. TV signal connection to output digital audio signal over coaxial S/PDIF cable 10. VGA connection for ... to output audio signal to connect CVBS video signal source 11. Service port for Pay per View services) provider 14. Kensington Lock 6 ASUS LED TV Monitor T1 Series CI card slot for CI (Common Interface) card from antenna or cable 13. Power socket and switch to connect power ...
...in connection to switch the display on and off 2. Coaxial S/PDIF audio-out to connect TV signal source from your CAM (Conditional Access Module, generally used for manufacturer use ONLY 16. TV signal connection to output digital audio signal over coaxial S/PDIF cable 10. VGA connection for ... to output audio signal to connect CVBS video signal source 11. Service port for Pay per View services) provider 14. Kensington Lock 6 ASUS LED TV Monitor T1 Series CI card slot for CI (Common Interface) card from antenna or cable 13. Power socket and switch to connect power ...

User Manual
Page 17
Close the cover. to +, - ASUS LED TV Monitor T1 Series 7 Insert two AAA type batteries in a recycle bin to prevent from environment pollution. DO NOT mix old or used batteries with new ones. ▪ Use the remote controller in front of the remote receiver with a distance shorter than 7 meters and within 30 degree to the left and to the right. ▪ Dispose of used batteries in correct polarity (+ to -). 3. 1.4 Remote Controller Introduction Installing the batteries 1. Open the battery compartment cover on the back side. 2.
Close the cover. to +, - ASUS LED TV Monitor T1 Series 7 Insert two AAA type batteries in a recycle bin to prevent from environment pollution. DO NOT mix old or used batteries with new ones. ▪ Use the remote controller in front of the remote receiver with a distance shorter than 7 meters and within 30 degree to the left and to the right. ▪ Dispose of used batteries in correct polarity (+ to -). 3. 1.4 Remote Controller Introduction Installing the batteries 1. Open the battery compartment cover on the back side. 2.
User Manual
Page 18
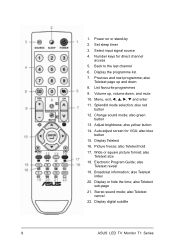
... mute 10. Menu, exit and enter 11. also Teletext reveal 19. Select input signal source 4. also red button 12. Change sound mode; Display digital subtitle 8 ASUS LED TV Monitor T1 Series also Teletext size 18. Back to the last channel 6. Set sleep timer 3. also green button 13. Picture freeze; Broadcast information; Auto adjust...
... mute 10. Menu, exit and enter 11. also Teletext reveal 19. Select input signal source 4. also red button 12. Change sound mode; Display digital subtitle 8 ASUS LED TV Monitor T1 Series also Teletext size 18. Back to the last channel 6. Set sleep timer 3. also green button 13. Picture freeze; Broadcast information; Auto adjust...

User Manual
Page 19
...;. It is most comfortable for you. -5˚ - 15˚ ▪ Hold the stand to fit it into the arm groove. 3. Align the base on a table. 2. ASUS LED TV Monitor T1 Series 9 2.1 Assembling the Display To assemble the monitor base: 1. Fix the base to the arm by fastening the bundled screw.
...;. It is most comfortable for you. -5˚ - 15˚ ▪ Hold the stand to fit it into the arm groove. 3. Align the base on a table. 2. ASUS LED TV Monitor T1 Series 9 2.1 Assembling the Display To assemble the monitor base: 1. Fix the base to the arm by fastening the bundled screw.
User Manual
Page 20
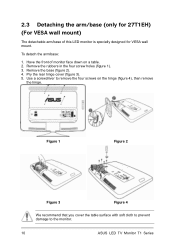
2.3 Detaching the arm/base (only for VESA wall mount. Use a screwdriver to the monitor. 10 ASUS LED TV Monitor T1 Series Pry the rear hinge cover (figure 3). 5. Figure 1 Figure 2 Figure 3 Figure 4 We recommend that you cover the table surface with soft cloth to ...prevent damage to remove the four screws on a table. 2. Remove the rubbers in the four screw holes (figure 1). 3. Have the front of this LED monitor is specially designed for 27T1EH) (For VESA wall mount) The detachable arm/base of monitor face down on the hinge (figure 4), then remove the...
2.3 Detaching the arm/base (only for VESA wall mount. Use a screwdriver to the monitor. 10 ASUS LED TV Monitor T1 Series Pry the rear hinge cover (figure 3). 5. Figure 1 Figure 2 Figure 3 Figure 4 We recommend that you cover the table surface with soft cloth to ...prevent damage to remove the four screws on a table. 2. Remove the rubbers in the four screw holes (figure 1). 3. Have the front of this LED monitor is specially designed for 27T1EH) (For VESA wall mount) The detachable arm/base of monitor face down on the hinge (figure 4), then remove the...

User Manual
Page 21
When more than one signal sources are switched off or the power cord is ON. 2.4 Connecting the Display For 22T1EH, 24T1EH & 27T1EH PC SCART, S-Video, Composite, & Component D-Sub, HDMI, & Audio-in HDMI & Audio-in S/PDIF TV Signal (Antenna, Cable, etc) AC Power DVD Player, etc External Stereo Speakers ▪ To connect the power... the audio-in blue to a power outlet. See section 1.3 Display Introduction for the location of external speakers. 2.5 Turning the Display On Press the power button. ASUS LED TV Monitor T1 Series 11
When more than one signal sources are switched off or the power cord is ON. 2.4 Connecting the Display For 22T1EH, 24T1EH & 27T1EH PC SCART, S-Video, Composite, & Component D-Sub, HDMI, & Audio-in HDMI & Audio-in S/PDIF TV Signal (Antenna, Cable, etc) AC Power DVD Player, etc External Stereo Speakers ▪ To connect the power... the audio-in blue to a power outlet. See section 1.3 Display Introduction for the location of external speakers. 2.5 Turning the Display On Press the power button. ASUS LED TV Monitor T1 Series 11

