User Manual
Page 3
...2 1.3.2 Top view 3 1.3.3 Rear view 5 1.4 Remote Controller Introduction 7 2.1 Assembling the Display 9 2.2 Adjusting the Posture of the Display 9 2.3 Detaching the arm/base (only for 27T1EH 10 2.4 Connecting the Display 11 2.5 Turning the Display On 11 2.6 Setting the Monitor 12 2.7 Setting the Television 13 2.8 Using Teletext 14 2.9 Electronic Programme Guide (EPG 15 2.10 Programme List 15 3.1 On-Screen Display (OSD) Menu 16 3.1.1 How to reconfigure 16 3.1.2 OSD menu introduction 16 3.2 Specifications Summary 24 3.3 Troubleshooting (FAQ 27 ASUS LED TV Monitor T1 Series iii
...2 1.3.2 Top view 3 1.3.3 Rear view 5 1.4 Remote Controller Introduction 7 2.1 Assembling the Display 9 2.2 Adjusting the Posture of the Display 9 2.3 Detaching the arm/base (only for 27T1EH 10 2.4 Connecting the Display 11 2.5 Turning the Display On 11 2.6 Setting the Monitor 12 2.7 Setting the Television 13 2.8 Using Teletext 14 2.9 Electronic Programme Guide (EPG 15 2.10 Programme List 15 3.1 On-Screen Display (OSD) Menu 16 3.1.1 How to reconfigure 16 3.1.2 OSD menu introduction 16 3.2 Specifications Summary 24 3.3 Troubleshooting (FAQ 27 ASUS LED TV Monitor T1 Series iii

User Manual
Page 4
... determined by turning the equipment off and on a circuit different from digital apparatus set out in a particular installation. The use of shielding cables for compliance could void the user's authority to radio communications. As an Energy Star® Partner, our company has determined that to which can radiate radio frequency energy and, if not installed and used in a residential installation. Changes or...
... determined by turning the equipment off and on a circuit different from digital apparatus set out in a particular installation. The use of shielding cables for compliance could void the user's authority to radio communications. As an Energy Star® Partner, our company has determined that to which can radiate radio frequency energy and, if not installed and used in a residential installation. Changes or...
User Manual
Page 5
... provided for disposal of power supply to your home, consult your retailer. ▪ Before using the product, make sure all cables are correctly connected and the power cables are not sure of the type of electronic products. ASUS LED TV Monitor T1 Series v Overloading can result in municipal waste. To prevent the spread of fire, keep candles or other open the display cabinet. If you...
... provided for disposal of power supply to your home, consult your retailer. ▪ Before using the product, make sure all cables are correctly connected and the power cables are not sure of the type of electronic products. ASUS LED TV Monitor T1 Series v Overloading can result in municipal waste. To prevent the spread of fire, keep candles or other open the display cabinet. If you...

User Manual
Page 6
... positioning the display. Turn off the Power Switch and turn off and unplug the power cord. Care and Cleaning ▪ Before you lift or reposition your display, it is displayed for hours, an afterimage of the previous screen may remain after switching the image. Clean the display surface with mild cleaner. ▪ Avoid using a cleaner containing alcohol or acetone. vi ASUS LED TV Monitor T1 Series Do not repair the screen by the stand...
... positioning the display. Turn off the Power Switch and turn off and unplug the power cord. Care and Cleaning ▪ Before you lift or reposition your display, it is displayed for hours, an afterimage of the previous screen may remain after switching the image. Clean the display surface with mild cleaner. ▪ Avoid using a cleaner containing alcohol or acetone. vi ASUS LED TV Monitor T1 Series Do not repair the screen by the stand...
User Manual
Page 11
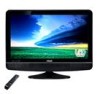
... or missing, contact your needs on a display for the following items: ▪ LED display ▪ Display base and screw ▪ Warranty card ▪ Quick start guide ▪ User's manual CD ▪ Power cord ▪ VGA cable ▪ Remote controller and batteries ▪ Audio cable If any of features that the TV Monitor T1 Series is to bring to you for purchasing the ASUS® TV Monitor T1 Series LED display! It integrates a number of various media input interfaces and a built...
... or missing, contact your needs on a display for the following items: ▪ LED display ▪ Display base and screw ▪ Warranty card ▪ Quick start guide ▪ User's manual CD ▪ Power cord ▪ VGA cable ▪ Remote controller and batteries ▪ Audio cable If any of features that the TV Monitor T1 Series is to bring to you for purchasing the ASUS® TV Monitor T1 Series LED display! It integrates a number of various media input interfaces and a built...

User Manual
Page 12
1.3 Display Introduction 1.3.1 Front view 1. ▪ ▪ Power button and power indicator Press this button to turn the display on, off, or stand-by 2. Remote receiver ▪ The display receives the signal from the remote controller here. 2 ASUS LED TV Monitor T1 Series The colour of the power indicator is as the below table. Status Blue Red Description On Stand-by .
1.3 Display Introduction 1.3.1 Front view 1. ▪ ▪ Power button and power indicator Press this button to turn the display on, off, or stand-by 2. Remote receiver ▪ The display receives the signal from the remote controller here. 2 ASUS LED TV Monitor T1 Series The colour of the power indicator is as the below table. Status Blue Red Description On Stand-by .

User Manual
Page 13
... optimized parameters by pressing this button for 2 - 3 seconds ▪ To enter/select the icon (function) highlighted while the OSD is activated ▪ To exit from VGA input to the previous programme ▪ To choose the left item of the OSD menu ▪ To choose the previous mode in Splendid™ mode selection or the previous source in Input source selection ASUS LED TV Monitor T1 Series...
... optimized parameters by pressing this button for 2 - 3 seconds ▪ To enter/select the icon (function) highlighted while the OSD is activated ▪ To exit from VGA input to the previous programme ▪ To choose the left item of the OSD menu ▪ To choose the previous mode in Splendid™ mode selection or the previous source in Input source selection ASUS LED TV Monitor T1 Series...
User Manual
Page 16
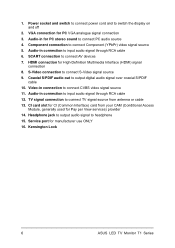
... signal source 9. S-Video connection to connect AV devices 7. Kensington Lock 6 ASUS LED TV Monitor T1 Series Component connection to output digital audio signal over coaxial S/PDIF cable 10. HDMI connection for manufacturer use ONLY 16. Coaxial S/PDIF audio-out to connect Component (YPbPr) video signal source 5. Service port for High-Definition Multimedia Interface (HDMI) signal connection 8. Audio-in for CI (Common Interface) card from antenna or cable 13. Audio-in connection to connect PC audio source 4. Headphone jack to output audio signal to switch the display...
... signal source 9. S-Video connection to connect AV devices 7. Kensington Lock 6 ASUS LED TV Monitor T1 Series Component connection to output digital audio signal over coaxial S/PDIF cable 10. HDMI connection for manufacturer use ONLY 16. Coaxial S/PDIF audio-out to connect Component (YPbPr) video signal source 5. Service port for High-Definition Multimedia Interface (HDMI) signal connection 8. Audio-in for CI (Common Interface) card from antenna or cable 13. Audio-in connection to connect PC audio source 4. Headphone jack to output audio signal to switch the display...
User Manual
Page 18
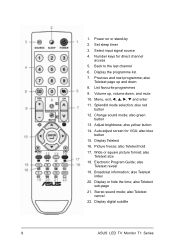
... Teletext size 18. also Teletext reveal 19. Stereo sound mode; Menu, exit and enter 11. Change sound mode; Broadcast information; Wide or square picture format; Select input signal source 4. List favourite programmes 9. Auto adjust screen for direct channel access 5. Display Teletext 16. also Teletext cancel 22. 1. Back to the last channel 6. Display or hide the time; Set sleep timer 3. also Teletext hold 17. Electronic Program Guide; Display digital subtitle 8 ASUS LED TV Monitor T1 Series also red button...
... Teletext size 18. also Teletext reveal 19. Stereo sound mode; Menu, exit and enter 11. Change sound mode; Broadcast information; Wide or square picture format; Select input signal source 4. List favourite programmes 9. Auto adjust screen for direct channel access 5. Display Teletext 16. also Teletext cancel 22. 1. Back to the last channel 6. Display or hide the time; Set sleep timer 3. also Teletext hold 17. Electronic Program Guide; Display digital subtitle 8 ASUS LED TV Monitor T1 Series also red button...

User Manual
Page 21
... display's AC input port, the other end to a power outlet. ASUS LED TV Monitor T1 Series 11 When more than one signal sources are switched off or the power cord is ON. Before you can switch the input source by using the key on the keypad of the display or on the remote controller. ▪ To connect the audio cable: connect the audio cable from the display's audio-in port to the computer's and/or video devices' audio-out port. ▪ To connect...
... display's AC input port, the other end to a power outlet. ASUS LED TV Monitor T1 Series 11 When more than one signal sources are switched off or the power cord is ON. Before you can switch the input source by using the key on the keypad of the display or on the remote controller. ▪ To connect the audio cable: connect the audio cable from the display's audio-in port to the computer's and/or video devices' audio-out port. ▪ To connect...
User Manual
Page 22
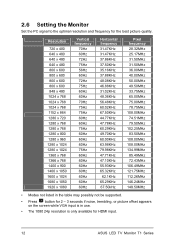
... 60Hz 70Hz 75Hz 75Hz 60Hz 60Hz 75Hz 60Hz 60Hz 60Hz 75Hz 60Hz 60Hz 60Hz 60Hz 60Hz 60Hz 60Hz Horizontal frequency 31.47KHz 31.47KHz 37.86KHz 37.50KHz 35.16KHz 37.88KHz 48.08KHz 46.88KHz 31.02KHz ...Modes not listed in the table may possibly not be supported. ▪ Press button for 2 - 3 seconds if noise, trembling, or picture offset appears on the screen while VGA input is in use. ▪ The 1080 24p resolution is only available for the best picture quality. 2.6 Setting the Monitor Set the PC signal to the optimal resolution and frequency for HDMI input. 12 ASUS LED TV Monitor T1 Series...
... 60Hz 70Hz 75Hz 75Hz 60Hz 60Hz 75Hz 60Hz 60Hz 60Hz 75Hz 60Hz 60Hz 60Hz 60Hz 60Hz 60Hz 60Hz Horizontal frequency 31.47KHz 31.47KHz 37.86KHz 37.50KHz 35.16KHz 37.88KHz 48.08KHz 46.88KHz 31.02KHz ...Modes not listed in the table may possibly not be supported. ▪ Press button for 2 - 3 seconds if noise, trembling, or picture offset appears on the screen while VGA input is in use. ▪ The 1080 24p resolution is only available for the best picture quality. 2.6 Setting the Monitor Set the PC signal to the optimal resolution and frequency for HDMI input. 12 ASUS LED TV Monitor T1 Series...

User Manual
Page 25
... function. ASUS LED TV Monitor T1 Series 15 You can specify the programme and the time that should be available in some countries or regions. Digital television programme Analogue television programme Radio channel 2. Use and ENTER to display the information of a programme. Press to select and display the desired programme if it is to play. Press the blue button to...
... function. ASUS LED TV Monitor T1 Series 15 You can specify the programme and the time that should be available in some countries or regions. Digital television programme Analogue television programme Radio channel 2. Use and ENTER to display the information of a programme. Press to select and display the desired programme if it is to play. Press the blue button to...

User Manual
Page 26
... Technology. 16 ASUS LED TV Monitor T1 Series Press MENU button either on the keypad of the OSD menu list whenever you can go back to navigate through the sub-menu functions. Repeat step 2 and 3 to reconfigure 1. In this mode, you press the MENU button. Use and to the top level of the display or on the remote controller. 3.1.2 OSD menu introduction 1. 3.1 On-Screen Display (OSD) Menu 3.1.1 How to adjust any other...
... Technology. 16 ASUS LED TV Monitor T1 Series Press MENU button either on the keypad of the OSD menu list whenever you can go back to navigate through the sub-menu functions. Repeat step 2 and 3 to reconfigure 1. In this mode, you press the MENU button. Use and to the top level of the display or on the remote controller. 3.1.2 OSD menu introduction 1. 3.1 On-Screen Display (OSD) Menu 3.1.1 How to adjust any other...

User Manual
Page 27
... in use. ▪ Sharpness: to specify the intense of the VGA input image. - Auto Adjust: to adjust the horizontal position of the displayed picture; Horizontal Pos.: to let the display automatically optimize the VGA input image. - - this function is not in Standard Splendid™ mode. ▪ Tint: to reset all the picture parameters. ASUS LED TV Monitor T1 Series 17 Phase: to adjust the phase of the VGA input image. ▪ Noise Reduction: to adjust the sharpness of the VGA input image. -
... in use. ▪ Sharpness: to specify the intense of the VGA input image. - Auto Adjust: to adjust the horizontal position of the displayed picture; Horizontal Pos.: to let the display automatically optimize the VGA input image. - - this function is not in Standard Splendid™ mode. ▪ Tint: to reset all the picture parameters. ASUS LED TV Monitor T1 Series 17 Phase: to adjust the phase of the VGA input image. ▪ Noise Reduction: to adjust the sharpness of the VGA input image. -

User Manual
Page 31
... or visual impaired audio if it is broadcasted. ▪ Subtitle Language: to select your Pay-TV services provider. ▪ Software Update: to upgrade the system. 4. System ▪ Menu Language: to select the language of this product. Visual Impaired: to adjust the volume of your preferred language for audio. ▪ Audio Language: to select your CAM, Conditional Access Module, in the CI card slot. ASUS LED TV Monitor T1 Series 21
... or visual impaired audio if it is broadcasted. ▪ Subtitle Language: to select your Pay-TV services provider. ▪ Software Update: to upgrade the system. 4. System ▪ Menu Language: to select the language of this product. Visual Impaired: to adjust the volume of your preferred language for audio. ▪ Audio Language: to select your CAM, Conditional Access Module, in the CI card slot. ASUS LED TV Monitor T1 Series 21
User Manual
Page 32
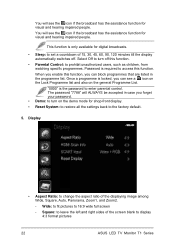
... password. ▪ Demo: to turn off . Display ▪ Aspect Ratio: to display 4:3 format pictures 22 ASUS LED TV Monitor T1 Series Wide: to fit pictures to enter parental control. Password is only available for visual and hearing impaired people. You will see the icon if the broadcast has the assistance function for shop-front display. ▪ Reset System: to restore all the settings back to the factory default...
... password. ▪ Demo: to turn off . Display ▪ Aspect Ratio: to display 4:3 format pictures 22 ASUS LED TV Monitor T1 Series Wide: to fit pictures to enter parental control. Password is only available for visual and hearing impaired people. You will see the icon if the broadcast has the assistance function for shop-front display. ▪ Reset System: to restore all the settings back to the factory default...

User Manual
Page 34
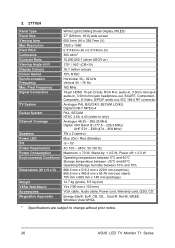
... VESA Wall-Mount Accessories Regulation Approvals 540.6 mm x 438.5 mm x 191.2 mm (machine) 594 mm x 543 mm x 147 mm (package) 7.6 kg (gross), 5.9 kg (net) Not applicable VGA cable, Audio cable, Power cord, Warranty card, QSG, CD Energy Star®, EuP, CB, CE, , Gost-R, RoHS, WEEE, Windows Vista WHQL * Specifications are subject to change without prior notice. 24 ASUS LED TV Monitor T1 Series 3.2 Specifications Summary 1. 22T1EH Panel Type Panel Size Viewing Area Max Resolution Pixel...
... VESA Wall-Mount Accessories Regulation Approvals 540.6 mm x 438.5 mm x 191.2 mm (machine) 594 mm x 543 mm x 147 mm (package) 7.6 kg (gross), 5.9 kg (net) Not applicable VGA cable, Audio cable, Power cord, Warranty card, QSG, CD Energy Star®, EuP, CB, CE, , Gost-R, RoHS, WEEE, Windows Vista WHQL * Specifications are subject to change without prior notice. 24 ASUS LED TV Monitor T1 Series 3.2 Specifications Summary 1. 22T1EH Panel Type Panel Size Viewing Area Max Resolution Pixel...

User Manual
Page 35
Pixel Frequency Signal Connectors TV System Colour System Channel Coverage Speakers Power LED Tilt Power Requirement Power Consumption Environmental Conditions Dimensions (W x H x D) Weight VESA Wall-Mount Accessories Regulation Approvals White Light Emitting Diode Display (WLED) 23.6" (60cm, 16:9) wide screen 523mm (H) x 295mm (V) 1920 x 1080 0.275mm (H) x 0.275mm (V) 300 cd/m2 10,000,000:1 (when ASCR on) 170° / 160° (CR>10) 16.7 million colours 70% NTSC Horizontal 30 - 82 kHz Vertical 50...
Pixel Frequency Signal Connectors TV System Colour System Channel Coverage Speakers Power LED Tilt Power Requirement Power Consumption Environmental Conditions Dimensions (W x H x D) Weight VESA Wall-Mount Accessories Regulation Approvals White Light Emitting Diode Display (WLED) 23.6" (60cm, 16:9) wide screen 523mm (H) x 295mm (V) 1920 x 1080 0.275mm (H) x 0.275mm (V) 300 cd/m2 10,000,000:1 (when ASCR on) 170° / 160° (CR>10) 16.7 million colours 70% NTSC Horizontal 30 - 82 kHz Vertical 50...
User Manual
Page 36
... x 100 mm) VGA cable, Audio cable, Power cord, Warranty card, QSG, CD Energy Star®, EuP, CB, CE, , Gost-R, RoHS, WEEE, Windows Vista WHQL * Specifications are subject to change without prior notice. 26 ASUS LED TV Monitor T1 Series Pixel Frequency Signal Connectors TV System Colour System Channel Coverage Speakers Power LED Tilt Power Requirement Power Consumption Environmental Conditions Dimensions (W x H x D) Weight VESA Wall-Mount Accessories Regulation Approvals White Light Emitting Diode Display (WLED) 27" (68.9cm, 16:9) wide screen 600.1mm (H) x 338...
... x 100 mm) VGA cable, Audio cable, Power cord, Warranty card, QSG, CD Energy Star®, EuP, CB, CE, , Gost-R, RoHS, WEEE, Windows Vista WHQL * Specifications are subject to change without prior notice. 26 ASUS LED TV Monitor T1 Series Pixel Frequency Signal Connectors TV System Colour System Channel Coverage Speakers Power LED Tilt Power Requirement Power Consumption Environmental Conditions Dimensions (W x H x D) Weight VESA Wall-Mount Accessories Regulation Approvals White Light Emitting Diode Display (WLED) 27" (68.9cm, 16:9) wide screen 600.1mm (H) x 338...
User Manual
Page 37
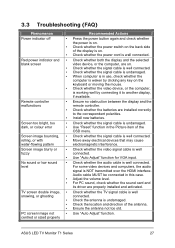
.... Screen too bright, too dark, or colour error ▪ Check whether the signal cable is undamaged. ▪ Use "Reset" function in this case. ▪ Adjust the volume level. ▪ For PC sound, check whether the sound card and its driver are installed correctly to another display, if available. Audio cable MUST be connected in the Picture item of the antenna. ▪ Ensure the antenna not too old. 3.3 Troubleshooting (FAQ) Phenomenon Recommended Actions Power...
.... Screen too bright, too dark, or colour error ▪ Check whether the signal cable is undamaged. ▪ Use "Reset" function in this case. ▪ Adjust the volume level. ▪ For PC sound, check whether the sound card and its driver are installed correctly to another display, if available. Audio cable MUST be connected in the Picture item of the antenna. ▪ Ensure the antenna not too old. 3.3 Troubleshooting (FAQ) Phenomenon Recommended Actions Power...


