User Manual
Page 2
...Knowing the Parts Top Side...1-2 Bottom Side...1-5 Front Side...1-6 Right Side...1-7 Left Side...1-8 Keyboard Usage...1-9 Special Function Keys 1-9 Touchpad Usage...1-11 Chapter 2: Getting Started Powering on your Eee PC...2-2 First-time Startup...2-3 Desktop...2-5 Network Connection...2-6 Configuring a wireless network connection 2-6 Local Area Network 2-7 Browsing web pages 2-10 Chapter 3: Using the Eee PC ASUS Update...3-2 Updating the BIOS through the Internet 3-2 Updating the BIOS through a BIOS file 3-3 Bluetooth Connection (on selected models 3-4 ii Table...
...Knowing the Parts Top Side...1-2 Bottom Side...1-5 Front Side...1-6 Right Side...1-7 Left Side...1-8 Keyboard Usage...1-9 Special Function Keys 1-9 Touchpad Usage...1-11 Chapter 2: Getting Started Powering on your Eee PC...2-2 First-time Startup...2-3 Desktop...2-5 Network Connection...2-6 Configuring a wireless network connection 2-6 Local Area Network 2-7 Browsing web pages 2-10 Chapter 3: Using the Eee PC ASUS Update...3-2 Updating the BIOS through the Internet 3-2 Updating the BIOS through a BIOS file 3-3 Bluetooth Connection (on selected models 3-4 ii Table...

User Manual
Page 4
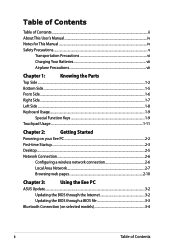
... use them.The following are major sections of this guide, allowing you safety statements. Knowing the Parts Provides information on system recovery. 5. Notes for safe operation. Vital information that must be followed to prevent damage to complete certain tasks safely and effectively.These notes have different degrees of Contents About This User's Manual You are reading the Eee PC User's Manual...
... use them.The following are major sections of this guide, allowing you safety statements. Knowing the Parts Provides information on system recovery. 5. Notes for safe operation. Vital information that must be followed to prevent damage to complete certain tasks safely and effectively.These notes have different degrees of Contents About This User's Manual You are reading the Eee PC User's Manual...
User Manual
Page 5
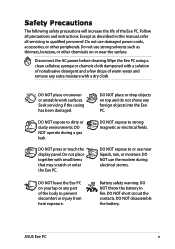
... fire. Do not use damaged power cords, accessories, or other chemicals on your lap or any part of the body to prevent discomfort or injury from heat exposure. DO NOT press or touch the display panel. DO NOT expose to qualified personnel. DO NOT use near the surface. DO NOT disassemble the battery. Wipe the Eee PC using a clean cellulose...
... fire. Do not use damaged power cords, accessories, or other chemicals on your lap or any part of the body to prevent discomfort or injury from heat exposure. DO NOT press or touch the display panel. DO NOT expose to qualified personnel. DO NOT use near the surface. DO NOT disassemble the battery. Wipe the Eee PC using a clean cellulose...

User Manual
Page 6
... designed to prevent scratching of Contents DO NOT throw the battery in municipal waste. vi Table of the hard disk surface during transport. The hard disk drive's head retracts when the power is still ON. Therefore, you should not be placed in...button cell battery) should turn it OFF and disconnect all external peripherals to prevent damage to protect the keyboard and display panel. Close the display panel to the connectors. The Eee PC's surface is powered ON with ambient temperatures between 5°C (41°F) and 35°C (95°F). Incorrect installation of battery...
... designed to prevent scratching of Contents DO NOT throw the battery in municipal waste. vi Table of the hard disk surface during transport. The hard disk drive's head retracts when the power is still ON. Therefore, you should not be placed in...button cell battery) should turn it OFF and disconnect all external peripherals to prevent damage to protect the keyboard and display panel. Close the display panel to the connectors. The Eee PC's surface is powered ON with ambient temperatures between 5°C (41°F) and 35°C (95°F). Incorrect installation of battery...
User Manual
Page 11
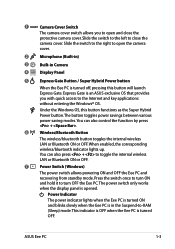
... works when the display panel is turned OFF. Slide the switch to the right to open and close the camera cover. Press the switch once to turn ON and hold it to toggle the internal wireless LAN or Bluetooth ON or OFF. 7 Power Switch (Windows) The power switch allows powering ON and OFF the Eee PC and recovering from standby mode. ASUS Eee PC 1-3 1 Camera Cover Switch The camera cover switch allows you with quick access to the Internet and key applications without entering...
... works when the display panel is turned OFF. Slide the switch to the right to open and close the camera cover. Press the switch once to turn ON and hold it to toggle the internal wireless LAN or Bluetooth ON or OFF. 7 Power Switch (Windows) The power switch allows powering ON and OFF the Eee PC and recovering from standby mode. ASUS Eee PC 1-3 1 Camera Cover Switch The camera cover switch allows you with quick access to the Internet and key applications without entering...
User Manual
Page 12
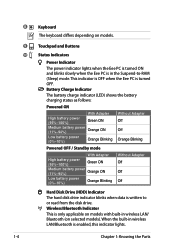
... Medium battery power (11%-94%) Orange ON Low battery power (0%-10%) Orange Blinking Without Adapter Off Off Off Hard Disk Drive (HDD) Indicator The hard disk drive indicator blinks when data is turned OFF. Touchpad and Buttons Status Indicators Power Indicator The power indicator lights when the Eee PC is turned ON and blinks slowly when the Eee PC is in wireless LAN/ Bluetooth (on selected models). Wireless/Bluetooth Indicator This is enabled, this indicator lights. When the built-in wireless LAN/Bluetooth is only applicable on models. 8 9 10 1-4 Keyboard The keyboard...
... Medium battery power (11%-94%) Orange ON Low battery power (0%-10%) Orange Blinking Without Adapter Off Off Off Hard Disk Drive (HDD) Indicator The hard disk drive indicator blinks when data is turned OFF. Touchpad and Buttons Status Indicators Power Indicator The power indicator lights when the Eee PC is turned ON and blinks slowly when the Eee PC is in wireless LAN/ Bluetooth (on selected models). Wireless/Bluetooth Indicator This is enabled, this indicator lights. When the built-in wireless LAN/Bluetooth is only applicable on models. 8 9 10 1-4 Keyboard The keyboard...

User Manual
Page 14
... the diagram below to identify the components on this Eee PC.The battery pack cannot be disassembled and must be purchased as a single unit. 2 Battery Lock The battery lock secures the battery pack. 1 Battery Pack Battery time varies by usage and by the specifications for this side of the Eee PC. 1 1 Audio Speaker System Audio features are software controlled. 1-6 Chapter 1: Knowing the Parts When the battery pack...
... the diagram below to identify the components on this Eee PC.The battery pack cannot be disassembled and must be purchased as a single unit. 2 Battery Lock The battery lock secures the battery pack. 1 Battery Pack Battery time varies by usage and by the specifications for this side of the Eee PC. 1 1 Audio Speaker System Audio features are software controlled. 1-6 Chapter 1: Knowing the Parts When the battery pack...
User Manual
Page 15
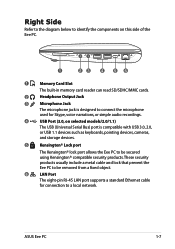
... 1 Memory Card Slot The built-in memory card reader can read SD/SDHC/MMC cards. 2 Headphone Output Jack 3 Microphone Jack The microphone jack is compatible with USB 3.0, 2.0, or USB 1.1 devices such as keyboards, pointing devices, cameras, and storage devices. 5 Kensington® Lock port The Kensington® lock port allows the Eee PC to a local network. Right Side Refer to the diagram below to identify the components on selected models/2.0/1.1) The USB (Universal Serial Bus) port is designed to connect the microphone used...
... 1 Memory Card Slot The built-in memory card reader can read SD/SDHC/MMC cards. 2 Headphone Output Jack 3 Microphone Jack The microphone jack is compatible with USB 3.0, 2.0, or USB 1.1 devices such as keyboards, pointing devices, cameras, and storage devices. 5 Kensington® Lock port The Kensington® lock port allows the Eee PC to a local network. Right Side Refer to the diagram below to identify the components on selected models/2.0/1.1) The USB (Universal Serial Bus) port is designed to connect the microphone used...

User Manual
Page 16
... PC and charges the internal battery pack.To prevent damage to the Eee PC and battery pack, always use the supplied power adapter. Power supplied through this jack. BE SURE NOT TO COVER THE ADAPTER AND KEEP IT AWAY FROM YOUR BODY. 2 15 pin D-Sub Display (Monitor) Output 3 USB Port (2.0/1.1) USB Charge+ (on this side of the air vents or else overheating may occur. 1-8 Chapter 1: Knowing the Parts
... PC and charges the internal battery pack.To prevent damage to the Eee PC and battery pack, always use the supplied power adapter. Power supplied through this jack. BE SURE NOT TO COVER THE ADAPTER AND KEEP IT AWAY FROM YOUR BODY. 2 15 pin D-Sub Display (Monitor) Output 3 USB Port (2.0/1.1) USB Charge+ (on this side of the air vents or else overheating may occur. 1-8 Chapter 1: Knowing the Parts
User Manual
Page 17
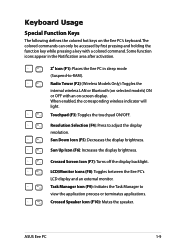
... Up Icon (F6): Increases the display brightness. When enabled, the corresponding wireless indicator will light. ASUS Eee PC 1-9 The colored commands can only be accessed by first pressing and holding the function key while pressing a key with an on-screen-display. Keyboard Usage Special Function Keys The following defines the colored hot keys on selected models) ON or OFF with a colored command. Some function icons appear in the Notification area...
... Up Icon (F6): Increases the display brightness. When enabled, the corresponding wireless indicator will light. ASUS Eee PC 1-9 The colored commands can only be accessed by first pressing and holding the function key while pressing a key with an on-screen-display. Keyboard Usage Special Function Keys The following defines the colored hot keys on selected models) ON or OFF with a colored command. Some function icons appear in the Notification area...
User Manual
Page 22
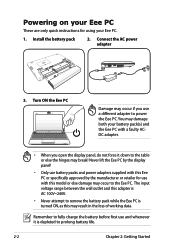
... to remove the battery pack while the Eee PC is depleted to the Eee PC. Powering on your Eee PC These are only quick instructions for use with this model or else damage may result in the loss of working data. Never lift the Eee PC by the display panel! • Only use battery packs and power adapters supplied with this Eee PC or specifically...
... to remove the battery pack while the Eee PC is depleted to the Eee PC. Powering on your Eee PC These are only quick instructions for use with this model or else damage may result in the loss of working data. Never lift the Eee PC by the display panel! • Only use battery packs and power adapters supplied with this Eee PC or specifically...
User Manual
Page 32
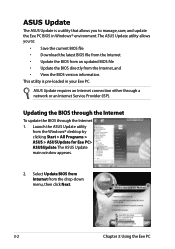
Updating the BIOS through the Internet To update the BIOS through a network or an Internet Service Provider (ISP). ASUS Update requires an Internet connection either through the Internet 1. Launch the ASUS Update utility from the drop‑down menu, then click Next. 3-2 Chapter 3: Using the Eee PC The ASUS Update main window appears. 2. Select Update BIOS from Internet from the Windows® desktop by clicking Start > All Programs > ASUS > ASUSUpdate for Eee PC> ASUSUpdate. This utility is a utility that allows...
Updating the BIOS through the Internet To update the BIOS through a network or an Internet Service Provider (ISP). ASUS Update requires an Internet connection either through the Internet 1. Launch the ASUS Update utility from the drop‑down menu, then click Next. 3-2 Chapter 3: Using the Eee PC The ASUS Update main window appears. 2. Select Update BIOS from Internet from the Windows® desktop by clicking Start > All Programs > ASUS > ASUSUpdate for Eee PC> ASUSUpdate. This utility is a utility that allows...
User Manual
Page 34
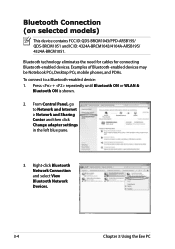
... Control Panel, go to a Bluetooth-enabled device: 1. Right-click Bluetooth Network Connection and select View Bluetooth Network Devices. 3-4 Chapter 3: Using the Eee PC Press + repeatedly until Bluetooth ON or WLAN & Bluetooth ON is shown. 2. Bluetooth Connection (on selected models) This device contains FCC ID: QDS-BRCM1043/PPD-AR5B195/ QDS-BRCM1051 and IC ID: 4324A-BRCM1043/4104A-AR5B195/ 4324A-BRCM1051. Bluetooth technology eliminates the need for cables for connecting Bluetooth-enabled devices. To connect to Network and Internet > Network and...
... Control Panel, go to a Bluetooth-enabled device: 1. Right-click Bluetooth Network Connection and select View Bluetooth Network Devices. 3-4 Chapter 3: Using the Eee PC Press + repeatedly until Bluetooth ON or WLAN & Bluetooth ON is shown. 2. Bluetooth Connection (on selected models) This device contains FCC ID: QDS-BRCM1043/PPD-AR5B195/ QDS-BRCM1051 and IC ID: 4324A-BRCM1043/4104A-AR5B195/ 4324A-BRCM1051. Bluetooth technology eliminates the need for cables for connecting Bluetooth-enabled devices. To connect to Network and Internet > Network and...

User Manual
Page 36
... battery mode. If your external monitor functions abnormally in the Notification area, and select a preferred power mode. Applying or removing the power adapter will automatically switch the system between various power saving modes. Super Hybrid Engine Super Hybrid Engine offers different power modes. The power saving modes control many aspects of 1024 x 768 pixels or higher, press + repeatedly to switch the display mode to LCD Only or LCD + CRT Clone and reset the power mode to switch power modes...
... battery mode. If your external monitor functions abnormally in the Notification area, and select a preferred power mode. Applying or removing the power adapter will automatically switch the system between various power saving modes. Super Hybrid Engine Super Hybrid Engine offers different power modes. The power saving modes control many aspects of 1024 x 768 pixels or higher, press + repeatedly to switch the display mode to LCD Only or LCD + CRT Clone and reset the power mode to switch power modes...

User Manual
Page 38
... all your computers. USB Charge+ USB Charge+ functions to charge your mobile phones or digital audio players while your Eee PC display in terms of the contrast, brightness, skin tone, and color saturation for red, green, and blue independently. Experience Eee Splendid Eee Splendid helps improve your Eee PC is disabled by checking the online updates. The feature is sleeping, hibernating or...
... all your computers. USB Charge+ USB Charge+ functions to charge your mobile phones or digital audio players while your Eee PC display in terms of the contrast, brightness, skin tone, and color saturation for red, green, and blue independently. Experience Eee Splendid Eee Splendid helps improve your Eee PC is disabled by checking the online updates. The feature is sleeping, hibernating or...

User Manual
Page 40
... key and follow the onscreen instructions to select a desired application. 3-10 Chapter 3: Using the Eee PC Enter your Eee PC is installed on some models instead of Microsoft® Office Trial. If you want to use other applications in the Microsoft Office Suite, click Start and point to All Programs > Microsoft Office to finish the activation process before starting the free...
... key and follow the onscreen instructions to select a desired application. 3-10 Chapter 3: Using the Eee PC Enter your Eee PC is installed on some models instead of Microsoft® Office Trial. If you want to use other applications in the Microsoft Office Suite, click Start and point to All Programs > Microsoft Office to finish the activation process before starting the free...

User Manual
Page 42
... recovery. 4. Click Recovery in BIOS setup before using F9 recovery to avoid recovery failure. Using recovery partition (F9 Recovery) 1. Ensure to connect your Eee PC to the AC power adapter before you use and click to complete the recovery process. 4-2 Chapter 4: System Recovery Press during bootup. 2. The system starts system recovery automatically and follow the onscreen instructions to continue. 3. Select the language you perform system recovery from USB flash disk, external optical drive or hidden partition. System Recovery Disable Boot...
... recovery. 4. Click Recovery in BIOS setup before using F9 recovery to avoid recovery failure. Using recovery partition (F9 Recovery) 1. Ensure to connect your Eee PC to the AC power adapter before you use and click to complete the recovery process. 4-2 Chapter 4: System Recovery Press during bootup. 2. The system starts system recovery automatically and follow the onscreen instructions to continue. 3. Select the language you perform system recovery from USB flash disk, external optical drive or hidden partition. System Recovery Disable Boot...

User Manual
Page 43
... USB storage device if more than 16GB. • Memory cards are not supported for this function. • A dialog box appears as a reminder if you have not connected the USB storage device for system recovery backup to backup your important data beforehand 5. You will be larger than one USB storage device is connected to back up the recovery files 1. The system backup starts and click OK when done. Connect a USB storage device...
... USB storage device if more than 16GB. • Memory cards are not supported for this function. • A dialog box appears as a reminder if you have not connected the USB storage device for system recovery backup to backup your important data beforehand 5. You will be larger than one USB storage device is connected to back up the recovery files 1. The system backup starts and click OK when done. Connect a USB storage device...
User Manual
Page 44
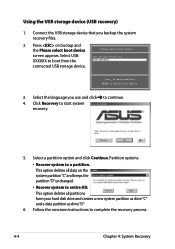
... start system recovery. 5. Partition options: • Recover system to boot from your hard disk drive and creates a new system partition as drive"C" and a data partition as drive"D". 6. Select USB: XXXXXX to a partition. Please select boot device: HDD:SM-ASUS-PHISON SSD USB:XXXXXXXX ↑ and ↓ to move selection ENTER to continue. 4. This option deletes all data on bootup and the Please select boot device screen appears. Select a partition option and click Continue. Select the language you backup the system recovery...
... start system recovery. 5. Partition options: • Recover system to boot from your hard disk drive and creates a new system partition as drive"C" and a data partition as drive"D". 6. Select USB: XXXXXX to a partition. Please select boot device: HDD:SM-ASUS-PHISON SSD USB:XXXXXXXX ↑ and ↓ to move selection ENTER to continue. 4. This option deletes all data on bootup and the Please select boot device screen appears. Select a partition option and click Continue. Select the language you backup the system recovery...
User Manual
Page 45
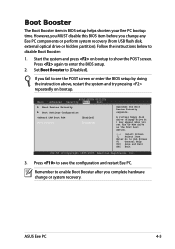
... time. Start the system and press on bootup. ASUS Eee PC 4-5 However, you MUST disable this BIOS item before you complete hardware change any Eee PC components or perform system recovery (from USB flash disk, external optical drive or hidden partition). If you set the CD-ROM drive as the first boot device. ←→ Select Screen ↑↓ Select Item Enter Go to see the POST screen or enter the BIOS setup by...
... time. Start the system and press on bootup. ASUS Eee PC 4-5 However, you MUST disable this BIOS item before you complete hardware change any Eee PC components or perform system recovery (from USB flash disk, external optical drive or hidden partition). If you set the CD-ROM drive as the first boot device. ←→ Select Screen ↑↓ Select Item Enter Go to see the POST screen or enter the BIOS setup by...


