User Manual
Page 1
E5064 Eee PC User Manual Windows® 7 Edition Eee PC 1005 Series 15G06Q178001
E5064 Eee PC User Manual Windows® 7 Edition Eee PC 1005 Series 15G06Q178001
User Manual
Page 2
......1-11 Multi-finger gesture input (on selected models 1-11 Chapter 2: Getting Started Powering on your Eee PC...2-2 First-time Startup...2-3 Desktop...2-5 Network Connection...2-6 Configuring a wireless network connection 2-6 Local Area Network 2-7 Browsing web pages 2-10 Chapter 3: Using the Eee PC ASUS Update...3-2 Updating the BIOS through the Internet 3-2 Updating the BIOS through a BIOS file 3-3 Bluetooth Connection...
......1-11 Multi-finger gesture input (on selected models 1-11 Chapter 2: Getting Started Powering on your Eee PC...2-2 First-time Startup...2-3 Desktop...2-5 Network Connection...2-6 Configuring a wireless network connection 2-6 Local Area Network 2-7 Browsing web pages 2-10 Chapter 3: Using the Eee PC ASUS Update...3-2 Updating the BIOS through the Internet 3-2 Updating the BIOS through a BIOS file 3-3 Bluetooth Connection...
User Manual
Page 3
Eee Sharing...3-8 Eee Xperience...3-8 Eee Tools...3-9 Boingo (on selected models 3-9 Microsoft® Office Trial...3-10 Chapter 4: Support DVD & System Recovery Support DVD information 4-2 Running the support DVD 4-2 Drivers menu...4-3 Utilities ... Notices...A-8 Power Safety Requirement A-9 REACH Notice...A-9 Nordic Lithium Cautions (for lithium-ion batteries A-10 Copyright Information...A-12 Limitation of Liability...A-13 Service and Support...A-13 ASUS Eee PC iii
Eee Sharing...3-8 Eee Xperience...3-8 Eee Tools...3-9 Boingo (on selected models 3-9 Microsoft® Office Trial...3-10 Chapter 4: Support DVD & System Recovery Support DVD information 4-2 Running the support DVD 4-2 Drivers menu...4-3 Utilities ... Notices...A-8 Power Safety Requirement A-9 REACH Notice...A-9 Nordic Lithium Cautions (for lithium-ion batteries A-10 Copyright Information...A-12 Limitation of Liability...A-13 Service and Support...A-13 ASUS Eee PC iii
User Manual
Page 4
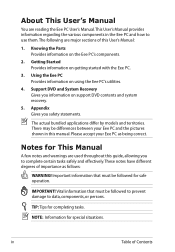
...by models and territories. There may be followed for completing tasks. Important information that must be differences between your Eee PC as follows: WARNING! Vital information that must be followed to prevent damage to complete certain tasks safely and effectively.... notes and warnings are used throughout this User's Manual: 1. Knowing the Parts Provides information on using the Eee PC's utilities. 4. Using the Eee PC Provides information on the Eee PC's components. 2. IMPORTANT! Getting Started Provides information on support DVD contents and system recovery. 5. iv Table ...
...by models and territories. There may be followed for completing tasks. Important information that must be differences between your Eee PC as follows: WARNING! Vital information that must be followed to prevent damage to complete certain tasks safely and effectively.... notes and warnings are used throughout this User's Manual: 1. Knowing the Parts Provides information on using the Eee PC's utilities. 4. Using the Eee PC Provides information on the Eee PC's components. 2. IMPORTANT! Getting Started Provides information on support DVD contents and system recovery. 5. iv Table ...
User Manual
Page 5
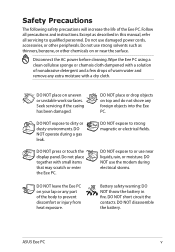
...modem during a gas leak. Disconnect the AC power before cleaning. DO NOT leave the Eee PC on top and do not shove any extra moisture with small items that may scratch or enter the Eee PC. DO NOT operate during electrical storms. Battery safety warning: DO NOT throw the battery... The following safety precautions will increase the life of warm water and remove any foreign objects into the Eee PC. Do not use strong solvents such as described in fire. Wipe the Eee PC using a clean cellulose sponge or chamois cloth dampened with a solution of nonabrasive detergent and a few drops...
...modem during a gas leak. Disconnect the AC power before cleaning. DO NOT leave the Eee PC on top and do not shove any extra moisture with small items that may scratch or enter the Eee PC. DO NOT operate during electrical storms. Battery safety warning: DO NOT throw the battery... The following safety precautions will increase the life of warm water and remove any foreign objects into the Eee PC. Do not use strong solvents such as described in fire. Wipe the Eee PC using a clean cellulose sponge or chamois cloth dampened with a solution of nonabrasive detergent and a few drops...
User Manual
Page 6
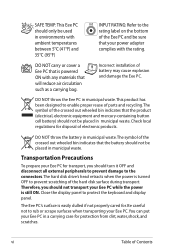
... Close the display panel to prevent scratching of the hard disk surface during transport. DO NOT carry or cover a Eee PC that is still ON. SAFE TEMP: This Eee PC should only be used in environments with ambient temperatures between 5°C (41°F) and 35°C (95°... from dirt, water, shock, and scratches. vi Table of battery may cause explosion and damage the Eee PC. Transportation Precautions To prepare your Eee PC for transport, you should not transport your Eee PC while the power is powered ON with any materials that will reduce air circulation such as a carrying...
... Close the display panel to prevent scratching of the hard disk surface during transport. DO NOT carry or cover a Eee PC that is still ON. SAFE TEMP: This Eee PC should only be used in environments with ambient temperatures between 5°C (41°F) and 35°C (95°... from dirt, water, shock, and scratches. vi Table of battery may cause explosion and damage the Eee PC. Transportation Precautions To prepare your Eee PC for transport, you should not transport your Eee PC while the power is powered ON with any materials that will reduce air circulation such as a carrying...
User Manual
Page 7
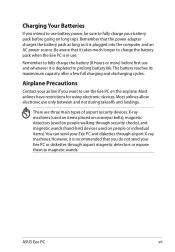
... machines. Remember to fully charge the battery (8 hours or more) before going on the airplane. Most airlines allow electronic use the Eee PC on long trips. Most airlines have restrictions for using electronic devices. Charging Your Batteries If you intend to use battery power, be ...use and whenever it is plugged into the computer and an AC power source. ASUS Eee PC vii However, it is recommended that it is depleted to magnetic wands. Airplane Precautions Contact your Eee PC and diskettes through airport magnetic detectors or expose them to prolong battery life.The...
... machines. Remember to fully charge the battery (8 hours or more) before going on the airplane. Most airlines allow electronic use the Eee PC on long trips. Most airlines have restrictions for using electronic devices. Charging Your Batteries If you intend to use battery power, be ...use and whenever it is plugged into the computer and an AC power source. ASUS Eee PC vii However, it is recommended that it is depleted to magnetic wands. Airplane Precautions Contact your Eee PC and diskettes through airport magnetic detectors or expose them to prolong battery life.The...
User Manual
Page 10
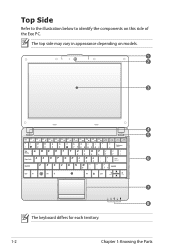
Top Side Refer to the illustration below to identify the components on models. 1 2 3 4 5 6 7 8 The keyboard differs for each territory. 1-2 Chapter 1: Knowing the Parts The top side may vary in appearance depending on this side of the Eee PC.
Top Side Refer to the illustration below to identify the components on models. 1 2 3 4 5 6 7 8 The keyboard differs for each territory. 1-2 Chapter 1: Knowing the Parts The top side may vary in appearance depending on this side of the Eee PC.

User Manual
Page 11
...functions as a desktop mouse. 8 Status Indicators Power Indicator The power indicator lights when the Eee PC is turned ON and blinks slowly when the Eee PC is in the Save-to turn OFF the Eee PC. ASUS Eee PC 1-3 You can be depressed) and palm rest for both hands. Power Indicator The power ...indicator lights when the Eee PC is turned ON and blinks slowly when the Eee PC is turned OFF. 6 Keyboard ...
...functions as a desktop mouse. 8 Status Indicators Power Indicator The power indicator lights when the Eee PC is turned ON and blinks slowly when the Eee PC is in the Save-to turn OFF the Eee PC. ASUS Eee PC 1-3 You can be depressed) and palm rest for both hands. Power Indicator The power ...indicator lights when the Eee PC is turned ON and blinks slowly when the Eee PC is turned OFF. 6 Keyboard ...
User Manual
Page 13
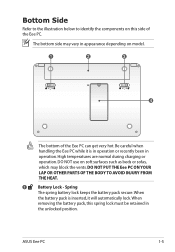
... Side Refer to the illustration below to identify the components on this spring lock must be retained in the unlocked position. ASUS Eee PC 1-5 Be careful when handling the Eee PC while it is inserted, it will automatically lock. High temperatures are normal during charging or operation. When removing the battery ...pack, this side of the Eee PC can get very hot. The bottom side may block the vents. DO NOT PUT THE Eee PC ON YOUR LAP OR OTHER PARTS OF THE BODY TO AVOID INJURY FROM THE HEAT. 1 ...
... Side Refer to the illustration below to identify the components on this spring lock must be retained in the unlocked position. ASUS Eee PC 1-5 Be careful when handling the Eee PC while it is inserted, it will automatically lock. High temperatures are normal during charging or operation. When removing the battery ...pack, this side of the Eee PC can get very hot. The bottom side may block the vents. DO NOT PUT THE Eee PC ON YOUR LAP OR OTHER PARTS OF THE BODY TO AVOID INJURY FROM THE HEAT. 1 ...

User Manual
Page 14
Battery time varies by usage and by the specifications for this side of the Eee PC. 1 1 Audio Speaker System The built-in a dedicated compartment. Move the manual lock ... Pack The battery pack is automatically charged when connected to an AC power source and maintains power to the Eee PC when AC power is used to keep the battery pack secured. This allows use when moving temporarily between locations...manual lock to the unlocked position to identify the components on this Eee PC.The battery pack cannot be disassembled and must be purchased as a single unit. 3 Battery Lock -
Battery time varies by usage and by the specifications for this side of the Eee PC. 1 1 Audio Speaker System The built-in a dedicated compartment. Move the manual lock ... Pack The battery pack is automatically charged when connected to an AC power source and maintains power to the Eee PC when AC power is used to keep the battery pack secured. This allows use when moving temporarily between locations...manual lock to the unlocked position to identify the components on this Eee PC.The battery pack cannot be disassembled and must be purchased as a single unit. 3 Battery Lock -

User Manual
Page 15
...cameras, and storage devices, connected in connector allows convenient use without additional adapters. ASUS Eee PC 1-7 The built-in a series up to 12Mbits/sec (USB 1.1) and 480Mbits/sec (USB 2.0). Using this side of the Eee PC. 1 23 4 5 1 Memory Card Slot The built-in memory card reader... can read SD/SDHC/MMC cards. 2 Headphone Output Jack The 1/8" stereo headphone jack (3.5mm) connects the Eee PC's audio out signal to amplified speakers or headphones. Right Side Refer to the illustration below to identify the components on this jack automatically...
...cameras, and storage devices, connected in connector allows convenient use without additional adapters. ASUS Eee PC 1-7 The built-in a series up to 12Mbits/sec (USB 1.1) and 480Mbits/sec (USB 2.0). Using this side of the Eee PC. 1 23 4 5 1 Memory Card Slot The built-in memory card reader... can read SD/SDHC/MMC cards. 2 Headphone Output Jack The 1/8" stereo headphone jack (3.5mm) connects the Eee PC's audio out signal to amplified speakers or headphones. Right Side Refer to the illustration below to identify the components on this jack automatically...
User Manual
Page 16
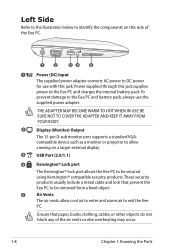
... a standard VGAcompatible device such as a monitor or projector to allow cool air to enter and warm air to exit the Eee PC. Ensure that prevent the Eee PC to be secured using Kensington® compatible security products. Left Side Refer to the illustration below to identify the components on ...a larger external display. 3 USB Port (2.0/1.1) 4 Kensington® Lock port The Kensington® lock port allows the Eee PC to be removed from a fixed object. 5 Air Vents The air vents allow viewing on this side of the air vents or else overheating ...
... a standard VGAcompatible device such as a monitor or projector to allow cool air to enter and warm air to exit the Eee PC. Ensure that prevent the Eee PC to be secured using Kensington® compatible security products. Left Side Refer to the illustration below to identify the components on ...a larger external display. 3 USB Port (2.0/1.1) 4 Kensington® Lock port The Kensington® lock port allows the Eee PC to be removed from a fixed object. 5 Air Vents The air vents allow viewing on this side of the air vents or else overheating ...
User Manual
Page 17
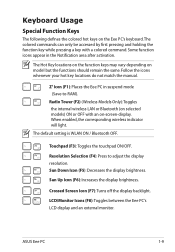
...Notification area after activation. Crossed Screen Icon (F7): Turns off the display backlight. LCD/Monitor Icons (F8): Toggles between the Eee PC's LCD display and an external monitor. Some function icons appear in suspend mode (Save-to adjust the display resolution. Sun Down...or Bluetooth (on -screen-display. The Hot Key locations on the function keys may vary depending on the Eee PC's keyboard. When enabled, the corresponding wireless indicator will light. ASUS Eee PC 1-9 Follow the icons whenever your hot key locations do not match the manual. The default setting is ...
...Notification area after activation. Crossed Screen Icon (F7): Turns off the display backlight. LCD/Monitor Icons (F8): Toggles between the Eee PC's LCD display and an external monitor. Some function icons appear in suspend mode (Save-to adjust the display resolution. Sun Down...or Bluetooth (on -screen-display. The Hot Key locations on the function keys may vary depending on the Eee PC's keyboard. When enabled, the corresponding wireless indicator will light. ASUS Eee PC 1-9 Follow the icons whenever your hot key locations do not match the manual. The default setting is ...
User Manual
Page 19
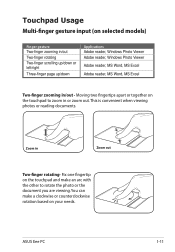
... apart or together on the touchpad to rotate the photo or the document you are viewing. This is convenient when viewing photos or reading documents. ASUS Eee PC 1-11 Touchpad Usage Multi-finger gesture input (on selected models) Finger gesture Two-finger zooming in/out Two-finger rotating Two-finger scrolling up/down...
... apart or together on the touchpad to rotate the photo or the document you are viewing. This is convenient when viewing photos or reading documents. ASUS Eee PC 1-11 Touchpad Usage Multi-finger gesture input (on selected models) Finger gesture Two-finger zooming in/out Two-finger rotating Two-finger scrolling up/down...

User Manual
Page 21
Powering on your Eee PC First-time Startup Desktop Network Connection 2 Chapter 2: Getting Started
Powering on your Eee PC First-time Startup Desktop Network Connection 2 Chapter 2: Getting Started
User Manual
Page 22
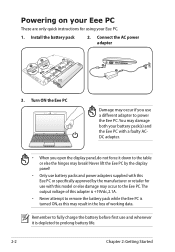
...turned ON, as this may result in the loss of this adapter is +19Vdc, 2.1A. • Never attempt to remove the battery pack while the Eee PC is depleted to prolong battery life. 2-2 Chapter 2: Getting Started Connect the AC power adapter 3 1 2 2 1 3 110V-220V 3. Remember to fully... the battery before first use a different adapter to power the Eee PC. You may damage both your Eee PC. 1. Never lift the Eee PC by the display panel! • Only use battery packs and power adapters supplied with this Eee PC or specifically approved by the manufacturer or retailer for using your ...
...turned ON, as this may result in the loss of this adapter is +19Vdc, 2.1A. • Never attempt to remove the battery pack while the Eee PC is depleted to prolong battery life. 2-2 Chapter 2: Getting Started Connect the AC power adapter 3 1 2 2 1 3 110V-220V 3. Remember to fully... the battery before first use a different adapter to power the Eee PC. You may damage both your Eee PC. 1. Never lift the Eee PC by the display panel! • Only use battery packs and power adapters supplied with this Eee PC or specifically approved by the manufacturer or retailer for using your ...
User Manual
Page 23
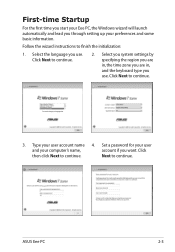
...basic information. Click then click Next to continue. Select the language you use . First-time Startup For the first time you start your Eee PC, the Windows wizard will launch automatically and lead you through setting up your computer's name, account if you want. Next to continue. Select...you system settings by specifying the region you are in, the time zone you are in, and the keyboard type you use . ASUS Eee PC 2-3 Click Next to finish the initialization: 1. Follow the wizard instructions to continue. 2. Click Next to continue. 3. Type your user account name 4.
...basic information. Click then click Next to continue. Select the language you use . First-time Startup For the first time you start your Eee PC, the Windows wizard will launch automatically and lead you through setting up your computer's name, account if you want. Next to continue. Select...you system settings by specifying the region you are in, the time zone you are in, and the keyboard type you use . ASUS Eee PC 2-3 Click Next to finish the initialization: 1. Follow the wizard instructions to continue. 2. Click Next to continue. 3. Type your user account name 4.
User Manual
Page 25
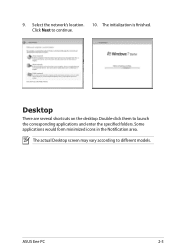
Click Next to launch the corresponding applications and enter the specified folders. Double-click them to continue. Desktop There are several shortcuts on the desktop. 9. Select the network's location. 10. The actual Desktop screen may vary according to different models. Some applications would form minimized icons in the Notification area. ASUS Eee PC 2-5 The initialization is finished.
Click Next to launch the corresponding applications and enter the specified folders. Double-click them to continue. Desktop There are several shortcuts on the desktop. 9. Select the network's location. 10. The actual Desktop screen may vary according to different models. Some applications would form minimized icons in the Notification area. ASUS Eee PC 2-5 The initialization is finished.
User Manual
Page 27
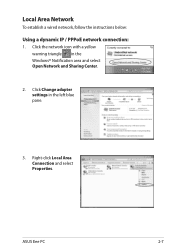
Right-click Local Area Connection and select Properties. ASUS Eee PC 2-7 Local Area Network To establish a wired network, follow the instructions below: Using a dynamic IP / PPPoE network connection: 1. Click the network icon with a yellow warning triangle in the left blue pane. 3. Click Change adapter settings in the Windows® Notification area and select Open Network and Sharing Center. 2.
Right-click Local Area Connection and select Properties. ASUS Eee PC 2-7 Local Area Network To establish a wired network, follow the instructions below: Using a dynamic IP / PPPoE network connection: 1. Click the network icon with a yellow warning triangle in the left blue pane. 3. Click Change adapter settings in the Windows® Notification area and select Open Network and Sharing Center. 2.


