Manual
Page 5
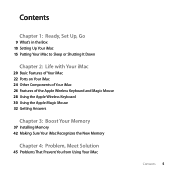
Contents Chapter 1: Ready, Set Up, Go 9 What's in the Box 10 Setting Up Your iMac 15 Putting Your iMac to Sleep or Shutting It Down Chapter 2: Life with Your iMac 20 Basic Features of Your iMac 22 Ports on Your iMac 24 Other Components of Your iMac 26 Features of the Apple Wireless Keyboard and Magic Mouse 28 Using the Apple Wireless Keyboard 30 Using the Apple Magic Mouse 32 Getting Answers Chapter 3: Boost Your Memory 37 Installing Memory 42 Making Sure Your iMac Recognizes the New Memory Chapter 4: Problem, Meet Solution 45 Problems That Prevent You from Using Your iMac Contents 5
Contents Chapter 1: Ready, Set Up, Go 9 What's in the Box 10 Setting Up Your iMac 15 Putting Your iMac to Sleep or Shutting It Down Chapter 2: Life with Your iMac 20 Basic Features of Your iMac 22 Ports on Your iMac 24 Other Components of Your iMac 26 Features of the Apple Wireless Keyboard and Magic Mouse 28 Using the Apple Wireless Keyboard 30 Using the Apple Magic Mouse 32 Getting Answers Chapter 3: Boost Your Memory 37 Installing Memory 42 Making Sure Your iMac Recognizes the New Memory Chapter 4: Problem, Meet Solution 45 Problems That Prevent You from Using Your iMac Contents 5

Manual
Page 24
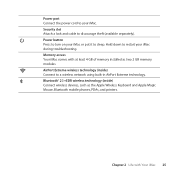
Other Components of Your iMac Power port Security slot ® Power button ® Memory access (underneath) 24 Chapter 2 Life with Your iMac
Other Components of Your iMac Power port Security slot ® Power button ® Memory access (underneath) 24 Chapter 2 Life with Your iMac
Manual
Page 25
... technology. ◊ Bluetooth® 2.1+EDR wireless technology (inside ) Connect to restart your iMac. Memory access Your iMac comes with Your iMac 25 Z AirPort Extreme wireless technology (inside ) Connect wireless devices, such as two 2 GB memory modules. Chapter 2 Life with at least 4 GB of memory installed as the Apple Wireless Keyboard and Apple Magic Mouse, Bluetooth mobile phones, PDAs, and printers.
... technology. ◊ Bluetooth® 2.1+EDR wireless technology (inside ) Connect to restart your iMac. Memory access Your iMac comes with Your iMac 25 Z AirPort Extreme wireless technology (inside ) Connect wireless devices, such as two 2 GB memory modules. Chapter 2 Life with at least 4 GB of memory installed as the Apple Wireless Keyboard and Apple Magic Mouse, Bluetooth mobile phones, PDAs, and printers.
Manual
Page 32
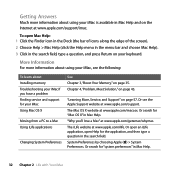
... Preferences. "Learning More, Service, and Support" on page 43. Or see the following: To learn about Installing memory Troubleshooting your iMac if you 'll love a Mac" at www.apple.com/getamac/whymac. Or open an iLife application, open Mac Help: 1 Click the Finder icon in the Dock (the ...more information about using your iMac is available in Mac Help and on page 35. To open Help for your iMac Using Mac OS X Moving from a PC to a Mac Using iLife applications Changing System Preferences See Chapter 3, "Boost Your Memory," on the Internet at www.apple.com/support. Or search ...
... Preferences. "Learning More, Service, and Support" on page 43. Or see the following: To learn about Installing memory Troubleshooting your iMac if you 'll love a Mac" at www.apple.com/getamac/whymac. Or open an iLife application, open Mac Help: 1 Click the Finder icon in the Dock (the ...more information about using your iMac is available in Mac Help and on page 35. To open Help for your iMac Using Mac OS X Moving from a PC to a Mac Using iLife applications Changing System Preferences See Chapter 3, "Boost Your Memory," on the Internet at www.apple.com/support. Or search ...

Manual
Page 35
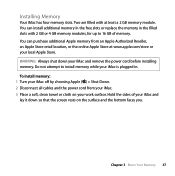
3 Boost Your Memory 3 www.apple.com/store Mac Help RAM
3 Boost Your Memory 3 www.apple.com/store Mac Help RAM
Manual
Page 36
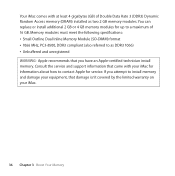
... damage isn't covered by the limited warranty on your iMac for information about how to contact Apple for up to install memory and damage your equipment, that came with at least 4 gigabytes (GB) of 16 GB. You can replace or install additional 2 GB or 4 GB memory modules for service. Memory modules must meet the following specifications: Â Small Outline...
... damage isn't covered by the limited warranty on your iMac for information about how to contact Apple for up to install memory and damage your equipment, that came with at least 4 gigabytes (GB) of 16 GB. You can replace or install additional 2 GB or 4 GB memory modules for service. Memory modules must meet the following specifications: Â Small Outline...
Manual
Page 37
... remove the power cord before installing memory. You can purchase additional Apple memory from your iMac off by choosing Apple () > Shut Down. 2 Disconnect all cables and the power cord from an Apple Authorized Reseller, an Apple Store retail location, or the online Apple Store at least a 2 GB memory module. To install memory: 1 Turn your iMac. 3 Place a soft, clean towel or cloth...
... remove the power cord before installing memory. You can purchase additional Apple memory from your iMac off by choosing Apple () > Shut Down. 2 Disconnect all cables and the power cord from an Apple Authorized Reseller, an Apple Store retail location, or the online Apple Store at least a 2 GB memory module. To install memory: 1 Turn your iMac. 3 Place a soft, clean towel or cloth...
Manual
Page 38
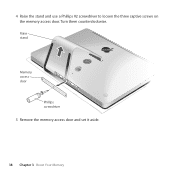
Turn them counterclockwise. Raise stand Memory access door ® Phillips screwdriver 5 Remove the memory access door and set it aside. 38 Chapter 3 Boost Your Memory 4 Raise the stand and use a Phillips #2 screwdriver to loosen the three captive screws on the memory access door.
Turn them counterclockwise. Raise stand Memory access door ® Phillips screwdriver 5 Remove the memory access door and set it aside. 38 Chapter 3 Boost Your Memory 4 Raise the stand and use a Phillips #2 screwdriver to loosen the three captive screws on the memory access door.
Manual
Page 39
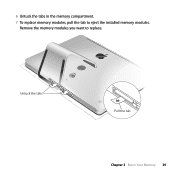
Remove the memory modules you want to eject the installed memory modules. Untuck the tabs ® Pull the tab Chapter 3 Boost Your Memory 39 6 Untuck the tabs in the memory compartment. 7 To replace memory modules, pull the tab to replace.
Remove the memory modules you want to eject the installed memory modules. Untuck the tabs ® Pull the tab Chapter 3 Boost Your Memory 39 6 Untuck the tabs in the memory compartment. 7 To replace memory modules, pull the tab to replace.
Manual
Page 40
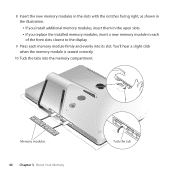
You'll hear a slight click when the memory module is seated correctly. 10 Tuck the tabs into its slot. 8 Insert the new memory modules in the slots with the notches facing right, as shown in the illustration. Â If you install additional memory modules, insert them in the open slots. Â If you replace the installed memory modules, insert a new memory module in each of the front slots closest to the display. 9 Press each memory module firmly and evenly into the memory compartment. Memory modules 40 Chapter 3 Boost Your Memory ® Tuck the tab
You'll hear a slight click when the memory module is seated correctly. 10 Tuck the tabs into its slot. 8 Insert the new memory modules in the slots with the notches facing right, as shown in the illustration. Â If you install additional memory modules, insert them in the open slots. Â If you replace the installed memory modules, insert a new memory module in each of the front slots closest to the display. 9 Press each memory module firmly and evenly into the memory compartment. Memory modules 40 Chapter 3 Boost Your Memory ® Tuck the tab
Manual
Page 41
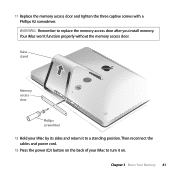
Then reconnect the cables and power cord. 13 Press the power (®) button on the back of your iMac by its sides and return it on. 11 Replace the memory access door and tighten the three captive screws with a Phillips #2 screwdriver. WARNING: Remember to a standing position. Raise stand Memory access door ® Phillips screwdriver 12 Hold your iMac to turn it to replace the memory access door after you install memory. Chapter 3 Boost Your Memory 41 Your iMac won't function properly without the memory access door.
Then reconnect the cables and power cord. 13 Press the power (®) button on the back of your iMac by its sides and return it on. 11 Replace the memory access door and tighten the three captive screws with a Phillips #2 screwdriver. WARNING: Remember to a standing position. Raise stand Memory access door ® Phillips screwdriver 12 Hold your iMac to turn it to replace the memory access door after you install memory. Chapter 3 Boost Your Memory 41 Your iMac won't function properly without the memory access door.
Manual
Page 42
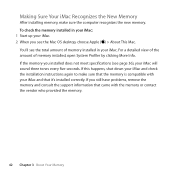
... (see the Mac OS desktop, choose Apple () > About This Mac. To check the memory installed in your iMac will sound three tones every five seconds. For a detailed view of the amount of memory installed in your iMac: 1 Start up your iMac. 2 When you still have problems, remove the memory and consult the support information that came...
... (see the Mac OS desktop, choose Apple () > About This Mac. To check the memory installed in your iMac will sound three tones every five seconds. For a detailed view of the amount of memory installed in your iMac: 1 Start up your iMac. 2 When you still have problems, remove the memory and consult the support information that came...
Manual
Page 44
...the version of Mac OS X installed on your iMac needs service, see "Learning More, Service, and Support" on the iMac Service & Support website at www.apple.com/support/imac. If you may indicate that the application isn't compatible with your iMac, except to note: Â The applications ...before the problem occurred. Problems that occur only with a specific application may have problems while working with your iMac, there's usually a simple and quick solution. Things to install memory. If your computer. Â Any software that you recently installed. Â Any new hardware (such...
...the version of Mac OS X installed on your iMac needs service, see "Learning More, Service, and Support" on the iMac Service & Support website at www.apple.com/support/imac. If you may indicate that the application isn't compatible with your iMac, except to note: Â The applications ...before the problem occurred. Problems that occur only with a specific application may have problems while working with your iMac, there's usually a simple and quick solution. Things to install memory. If your computer. Â Any software that you recently installed. Â Any new hardware (such...

Manual
Page 46
...Make sure the power cord is plugged into your iMac starts up your iMac sounds tones every five seconds, make sure that the memory is compatible with Your iMac" on page 54). Keep holding the power (®) button for about contacting Apple for information about 5 seconds, until it is ... the problem occurs frequently, you may need to reinstall your iMac to start up your iMac. Â If you still can't start up your iMac freezes during startup or you hear the startup sound a second time. This resets the parameter RAM (PRAM). Â If you installed allows your system software...
...Make sure the power cord is plugged into your iMac starts up your iMac sounds tones every five seconds, make sure that the memory is compatible with Your iMac" on page 54). Keep holding the power (®) button for about contacting Apple for information about 5 seconds, until it is ... the problem occurs frequently, you may need to reinstall your iMac to start up your iMac. Â If you still can't start up your iMac freezes during startup or you hear the startup sound a second time. This resets the parameter RAM (PRAM). Â If you installed allows your system software...
Manual
Page 49
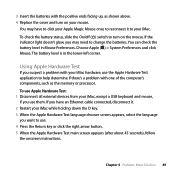
... batteries with the positive ends facing up, as the memory or processor. If the indicator light doesn't glow, you want to help determine if there's a problem with your iMac while holding down the D key. 3 When the Apple Hardware Test language chooser screen appears, select the language ...you may have an Ethernet cable connected, disconnect it to your iMac. Using Apple Hardware Test If you suspect a problem with one...
... batteries with the positive ends facing up, as the memory or processor. If the indicator light doesn't glow, you want to help determine if there's a problem with your iMac while holding down the D key. 3 When the Apple Hardware Test language chooser screen appears, select the language ...you may have an Ethernet cable connected, disconnect it to your iMac. Using Apple Hardware Test If you suspect a problem with one...
Manual
Page 57
...hold the mouse upside-down and roll the ball vigorously while cleaning.  See "Cleaning Your Mouse" on Apple's discussion forums. Chapter 4 Problem, Meet Solution 57 You can find more information. In the Finder, choose Help > Mac Help...get lost repeatedly  You may need service, contact Apple or take your iMac to an Apple Authorized Service Provider. Learning More, Service, and Support Your iMac does not have a problem using your iMac or working with a scroll ball and the scrolling feels.... If you have any user-serviceable parts, except the keyboard, mouse, and memory.
...hold the mouse upside-down and roll the ball vigorously while cleaning.  See "Cleaning Your Mouse" on Apple's discussion forums. Chapter 4 Problem, Meet Solution 57 You can find more information. In the Finder, choose Help > Mac Help...get lost repeatedly  You may need service, contact Apple or take your iMac to an Apple Authorized Service Provider. Learning More, Service, and Support Your iMac does not have a problem using your iMac or working with a scroll ball and the scrolling feels.... If you have any user-serviceable parts, except the keyboard, mouse, and memory.
Manual
Page 58
...complimentary). For information, visit www.apple.com/support/products or visit the website address for your iMac, use System Profiler. Call the support center number nearest you what hardware and software is installed, the serial number and operating system version, how much memory is installed, and more. Have... the purchase date and your iMac serial number ready when you with 90 days of technical support and one year of hardware repair ...
...complimentary). For information, visit www.apple.com/support/products or visit the website address for your iMac, use System Profiler. Call the support center number nearest you what hardware and software is installed, the serial number and operating system version, how much memory is installed, and more. Have... the purchase date and your iMac serial number ready when you with 90 days of technical support and one year of hardware repair ...

Manual
Page 62
Water and wet locations Keep your iMac away from dampness or wet weather, such as drinks, washbasins, bathtubs, shower stalls, and so on a stable work surface. Power The only way to disconnect power completely is to install memory. 62 Chapter 5 Last, but Not Least Always unplug the power cord ... or use of your computer may void the manufacturer's warranty. Never push objects into the ventilation openings. Proper handling Set up your iMac on . Protect your iMac from sources of liquid, such as rain, snow, and fog. For your safety and that of your equipment, follow these safety ...
Water and wet locations Keep your iMac away from dampness or wet weather, such as drinks, washbasins, bathtubs, shower stalls, and so on a stable work surface. Power The only way to disconnect power completely is to install memory. 62 Chapter 5 Last, but Not Least Always unplug the power cord ... or use of your computer may void the manufacturer's warranty. Never push objects into the ventilation openings. Proper handling Set up your iMac on . Protect your iMac from sources of liquid, such as rain, snow, and fog. For your safety and that of your equipment, follow these safety ...
Manual
Page 63
.... Chapter 5 Last, but Not Least 63 WARNING: Your AC cord has a three-wire grounding plug (a plug that you can unplug your iMac needs service or repair  You want to add memory  The power cord or plug becomes frayed or otherwise damaged  You spill something into the case  Your... iMac is exposed to rain or excess moisture  Your iMac has been dropped or the case has been damaged  You suspect that...
.... Chapter 5 Last, but Not Least 63 WARNING: Your AC cord has a three-wire grounding plug (a plug that you can unplug your iMac needs service or repair  You want to add memory  The power cord or plug becomes frayed or otherwise damaged  You spill something into the case  Your... iMac is exposed to rain or excess moisture  Your iMac has been dropped or the case has been damaged  You suspect that...
Manual
Page 65
... 37). Chapter 5 Last, but that came with your computer for instructions about how to open your iMac or install items other than memory, you open your iMac. Do not allow children access to your safety, have this product through the ventilation openings in hazardous ... equipment may be dangerous and damage your equipment's manual may be supervised by an Apple Authorized Service Provider. Do not attempt to contact an Apple Authorized Service Provider or Apple for Optical Disc Drives WARNING: Making adjustments or performing procedures other than those specified in...
... 37). Chapter 5 Last, but that came with your computer for instructions about how to open your iMac or install items other than memory, you open your iMac. Do not allow children access to your safety, have this product through the ventilation openings in hazardous ... equipment may be dangerous and damage your equipment's manual may be supervised by an Apple Authorized Service Provider. Do not attempt to contact an Apple Authorized Service Provider or Apple for Optical Disc Drives WARNING: Making adjustments or performing procedures other than those specified in...