User Manual
Page 5
Contents Chapter 1: Ready, Set Up, Go 11 Setting Up Your Mac Pro 19 Putting Your Mac Pro to Sleep or Shutting It Down Chapter 2: Life with Your Mac Pro 24 Basic Features on the Front of Your Mac Pro 26 Features of Your Apple Keyboard 28 Ports and Connectors on the Back of Your Mac Pro 30 More Ports and Connectors on the Back 32 Internal Expansion Options 34 Getting Answers Chapter 3: Making a Good Thing Better 39 Opening the Mac Pro 43 Installing Memory 51 Installing Internal Storage Devices 60 Adding PCI Express Cards 64 Replacing the Internal Backup Battery Contents 5
Contents Chapter 1: Ready, Set Up, Go 11 Setting Up Your Mac Pro 19 Putting Your Mac Pro to Sleep or Shutting It Down Chapter 2: Life with Your Mac Pro 24 Basic Features on the Front of Your Mac Pro 26 Features of Your Apple Keyboard 28 Ports and Connectors on the Back of Your Mac Pro 30 More Ports and Connectors on the Back 32 Internal Expansion Options 34 Getting Answers Chapter 3: Making a Good Thing Better 39 Opening the Mac Pro 43 Installing Memory 51 Installing Internal Storage Devices 60 Adding PCI Express Cards 64 Replacing the Internal Backup Battery Contents 5
User Manual
Page 10
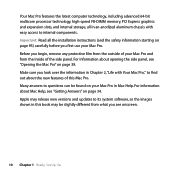
...64-bit multicore processor technology, high-speed FB-DIMM memory, PCI Express graphics and expansion slots, and internal storage, all the installation instructions (and the safety information starting on page 95) carefully before you first use your Mac Pro. Make sure you look over the information in an... anodized aluminum chassis with Your Mac Pro," to its system software, so the images shown in Mac Help. For information about Mac Help, see "Getting Answers" on page 39. Apple may be slightly different from what you begin, remove any protective film...
...64-bit multicore processor technology, high-speed FB-DIMM memory, PCI Express graphics and expansion slots, and internal storage, all the installation instructions (and the safety information starting on page 95) carefully before you first use your Mac Pro. Make sure you look over the information in an... anodized aluminum chassis with Your Mac Pro," to its system software, so the images shown in Mac Help. For information about Mac Help, see "Getting Answers" on page 39. Apple may be slightly different from what you begin, remove any protective film...

User Manual
Page 32
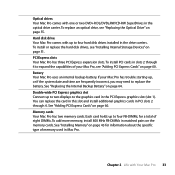
Internal Expansion Options 32 Chapter 2 Life with Your Mac Pro Optical drive carrier Hard disk drive carriers (4) Slots 2-4: PCI Express Battery Slot 1: Double-wide PCI Express graphics (graphics card installed) Top memory card Bottom memory card
Internal Expansion Options 32 Chapter 2 Life with Your Mac Pro Optical drive carrier Hard disk drive carriers (4) Slots 2-4: PCI Express Battery Slot 1: Double-wide PCI Express graphics (graphics card installed) Top memory card Bottom memory card
User Manual
Page 33
...up to four FB-DIMMs, for information about the specific type of memory used in the PCI Express graphics slot (slot 1). Memory cards Your Mac Pro has two memory cards. See "Replacing the Internal Backup Battery" on page 60. If your Mac Pro, see "Adding PCI Express Cards" on page 55. See "... with up to two displays to replace the battery. Hard disk drive Your Mac Pro comes with Your Mac Pro 33 To replace an optical drive, see "Installing Internal Storage Devices" on the memory cards. PCI Express slots Your Mac Pro has three PCI Express expansion slots. Each card holds up , or if ...
...up to four FB-DIMMs, for information about the specific type of memory used in the PCI Express graphics slot (slot 1). Memory cards Your Mac Pro has two memory cards. See "Replacing the Internal Backup Battery" on page 60. If your Mac Pro, see "Adding PCI Express Cards" on page 55. See "... with up to two displays to replace the battery. Hard disk drive Your Mac Pro comes with Your Mac Pro 33 To replace an optical drive, see "Installing Internal Storage Devices" on the memory cards. PCI Express slots Your Mac Pro has three PCI Express expansion slots. Each card holds up , or if ...
User Manual
Page 34
... more information about Installing additional drives, memory, expansion cards, or changing the battery Troubleshooting your Mac Pro if you have a problem Finding service and support for "Mac OS X" in the search field. 34 Chapter 2 Life with Your Mac Pro Or the Mac Pro Support website at www.apple.com/getamac/movetomac. To open Mac Help, and then type a question in...
... more information about Installing additional drives, memory, expansion cards, or changing the battery Troubleshooting your Mac Pro if you have a problem Finding service and support for "Mac OS X" in the search field. 34 Chapter 2 Life with Your Mac Pro Or the Mac Pro Support website at www.apple.com/getamac/movetomac. To open Mac Help, and then type a question in...
User Manual
Page 38
... on your needs. To contact an Apple Authorized Service Provider or Apple for additional information about important procedures in this or any other warranty question. 38 Chapter 3 Making a Good Thing Better Use the information in the following sections: Â "Opening the Mac Pro" on page 39 Â "Installing Memory" on page 43 Â "Installing Internal...
... on your needs. To contact an Apple Authorized Service Provider or Apple for additional information about important procedures in this or any other warranty question. 38 Chapter 3 Making a Good Thing Better Use the information in the following sections: Â "Opening the Mac Pro" on page 39 Â "Installing Memory" on page 43 Â "Installing Internal...

User Manual
Page 40
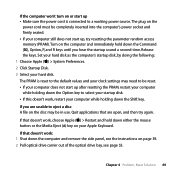
To avoid generating static, do not walk around the room until you touch parts or install components inside your Mac Pro to discharge static. 40 Chapter 3 Making a Good Thing Better 3 Touch the metal on the outside of your Mac Pro. Touch the metal case to discharge any static electricity. Important: Always discharge static before you finish installing the cards, memory, or internal storage device and replace the side panel.
To avoid generating static, do not walk around the room until you touch parts or install components inside your Mac Pro to discharge static. 40 Chapter 3 Making a Good Thing Better 3 Touch the metal on the outside of your Mac Pro. Touch the metal case to discharge any static electricity. Important: Always discharge static before you finish installing the cards, memory, or internal storage device and replace the side panel.

User Manual
Page 43
... (SPD) feature has been programmed properly, as a pair of 1 GB fully buffered dual inline memory modules (FB-DIMMs) in two of memory. DIMMs from the Apple Store at www.apple.com/guide. DIMMs must be used in Mac computers, make sure that you use in your Mac Pro to operate louder or decrease performance to the Joint Electron...
... (SPD) feature has been programmed properly, as a pair of 1 GB fully buffered dual inline memory modules (FB-DIMMs) in two of memory. DIMMs from the Apple Store at www.apple.com/guide. DIMMs must be used in Mac computers, make sure that you use in your Mac Pro to operate louder or decrease performance to the Joint Electron...

User Manual
Page 44
...-DIMMs in matched pairs of equal size and equal specification. The components on page 39. · WARNING: Let your Mac Pro, open it, and remove the side panel, following the instructions on the memory cards may be very hot. 44 Chapter 3 Making a Good Thing Better If you touch the internal components. It's ...card One pair on the top memory card and one pair on the bottom card Two pairs on the top memory card and one pair on the bottom card Two pairs on the top memory card and two pairs on the bottom card To install memory: 1 Shut down your Mac Pro cool down for DIMM placement.
...-DIMMs in matched pairs of equal size and equal specification. The components on page 39. · WARNING: Let your Mac Pro, open it, and remove the side panel, following the instructions on the memory cards may be very hot. 44 Chapter 3 Making a Good Thing Better If you touch the internal components. It's ...card One pair on the top memory card and one pair on the bottom card Two pairs on the top memory card and one pair on the bottom card Two pairs on the top memory card and two pairs on the bottom card To install memory: 1 Shut down your Mac Pro cool down for DIMM placement.

User Manual
Page 45
Chapter 3 Making a Good Thing Better 45 2 Using the two finger holes, pull on the memory cards to remove them, and then place them on a soft, clean cloth with the DIMMs facing up.
Chapter 3 Making a Good Thing Better 45 2 Using the two finger holes, pull on the memory cards to remove them, and then place them on a soft, clean cloth with the DIMMs facing up.

User Manual
Page 46
... both ends of the DIMM down until the tabs are vertical and the ejectors snap into place. 5 Install the first pair of additional DIMMs Top memory card Bottom memory card 46 Chapter 3 Making a Good Thing Better Important: When installing or removing DIMMs, don't touch the gold connectors on the DIMMs or the... in DIMM slot 2, as matched pairs and in the order shown here. 1a Move one DIMM from slot 1. 3 On the bottom memory card, open the ejectors on the bottom memory card in DIMM slots 1 and 2, the slots closest to top card 1b First pair of additional DIMMs on the DIMM slot and...
... both ends of the DIMM down until the tabs are vertical and the ejectors snap into place. 5 Install the first pair of additional DIMMs Top memory card Bottom memory card 46 Chapter 3 Making a Good Thing Better Important: When installing or removing DIMMs, don't touch the gold connectors on the DIMMs or the... in DIMM slot 2, as matched pairs and in the order shown here. 1a Move one DIMM from slot 1. 3 On the bottom memory card, open the ejectors on the bottom memory card in DIMM slots 1 and 2, the slots closest to top card 1b First pair of additional DIMMs on the DIMM slot and...

User Manual
Page 47
Chapter 3 Making a Good Thing Better 47 6 If you add a second pair of additional DIMMs, install them on the top memory card in DIMM slots 3 and 4, the last two slots. 2 Second pair of additional DIMMs 3 Third pair of additional DIMMs Top memory card Bottom memory card 7 If you add a third pair of additional DIMMs, install them on the bottom memory card in DIMM slots 3 and 4.
Chapter 3 Making a Good Thing Better 47 6 If you add a second pair of additional DIMMs, install them on the top memory card in DIMM slots 3 and 4, the last two slots. 2 Second pair of additional DIMMs 3 Third pair of additional DIMMs Top memory card Bottom memory card 7 If you add a third pair of additional DIMMs, install them on the bottom memory card in DIMM slots 3 and 4.

User Manual
Page 48
Memory slots 48 Chapter 3 Making a Good Thing Better 8 Lay your Mac Pro down on a soft, clean cloth on the desk or work surface to avoid scratching the work surface or your Mac Pro. 9 Reinstall each memory card, pushing it straight down until it's seated in the memory slot.
Memory slots 48 Chapter 3 Making a Good Thing Better 8 Lay your Mac Pro down on a soft, clean cloth on the desk or work surface to avoid scratching the work surface or your Mac Pro. 9 Reinstall each memory card, pushing it straight down until it's seated in the memory slot.
User Manual
Page 69
... be in use. Chapter 4 Problem, Meet Solution 69 The PRAM is connected to a working power source. Quit applications that doesn't work , choose Apple () > Restart and hold down the Shift key. Turn on the computer and immediately hold down either the mouse button or the Media Eject (C)... key on your computer while holding down the Command (x), Option, P, and R keys until you are open, and then try resetting the parameter random access memory (PRAM). If you hear the startup sound a second time. Release the keys. If that are unable to eject a disc A file on the disc...
... be in use. Chapter 4 Problem, Meet Solution 69 The PRAM is connected to a working power source. Quit applications that doesn't work , choose Apple () > Restart and hold down the Shift key. Turn on the computer and immediately hold down either the mouse button or the Media Eject (C)... key on your computer while holding down the Command (x), Option, P, and R keys until you are open, and then try resetting the parameter random access memory (PRAM). If you hear the startup sound a second time. Release the keys. If that are unable to eject a disc A file on the disc...

User Manual
Page 70
...194; One short flash followed by a longer off period: No valid memory. Â Three short flashes followed by a longer off period: Failed memory. Problems with your computer. To force an application to quit: 1 Press Command (x)-Option-Esc or choose Apple () > Force Quit from the menu bar. 2 Select the... expansion card, or another internal component, make sure that it is compatible with Software When an application freezes or does not respond, Mac OS X provides a way to quit the application without restarting your computer. 3 Carefully insert the end of a straightened paper clip ...
...194; One short flash followed by a longer off period: No valid memory. Â Three short flashes followed by a longer off period: Failed memory. Problems with your computer. To force an application to quit: 1 Press Command (x)-Option-Esc or choose Apple () > Force Quit from the menu bar. 2 Select the... expansion card, or another internal component, make sure that it is compatible with Software When an application freezes or does not respond, Mac OS X provides a way to quit the application without restarting your computer. 3 Carefully insert the end of a straightened paper clip ...

User Manual
Page 81
...get help , System Profiler, or Apple Hardware Test. Apple Hardware Test You can search the AppleCare Knowledge Base, check for service. If you which hardware and software is installed, the serial number and operating system version, how much memory is installed, and more. Onscreen ... wireless technology with your computer, use Apple Hardware Test to your Mac Pro. Chapter 4 Problem, Meet Solution 81 Choose your Mac Pro needs service, take it installed. For more information about your Mac Pro, contact an Apple Authorized Service Provider or an Apple Store to purchase it and have it...
...get help , System Profiler, or Apple Hardware Test. Apple Hardware Test You can search the AppleCare Knowledge Base, check for service. If you which hardware and software is installed, the serial number and operating system version, how much memory is installed, and more. Onscreen ... wireless technology with your computer, use Apple Hardware Test to your Mac Pro. Chapter 4 Problem, Meet Solution 81 Choose your Mac Pro needs service, take it installed. For more information about your Mac Pro, contact an Apple Authorized Service Provider or an Apple Store to purchase it and have it...

User Manual
Page 86
...Mac Pro, including the amount of your Mac Pro are included in matched pairs of equal size and equal specification (an equal number of ICs per DIMM)  Eight DIMM slots available (four slots per memory... ICs maximum per processor  1600 MHz dual independent frontside buses Random-access memory (RAM)  Fully buffered dual inline memory modules (FB-DIMMs)  PC2-6400, 800 MHz, DDR2, FB-DIMMs... follows. To open System Profiler, choose Apple () > About This Mac from the menu bar, and then click More Info. Processor and Memory Specifications Processor  One or two ...
...Mac Pro, including the amount of your Mac Pro are included in matched pairs of equal size and equal specification (an equal number of ICs per DIMM)  Eight DIMM slots available (four slots per memory... ICs maximum per processor  1600 MHz dual independent frontside buses Random-access memory (RAM)  Fully buffered dual inline memory modules (FB-DIMMs)  PC2-6400, 800 MHz, DDR2, FB-DIMMs... follows. To open System Profiler, choose Apple () > About This Mac from the menu bar, and then click More Info. Processor and Memory Specifications Processor  One or two ...

User Manual
Page 111
...87 H hand positions 100 hard disk drive 33, 51 headphone jack 25, 92 I iLife 34 installing applications 79 hard disk drives 51 Mac OS X 79 memory 43 PCI Express cards 60 SuperDrive 55 Internet problems connecting 76 J JEDEC specification 43, 87 K keyboard 26 connecting 16 function keys 27 keyboard... 97 Media Eject key 27 media keys 27 memory 43 installing 43 location 33 memory cards 43 specifications 86 Mighty Mouse cleaning 99 connecting 16 Mute key 27 N network connections 77 no image on screen 73 O online resources 81 opening your Mac Pro 39 operating environment 94 optical digital audio 31,...
...87 H hand positions 100 hard disk drive 33, 51 headphone jack 25, 92 I iLife 34 installing applications 79 hard disk drives 51 Mac OS X 79 memory 43 PCI Express cards 60 SuperDrive 55 Internet problems connecting 76 J JEDEC specification 43, 87 K keyboard 26 connecting 16 function keys 27 keyboard... 97 Media Eject key 27 media keys 27 memory 43 installing 43 location 33 memory cards 43 specifications 86 Mighty Mouse cleaning 99 connecting 16 Mute key 27 N network connections 77 no image on screen 73 O online resources 81 opening your Mac Pro 39 operating environment 94 optical digital audio 31,...
User Manual
Page 112
... button 17, 25 power cord 12 power requirements 93 power socket 29 power supply 93 problems connecting to Internet 76 processor 86 protective film 10 R RAM 33, 43, 86 reset the PRAM 69 S SAS drive 51 screen setting brightness 27 screen freezes 74 Serial ATA drive 51 Serial Attached SCSI drive..., 86 AirPort Extreme 90 analog audio 92 audio 91 battery 94 Bluetooth 90 Ethernet 90 expansion cards 93 FireWire 89 graphics card 87 JEDEC 43 memory 86 optical digital audio 91 optical drive 88 PCI Express cards 93 peripherals 93 power supply 93 processor 86 SuperDrive 88 system clock 94 static...
... button 17, 25 power cord 12 power requirements 93 power socket 29 power supply 93 problems connecting to Internet 76 processor 86 protective film 10 R RAM 33, 43, 86 reset the PRAM 69 S SAS drive 51 screen setting brightness 27 screen freezes 74 Serial ATA drive 51 Serial Attached SCSI drive..., 86 AirPort Extreme 90 analog audio 92 audio 91 battery 94 Bluetooth 90 Ethernet 90 expansion cards 93 FireWire 89 graphics card 87 JEDEC 43 memory 86 optical digital audio 91 optical drive 88 PCI Express cards 93 peripherals 93 power supply 93 processor 86 SuperDrive 88 system clock 94 static...