User Guide
Page 4
... Motion Sensor 47 Using Your Battery 51 Securing Your iBook G4 Chapter 4 53 Adding Memory to Your iBook G4 54 Installing Additional Memory 59 Making Sure Your iBook G4 Recognizes the New Memory Chapter 5 61 Troubleshooting 61 Problems That Prevent You From Using Your Computer 63 Other Problems 64 Using Apple Hardware Test 65 Reinstalling the Software That Came With...
... Motion Sensor 47 Using Your Battery 51 Securing Your iBook G4 Chapter 4 53 Adding Memory to Your iBook G4 54 Installing Additional Memory 59 Making Sure Your iBook G4 Recognizes the New Memory Chapter 5 61 Troubleshooting 61 Problems That Prevent You From Using Your Computer 63 Other Problems 64 Using Apple Hardware Test 65 Reinstalling the Software That Came With...
User Guide
Page 53
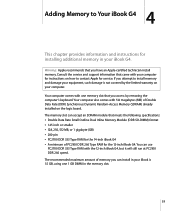
... Type RAM with one 1 GB DIMM in your computer for instructions on how to contact Apple for the 12-inch iBook G4. Your computer also comes with your iBook G4. You can install in your computer. The recommended maximum amount of memory you attempt to install memory and damage your equipment, such damage is 1.5 GB, using one...
... Type RAM with one 1 GB DIMM in your computer for instructions on how to contact Apple for the 12-inch iBook G4. Your computer also comes with your iBook G4. You can install in your computer. The recommended maximum amount of memory you attempt to install memory and damage your equipment, such damage is 1.5 GB, using one...

User Guide
Page 54
...2 Turn over the iBook and locate the battery latch. Installing Additional Memory To install additional memory in the following pages. Step 1: Removing the Battery and Keyboard 1 Shut down to let the internal components cool before continuing. 54 Chapter 4 Adding Memory to Your iBook G4 If you must: ... Remove the battery and keyboard.  Install the memory.  Replace the keyboard and battery. These tasks are described in your iBook, you have been using your iBook, wait 30 minutes after shutting...
...2 Turn over the iBook and locate the battery latch. Installing Additional Memory To install additional memory in the following pages. Step 1: Removing the Battery and Keyboard 1 Shut down to let the internal components cool before continuing. 54 Chapter 4 Adding Memory to Your iBook G4 If you must: ... Remove the battery and keyboard.  Install the memory.  Replace the keyboard and battery. These tasks are described in your iBook, you have been using your iBook, wait 30 minutes after shutting...
User Guide
Page 55
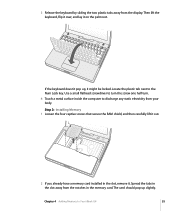
...RAM shield, and then carefully lift it . The card should pop up , it on the palm rest. Chapter 4 Adding Memory to the Num Lock key. Locate the plastic tab next to Your iBook G4 55 3 Release the keyboard by sliding the two plastic tabs away from your body. Spread the tabs in the... slot away from the notches in the slot, remove it out. 2 If you already have a memory card installed in the memory card. Use a small flathead screwdriver...
...RAM shield, and then carefully lift it . The card should pop up , it on the palm rest. Chapter 4 Adding Memory to the Num Lock key. Locate the plastic tab next to Your iBook G4 55 3 Release the keyboard by sliding the two plastic tabs away from your body. Spread the tabs in the... slot away from the notches in the slot, remove it out. 2 If you already have a memory card installed in the memory card. Use a small flathead screwdriver...

User Guide
Page 56
Try reinserting the card to make sure it in to the slot. 30O 4 Press down . Push the card to seat it fully in to the slot at a 30-degree angle. Now that you're done installing the memory card, proceed to the next section and "Making Sure Your iBook G4 Recognizes the New Memory" on the memory card to Your iBook G4 3 Insert the new memory card in place. If the memory card does not latch, do not force it down on page 59. 56 Chapter 4 Adding Memory to lock it is fully seated. 5 Replace the RAM shield.
Try reinserting the card to make sure it in to the slot. 30O 4 Press down . Push the card to seat it fully in to the slot at a 30-degree angle. Now that you're done installing the memory card, proceed to the next section and "Making Sure Your iBook G4 Recognizes the New Memory" on the memory card to Your iBook G4 3 Insert the new memory card in place. If the memory card does not latch, do not force it down on page 59. 56 Chapter 4 Adding Memory to lock it is fully seated. 5 Replace the RAM shield.

User Guide
Page 57
Step 3: Replacing the Keyboard and Battery 1 Replace the keyboard by inserting it at an angle and gently lowering it in to Your iBook G4 57 Chapter 4 Adding Memory to place.
Step 3: Replacing the Keyboard and Battery 1 Replace the keyboard by inserting it at an angle and gently lowering it in to Your iBook G4 57 Chapter 4 Adding Memory to place.
User Guide
Page 58
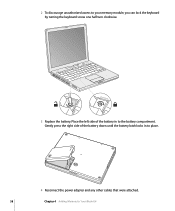
Gently press the right side of the battery in to place. 4 Reconnect the power adapter and any other cables that were attached. 58 Chapter 4 Adding Memory to your memory module, you can lock the keyboard by turning the keyboard screw one half turn clockwise. ® Á ¥ 3 Replace the battery. 2 To discourage unauthorized access to Your iBook G4 Place the left side of the battery down until the battery latch locks in to the battery compartment.
Gently press the right side of the battery in to place. 4 Reconnect the power adapter and any other cables that were attached. 58 Chapter 4 Adding Memory to your memory module, you can lock the keyboard by turning the keyboard screw one half turn clockwise. ® Á ¥ 3 Replace the battery. 2 To discourage unauthorized access to Your iBook G4 Place the left side of the battery down until the battery latch locks in to the battery compartment.

User Guide
Page 59
... memory installed in your iBook G4 The total memory includes the amount that came with the computer plus the new memory you added. Total memory installed in your iBook and that it is compatible with the memory or contact the vendor who provided the memory. Chapter 4 Adding Memory to make sure that the memory you see the Mac OS desktop, choose Apple...
... memory installed in your iBook G4 The total memory includes the amount that came with the computer plus the new memory you added. Total memory installed in your iBook and that it is compatible with the memory or contact the vendor who provided the memory. Chapter 4 Adding Memory to make sure that the memory you see the Mac OS desktop, choose Apple...
User Guide
Page 61
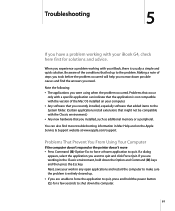
... press the Esc key. Making a note of the Mac OS installed on the Apple Service & Support website at www.apple.com/support. If a dialog appears, select the application you need. Next, save your iBook G4, check here first for a few seconds to the System folder. (Certain applications ...that occur only with the Classic environment.) Â Any new hardware that you installed, such as additional memory or a peripheral. Troubleshooting 5 5 If you have a problem working with your iBook, there is usually a simple and quick solution. Problems That Prevent You From Using Your Computer If ...
... press the Esc key. Making a note of the Mac OS installed on the Apple Service & Support website at www.apple.com/support. If a dialog appears, select the application you need. Next, save your iBook G4, check here first for a few seconds to the System folder. (Certain applications ...that occur only with the Classic environment.) Â Any new hardware that you installed, such as additional memory or a peripheral. Troubleshooting 5 5 If you have a problem working with your iBook, there is usually a simple and quick solution. Problems That Prevent You From Using Your Computer If ...
User Guide
Page 62
..., until you hear the startup sound a second time.  If you recently installed additional memory, make sure that it allows the computer to start up your computer. See whether removing it... few seconds. Then hold down . Make sure to use a particular application, check with your iBook for incompatible system extensions. Press the small button on page 55).  If you are ...down the C key as it by pressing and holding the power button (®) for about contacting Apple for service. 62 Chapter 5 Troubleshooting  If the computer still doesn't respond, try using ...
..., until you hear the startup sound a second time.  If you recently installed additional memory, make sure that it allows the computer to start up your computer. See whether removing it... few seconds. Then hold down . Make sure to use a particular application, check with your iBook for incompatible system extensions. Press the small button on page 55).  If you are ...down the C key as it by pressing and holding the power button (®) for about contacting Apple for service. 62 Chapter 5 Troubleshooting  If the computer still doesn't respond, try using ...
User Guide
Page 64
... System Preferences and verify the information entered there with your computer. 3 Restart your Internet service provider (ISP) or network administrator. To use the Apple Hardware Test application to help determine if there is plugged in to the modem port (W) and not the Ethernet port (G) on the computer. &#...Disconnect all external devices from the menu bar) and the instructions that doesn't work, restart the computer while holding down the Option key as the memory or processor. Up to four bars appear to your questions are using a dial-up . If you are not in the menu bar. If ...
... System Preferences and verify the information entered there with your computer. 3 Restart your Internet service provider (ISP) or network administrator. To use the Apple Hardware Test application to help determine if there is plugged in to the modem port (W) and not the Ethernet port (G) on the computer. &#...Disconnect all external devices from the menu bar) and the instructions that doesn't work, restart the computer while holding down the Option key as the memory or processor. Up to four bars appear to your questions are using a dial-up . If you are not in the menu bar. If ...
User Guide
Page 67
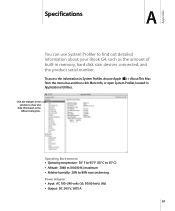
... to find out detailed information about your iBook G4, such as the amount of built-in Applications/Utilities. To access the information in System Profiler, choose Apple () > About This Mac from the menu bar and then click More Info, or open System Profiler, located in memory, hard disk size, devices connected, and the...
... to find out detailed information about your iBook G4, such as the amount of built-in Applications/Utilities. To access the information in System Profiler, choose Apple () > About This Mac from the menu bar and then click More Info, or open System Profiler, located in memory, hard disk size, devices connected, and the...
User Guide
Page 70
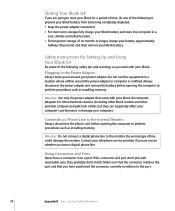
...of the following to the port. 70 Appendix B Care, Use, and Safety Information Safety Instructions for Setting Up and Using Your iBook G4 Be aware of line could damage the modem. Always disconnect the power adapter and remove the battery before opening the computer to perform... the phone cord before opening the computer to perform procedures such as installing memory. Contact your telephone service provider if you are going to store your iBook for other electronic devices (including other iBook models and other portable computers) might look similar, but they probably don't...
...of the following to the port. 70 Appendix B Care, Use, and Safety Information Safety Instructions for Setting Up and Using Your iBook G4 Be aware of line could damage the modem. Always disconnect the power adapter and remove the battery before opening the computer to perform... the phone cord before opening the computer to perform procedures such as installing memory. Contact your telephone service provider if you are going to store your iBook for other electronic devices (including other iBook models and other portable computers) might look similar, but they probably don't...

User Guide
Page 101
... 63 amber light 21 analog phone line 7, 41 antenna, AirPort Extreme 13 Appearance preferences 25 Apple 56K internal modem 41 Apple Hardware Test 64 Apple VGA Display Adapter 41 Apple Video Adapter 42 application freeze 26 applications installing 66 troubleshooting 63 using 26 B base station 37 battery calibrating 17...desktop 24 image size 20 password 63, 93 the resolution 20 the screen 20 System Preferences 24 charging the battery 49 checking memory 59 Classic environment support 66 cleaning your computer 69 communicating using Bluetooth 37 computer disposal 96 freezes 62 inventory 5 putting to ...
... 63 amber light 21 analog phone line 7, 41 antenna, AirPort Extreme 13 Appearance preferences 25 Apple 56K internal modem 41 Apple Hardware Test 64 Apple VGA Display Adapter 41 Apple Video Adapter 42 application freeze 26 applications installing 66 troubleshooting 63 using 26 B base station 37 battery calibrating 17...desktop 24 image size 20 password 63, 93 the resolution 20 the screen 20 System Preferences 24 charging the battery 49 checking memory 59 Classic environment support 66 cleaning your computer 69 communicating using Bluetooth 37 computer disposal 96 freezes 62 inventory 5 putting to ...

User Guide
Page 103
...15 power, battery 50 power adapter port 13 103 installation instructions 5 installing applications 66 Classic support 66 Mac OS 9 66 Mac OS X 66 memory 54, 55 internal modem connecting 7 port 15 using 41 Internet configuration 80 connecting to 9 connection problems 64, 91 using Setup Assistant to connect 86...54, 55 microphone 13, 43 modem cable 7, 75 Index connecting 7, 41 dial-up 78 DSL 7, 75 internal 7 using 41 monitor, connecting 42, 92 mouse connecting external 23 See also trackpad multiple USB devices 33 music, recording 45 N Network Connections 90 networking two computers 35 wireless 36...
...15 power, battery 50 power adapter port 13 103 installation instructions 5 installing applications 66 Classic support 66 Mac OS 9 66 Mac OS X 66 memory 54, 55 internal modem connecting 7 port 15 using 41 Internet configuration 80 connecting to 9 connection problems 64, 91 using Setup Assistant to connect 86...54, 55 microphone 13, 43 modem cable 7, 75 Index connecting 7, 41 dial-up 78 DSL 7, 75 internal 7 using 41 monitor, connecting 42, 92 mouse connecting external 23 See also trackpad multiple USB devices 33 music, recording 45 N Network Connections 90 networking two computers 35 wireless 36...
User Guide
Page 104
See memory recording CD-R 45 CD-RW 45 DVD 46 music 45 reinstalling software 93 removing and ...Appearance 25 Bluetooth 38, 39, 50 customizing the desktop 24 Dashboard & Exposé 25 Desktop & Screen Saver 25 Displays 20, 42 Dock 25 Energy Saver 50, 92 Keyboard & Mouse 22 Network 50, 64, 75, 76 Print & Fax 28, 91 Software Update...testing your Internet configuration 80 trackpad location 13 scrolling 13, 22 tips 22 using AirPort 63 with an application 63 projector, connecting 42 putting your computer to sleep 16 Q question mark, blinking 11 R RAM. See display mirroring Print & Fax preferences 28, ...
See memory recording CD-R 45 CD-RW 45 DVD 46 music 45 reinstalling software 93 removing and ...Appearance 25 Bluetooth 38, 39, 50 customizing the desktop 24 Dashboard & Exposé 25 Desktop & Screen Saver 25 Displays 20, 42 Dock 25 Energy Saver 50, 92 Keyboard & Mouse 22 Network 50, 64, 75, 76 Print & Fax 28, 91 Software Update...testing your Internet configuration 80 trackpad location 13 scrolling 13, 22 tips 22 using AirPort 63 with an application 63 projector, connecting 42 putting your computer to sleep 16 Q question mark, blinking 11 R RAM. See display mirroring Print & Fax preferences 28, ...