
Getting Started
Page 6
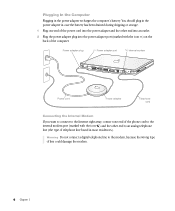
You should plug in the power adapter in case the battery has been drained during shipping or storage. 1 Plug one end of the phone cord to the internal modem port (marked with the icon &#...
You should plug in the power adapter in case the battery has been drained during shipping or storage. 1 Plug one end of the phone cord to the internal modem port (marked with the icon &#...

Getting Started
Page 40
... with your computer, simply connect the device to become depleted faster. In most cases you attach a new device. However, these types of USB devices can cause your PowerBook. When you connect a USB device, if your PowerBook cannot find the correct software, you can either install the software that... makes it is a good idea to work with the device or follow the onscreen prompts to use the Internet to use. Note: Apple has already included software to plug in the power adapter. 40 Chapter 3 Your computer automatically loads the correct software whenever you can connect...
... with your computer, simply connect the device to become depleted faster. In most cases you attach a new device. However, these types of USB devices can cause your PowerBook. When you connect a USB device, if your PowerBook cannot find the correct software, you can either install the software that... makes it is a good idea to work with the device or follow the onscreen prompts to use the Internet to use. Note: Apple has already included software to plug in the power adapter. 40 Chapter 3 Your computer automatically loads the correct software whenever you can connect...

Getting Started
Page 64
® ® 10 Gently push the RAM expansion card down until the two snaps on either side of the card lock into place. 11 Flip the keyboard back on top of the opening in your PowerBook and insert the small tabs at the bottom of the keyboard into the openings in the PowerBook case. 64 Chapter 4
® ® 10 Gently push the RAM expansion card down until the two snaps on either side of the card lock into place. 11 Flip the keyboard back on top of the opening in your PowerBook and insert the small tabs at the bottom of the keyboard into the openings in the PowerBook case. 64 Chapter 4

Getting Started
Page 68
4 Remove the battery by sliding the latch to the right. If you have been using your PowerBook, wait 30 minutes after shutting down your computer to let the internal components cool down before continuing. 5 Using a small Phillips screwdriver, remove the eight screws that secure the bottom case of your PowerBook may be hot. Warning The internal components of the PowerBook in the order shown in the illustration below. 1 4 3 2 5 8 7 6 68 Chapter 4 Make sure to return the battery latch fully to the left.
4 Remove the battery by sliding the latch to the right. If you have been using your PowerBook, wait 30 minutes after shutting down your computer to let the internal components cool down before continuing. 5 Using a small Phillips screwdriver, remove the eight screws that secure the bottom case of your PowerBook may be hot. Warning The internal components of the PowerBook in the order shown in the illustration below. 1 4 3 2 5 8 7 6 68 Chapter 4 Make sure to return the battery latch fully to the left.

Getting Started
Page 69
If you . 7 Pivot the bottom case up . Slide the bottom case forward completely before lifting it up as shown in the illustration below. Working Inside Your Computer 69 6 Carefully slide the bottom case away from the DVD slot. Important Do not twist the case from side to make sure the bottom case is slid all the way forward and releases from you feel any resistance when lifting the bottom case, double-check to side.
If you . 7 Pivot the bottom case up . Slide the bottom case forward completely before lifting it up as shown in the illustration below. Working Inside Your Computer 69 6 Carefully slide the bottom case away from the DVD slot. Important Do not twist the case from side to make sure the bottom case is slid all the way forward and releases from you feel any resistance when lifting the bottom case, double-check to side.

Getting Started
Page 71
AirPort Card 12 Connect the AirPort Card to the computer. Important The plastic tab must be able to attach the bottom case securely to the end of the card. 11 Position the AirPort Card with the AirPort ID numbers and bar code visible and slide the card ...
AirPort Card 12 Connect the AirPort Card to the computer. Important The plastic tab must be able to attach the bottom case securely to the end of the card. 11 Position the AirPort Card with the AirPort ID numbers and bar code visible and slide the card ...

Getting Started
Page 72
Check the alignment of the case. Check the outside edges and around the battery bay. 14 Attach the bottom case to make sure the bottom case is properly positioned. 8 5 6 7 4 1 2 3 15 Replace the battery and turn the computer over. 72 Chapter 4 Then press down slightly to secure the case. Make sure the seams between the bottom case and the frame are closed. Line up the notches on the right and left sides of the eight screw holes to the computer and replace the eight screws in the order shown in the illustration below.
Check the alignment of the case. Check the outside edges and around the battery bay. 14 Attach the bottom case to make sure the bottom case is properly positioned. 8 5 6 7 4 1 2 3 15 Replace the battery and turn the computer over. 72 Chapter 4 Then press down slightly to secure the case. Make sure the seams between the bottom case and the frame are closed. Line up the notches on the right and left sides of the eight screw holes to the computer and replace the eight screws in the order shown in the illustration below.

Getting Started
Page 73
16 Look at the DVD drive slot to the bottom case and remove the gap. ® DVD drive slot 17 Reconnect the power adapter and any other cables that the case is properly secured. Working Inside Your Computer 73 If a gap exists below the DVD drive slot, gently pull the bottom of the DVD drive slot toward you to secure the DVD drive to make sure that were attached.
16 Look at the DVD drive slot to the bottom case and remove the gap. ® DVD drive slot 17 Reconnect the power adapter and any other cables that the case is properly secured. Working Inside Your Computer 73 If a gap exists below the DVD drive slot, gently pull the bottom of the DVD drive slot toward you to secure the DVD drive to make sure that were attached.

Getting Started
Page 84
...such as installing memory or removing the hard disk. The bottom of the case is confined. Safety Instructions for the bottom of the case to get warm. Adapters for other electronic devices (including other PowerBook models and other portable computers) may look similar, but they may damage your... outlet is open or missing parts can be dangerous and damage your computer. Warning Never turn on your computer unless all of the PowerBook case functions as installing memory or removing the hard disk. Operating the computer when it is normal for Setting Up and Using Your Computer ...
...such as installing memory or removing the hard disk. The bottom of the case is confined. Safety Instructions for the bottom of the case to get warm. Adapters for other electronic devices (including other PowerBook models and other portable computers) may look similar, but they may damage your... outlet is open or missing parts can be dangerous and damage your computer. Warning Never turn on your computer unless all of the PowerBook case functions as installing memory or removing the hard disk. Operating the computer when it is normal for Setting Up and Using Your Computer ...

Getting Started
Page 85
...computer into a wall socket. m Follow all the installation instructions carefully before you always do not permit them to handle any kind into the case m Your computer is to . Do not allow children access to the interior of any electrical product and do the following: m Keep your...misused. m Read all instructions and warnings dealing with your equipment, always take the following conditions exists: m You want to clean the case (use only the recommended procedure described earlier) Important The only way to disconnect power completely is exposed to remove any parts (leave the...
...computer into a wall socket. m Follow all the installation instructions carefully before you always do not permit them to handle any kind into the case m Your computer is to . Do not allow children access to the interior of any electrical product and do the following: m Keep your...misused. m Read all instructions and warnings dealing with your equipment, always take the following conditions exists: m You want to clean the case (use only the recommended procedure described earlier) Important The only way to disconnect power completely is exposed to remove any parts (leave the...