
Getting Started
Page 4
...(DVI, VGA, Composite, and S-Video) 43 Using Your Optical Drive 46 Battery 49 Security Slot 51 Adding Memory to Your Computer 51 Installing Additional Memory 57 Troubleshooting 58 Problems That Prevent You From Using Your Computer 59 Other Problems 61 Restoring Your Computer's Software 62... and Safety Information 65 Cleaning Your PowerBook 65 Carrying Your PowerBook 65 Storing Your PowerBook 66 Safety Instructions for Setting Up and Using Your Computer 67 General Safety Instructions 68 Battery 68 Connectors and Ports 68 Avoid Hearing Damage 68 Apple and the Environment 69 Ergonomics 71 Connecting...
...(DVI, VGA, Composite, and S-Video) 43 Using Your Optical Drive 46 Battery 49 Security Slot 51 Adding Memory to Your Computer 51 Installing Additional Memory 57 Troubleshooting 58 Problems That Prevent You From Using Your Computer 59 Other Problems 61 Restoring Your Computer's Software 62... and Safety Information 65 Cleaning Your PowerBook 65 Carrying Your PowerBook 65 Storing Your PowerBook 66 Safety Instructions for Setting Up and Using Your Computer 67 General Safety Instructions 68 Battery 68 Connectors and Ports 68 Avoid Hearing Damage 68 Apple and the Environment 69 Ergonomics 71 Connecting...
Getting Started
Page 51
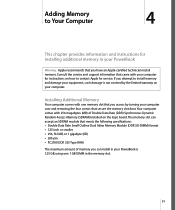
... you access by the limited warranty on how to contact Apple for installing additional memory in your PowerBook Warning: Apple recommends that you can accept an SDRAM module that you attempt to install memory and damage your equipment, such damage is 1.25 GB, using one memory slot that meets the following specifications: • Double Data Rate...
... you access by the limited warranty on how to contact Apple for installing additional memory in your PowerBook Warning: Apple recommends that you can accept an SDRAM module that you attempt to install memory and damage your equipment, such damage is 1.25 GB, using one memory slot that meets the following specifications: • Double Data Rate...

Getting Started
Page 52
... power adapter, phone cord, and any static electricity from the bottom of your PowerBook may be hot. Turn the computer over and remove the battery by giving the latch a quarter turn. To install additional memory: 1 Shut down to let the internal components cool before continuing. 2 Using ...a Phillips size 00 screwdriver, unscrew the memory slot door and remove it from your computer. If you have been using your PowerBook, wait 10 minutes after shutting down your body. 52 Chapter 4 Adding Memory to the computer. Battery Latch Warning: The internal components of ...
... power adapter, phone cord, and any static electricity from the bottom of your PowerBook may be hot. Turn the computer over and remove the battery by giving the latch a quarter turn. To install additional memory: 1 Shut down to let the internal components cool before continuing. 2 Using ...a Phillips size 00 screwdriver, unscrew the memory slot door and remove it from your computer. If you have been using your PowerBook, wait 10 minutes after shutting down your body. 52 Chapter 4 Adding Memory to the computer. Battery Latch Warning: The internal components of ...

Getting Started
Page 53
Push the card to seat it . The card should pop up slightly. 5 Insert the new memory card into the slot. 30O Chapter 4 Adding Memory to Your Computer 53 Spread the tabs in the slot away from the notches in the slot, remove it fully into the slot at a 30-degree angle. 4 If you already have a memory card installed in the memory card.
Push the card to seat it . The card should pop up slightly. 5 Insert the new memory card into the slot. 30O Chapter 4 Adding Memory to Your Computer 53 Spread the tabs in the slot away from the notches in the slot, remove it fully into the slot at a 30-degree angle. 4 If you already have a memory card installed in the memory card.

Getting Started
Page 54
If the memory card does not latch, do not force the card down on the memory card to lock it into place. Try reinserting the card to Your Computer 6 Press down . Note: To avoid damage, be careful not to overtighten the screws. 54 Chapter 4 Adding Memory to make sure it is fully seated. 7 Replace the memory slot door and screw it in place.
If the memory card does not latch, do not force the card down on the memory card to lock it into place. Try reinserting the card to Your Computer 6 Press down . Note: To avoid damage, be careful not to overtighten the screws. 54 Chapter 4 Adding Memory to make sure it is fully seated. 7 Replace the memory slot door and screw it in place.

Getting Started
Page 55
... of the battery into place. 9 Reconnect the power adapter and any other cables that were attached. If you see the Mac OS desktop, choose Apple (K) > About This Mac from the menu bar. Place the left side of memory installed in your PowerBook and check the instructions again to Your Computer 55 If the...
... of the battery into place. 9 Reconnect the power adapter and any other cables that were attached. If you see the Mac OS desktop, choose Apple (K) > About This Mac from the menu bar. Place the left side of memory installed in your PowerBook and check the instructions again to Your Computer 55 If the...

Getting Started
Page 57
... a specific application may not be compatible with the Classic environment.) • Any new hardware, such as additional memory or a peripheral, that you installed. Things to the problem. When you were using when the problem occurred. ...you narrow down possible causes and then find more troubleshooting information in the AppleCare Knowledge Base at kbase.info.apple.com. 57 You can also find the answers you need. Troubleshooting 5 5 If you have a ... applications you experience a problem, there is not compatible with your PowerBook, check here first for solutions and advice.
... a specific application may not be compatible with the Classic environment.) • Any new hardware, such as additional memory or a peripheral, that you installed. Things to the problem. When you were using when the problem occurred. ...you narrow down possible causes and then find more troubleshooting information in the AppleCare Knowledge Base at kbase.info.apple.com. 57 You can also find the answers you need. Troubleshooting 5 5 If you have a ... applications you experience a problem, there is not compatible with your PowerBook, check here first for solutions and advice.

Getting Started
Page 59
...up your computer, see the service and support information that it starts up. 2 Choose Installer > Reset Password from a manufacturer other than Apple, contact the manufacturer. Then restart your PowerBook to charge the battery until you hear the startup sound a second time. • If you are connected to your... battery needs to use the power adapter that came with your computer. To see page 51). • If you recently installed additional memory, make sure that it allows the computer to start up (see how much the battery has recharged, look at least 10 percent before...
...up your computer, see the service and support information that it starts up. 2 Choose Installer > Reset Password from a manufacturer other than Apple, contact the manufacturer. Then restart your PowerBook to charge the battery until you hear the startup sound a second time. • If you are connected to your... battery needs to use the power adapter that came with your computer. To see page 51). • If you recently installed additional memory, make sure that it allows the computer to start up (see how much the battery has recharged, look at least 10 percent before...

Getting Started
Page 60
...doesn't work, restart the computer while holding down the Option key as the memory or processor. Click Apple Hardware Test and click the right arrow. 3 When the Apple Hardware Test main screen appears, follow the onscreen instructions. 4 If Apple Hardware Test detects a problem, it . 2 Start up . If you...computer. Check the AirPort status icon in the menu bar. If you suspect a problem with wireless communication and reduce this range. Apple Hardware Test is running and has a wireless access point. • Make sure you have an Ethernet cable connected, disconnect it displays...
...doesn't work, restart the computer while holding down the Option key as the memory or processor. Click Apple Hardware Test and click the right arrow. 3 When the Apple Hardware Test main screen appears, follow the onscreen instructions. 4 If Apple Hardware Test detects a problem, it . 2 Start up . If you...computer. Check the AirPort status icon in the menu bar. If you suspect a problem with wireless communication and reduce this range. Apple Hardware Test is running and has a wireless access point. • Make sure you have an Ethernet cable connected, disconnect it displays...

Getting Started
Page 63
To access the information in System Profiler, choose Apple (K) > About This Mac from the menu bar and then click More Info, or open System Profiler, located in the different categories. Operating Environment • Operating ...; C to 35° C) • Altitude: 3048 m (10,000 ft.) maximum • Relative humidity: 20% to find out detailed information about your PowerBook, such as the amount of built-in memory, hard disk size, devices connected, and the product serial number. Appendix Specifications A A You can use System Profiler to 80% noncondensing Power Adapter...
To access the information in System Profiler, choose Apple (K) > About This Mac from the menu bar and then click More Info, or open System Profiler, located in the different categories. Operating Environment • Operating ...; C to 35° C) • Altitude: 3048 m (10,000 ft.) maximum • Relative humidity: 20% to find out detailed information about your PowerBook, such as the amount of built-in memory, hard disk size, devices connected, and the product serial number. Appendix Specifications A A You can use System Profiler to 80% noncondensing Power Adapter...

Getting Started
Page 66
...on a flat, stable surface. Operating the computer when it is on, as a cooling surface that transfers heat from the back of the PowerBook case functions as the material may block the airflow vents, in particular the rear vents, and cause the computer to perform procedures such as ...installing memory or removing the hard disk. For prolonged use this equipment in place. Warning: Do not place your PowerBook on and off which may affect your power adapter. Connecting a Phone Line to the ...
...on a flat, stable surface. Operating the computer when it is on, as a cooling surface that transfers heat from the back of the PowerBook case functions as the material may block the airflow vents, in particular the rear vents, and cause the computer to perform procedures such as ...installing memory or removing the hard disk. For prolonged use this equipment in place. Warning: Do not place your PowerBook on and off which may affect your power adapter. Connecting a Phone Line to the ...

Getting Started
Page 99
... base station 37 Card 37 connection 74 problems 60 setting up 83 setting up a connection 11, 73 amber light 21 analog phone line 13, 39 Apple 56K internal modem 39 application freeze 29 audio line in port 9 B base station 37 battery 17, 46, 47 calibrating 17 charging 48 conservation 48 ... image size 20 password 59 System Preferences 24 the desktop 24 the resolution 20 the screen 20 charging the battery 48 checking memory 55 cleaning your display 65 your PowerBook 65 closed display 42 communicating via Bluetooth 36 computer freezes 58 inventory 5 won't turn on 59 connecting a cable modem 13 a DSL...
... base station 37 Card 37 connection 74 problems 60 setting up 83 setting up a connection 11, 73 amber light 21 analog phone line 13, 39 Apple 56K internal modem 39 application freeze 29 audio line in port 9 B base station 37 battery 17, 46, 47 calibrating 17 charging 48 conservation 48 ... image size 20 password 59 System Preferences 24 the desktop 24 the resolution 20 the screen 20 charging the battery 48 checking memory 55 cleaning your display 65 your PowerBook 65 closed display 42 communicating via Bluetooth 36 computer freezes 58 inventory 5 won't turn on 59 connecting a cable modem 13 a DSL...

Getting Started
Page 100
... 7 G general safety 67 green light 21 H hand positions 69 headphone jack 39 port 9, 39 I image size 20 inserting a disc 43 installation instructions 5 installing memory 52 internal modem 39 Internet configuration 76 connection 61, 89 using Setup Assistant 83 Internet service provider 72 inventory of items 5 ISP 72 K keeping the... 62 M Mac OS 9 24 Mac OS X 24 interface 90 manual Internet configuration 79 manually using DHCP router option 11, 73 Media Eject key 7 memory checking 55 microphone 7, 39 mini-DVI port 9 Mini-DVI to DVI Adapter 40 Mini-DVI to VGA adapter 40 Mini-DVI to Video Adapter 40...
... 7 G general safety 67 green light 21 H hand positions 69 headphone jack 39 port 9, 39 I image size 20 inserting a disc 43 installation instructions 5 installing memory 52 internal modem 39 Internet configuration 76 connection 61, 89 using Setup Assistant 83 Internet service provider 72 inventory of items 5 ISP 72 K keeping the... 62 M Mac OS 9 24 Mac OS X 24 interface 90 manual Internet configuration 79 manually using DHCP router option 11, 73 Media Eject key 7 memory checking 55 microphone 7, 39 mini-DVI port 9 Mini-DVI to DVI Adapter 40 Mini-DVI to VGA adapter 40 Mini-DVI to Video Adapter 40...