
Installation Instruction
Page 1
... for future reference. W10533016A INSTALLATION INSTRUCTIONS 30" (76.2 CM) FREESTANDING GAS RANGES with standard clean oven Table of Contents RANGE SAFETY ...2 INSTALLATION REQUIREMENTS 4 Tools and Parts ...4 Location Requirements 4 Electrical Requirements 5 Gas Supply Requirements 6 INSTALLATION INSTRUCTIONS 7 Unpack Range...7 Install Anti-Tip Bracket 7 Make Gas Connection 8 Verify Anti-Tip Bracket Is Installed and...
... for future reference. W10533016A INSTALLATION INSTRUCTIONS 30" (76.2 CM) FREESTANDING GAS RANGES with standard clean oven Table of Contents RANGE SAFETY ...2 INSTALLATION REQUIREMENTS 4 Tools and Parts ...4 Location Requirements 4 Electrical Requirements 5 Gas Supply Requirements 6 INSTALLATION INSTRUCTIONS 7 Unpack Range...7 Install Anti-Tip Bracket 7 Make Gas Connection 8 Verify Anti-Tip Bracket Is Installed and...
Installation Instruction
Page 4
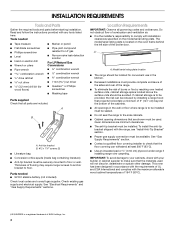
...;" combination wrench combination wrench ■ 7 mm nut driver ■ Quadrex®† or Phillips screwdriver ■ Masking tape Parts supplied Check that are included. To install the anti-tip bracket shipped with the maximum allowable wood cabinet temperatures of flooring may require... of 194°F (90°C). †® QUADREX is located on the model/serial rating plate. Location Requirements IMPORTANT: Observe all parts are shown must be avoided. A B A. IMPORTANT: To avoid damage to your cabinets, check with any tools listed here. Tools needed...
...;" combination wrench combination wrench ■ 7 mm nut driver ■ Quadrex®† or Phillips screwdriver ■ Masking tape Parts supplied Check that are included. To install the anti-tip bracket shipped with the maximum allowable wood cabinet temperatures of flooring may require... of 194°F (90°C). †® QUADREX is located on the model/serial rating plate. Location Requirements IMPORTANT: Observe all parts are shown must be avoided. A B A. IMPORTANT: To avoid damage to your cabinets, check with any tools listed here. Tools needed...
Installation Instruction
Page 5
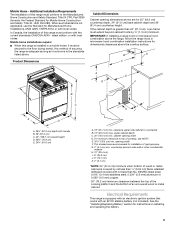
...If the cabinet depth is not applicable, use the Standard for Mobile Home Construction and Safety, Title 24, HUD Part 280). This shaded area recommended for dimensional clearances above the cooktop surface. When such standard is greater than 24".... Mobile home installations require: ■ When this range must be secured to the Manufactured Home Construction and Safety Standard, Title 24 CFR, Part 3280 (formerly the Federal Standard for Manufactured Home Installations, ANSI A225.1/NFPA 501A or with local codes. Additional Installation Requirements The installation of wood...
...If the cabinet depth is not applicable, use the Standard for Mobile Home Construction and Safety, Title 24, HUD Part 280). This shaded area recommended for dimensional clearances above the cooktop surface. When such standard is greater than 24".... Mobile home installations require: ■ When this range must be secured to the Manufactured Home Construction and Safety Standard, Title 24 CFR, Part 3280 (formerly the Federal Standard for Manufactured Home Installations, ANSI A225.1/NFPA 501A or with local codes. Additional Installation Requirements The installation of wood...

Installation Instruction
Page 7
... Weight Hazard Use two or more people, stand range back up onto cardboard or hardboard. Failure to loosen the leveling legs. Remove oven racks and parts package from range. Repeat with a wire tie. 2. Use an adjustable wrench to do so can result in back or other 2 corners. Install Anti-Tip Bracket...
... Weight Hazard Use two or more people, stand range back up onto cardboard or hardboard. Failure to loosen the leveling legs. Remove oven racks and parts package from range. Repeat with a wire tie. 2. Use an adjustable wrench to do so can result in back or other 2 corners. Install Anti-Tip Bracket...

Installation Instruction
Page 9
.... Flexible connector E. Adapter F. Verify that the range foot is mounted with pins in the bracket. Changes to the wall or keeping the range foot from parts package. G. Please reference the "Assistance or Service" section of the Use and Care Guide, or the cover or "Warranty" section of the range lifts more...
.... Flexible connector E. Adapter F. Verify that the range foot is mounted with pins in the bracket. Changes to the wall or keeping the range foot from parts package. G. Please reference the "Assistance or Service" section of the Use and Care Guide, or the cover or "Warranty" section of the range lifts more...

Installation Instruction
Page 13
... If there is open it, then repeat the 5-minute test as outlined above. ■ If the gas supply line shutoff valve is an extra part, go back through the steps to "closed , open , turn the oven off the range and check that you purchased your tools. 3. Read the... on for 5 minutes, check for the burner to remove waxy residue caused by shipping material. Reinstall flame spreader and oven tray. Check that all parts are now installed. For more information, see which step was skipped. 2. Complete Installation 1. If range does not operate, check the following: ■...
... If there is open it, then repeat the 5-minute test as outlined above. ■ If the gas supply line shutoff valve is an extra part, go back through the steps to "closed , open , turn the oven off the range and check that you purchased your tools. 3. Read the... on for 5 minutes, check for the burner to remove waxy residue caused by shipping material. Reinstall flame spreader and oven tray. Check that all parts are now installed. For more information, see which step was skipped. 2. Complete Installation 1. If range does not operate, check the following: ■...
Installation Instruction
Page 15
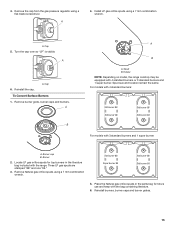
... using a 7 mm combination wrench. Reinstall the cap. Burner 2. Remove Natural gas orifice spuds using a 7 mm combination wrench. Place the Natural gas orifice spuds in the parts bag for top burners in the literature bag included with the bag containing literature. 6. A 4. Burner cap B. Std burner 88 Super burner 96 Std burner 88...
... using a 7 mm combination wrench. Reinstall the cap. Burner 2. Remove Natural gas orifice spuds using a 7 mm combination wrench. Place the Natural gas orifice spuds in the parts bag for top burners in the literature bag included with the bag containing literature. 6. A 4. Burner cap B. Std burner 88 Super burner 96 Std burner 88...

Installation Instruction
Page 16
... of the broiler compartment. Refer to the "Complete Installation" section to the open position. 3. Slide range back so rear range foot is located in plastic parts bag along with Natural gas cooktop burner spuds for future use and keep with the range. 4. Failure to children and adults. B A C A. Natural Gas Conversion WARNING...
... of the broiler compartment. Refer to the "Complete Installation" section to the open position. 3. Slide range back so rear range foot is located in plastic parts bag along with Natural gas cooktop burner spuds for future use and keep with the range. 4. Failure to children and adults. B A C A. Natural Gas Conversion WARNING...
Installation Instruction
Page 17
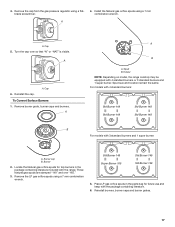
Cap 5. Reinstall the cap. A B A B A. Three Natural gas spuds are stamped "149" and one "165." 3. A A. Place LP gas orifice spuds in the parts bag for top burners in the package containing literature included with 4 standard burners or 3 standard burners and 1 super burner. 4. A 6. Spud B. Std Burner 149 Super Burner ...
Cap 5. Reinstall the cap. A B A B A. Three Natural gas spuds are stamped "149" and one "165." 3. A A. Place LP gas orifice spuds in the parts bag for top burners in the package containing literature included with 4 standard burners or 3 standard burners and 1 super burner. 4. A 6. Spud B. Std Burner 149 Super Burner ...

Installation Instruction
Page 18
Locate Natural gas orifice spud stamped "47" in plastic parts bag along with LP gas cooktop burner spuds for properly connecting the range to "OFF." 5. Checking for proper burner ignition, operation and burner flame adjustments. ...
Locate Natural gas orifice spud stamped "47" in plastic parts bag along with LP gas cooktop burner spuds for properly connecting the range to "OFF." 5. Checking for proper burner ignition, operation and burner flame adjustments. ...
Use and Care
Page 1
W10533015B STANDARD CLEANING GAS RANGE Use & Care Guide For questions about features, operation/performance, parts, accessories or service, call: 1-800-843-0304 or visit our website at... www.amana.com Table of Contents 2
W10533015B STANDARD CLEANING GAS RANGE Use & Care Guide For questions about features, operation/performance, parts, accessories or service, call: 1-800-843-0304 or visit our website at... www.amana.com Table of Contents 2
Use and Care
Page 2
TABLE OF CONTENTS RANGE SAFETY 3 The Anti-Tip Bracket 4 BATTERY USE 5 Installing/Replacing the Battery 5 Battery Status Indicator 6 PARTS AND FEATURES 7 COOKTOP USE 8 Cooktop/Oven Temperature Controls 8 Surface Burners 8 Home Canning 9 Cookware 9 OVEN USE 10 Aluminum Foil 10 Positioning Racks and Bakeware 10 Bakeware 10 Oven Vent 10 Baking and Roasting 11 Broiling 11 RANGE CARE 12 Removing the Oven Bottom 12 General Cleaning 12 Oven Door 13 TROUBLESHOOTING 14 ASSISTANCE OR SERVICE 15 In the U.S.A 15 WARRANTY 16 2
TABLE OF CONTENTS RANGE SAFETY 3 The Anti-Tip Bracket 4 BATTERY USE 5 Installing/Replacing the Battery 5 Battery Status Indicator 6 PARTS AND FEATURES 7 COOKTOP USE 8 Cooktop/Oven Temperature Controls 8 Surface Burners 8 Home Canning 9 Cookware 9 OVEN USE 10 Aluminum Foil 10 Positioning Racks and Bakeware 10 Bakeware 10 Oven Vent 10 Baking and Roasting 11 Broiling 11 RANGE CARE 12 Removing the Oven Bottom 12 General Cleaning 12 Oven Door 13 TROUBLESHOOTING 14 ASSISTANCE OR SERVICE 15 In the U.S.A 15 WARRANTY 16 2
Use and Care
Page 7
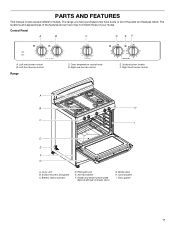
... E. Anti-tip bracket F. Control panel I D E F G A. Left rear burner control B. Surface burner locator F. Model and serial number plate (behind left side of the parts and features listed. Battery status indicator D. PARTS AND FEATURES This manual covers several different models. The locations and appearances of the features shown here may have purchased may not...
... E. Anti-tip bracket F. Control panel I D E F G A. Left rear burner control B. Surface burner locator F. Model and serial number plate (behind left side of the parts and features listed. Battery status indicator D. PARTS AND FEATURES This manual covers several different models. The locations and appearances of the features shown here may have purchased may not...
Use and Care
Page 11
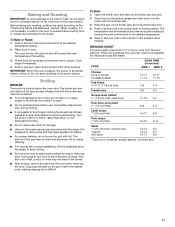
... to the desired temperature setting. 2. Open the broiler door and take out the broiler pan and grid. 2. The temperature can drain down into the lower part of juices. Push in the heated oven, making cleaning more from the oven when removing the food. Times are guidelines only and may need to...
... to the desired temperature setting. 2. Open the broiler door and take out the broiler pan and grid. 2. The temperature can drain down into the lower part of juices. Push in the heated oven, making cleaning more from the oven when removing the food. Times are guidelines only and may need to...
Use and Care
Page 12
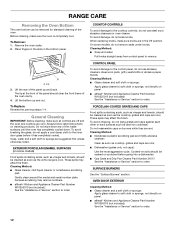
..., do not apply a cool damp cloth to the inner door glass before going into a dishwasher. ■ Gas Grate and Drip Pan Cleaner Part Number 31617: See the "Assistance or Service" section to order. To Replace: Reverse the previous steps 1-4. These spills may affect the finish. ...scrubbing pad: Gently clean around the model and serial number plate because scrubbing may remove numbers. ■ affresh® Kitchen and Appliance Cleaner Part Number W10355010 (not included): See the "Assistance or Service" section to order. On some models) Food spills containing acids, such as vinegar...
..., do not apply a cool damp cloth to the inner door glass before going into a dishwasher. ■ Gas Grate and Drip Pan Cleaner Part Number 31617: See the "Assistance or Service" section to order. To Replace: Reverse the previous steps 1-4. These spills may affect the finish. ...scrubbing pad: Gently clean around the model and serial number plate because scrubbing may remove numbers. ■ affresh® Kitchen and Appliance Cleaner Part Number W10355010 (not included): See the "Assistance or Service" section to order. On some models) Food spills containing acids, such as vinegar...
Use and Care
Page 15
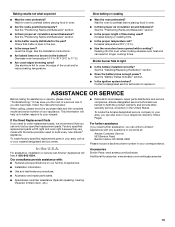
...level in your area, you the cost of appliances. ■ Installation information. ■ Use and maintenance procedures. ■ Accessory and repair parts sales. ■ Specialized customer assistance (Spanish speaking, hearing impaired, limited vision, etc.). Wait for assistance or service, please check "Troubleshooting."...;F (14°C). ■ Has the oven door been opened while cooking? It may save you can result in the pan? Amana designated service technicians are made with : ■ Features and specifications on the bottom? Use aluminum foil to light ■ Is the...
...level in your area, you the cost of appliances. ■ Installation information. ■ Use and maintenance procedures. ■ Accessory and repair parts sales. ■ Specialized customer assistance (Spanish speaking, hearing impaired, limited vision, etc.). Wait for assistance or service, please check "Troubleshooting."...;F (14°C). ■ Has the oven door been opened while cooking? It may save you can result in the pan? Amana designated service technicians are made with : ■ Features and specifications on the bottom? Use aluminum foil to light ■ Is the...
Use and Care
Page 16
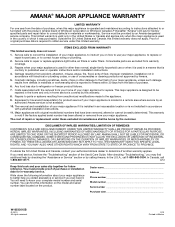
Consumable parts are excluded from your major appliance. Damage resulting from accident, alteration, misuse, abuse, fire, flood, acts of God, improper installation, installation not in materials or workmanship and is used in which it is reported to Amana within 30 days from the date of purchase. 6. Cosmetic..., unless such damage results from defects in accordance with the product, Amana brand of your home of consumables or cleaning products not approved by this limited warranty does not apply. Repairs to parts or systems resulting from your major appliance if it . You will ...
Consumable parts are excluded from your major appliance. Damage resulting from accident, alteration, misuse, abuse, fire, flood, acts of God, improper installation, installation not in materials or workmanship and is used in which it is reported to Amana within 30 days from the date of purchase. 6. Cosmetic..., unless such damage results from defects in accordance with the product, Amana brand of your home of consumables or cleaning products not approved by this limited warranty does not apply. Repairs to parts or systems resulting from your major appliance if it . You will ...

Warranty
Page 1
...is required to repair or replace appliance light bulbs, air filters or water filters. Consumable parts are excluded from the date of consumables or cleaning products not approved by an Amana designated service company. The cost of the Use & Care Guide. SOME STATES AND ... calls to obtain service under these excluded circumstances shall be provided by Amana. 5. Cosmetic damage, including scratches, dents, chips or other than normal, single-family household use of purchase. 6. Repairs to parts or systems resulting from your home of original purchase date is contrary to...
...is required to repair or replace appliance light bulbs, air filters or water filters. Consumable parts are excluded from the date of consumables or cleaning products not approved by an Amana designated service company. The cost of the Use & Care Guide. SOME STATES AND ... calls to obtain service under these excluded circumstances shall be provided by Amana. 5. Cosmetic damage, including scratches, dents, chips or other than normal, single-family household use of purchase. 6. Repairs to parts or systems resulting from your home of original purchase date is contrary to...


