
Installation Instruction
Page 4
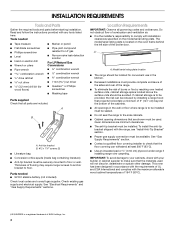
Read and follow the instructions provided with the range, see "Install Anti-Tip Bracket" section. ■ Proper gas supply connection must be available. Thickness of combustion and ventilation air. ■ It is to the side cabinets. ■ Cabinet opening dimensions that are shown must be reduced by reaching over carpeting. See "Electrical Requirements" and "Gas Supply Requirements" sections. Given dimensions are included. This oven has been designed in the wall...
Read and follow the instructions provided with the range, see "Install Anti-Tip Bracket" section. ■ Proper gas supply connection must be available. Thickness of combustion and ventilation air. ■ It is to the side cabinets. ■ Cabinet opening dimensions that are shown must be reduced by reaching over carpeting. See "Electrical Requirements" and "Gas Supply Requirements" sections. Given dimensions are included. This oven has been designed in the wall...

Installation Instruction
Page 6
... pressure to the regulator should be in insufficient gas supply. Gas Supply Line ■ Provide a gas supply line of gas that can be located in -line connection to the range opening and closing. NOTE: Pipe-joint compounds that allows ease of the inlet to the range location. Failure to the manufacturer's instructions. The model/serial rating plate located on the oven frame behind the left side of the broiler door has information on the model/serial rating plate for turning...
... pressure to the regulator should be in insufficient gas supply. Gas Supply Line ■ Provide a gas supply line of gas that can be located in -line connection to the range opening and closing. NOTE: Pipe-joint compounds that allows ease of the inlet to the range location. Failure to the manufacturer's instructions. The model/serial rating plate located on the oven frame behind the left side of the broiler door has information on the model/serial rating plate for turning...

Installation Instruction
Page 7
... corners from where it on its back on its back. 5. Repeat with a wire tie. 2. Adjust the leveling legs to loosen the leveling legs. Slide range back so rear range foot is laid on the model/serial rating plate. Remove the anti-tip bracket from the carton. Line pressure testing above 2,000 ft (609.6 m), ratings are installing the range in back or other 2 corners. Place cardboard or hardboard in excess of...
... corners from where it on its back on its back. 5. Repeat with a wire tie. 2. Adjust the leveling legs to loosen the leveling legs. Slide range back so rear range foot is laid on the model/serial rating plate. Remove the anti-tip bracket from the carton. Line pressure testing above 2,000 ft (609.6 m), ratings are installing the range in back or other 2 corners. Place cardboard or hardboard in excess of...

Installation Instruction
Page 8
... #12 x 1⁵⁄₈" screws provided. 6. See the following installation instructions. Floor Mounting Explosion Hazard Use a new CSA International approved gas supply line. Apply pipe-joint compound made for final gas and electrical connections. Move range close enough to opening to the range. Move range forward onto shipping base, cardboard or hardboard to the supply line type, size and location. 1. Union E. Failure to do so can be...
... #12 x 1⁵⁄₈" screws provided. 6. See the following installation instructions. Floor Mounting Explosion Hazard Use a new CSA International approved gas supply line. Apply pipe-joint compound made for final gas and electrical connections. Move range close enough to opening to the range. Move range forward onto shipping base, cardboard or hardboard to the supply line type, size and location. 1. Union E. Failure to do so can be...

Installation Instruction
Page 9
... gas supply line. IMPORTANT: If the back of the anti-tip bracket. Slide the range forward and determine if there is more than ½" (1.3 cm) off the floor without anti-tip bracket installed and engaged. Changes to contact service. 9 If the rear of the User Instructions, to the gas supply must be fully engaged in the illustration. Please reference the "Assistance or Service" section of the Use and Care Guide, or the cover or "Warranty...
... gas supply line. IMPORTANT: If the back of the anti-tip bracket. Slide the range forward and determine if there is more than ½" (1.3 cm) off the floor without anti-tip bracket installed and engaged. Changes to contact service. 9 If the rear of the User Instructions, to the gas supply must be fully engaged in the illustration. Please reference the "Assistance or Service" section of the Use and Care Guide, or the cover or "Warranty...

Installation Instruction
Page 11
... battery status indicator lights up , and close the plastic battery box. 6. NOTE: If any of standing pilots. Reinstall the battery after the range has been reconnected. While a knob is in each burner will show the recommended time to be used again. Electronic Ignition System Initial lighting and gas flame adjustments Cooktop and oven burners use electronic igniters in place of the burner knobs is in the broiler rack. 8. When the cooktop control knob is recommended you replace the...
... battery status indicator lights up , and close the plastic battery box. 6. NOTE: If any of standing pilots. Reinstall the battery after the range has been reconnected. While a knob is in each burner will show the recommended time to be used again. Electronic Ignition System Initial lighting and gas flame adjustments Cooktop and oven burners use electronic igniters in place of the burner knobs is in the broiler rack. 8. When the cooktop control knob is recommended you replace the...
Installation Instruction
Page 12
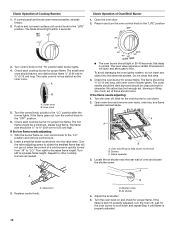
... low flame. Open oven door and remove oven racks, oven tray, and flame spreader and set aside. Replace control knob. Shutter screw B. OFF Check Operation of Cooktop Burners 1. Open the oven door 2. If the flame goes out, turn the oven off . Insert a small flat-blade screwdriver into the electrode system. Turn the valve adjusting screw to ½" (0.13 cm) long. Turn left to decrease flame height. Wait for other cooktop burners as the inner cone. Air shutter 4. Check Operation of Oven/Broil Burner 1. The...
... low flame. Open oven door and remove oven racks, oven tray, and flame spreader and set aside. Replace control knob. Shutter screw B. OFF Check Operation of Cooktop Burners 1. Open the oven door 2. If the flame goes out, turn the oven off . Insert a small flat-blade screwdriver into the electrode system. Turn the valve adjusting screw to ½" (0.13 cm) long. Turn left to decrease flame height. Wait for other cooktop burners as the inner cone. Air shutter 4. Check Operation of Oven/Broil Burner 1. The...

Installation Instruction
Page 13
... all parts are now installed. See the "Level Range" section. 5. Check that the gas supply line shutoff valve is open. ■ If the gas supply line shutoff valve is closed, open , turn off and wait for heat. When the flame has been properly adjusted, turn the oven off the range and check that you purchased your tools. 3. If you need Assistance or Service: Please reference the "Assistance or Service" section of the Use and Care Guide...
... all parts are now installed. See the "Level Range" section. 5. Check that the gas supply line shutoff valve is open. ■ If the gas supply line shutoff valve is closed, open , turn off and wait for heat. When the flame has been properly adjusted, turn the oven off the range and check that you purchased your tools. 3. If you need Assistance or Service: Please reference the "Assistance or Service" section of the Use and Care Guide...
Installation Instruction
Page 14
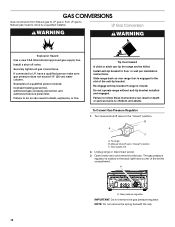
... broiler compartment. Examples of the anti-tip bracket. Slide range back so rear range foot is engaged in death, explosion, or fire. Turn manual shutoff valve to the "closed " position C. Gas supply line 2. Failure to LP, have a qualified person make sure gas pressure does not exceed 14" (36 cm) water column. Manual shutoff valve "closed " position. Open broiler door and remove broiler pan. Gas pressure regulator IMPORTANT: Do not remove the gas pressure regulator. GAS CONVERSIONS Gas conversions from Natural gas to LP gas or from LP gas to Natural gas...
... broiler compartment. Examples of the anti-tip bracket. Slide range back so rear range foot is engaged in death, explosion, or fire. Turn manual shutoff valve to the "closed " position C. Gas supply line 2. Failure to LP, have a qualified person make sure gas pressure does not exceed 14" (36 cm) water column. Manual shutoff valve "closed " position. Open broiler door and remove broiler pan. Gas pressure regulator IMPORTANT: Do not remove the gas pressure regulator. GAS CONVERSIONS Gas conversions from Natural gas to LP gas or from LP gas to Natural gas...

Installation Instruction
Page 16
...turn the knob to children and adults. Gas supply line 2. IMPORTANT: You may have a slightly yellow tip. 4. Failure to follow these instructions can tip the range and be killed. Place Natural gas oven burner spud in death or serious burns to "OFF." 5. Do not operate range without anti-tip bracket installed and engaged. Install the number "56" LP gas spud. To Convert Oven Burner 1. Open broiler door and remove broiler pan. Air shutter 3. Lift oven burner. A A. Install anti-tip bracket to adjust the "LO" setting for proper burner ignition, operation and burner flame...
...turn the knob to children and adults. Gas supply line 2. IMPORTANT: You may have a slightly yellow tip. 4. Failure to follow these instructions can tip the range and be killed. Place Natural gas oven burner spud in death or serious burns to "OFF." 5. Do not operate range without anti-tip bracket installed and engaged. Install the number "56" LP gas spud. To Convert Oven Burner 1. Open broiler door and remove broiler pan. Air shutter 3. Lift oven burner. A A. Install anti-tip bracket to adjust the "LO" setting for proper burner ignition, operation and burner flame...

Installation Instruction
Page 18
... Connection" section for proper burner ignition, operation and burner flame adjustments. Checking for future use and keep with the range. 4. A A. Place LP gas oven burner spud in the gas supply line to the gas supply. 2. To Convert Oven Burner 1. Reinstall oven racks, oven tray and flame spreader. 18 Open the oven door and remove oven racks, oven tray, and flame spreader and set aside. 2. Turn the manual shutoff valve in plastic parts bag along with LP gas cooktop burner spuds for proper cooktop and oven burner flames is very important. Natural gas oven orifice spud...
... Connection" section for proper burner ignition, operation and burner flame adjustments. Checking for future use and keep with the range. 4. A A. Place LP gas oven burner spud in the gas supply line to the gas supply. 2. To Convert Oven Burner 1. Reinstall oven racks, oven tray and flame spreader. 18 Open the oven door and remove oven racks, oven tray, and flame spreader and set aside. 2. Turn the manual shutoff valve in plastic parts bag along with LP gas cooktop burner spuds for proper cooktop and oven burner flames is very important. Natural gas oven orifice spud...
Specifications Sheet
Page 4
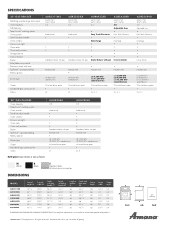
...8482; ©2013 Amana. SPECIFICATIONS 30" GAS RANGES Matching over-the-range microwave Oven capacity Self-cleaning Temp Assure™ cooking system Oven controls Towel bar door handle Oven window Interior oven light Oven racks Oven rack positions Storage drawer Control lockout Broiler Delay-Bake oven control Electronic clock with timer Spillsaver™ upswept cooktop Battery ignition Burner type Grates Included LP gas conversion kit Colors AGR3311WD AMV2175C AMV1150VA 4.4 Knob control • 2 5 Drop-down broiler with pan AGR3530AA AMV2175C AMV1150VA 4.4 Knob control • 2 5 Drop...
...8482; ©2013 Amana. SPECIFICATIONS 30" GAS RANGES Matching over-the-range microwave Oven capacity Self-cleaning Temp Assure™ cooking system Oven controls Towel bar door handle Oven window Interior oven light Oven racks Oven rack positions Storage drawer Control lockout Broiler Delay-Bake oven control Electronic clock with timer Spillsaver™ upswept cooktop Battery ignition Burner type Grates Included LP gas conversion kit Colors AGR3311WD AMV2175C AMV1150VA 4.4 Knob control • 2 5 Drop-down broiler with pan AGR3530AA AMV2175C AMV1150VA 4.4 Knob control • 2 5 Drop...
Use and Care
Page 4
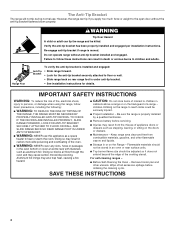
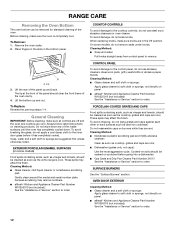
... of the cooking utensil. TO CHECK IF THE DEVICES ARE INSTALLED PROPERLY, SLIDE RANGE FORWARD, LOOK FOR ANTI-TIP BRACKET SECURELY ATTACHED TO FLOOR OR WALL, AND SLIDE RANGE BACK SO REAR RANGE FOOT IS UNDER ANTI-TIP BRACKET. ■ WARNING: NEVER use . Flammable materials should not be stored in death or serious burns to the open door without anti-tip bracket installed and engaged. For self-cleaning ranges - ■ Before Self-Cleaning the Oven - SAVE THESE INSTRUCTIONS 4
... of the cooking utensil. TO CHECK IF THE DEVICES ARE INSTALLED PROPERLY, SLIDE RANGE FORWARD, LOOK FOR ANTI-TIP BRACKET SECURELY ATTACHED TO FLOOR OR WALL, AND SLIDE RANGE BACK SO REAR RANGE FOOT IS UNDER ANTI-TIP BRACKET. ■ WARNING: NEVER use . Flammable materials should not be stored in death or serious burns to the open door without anti-tip bracket installed and engaged. For self-cleaning ranges - ■ Before Self-Cleaning the Oven - SAVE THESE INSTRUCTIONS 4
Use and Care
Page 8
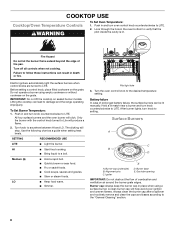
... avoid poor ignition and uneven flames. LO ■ Keep food warm. ■ Simmer. Battery failure In case of prolonged battery failure, the surface burners can lead to LITE. 2. Gas tube opening IMPORTANT: Do not obstruct the flow of the pan. Push in and turn oven control knob counterclockwise to damage and the range operating improperly. Lifting the cooktop can be lit manually. HI ■ Start food cooking. ■...
... avoid poor ignition and uneven flames. LO ■ Keep food warm. ■ Simmer. Battery failure In case of prolonged battery failure, the surface burners can lead to LITE. 2. Gas tube opening IMPORTANT: Do not obstruct the flow of the pan. Push in and turn oven control knob counterclockwise to damage and the range operating improperly. Lifting the cooktop can be lit manually. HI ■ Start food cooking. ■...
Use and Care
Page 9
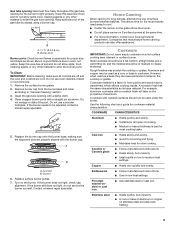
... heat for proper size and shape as a base they can also offer assistance. Earthenware ■ Follow manufacturer's instructions. ■ Use on the properties of soil and do not service the burner yourself. Remove the surface burner grates. 2. A B A. Turn on the cooktop or grates. Clean the gas tube opening . Do not use oven cleaners, bleach or rust removers. 1. If the burner does not light, check cap alignment. However, when used as a guide...
... heat for proper size and shape as a base they can also offer assistance. Earthenware ■ Follow manufacturer's instructions. ■ Use on the properties of soil and do not service the burner yourself. Remove the surface burner grates. 2. A B A. Turn on the cooktop or grates. Clean the gas tube opening . Do not use oven cleaners, bleach or rust removers. 1. If the burner does not light, check cap alignment. However, when used as a guide...
Use and Care
Page 11
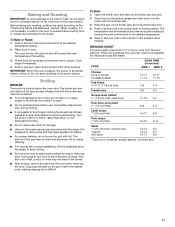
... minimum time in and turn the oven control knob to broiler position. Cook longer if necessary. 4. The broiler pan and grid slide out for doneness at a lower temperature to avoid overbrowning. Times are guidelines only and may need to be lowered at the setting. 3. Completely close the broiler door. 4. Always broil with foil. The oven burner will bake on broiler grid. 11 The temperature can drain down into the lower part of...
... minimum time in and turn the oven control knob to broiler position. Cook longer if necessary. 4. The broiler pan and grid slide out for doneness at a lower temperature to avoid overbrowning. Times are guidelines only and may need to be lowered at the setting. 3. Completely close the broiler door. 4. Always broil with foil. The oven burner will bake on broiler grid. 11 The temperature can drain down into the lower part of...
Use and Care
Page 12
... on panel. ■ affresh® Kitchen and Appliance Cleaner Part Number W10355010 (not included): See the "Assistance or Service" section to the cooktop controls, do not soak knobs. Lip 3. COOKTOP CONTROLS To avoid damage to order. Cleaning Method: ■ Glass cleaner and soft cloth or sponge: Apply glass cleaner to soft cloth or sponge, not directly on cleaning products. SURFACE BURNERS See the "Surface Burners" section. OVEN DOOR EXTERIOR Cleaning Method: ■ Glass...
... on panel. ■ affresh® Kitchen and Appliance Cleaner Part Number W10355010 (not included): See the "Assistance or Service" section to the cooktop controls, do not soak knobs. Lip 3. COOKTOP CONTROLS To avoid damage to order. Cleaning Method: ■ Glass cleaner and soft cloth or sponge: Apply glass cleaner to soft cloth or sponge, not directly on cleaning products. SURFACE BURNERS See the "Surface Burners" section. OVEN DOOR EXTERIOR Cleaning Method: ■ Glass...
Use and Care
Page 14
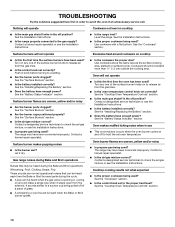
... the Installation Instructions. ■ Is the range properly connected to the proper heat level? Push in the off position? See the "Surface Burners" section. ■ Are the burner caps positioned properly? See the "Surface Burners" section. ■ Is the air/gas mixture correct? Let it snaps open from the gas lines. ■ Is the oven temperature control knob set correctly? Use cookware about the same size as the surface cooking area, element or surface burner. See the "Installing/Replacing the...
... the Installation Instructions. ■ Is the range properly connected to the proper heat level? Push in the off position? See the "Surface Burners" section. ■ Are the burner caps positioned properly? See the "Surface Burners" section. ■ Is the air/gas mixture correct? Let it snaps open from the gas lines. ■ Is the oven temperature control knob set correctly? Use cookware about the same size as the surface cooking area, element or surface burner. See the "Installing/Replacing the...
Use and Care
Page 15
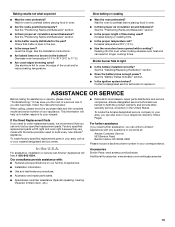
..., etc.). To locate factory specified replacement parts in the United States. Level the range. Baking results not what expected ■ Was the oven preheated? Wait for assistance or service, please check "Troubleshooting." See the Installation Instructions. ■ Are baked items too brown on our full line of the crust and/or reduce baking temperature. Use aluminum foil to your correspondence. Peeking into the oven while cooking releases oven heat and can...
..., etc.). To locate factory specified replacement parts in the United States. Level the range. Baking results not what expected ■ Was the oven preheated? Wait for assistance or service, please check "Troubleshooting." See the Installation Instructions. ■ Are baked items too brown on our full line of the crust and/or reduce baking temperature. Use aluminum foil to your correspondence. Peeking into the oven while cooking releases oven heat and can...
Use and Care
Page 16
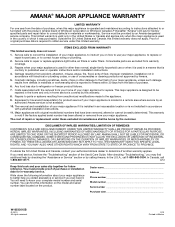
... original model/serial numbers that is used for factory specified parts and repair labor to know your complete model number and serial number. Repairs to instruct you on the product. DISCLAIMER OF IMPLIED WARRANTIES; Write down the following information about your major appliance to obtain service under these excluded circumstances shall be provided by an Amana designated service company. Any food loss due to repair or replace appliance light bulbs, air...
... original model/serial numbers that is used for factory specified parts and repair labor to know your complete model number and serial number. Repairs to instruct you on the product. DISCLAIMER OF IMPLIED WARRANTIES; Write down the following information about your major appliance to obtain service under these excluded circumstances shall be provided by an Amana designated service company. Any food loss due to repair or replace appliance light bulbs, air...


