Installation Instruction
Page 1
Only 8 Verify Anti-Tip Bracket Is Installed and Engaged 12 Level Range 13 Warming Drawer or Premium Storage Drawer 13 Storage Drawer 14 Oven Door 14 Complete Installation 14 Moving the Range 15 IMPORTANT: Save for local electrical inspector's use. Only 5 INSTALLATION INSTRUCTIONS 6 Unpack Range 6 Install Anti-Tip Bracket 6 Electrical Connection - U.S.A. U.S.A. INSTALLATION INSTRUCTIONS 30" (76 CM) FREESTANDING ELECTRIC RANGES Table of Contents RANGE SAFETY 2 INSTALLATION REQUIREMENTS 3 Tools and Parts 3 Location Requirements 3 Electrical Requirements - W10403811C
Only 8 Verify Anti-Tip Bracket Is Installed and Engaged 12 Level Range 13 Warming Drawer or Premium Storage Drawer 13 Storage Drawer 14 Oven Door 14 Complete Installation 14 Moving the Range 15 IMPORTANT: Save for local electrical inspector's use. Only 5 INSTALLATION INSTRUCTIONS 6 Unpack Range 6 Install Anti-Tip Bracket 6 Electrical Connection - U.S.A. U.S.A. INSTALLATION INSTRUCTIONS 30" (76 CM) FREESTANDING ELECTRIC RANGES Table of Contents RANGE SAFETY 2 INSTALLATION REQUIREMENTS 3 Tools and Parts 3 Location Requirements 3 Electrical Requirements - W10403811C

Installation Instruction
Page 3
...-tip bracket must be secured per the instructions in ring terminals or open-end spade terminals with your builder or cabinet supplier to be revised. Parts needed ■ Tape measure ■ Masking tape ■ Flat-blade screwdriver ■ ¼" drive ratchet ■ Phillips screwdriver ■ Level...a power supply cord kit: ■ A UL listed power supply cord kit marked for Mobile Home Construction and Safety, Title 24, HUD Part 280). It is recommended that all governing codes and ordinances. ■ It is not applicable, use the Standard for use with nominal 1&#...
...-tip bracket must be secured per the instructions in ring terminals or open-end spade terminals with your builder or cabinet supplier to be revised. Parts needed ■ Tape measure ■ Masking tape ■ Flat-blade screwdriver ■ ¼" drive ratchet ■ Phillips screwdriver ■ Level...a power supply cord kit: ■ A UL listed power supply cord kit marked for Mobile Home Construction and Safety, Title 24, HUD Part 280). It is recommended that all governing codes and ordinances. ■ It is not applicable, use the Standard for use with nominal 1&#...

Installation Instruction
Page 6
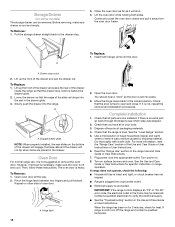
... in the cutout so that correspond to the bracket holes of the cutout. Bracket V-notch 4. Rear leveling leg B. Wrench or pliers C. Remove oven racks and parts package from centerline as shown. A A. Shipping base 4. Re-engage anti-tip bracket if range is 12 31.9 cm) from inside the storage drawer or warming...
... in the cutout so that correspond to the bracket holes of the cutout. Bracket V-notch 4. Rear leveling leg B. Wrench or pliers C. Remove oven racks and parts package from centerline as shown. A A. Shipping base 4. Re-engage anti-tip bracket if range is 12 31.9 cm) from inside the storage drawer or warming...

Installation Instruction
Page 9
Metal ground strap B. Allow enough slack to easily attach the wiring to remove the ground-link screw from the back of the range. Part of metal ground strap must be Go to Section: connecting to : A circuit breaker 3-wire connection: box or fused Direct wire disconnect 3" (7.6 cm) B A. Save the ground-...
Metal ground strap B. Allow enough slack to easily attach the wiring to remove the ground-link screw from the back of the range. Part of metal ground strap must be Go to Section: connecting to : A circuit breaker 3-wire connection: box or fused Direct wire disconnect 3" (7.6 cm) B A. Save the ground-...

Installation Instruction
Page 11
... Torque Specifications Attaching terminal lugs to the center terminal block post with the ground-link screw and ground-link section. Terminal lug 7. Neutral (white) wire E. Part of metal ground strap must not contact any other terminal. 6. Ground-link screw C. Loosen (do not remove) the setscrew on the front of the terminal...
... Torque Specifications Attaching terminal lugs to the center terminal block post with the ground-link screw and ground-link section. Terminal lug 7. Neutral (white) wire E. Part of metal ground strap must not contact any other terminal. 6. Ground-link screw C. Loosen (do not remove) the setscrew on the front of the terminal...
Installation Instruction
Page 14
Close the oven door as far as the door is an extra part, go back through the steps to remove the oven door. Continue to the locked position. To Replace: 1. Drawer stop notch is not, repeat the removal ...: 1. Lower the drawer so that the range is free to remove waxy residue caused by shipping material. A A. Then, follow these instructions. Open oven door all parts are placed in the range Use and Care Guide or User Instructions. 7. Pinch the hinge latch between two fingers and pull forward. You should hear...
Close the oven door as far as the door is an extra part, go back through the steps to remove the oven door. Continue to the locked position. To Replace: 1. Drawer stop notch is not, repeat the removal ...: 1. Lower the drawer so that the range is free to remove waxy residue caused by shipping material. A A. Then, follow these instructions. Open oven door all parts are placed in the range Use and Care Guide or User Instructions. 7. Pinch the hinge latch between two fingers and pull forward. You should hear...

Installation Instruction
Page 15
... be killed. Check that range is level. Plug in the slot of the anti-tip bracket. Electrical Shock Hazard Disconnect power before operating. Replace all parts and panels before servicing. Unplug the power supply cord. 3. Complete cleaning or maintenance. 4. Slide range back so rear range foot is level. 6. Re-engage anti...
... be killed. Check that range is level. Plug in the slot of the anti-tip bracket. Electrical Shock Hazard Disconnect power before operating. Replace all parts and panels before servicing. Unplug the power supply cord. 3. Complete cleaning or maintenance. 4. Slide range back so rear range foot is level. 6. Re-engage anti...
Use and Care
Page 3
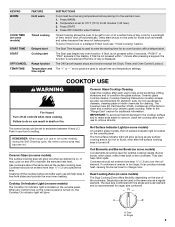
...cooktop and create a risk of electric shock. Among those areas are dark in desired location while oven is used in or around any part of the range unless specifically recommended in ignition of clothing. Proper relationship of utensil to burner will expose a portion of the heating ...TOUCH SURFACE UNITS OR AREAS NEAR UNITS - Flammable materials should break, cleaning solutions and spillovers may become hot enough to wipe spills on any part of a utensil should be positioned so that may result in the manual. Surface units may be stored in Manual. ■ Before Self...
...cooktop and create a risk of electric shock. Among those areas are dark in desired location while oven is used in or around any part of the range unless specifically recommended in ignition of clothing. Proper relationship of utensil to burner will expose a portion of the heating ...TOUCH SURFACE UNITS OR AREAS NEAR UNITS - Flammable materials should break, cleaning solutions and spillovers may become hot enough to wipe spills on any part of a utensil should be positioned so that may result in the manual. Surface units may be stored in Manual. ■ Before Self...
Use and Care
Page 5
... results. Use cookware about the same size as a regular element. Dual B. Delay start . The Off/Cancel keypad stops any oven function. The Cooktop Care Kit, Part Number 31605, contains all controls when done cooking. They also help catch spills. Cookware should not be set a Timed Cook or a Delayed Timed Cook see...
... results. Use cookware about the same size as a regular element. Dual B. Delay start . The Off/Cancel keypad stops any oven function. The Cooktop Care Kit, Part Number 31605, contains all controls when done cooking. They also help catch spills. Cookware should not be set a Timed Cook or a Delayed Timed Cook see...
Use and Care
Page 7
... Sabbath compliant. Opening the oven door or pressing the Oven Light keypad will light up . 6. Press and hold the TIMER SET/OFF keypad for only part of the cycle. If the oven has the Convection Bake feature, the oven light is to be disabled during this adjustment. For the oven light...
... Sabbath compliant. Opening the oven door or pressing the Oven Light keypad will light up . 6. Press and hold the TIMER SET/OFF keypad for only part of the cycle. If the oven has the Convection Bake feature, the oven light is to be disabled during this adjustment. For the oven light...
Use and Care
Page 11
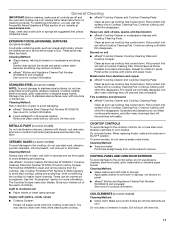
... disappears. Continue rubbing until white film disappears. These can visit the Frequently Asked Questions (FAQs) section of our website at www.amana.com. CONTROL PANEL AND OVEN DOOR EXTERIOR To avoid damage to remove. Heavy soil, dark streaks, specks and discoloration ■ ...on surface and scrape. COIL ELEMENTS (on cleaning products. These spills may remove numbers. ■ affresh® Kitchen and Appliance Cleaner Part Number W10355010 (not included): See cover for contact information. ■ Liquid detergent or all controls are off and elements are cool. Cleaning...
... disappears. Continue rubbing until white film disappears. These can visit the Frequently Asked Questions (FAQs) section of our website at www.amana.com. CONTROL PANEL AND OVEN DOOR EXTERIOR To avoid damage to remove. Heavy soil, dark streaks, specks and discoloration ■ ...on surface and scrape. COIL ELEMENTS (on cleaning products. These spills may remove numbers. ■ affresh® Kitchen and Appliance Cleaner Part Number W10355010 (not included): See cover for contact information. ■ Liquid detergent or all controls are off and elements are cool. Cleaning...

Use and Care
Page 12
... information. Plug in the OFF position. Cleaning Method: ■ Glass cleaner, mild liquid cleaner or nonabrasive scrubbing pad. ■ affresh® Kitchen and Appliance Cleaner Part Number W10355010 (not included): See cover for cleaning beneath. Food spills should be used to the rack guides will lift up to remove from the...
... information. Plug in the OFF position. Cleaning Method: ■ Glass cleaner, mild liquid cleaner or nonabrasive scrubbing pad. ■ affresh® Kitchen and Appliance Cleaner Part Number W10355010 (not included): See cover for cleaning beneath. Food spills should be used to the rack guides will lift up to remove from the...

Use and Care
Page 14
...; Kitchen and Appliance Cleaner Order Part Number W10355010 Split Oven Rack Order Part Number 4396927 Porcelain Broiler Pan and Grid Order Part Number 4396923 Gas Grate and Drip Pan Cleaner Order Part Number 31617A Gourmet Griddle Order Part Number 4396096RB Premium Broil Pan and Roasting Rack Order Part Number W10123240 www.amana.com/broilerpan 14 ACCESSORIES For...
...; Kitchen and Appliance Cleaner Order Part Number W10355010 Split Oven Rack Order Part Number 4396927 Porcelain Broiler Pan and Grid Order Part Number 4396923 Gas Grate and Drip Pan Cleaner Order Part Number 31617A Gourmet Griddle Order Part Number 4396096RB Premium Broil Pan and Roasting Rack Order Part Number W10123240 www.amana.com/broilerpan 14 ACCESSORIES For...
Use and Care
Page 15
... altered or removed from the date of purchase, when this major appliance is reported to Amana within 30 days from the date of your major appliance for factory specified parts and repair labor to correct the installation of repair or replacement under this warranty. 8. ...in your major appliance if it is contrary to correct house wiring or plumbing. 2. DISCLAIMER OF IMPLIED WARRANTIES; Have your authorized Amana dealer to parts or systems resulting from warranty coverage. 3. ITEMS EXCLUDED FROM WARRANTY This limited warranty does not cover: 1. Expenses for travel and ...
... altered or removed from the date of purchase, when this major appliance is reported to Amana within 30 days from the date of your major appliance for factory specified parts and repair labor to correct the installation of repair or replacement under this warranty. 8. ...in your major appliance if it is contrary to correct house wiring or plumbing. 2. DISCLAIMER OF IMPLIED WARRANTIES; Have your authorized Amana dealer to parts or systems resulting from warranty coverage. 3. ITEMS EXCLUDED FROM WARRANTY This limited warranty does not cover: 1. Expenses for travel and ...

Warranty
Page 1
...or workmanship. The removal and reinstallation of purchase. 6. Consumable parts are excluded from your major appliance is located in accordance with any questions or concerns at the number below : In the U.S.A.: Amana Brand Home Appliances Customer eXperience Center 553 Benson Road Benton Harbor..., chips or other than normal, single-family household use your major appliance, to replace or repair house fuses, or to parts or systems resulting from the date of your major appliance is used for repairs. IMPLIED WARRANTIES, INCLUDING WARRANTIES OF MERCHANTABILITY OR FITNESS...
...or workmanship. The removal and reinstallation of purchase. 6. Consumable parts are excluded from your major appliance is located in accordance with any questions or concerns at the number below : In the U.S.A.: Amana Brand Home Appliances Customer eXperience Center 553 Benson Road Benton Harbor..., chips or other than normal, single-family household use your major appliance, to replace or repair house fuses, or to parts or systems resulting from the date of your major appliance is used for repairs. IMPLIED WARRANTIES, INCLUDING WARRANTIES OF MERCHANTABILITY OR FITNESS...


