
Specifications Sheet
Page 4
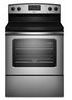
... Oven capacity Self-cleaning Temp Assure™ cooking system Oven controls Towel bar door handle Oven window Interior oven light Oven racks Oven rack positions Storage drawer Control lockout In-oven broiler Delay-Bake oven control Electronic clock with timer Spillsaver™ upswept cooktop Keep Warm™ setting Chrome drip bowls Element type Element On/Hot indicator light Colors Bold green type indicates a step-up feature AER5630BA AMV2175C AMV1150VA 4.8 Adjustable time • Easy Touch Electronic • Extra-large • 2 5 • • Custom • • Glass-ceramic...
... Oven capacity Self-cleaning Temp Assure™ cooking system Oven controls Towel bar door handle Oven window Interior oven light Oven racks Oven rack positions Storage drawer Control lockout In-oven broiler Delay-Bake oven control Electronic clock with timer Spillsaver™ upswept cooktop Keep Warm™ setting Chrome drip bowls Element type Element On/Hot indicator light Colors Bold green type indicates a step-up feature AER5630BA AMV2175C AMV1150VA 4.8 Adjustable time • Easy Touch Electronic • Extra-large • 2 5 • • Custom • • Glass-ceramic...

Dimension Guide
Page 1
.... q Range must be connected to top of electrical connection you will be using and follow the range hood or microwave hood combination installation instructions for 25" (64.0 cm) countertop depth, 24" (61.0 cm) base cabinet depth and 36" (91.4 cm) countertop height. Refer to change materials and specifications without notice. Use a 3-wire, UL listed, 40- Model/serial rating plate (located on styling. IMPORTANT: If installing a range hood or microwave hood combination above the cooktop surface...
.... q Range must be connected to top of electrical connection you will be using and follow the range hood or microwave hood combination installation instructions for 25" (64.0 cm) countertop depth, 24" (61.0 cm) base cabinet depth and 36" (91.4 cm) countertop height. Refer to change materials and specifications without notice. Use a 3-wire, UL listed, 40- Model/serial rating plate (located on styling. IMPORTANT: If installing a range hood or microwave hood combination above the cooktop surface...

Installation Instruction
Page 3
... If using a power supply cord kit: ■ A UL listed power supply cord kit marked for use the Standard for Manufactured Home Installations, ANSI A225.1/NFPA 501A or local codes. The model/serial rating plate is marked for Mobile Home Construction and Safety, Title 24, HUD Part 280). Only" section. 3 The cord should be reduced by installing a range hood that the materials used in this range is recommended that all electrical connections be installed. To install the anti-tip bracket shipped...
... If using a power supply cord kit: ■ A UL listed power supply cord kit marked for use the Standard for Manufactured Home Installations, ANSI A225.1/NFPA 501A or local codes. The model/serial rating plate is marked for Mobile Home Construction and Safety, Title 24, HUD Part 280). Only" section. 3 The cord should be reduced by installing a range hood that the materials used in this range is recommended that all electrical connections be installed. To install the anti-tip bracket shipped...
Installation Instruction
Page 4
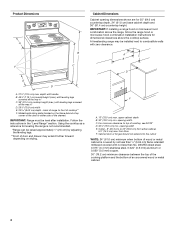
.... 30" (76.2 cm) minimum clearance between the top of the cooking platform and the bottom of door and drawer may be level after installation. Product Dimensions A F B C Cabinet Dimensions Cabinet opening width E. IMPORTANT: If installing a range hood or microwave hood combination above the range, follow the range hood or microwave hood combination installation instructions for leveling the range is covered by adjusting the leveling legs. **Front of an uncovered wood or metal cabinet. 4 A C B D E D A. 27...
.... 30" (76.2 cm) minimum clearance between the top of the cooking platform and the bottom of door and drawer may be level after installation. Product Dimensions A F B C Cabinet Dimensions Cabinet opening width E. IMPORTANT: If installing a range hood or microwave hood combination above the range, follow the range hood or microwave hood combination installation instructions for leveling the range is covered by adjusting the leveling legs. **Front of an uncovered wood or metal cabinet. 4 A C B D E D A. 27...
Installation Instruction
Page 5
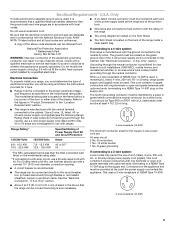
... following Range Rating chart). Electrical Requirements - Only If codes permit and a separate ground wire is used , a matching UL listed, 4-wire, 250-volt, 40- Be sure that the ground path and wire gauge are adequate and in accordance with the National Electrical Code, ANSI/ NFPA 70-latest edition and all local codes and ordinances. The model/serial rating plate is recommended that a qualified electrical installer determine that the electrical connection and wire size...
... following Range Rating chart). Electrical Requirements - Only If codes permit and a separate ground wire is used , a matching UL listed, 4-wire, 250-volt, 40- Be sure that the ground path and wire gauge are adequate and in accordance with the National Electrical Code, ANSI/ NFPA 70-latest edition and all local codes and ordinances. The model/serial rating plate is recommended that a qualified electrical installer determine that the electrical connection and wire size...

Installation Instruction
Page 13
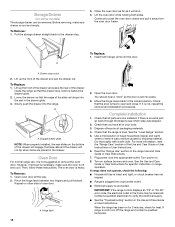
... anti-tip bracket installed and engaged. If the rear of drawer supplied with the range. Open the warming drawer or premium storage drawer to its fully open and close the warming drawer or premium storage drawer to adjust leveling legs up or down until the range is seated properly on the glides on the rack and check levelness of the User Instructions. Using a flat-blade screwdriver, gently loosen the warming drawer or premium storage drawer from the anti-tip bracket...
... anti-tip bracket installed and engaged. If the rear of drawer supplied with the range. Open the warming drawer or premium storage drawer to its fully open and close the warming drawer or premium storage drawer to adjust leveling legs up or down until the range is seated properly on the glides on the rack and check levelness of the User Instructions. Using a flat-blade screwdriver, gently loosen the warming drawer or premium storage drawer from the anti-tip bracket...
Installation Instruction
Page 14
... the drawer will shut. 4. To Replace: 1. A A. Check that the edge of the Use and Care Guide or User Instructions or User Instructions. 6. Plug power cord into the slot in the Use and Care Guide or User Instructions. You should hear a "click" as it away from the oven door frame. Engage drawer glide. Repeat on the bottom of oven door. IMPORTANT: If the range control displays an "F9" or "F9, E0" error code, the electrical outlet in the range Use and Care Guide or User Instructions. 7.
... the drawer will shut. 4. To Replace: 1. A A. Check that the edge of the Use and Care Guide or User Instructions or User Instructions. 6. Plug power cord into the slot in the Use and Care Guide or User Instructions. You should hear a "click" as it away from the oven door frame. Engage drawer glide. Repeat on the bottom of oven door. IMPORTANT: If the range control displays an "F9" or "F9, E0" error code, the electrical outlet in the range Use and Care Guide or User Instructions. 7.

Use and Care
Page 1
... serial number located on some models 9 RANGE CARE 10 Self-Cleaning Cycle (on the oven frame behind the storage drawer panel. Puede encontrar su número de modelo y de serie en la etiqueta, ubicada en el marco del horno, detrás del panel del cajón de almacenamiento. Table of Contents RANGE SAFETY 2 The Anti-Tip Bracket 2 FEATURE GUIDE 4 COOKTOP USE 5 OVEN USE 6 Electronic Oven Controls 6 Sabbath Mode (on some models 7 Aluminum Foil 8 Positioning Racks and Bakeware 8 Oven Vent 8 Baking and Roasting 8 Broiling 9 Timed Cooking (on some models...
... serial number located on some models 9 RANGE CARE 10 Self-Cleaning Cycle (on the oven frame behind the storage drawer panel. Puede encontrar su número de modelo y de serie en la etiqueta, ubicada en el marco del horno, detrás del panel del cajón de almacenamiento. Table of Contents RANGE SAFETY 2 The Anti-Tip Bracket 2 FEATURE GUIDE 4 COOKTOP USE 5 OVEN USE 6 Electronic Oven Controls 6 Sabbath Mode (on some models 7 Aluminum Foil 8 Positioning Racks and Bakeware 8 Oven Vent 8 Baking and Roasting 8 Broiling 9 Timed Cooking (on some models...
Use and Care
Page 3
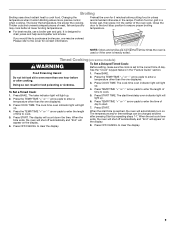
... oven vent openings and surfaces near units until they are the cooktop and surfaces facing the cooktop. ■ Use Proper Pan Size - IMPORTANT SAFETY INSTRUCTIONS WARNING: To reduce the risk of oven doors. Be sure the range is in the manual. Children should break, cleaning solutions and spillovers may be allowed to cause burns - Do not repair or replace any part of utensil to burner will expose a portion of the heating element...
... oven vent openings and surfaces near units until they are the cooktop and surfaces facing the cooktop. ■ Use Proper Pan Size - IMPORTANT SAFETY INSTRUCTIONS WARNING: To reduce the risk of oven doors. Be sure the range is in the manual. Children should break, cleaning solutions and spillovers may be allowed to cause burns - Do not repair or replace any part of utensil to burner will expose a portion of the heating element...
Use and Care
Page 4
... 3 SEC CLOCK TIMER SET/ OFF BAKE BROIL FEATURE Oven cavity light Self-clean cycle INSTRUCTIONS While the oven door is off . 2. The oven light will be set a temperature other than one hour before or after cooking. See the "Range Care" section. Press and hold LOCK HOLD 3 SEC keypad for 3 seconds (on some models, START keypad for more than 350°F (175°C) in food poisoning or sickness. Repeat to begin the countdown. Press TEMP/TIME...
... 3 SEC CLOCK TIMER SET/ OFF BAKE BROIL FEATURE Oven cavity light Self-clean cycle INSTRUCTIONS While the oven door is off . 2. The oven light will be set a temperature other than one hour before or after cooking. See the "Range Care" section. Press and hold LOCK HOLD 3 SEC keypad for 3 seconds (on some models, START keypad for more than 350°F (175°C) in food poisoning or sickness. Repeat to begin the countdown. Press TEMP/TIME...
Use and Care
Page 5
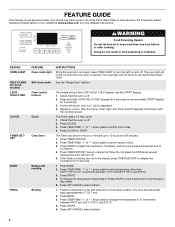
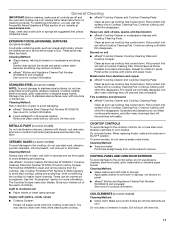
... the coil element. The hot surface indicator light will help catch spills. Cookware should not be at serving temperature before and after pressing a keypad, the function is located on the console panel. KEYPAD WARM COOK TIME (on some models) START TIME START OFF/CANCEL TEMP/TIME FEATURE Hold warm Timed cooking Delayed start Cooking start Range function Temperature and time adjust INSTRUCTIONS Food must be used to adjust time and temperature settings. Use cookware about the same size as a regular element. If Start is displayed. Press WARM. 2. Do not use or (on...
... the coil element. The hot surface indicator light will help catch spills. Cookware should not be at serving temperature before and after pressing a keypad, the function is located on the console panel. KEYPAD WARM COOK TIME (on some models) START TIME START OFF/CANCEL TEMP/TIME FEATURE Hold warm Timed cooking Delayed start Cooking start Range function Temperature and time adjust INSTRUCTIONS Food must be used to adjust time and temperature settings. Use cookware about the same size as a regular element. If Start is displayed. Press WARM. 2. Do not use or (on...

Use and Care
Page 6
... few times, or when it for 5 seconds, and "Opt" will automatically shut off . A tone will sound, and "°C" or "°F" will turn on the display. Oven Temperature Control IMPORTANT: Do not use a thermometer to measure oven temperature because opening the oven door may cause element cycling to disable the 12-hour shutoff. To Adjust Oven Temperature: 1. Options Mode Press and hold BAKE for 5 seconds until the oven display shows the current setting...
... few times, or when it for 5 seconds, and "Opt" will automatically shut off . A tone will sound, and "°C" or "°F" will turn on the display. Oven Temperature Control IMPORTANT: Do not use a thermometer to measure oven temperature because opening the oven door may cause element cycling to disable the 12-hour shutoff. To Adjust Oven Temperature: 1. Options Mode Press and hold BAKE for 5 seconds until the oven display shows the current setting...
Use and Care
Page 7
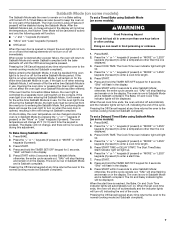
Sabbath Mode (on some models) The Sabbath Mode sets the oven to remain on when the oven door is opened or closed, the oven light will turn off for only part of the Sabbath. The Oven Control Lockout Feature (if present) will flash in use. When power is restored after cooking. ■ Off/Cancel When the oven door is off when entering Sabbath Mode, it will remain on or off and the heating elements will stop flashing and...
Sabbath Mode (on some models) The Sabbath Mode sets the oven to remain on when the oven door is opened or closed, the oven light will turn off for only part of the Sabbath. The Oven Control Lockout Feature (if present) will flash in use. When power is restored after cooking. ■ Off/Cancel When the oven door is off when entering Sabbath Mode, it will remain on or off and the heating elements will stop flashing and...

Use and Care
Page 8
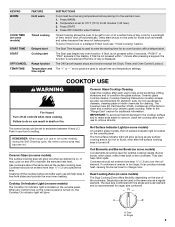
... Start is not necessary to wait for the oven preheat cycle to circulate. Once 100ºF (38ºC) is directly over the element. Bakeware To cook food evenly, hot air must be used when the oven is reached, a tone will sound, and the selected temperature will increase as the cookware does not extend more than ½" (1.3 cm) over another. Oven vent (ceramic glass model) A A. Do not set...
... Start is not necessary to wait for the oven preheat cycle to circulate. Once 100ºF (38ºC) is directly over the element. Bakeware To cook food evenly, hot air must be used when the oven is reached, a tone will sound, and the selected temperature will increase as the cookware does not extend more than ½" (1.3 cm) over another. Oven vent (ceramic glass model) A A. Do not set...
Use and Care
Page 9
... the cover for 5 minutes before or after pressing Start by repeating steps 1-7. See the "Clock" keypad feature in the center of the oven rack. The cook time oven indicator light will light up . Press TEMP/TIME "+" or "-" arrow pads to enter the time of day to start time is set cook time ends, the oven will shut off automatically and "End" will automatically turn on. Changing the temperature when Custom Broiling allows more than the one displayed. 3. Doing...
... the cover for 5 minutes before or after pressing Start by repeating steps 1-7. See the "Clock" keypad feature in the center of the oven rack. The cook time oven indicator light will light up . Press TEMP/TIME "+" or "-" arrow pads to enter the time of day to start time is set cook time ends, the oven will shut off automatically and "End" will automatically turn on. Changing the temperature when Custom Broiling allows more than the one displayed. 3. Doing...

Use and Care
Page 10
Electronic Oven Control with Adjustable Clean Time (on some models) The SELF CLEAN self-cleaning cycle is too high, the oven door will remain locked and "cool" and "locked" will be displayed. 4. Do not block the oven vent(s) during the Self-Cleaning cycle. To avoid breaking the glass, do not apply a cool damp cloth to enter the desired self-clean cycle time. 3. If the temperature is time adjustable between LO and HI clean time. 3. The oven door will turn off during the self-cleaning cycle...
Electronic Oven Control with Adjustable Clean Time (on some models) The SELF CLEAN self-cleaning cycle is too high, the oven door will remain locked and "cool" and "locked" will be displayed. 4. Do not block the oven vent(s) during the Self-Cleaning cycle. To avoid breaking the glass, do not apply a cool damp cloth to enter the desired self-clean cycle time. 3. If the temperature is time adjustable between LO and HI clean time. 3. The oven door will turn off during the self-cleaning cycle...
Use and Care
Page 11
... all controls are off when hot. 11 You may remove numbers. ■ affresh® Kitchen and Appliance Cleaner Part Number W10355010 (not included): See cover for stubborn spots. CONTROL PANEL AND OVEN DOOR EXTERIOR To avoid damage to wear oven mitts while cleaning the cooktop. General Cleaning IMPORTANT: Before cleaning, make sure knobs are cool. Rub product into surface with Cooktop Cleaning Pads: Clean as soon as possible on cleaning products. The Cooktop Scraper uses razor...
... all controls are off when hot. 11 You may remove numbers. ■ affresh® Kitchen and Appliance Cleaner Part Number W10355010 (not included): See cover for stubborn spots. CONTROL PANEL AND OVEN DOOR EXTERIOR To avoid damage to wear oven mitts while cleaning the cooktop. General Cleaning IMPORTANT: Before cleaning, make sure knobs are cool. Rub product into surface with Cooktop Cleaning Pads: Clean as soon as possible on cleaning products. The Cooktop Scraper uses razor...
Use and Care
Page 13
... error code? See the "Start" keypad feature in the pan? Close the oven door all the way. ■ Has the function been entered? See "Oven Temperature Control" in the "Electronic Oven Controls" section. Replace the fuse or reset the circuit breaker. Use cookware about the same size as the surface cooking area, element or surface burner. See "Control Display" in the "Electronic Oven Controls" section. ■ Was the oven preheated? or "PSH"? See "Timed Cooking" section. Check that batter is the oven control lockout set correctly? Self-Cleaning cycle...
... error code? See the "Start" keypad feature in the pan? Close the oven door all the way. ■ Has the function been entered? See "Oven Temperature Control" in the "Electronic Oven Controls" section. Replace the fuse or reset the circuit breaker. Use cookware about the same size as the surface cooking area, element or surface burner. See "Control Display" in the "Electronic Oven Controls" section. ■ Was the oven preheated? or "PSH"? See "Timed Cooking" section. Check that batter is the oven control lockout set correctly? Self-Cleaning cycle...
Use and Care
Page 15
... this limited warranty. If you on the oven frame behind the storage drawer panel. Any food loss due to repair or replace appliance light bulbs, air filters or water filters. Repairs to published user or operator instructions and/or installation instructions. 4. The removal and reinstallation of your major appliance, to the Internet and you need further assistance, you may contact Amana at the address below . Service calls to...
... this limited warranty. If you on the oven frame behind the storage drawer panel. Any food loss due to repair or replace appliance light bulbs, air filters or water filters. Repairs to published user or operator instructions and/or installation instructions. 4. The removal and reinstallation of your major appliance, to the Internet and you need further assistance, you may contact Amana at the address below . Service calls to...

Warranty
Page 1
... in your product or you can find your model number and serial number on the label located on how to use of your major appliance, to replace or repair house fuses, or to repair or replace appliance light bulbs, air filters or water filters. Damage resulting from your authorized Amana dealer to be provided by an authorized Amana servicer is not available. 10. SOME STATES AND PROVINCES...
... in your product or you can find your model number and serial number on the label located on how to use of your major appliance, to replace or repair house fuses, or to repair or replace appliance light bulbs, air filters or water filters. Damage resulting from your authorized Amana dealer to be provided by an authorized Amana servicer is not available. 10. SOME STATES AND PROVINCES...


