Use and Care
Page 4
...element. Other surfaces of the appliance may subject wiring or components underneath to damage. ■ Protective Liners - Do not repair or replace any part of the range unless specifically recommended in oven. ■ DO NOT TOUCH HEATING ELEMENTS OR INTERIOR SURFACES OF OVEN - Do not use . ...electric shock, or fire. ■ Glazed Cooking Utensils - They should be immersed in desired location while oven is used in or around any part of the range. ■ Wear Proper Apparel - Boilover causes smoking and greasy spillovers that it is equipped with one or more surface units ...
...element. Other surfaces of the appliance may subject wiring or components underneath to damage. ■ Protective Liners - Do not repair or replace any part of the range unless specifically recommended in oven. ■ DO NOT TOUCH HEATING ELEMENTS OR INTERIOR SURFACES OF OVEN - Do not use . ...electric shock, or fire. ■ Glazed Cooking Utensils - They should be immersed in desired location while oven is used in or around any part of the range. ■ Wear Proper Apparel - Boilover causes smoking and greasy spillovers that it is equipped with one or more surface units ...

Use and Care
Page 8
... the pan from the bottom (1) to stop position before turning or removing food. Very thin cuts of fish, poultry or meat may be adjusted for Part Number 4396923. ■ For proper draining, do not cover the grid with the element. 3. Before broiling, position rack according to OFF when finished. For diagram...
... the pan from the bottom (1) to stop position before turning or removing food. Very thin cuts of fish, poultry or meat may be adjusted for Part Number 4396923. ■ For proper draining, do not cover the grid with the element. 3. Before broiling, position rack according to OFF when finished. For diagram...
Use and Care
Page 9
... the cooktop controls, do not use steel wool, abrasive cleansers or oven cleaner. OVEN AND ROASTING RACKS ■ All-Purpose Appliance Cleaner Part Number 31682 (not included): See "Assistance or Service" section to order. For more information, see "Coil Elements and Burner Bowls." These... bowls ■ Warm, soapy water or dishwasher ■ Oven cleaner: Follow product label instructions. ■ Gas Grate and Drip Pan Cleaner Part Number 31617 (not included): See "Assistance or Service" section to remove. To avoid damage, do not remove seals under knobs. Cleaning Method:...
... the cooktop controls, do not use steel wool, abrasive cleansers or oven cleaner. OVEN AND ROASTING RACKS ■ All-Purpose Appliance Cleaner Part Number 31682 (not included): See "Assistance or Service" section to order. For more information, see "Coil Elements and Burner Bowls." These... bowls ■ Warm, soapy water or dishwasher ■ Oven cleaner: Follow product label instructions. ■ Gas Grate and Drip Pan Cleaner Part Number 31617 (not included): See "Assistance or Service" section to remove. To avoid damage, do not remove seals under knobs. Cleaning Method:...
Use and Care
Page 11
.... ■ Use and maintenance procedures. ■ Accessory and repair parts sales. ■ Specialized customer assistance (Spanish speaking, hearing impaired, limited vision, etc.). ■ Referrals to cover the edge of a service call Amana® Appliances toll free: 1-800-843-0304. Slow baking or ... afterwarranty service, anywhere in longer cooking times. Use aluminum foil to local dealers, repair parts distributors and service companies. ASSISTANCE OR SERVICE Before calling for oven to Amana® Appliances with : ■ Features and specifications on the bottom? If you can...
.... ■ Use and maintenance procedures. ■ Accessory and repair parts sales. ■ Specialized customer assistance (Spanish speaking, hearing impaired, limited vision, etc.). ■ Referrals to cover the edge of a service call Amana® Appliances toll free: 1-800-843-0304. Slow baking or ... afterwarranty service, anywhere in longer cooking times. Use aluminum foil to local dealers, repair parts distributors and service companies. ASSISTANCE OR SERVICE Before calling for oven to Amana® Appliances with : ■ Features and specifications on the bottom? If you can...

Use and Care
Page 12
... down the following information about your major appliance is covered by an Amana designated service company. Service calls to refrigerator or freezer product failures. 7. Expenses for travel and transportation for factory specified parts and repair labor to be provided by this book and your major .... Repairs to use of consumables or cleaning products not approved by calling Amana. The cost of repair or replacement under this information on the model and serial number label located on how to parts or systems resulting from the date of purchase. 6. Outside the 50...
... down the following information about your major appliance is covered by an Amana designated service company. Service calls to refrigerator or freezer product failures. 7. Expenses for travel and transportation for factory specified parts and repair labor to be provided by this book and your major .... Repairs to use of consumables or cleaning products not approved by calling Amana. The cost of repair or replacement under this information on the model and serial number label located on how to parts or systems resulting from the date of purchase. 6. Outside the 50...

Warranty
Page 1
...to instructions attached to or furnished with the product, Amana brand of Whirlpool Corporation or Whirlpool Canada LP (hereafter "Amana") will need service, first see the "Troubleshooting" section of the Use & Care Guide. Consumable parts are excluded from defects in materials or workmanship. ... not installed in which it was purchased. Repairs when your authorized Amana dealer to correct defects in materials or workmanship and is required to refrigerator or freezer product failures. 7. Repairs to parts or systems resulting from accident, alteration, misuse, abuse, fire, flood...
...to instructions attached to or furnished with the product, Amana brand of Whirlpool Corporation or Whirlpool Canada LP (hereafter "Amana") will need service, first see the "Troubleshooting" section of the Use & Care Guide. Consumable parts are excluded from defects in materials or workmanship. ... not installed in which it was purchased. Repairs when your authorized Amana dealer to correct defects in materials or workmanship and is required to refrigerator or freezer product failures. 7. Repairs to parts or systems resulting from accident, alteration, misuse, abuse, fire, flood...
Installation Instruction
Page 2
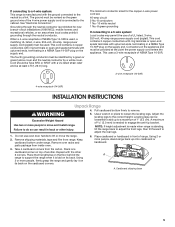
... will follow the instructions provided with any tools listed here. Tools needed Parts supplied Check that can happen if the instructions are included. INSTALLATION REQUIREMENTS Tools and Parts Gather the required tools and parts before starting installation. Always read and obey all parts are not followed. A ■ Tape measure ■ Masking tape ■ Flat...
... will follow the instructions provided with any tools listed here. Tools needed Parts supplied Check that can happen if the instructions are included. INSTALLATION REQUIREMENTS Tools and Parts Gather the required tools and parts before starting installation. Always read and obey all parts are not followed. A ■ Tape measure ■ Masking tape ■ Flat...
Installation Instruction
Page 3
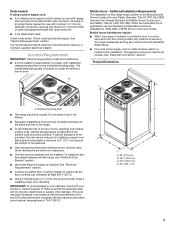
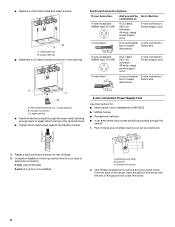
... clearances. ■ The floor anti-tip bracket must be secured to the Manufactured Home Construction and Safety Standard, Title 24 CFR, Part 3280 (formerly the Federal Standard for use with installation clearances specified on under range if installing range over heated surface units, cabinet storage... a range hood that projects horizontally a minimum of 5" (12.7 cm) beyond the bottom of 194°F (90°C). Check existing electrical supply. Parts needed If using a power supply cord: ■ A UL listed power supply cord kit marked for use with the range, see "Install Anti-Tip ...
... clearances. ■ The floor anti-tip bracket must be secured to the Manufactured Home Construction and Safety Standard, Title 24 CFR, Part 3280 (formerly the Federal Standard for use with installation clearances specified on under range if installing range over heated surface units, cabinet storage... a range hood that projects horizontally a minimum of 5" (12.7 cm) beyond the bottom of 194°F (90°C). Check existing electrical supply. Parts needed If using a power supply cord: ■ A UL listed power supply cord kit marked for use with the range, see "Install Anti-Tip ...
Installation Instruction
Page 5
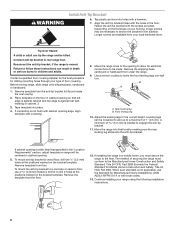
... made when range is standing, tilt the range back to adjust the front legs, then tilt forward to a maximum of another. Remove oven racks and parts package from range. Take 4 cardboard corners from the carton. A. Cord should be Type SRD or SRDT with a UL listed strain relief and be loosened to...
... made when range is standing, tilt the range back to adjust the front legs, then tilt forward to a maximum of another. Remove oven racks and parts package from range. Take 4 cardboard corners from the carton. A. Cord should be Type SRD or SRDT with a UL listed strain relief and be loosened to...
Installation Instruction
Page 6
... the floor in death or serious burns to the Manufactured Home Construction and Safety Standard, Title 24 CFR, Part 3280 (formerly the Federal Standard for Mobile Home Construction and Safety, Title 24, HUD Part 280). Remove the template from floor. Continue installing your type of securing the range must secure the range...
... the floor in death or serious burns to the Manufactured Home Construction and Safety Standard, Title 24 CFR, Part 3280 (formerly the Federal Standard for Mobile Home Construction and Safety, Title 24, HUD Part 280). Remove the template from floor. Continue installing your type of securing the range must secure the range...
Installation Instruction
Page 8
A C B A. Part of the range. Use Phillips screwdriver to remove the ground-link screw from the back of metal ground strap must be Go to Section: connecting ...
A C B A. Part of the range. Use Phillips screwdriver to remove the ground-link screw from the back of metal ground strap must be Go to Section: connecting ...
Installation Instruction
Page 10
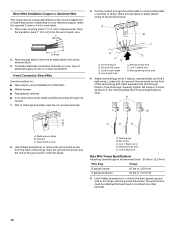
... Torque Specifications chart. Discard C. Bare (green) ground wire 4. Use Phillips screwdriver to the circuit breaker box or fused disconnect. A. Cord/conduit plate D. Line 1 (black) wire G. Part of each wire. 1" (2.5 cm) 3" (7.6 cm) 2. A B A B C C D E A. Direct Wire Installation: Copper or Aluminum Wire This range may be connected directly to remove the ground-link screw from...
... Torque Specifications chart. Discard C. Bare (green) ground wire 4. Use Phillips screwdriver to the circuit breaker box or fused disconnect. A. Cord/conduit plate D. Line 1 (black) wire G. Part of each wire. 1" (2.5 cm) 3" (7.6 cm) 2. A B A B C C D E A. Direct Wire Installation: Copper or Aluminum Wire This range may be connected directly to remove the ground-link screw from...
Installation Instruction
Page 12
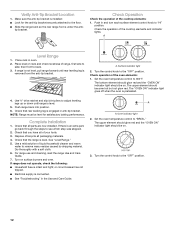
...position. Use a mild solution of the cooktop elements and indicator lights. If range does not operate, check the following: ■ Household fuse is an extra part, go back through the steps to remove waxy residue caused by shipping material. Set the oven temperature control to the "OFF" position. 12 Check the... oven elements: 1. Push in anti-tip bracket. Place rack in the Use and Care Guide. If there is intact and tight; Check that all parts are now installed. The "OVEN ON" indicator light goes off when the oven is level. The upper element should glow red and the "OVEN ON...
...position. Use a mild solution of the cooktop elements and indicator lights. If range does not operate, check the following: ■ Household fuse is an extra part, go back through the steps to remove waxy residue caused by shipping material. Set the oven temperature control to the "OFF" position. 12 Check the... oven elements: 1. Push in anti-tip bracket. Place rack in the Use and Care Guide. If there is intact and tight; Check that all parts are now installed. The "OVEN ON" indicator light goes off when the oven is level. The upper element should glow red and the "OVEN ON...


