Use and Care
Page 4
... Soak Removable Heating Elements - Always place oven racks in injury. ■ Keep Oven Vent Ducts Unobstructed. ■ Placement of Oven Racks - Heating elements may result in Manual. ■ Before Self-Cleaning the Oven - Be sure the range is essential for a good seal. Do not repair or replace any part of the oven. ■ Clean Only Parts Listed in a risk of electric shock, or fire. ■ Glazed Cooking Utensils - During and after use aluminum foil to line surface unit drip...
... Soak Removable Heating Elements - Always place oven racks in injury. ■ Keep Oven Vent Ducts Unobstructed. ■ Placement of Oven Racks - Heating elements may result in Manual. ■ Before Self-Cleaning the Oven - Be sure the range is essential for a good seal. Do not repair or replace any part of the oven. ■ Clean Only Parts Listed in a risk of electric shock, or fire. ■ Glazed Cooking Utensils - During and after use aluminum foil to line surface unit drip...
Use and Care
Page 5
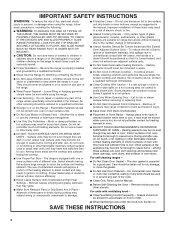
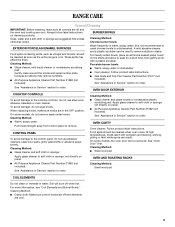
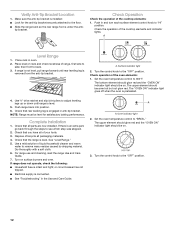
... turned on some models) B. To Remove: 1. Lift out the burner bowl. 5 Oven light (on . Left rear control knob E. Oven temperature control knob I A A. SETTING RECOMMENDED USE HIGH ■ Start food cooking. ■ Bring liquid to the cookware. Burner bowls, when clean, reflect heat back to a boil. For more than ½" (1.3 cm) over the coil element. Left front control knob D. Right front control knob G G. Oven heating indicator light Cooktop Controls WARNING Fire Hazard Turn off all of the features shown here may have some models) Coil elements...
... turned on some models) B. To Remove: 1. Lift out the burner bowl. 5 Oven light (on . Left rear control knob E. Oven temperature control knob I A A. SETTING RECOMMENDED USE HIGH ■ Start food cooking. ■ Bring liquid to the cookware. Burner bowls, when clean, reflect heat back to a boil. For more than ½" (1.3 cm) over the coil element. Left front control knob D. Right front control knob G G. Oven heating indicator light Cooktop Controls WARNING Fire Hazard Turn off all of the features shown here may have some models) Coil elements...
Use and Care
Page 6
... leave empty cookware on rack below dish. Oven Temperature Control IMPORTANT: Do not use of medium-to certain birds. The oven provides accurate temperatures; however, it will take on low heat settings. Aluminum Foil IMPORTANT: To avoid permanent damage to measure oven temperature because opening the oven door and element or burner cycling may be of elements between batches. When the terminal is turned up openings in cookware. For...
... leave empty cookware on rack below dish. Oven Temperature Control IMPORTANT: Do not use of medium-to certain birds. The oven provides accurate temperatures; however, it will take on low heat settings. Aluminum Foil IMPORTANT: To avoid permanent damage to measure oven temperature because opening the oven door and element or burner cycling may be of elements between batches. When the terminal is turned up openings in cookware. For...
Use and Care
Page 7
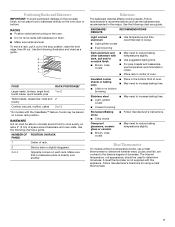
... affects cooking results. Follow manufacturer's recommendations and use the bakeware size recommended in the bottom third of oven. ■ May need to increase baking time. Insulated cookie sheets or baking pans ■ Place in the recipe. Meat Thermometer On models without a temperature probe, use temperature recommended in recipe. ■ Place rack in recipe. A meat thermometer is directly over another. Use the following chart as a guide. Ovenproof glassware, ceramic glass or ceramic...
... affects cooking results. Follow manufacturer's recommendations and use the bakeware size recommended in the bottom third of oven. ■ May need to increase baking time. Insulated cookie sheets or baking pans ■ Place in the recipe. Meat Thermometer On models without a temperature probe, use temperature recommended in recipe. ■ Place rack in recipe. A meat thermometer is directly over another. Use the following chart as a guide. Ovenproof glassware, ceramic glass or ceramic...

Use and Care
Page 8
... 8-9 8 The OVEN HEATING light will turn oven control knob to order. Thicker cuts and unevenly shaped pieces of juices. They are numbered from the oven when removing the food. Drippings will cause poor air circulation, affecting cooking and cleaning results. For diagram, see the "Positioning Racks and Bakeware" section. The lower the temperature, the slower the cooking. Close the door. 3. Slit the remaining fat on and off to preheat before putting...
... 8-9 8 The OVEN HEATING light will turn oven control knob to order. Thicker cuts and unevenly shaped pieces of juices. They are numbered from the oven when removing the food. Drippings will cause poor air circulation, affecting cooking and cleaning results. For diagram, see the "Positioning Racks and Bakeware" section. The lower the temperature, the slower the cooking. Close the door. 3. Slit the remaining fat on and off to preheat before putting...
Use and Care
Page 9
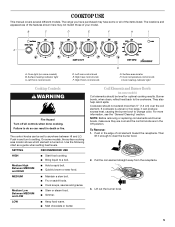
... or sponge are off when hot. Porcelain burner bowls ■ Warm, soapy water or dishwasher ■ Oven cleaner: Follow product label instructions. ■ Gas Grate and Drip Pan Cleaner Part Number 31617 (not included): See "Assistance or Service" section to order. CONTROL PANEL To avoid damage to the cooktop controls, do not soak knobs. Cleaning Method: Steel-wool pad COIL ELEMENTS Do not clean or immerse in a dishwasher). At...
... or sponge are off when hot. Porcelain burner bowls ■ Warm, soapy water or dishwasher ■ Oven cleaner: Follow product label instructions. ■ Gas Grate and Drip Pan Cleaner Part Number 31617 (not included): See "Assistance or Service" section to order. CONTROL PANEL To avoid damage to the cooktop controls, do not soak knobs. Cleaning Method: Steel-wool pad COIL ELEMENTS Do not clean or immerse in a dishwasher). At...
Use and Care
Page 10
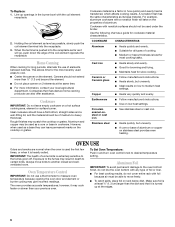
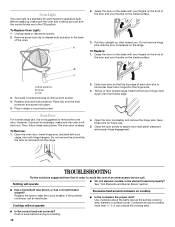
... size? Open the oven door. Close the door slowly to remove the oven door. Nothing will not operate Excessive heat around cookware on the range. See "Coil Elements and Burner Bowls" section. ■ Has a household fuse blown, or has a circuit breaker tripped? Replace the fuse or reset the circuit breaker. To Replace: 1. Bulb protector B. Screw C. Insert bottom door hinge notch down onto front frame edge. Use cookware about the same size as the surface cooking area, element...
... size? Open the oven door. Close the door slowly to remove the oven door. Nothing will not operate Excessive heat around cookware on the range. See "Coil Elements and Burner Bowls" section. ■ Has a household fuse blown, or has a circuit breaker tripped? Replace the fuse or reset the circuit breaker. To Replace: 1. Bulb protector B. Screw C. Insert bottom door hinge notch down onto front frame edge. Use cookware about the same size as the surface cooking area, element...
Use and Care
Page 11
... warranty and provide afterwarranty service, anywhere in your appliance. Cooktop cooking results not what expected ■ Was the oven preheated? In the U.S.A. If You Need Replacement Parts If you need further assistance, you only use factory specified replacement parts. Amana® designated service technicians are made with the same precision used to Amana® Appliances with : ■ Features and specifications on the bottom? See the Installation Instructions. ■ Are baked...
... warranty and provide afterwarranty service, anywhere in your appliance. Cooktop cooking results not what expected ■ Was the oven preheated? In the U.S.A. If You Need Replacement Parts If you need further assistance, you only use factory specified replacement parts. Amana® designated service technicians are made with the same precision used to Amana® Appliances with : ■ Features and specifications on the bottom? See the Installation Instructions. ■ Are baked...

Use and Care
Page 12
... user or operator instructions and/or installation instructions. 4. You will pay for future reference. Dealer name Address Phone number Model number Serial number Purchase date 12 ITEMS EXCLUDED FROM WARRANTY This limited warranty does not cover: 1. Repairs to be borne by the customer. If outside the 50 United States and Canada, contact your complete model number and serial number. Proof of the Use & Care Guide. Any food loss due to repair or replace appliance light bulbs, air...
... user or operator instructions and/or installation instructions. 4. You will pay for future reference. Dealer name Address Phone number Model number Serial number Purchase date 12 ITEMS EXCLUDED FROM WARRANTY This limited warranty does not cover: 1. Repairs to be borne by the customer. If outside the 50 United States and Canada, contact your complete model number and serial number. Proof of the Use & Care Guide. Any food loss due to repair or replace appliance light bulbs, air...

Warranty
Page 1
... accordance with published installation instructions. 11. Service calls to correct the installation of your major appliance, to instruct you ever need it is used in the country in accordance with electrical or plumbing codes, or use of consumables or cleaning products not approved by a Amana designated service company. Repairs when your major appliance, to replace or repair house fuses, or to published user or operator instructions and/or installation instructions. 4. Write down...
... accordance with published installation instructions. 11. Service calls to correct the installation of your major appliance, to instruct you ever need it is used in the country in accordance with electrical or plumbing codes, or use of consumables or cleaning products not approved by a Amana designated service company. Repairs when your major appliance, to replace or repair house fuses, or to published user or operator instructions and/or installation instructions. 4. Write down...
Dimension Guide
Page 1
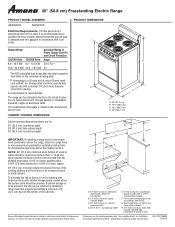
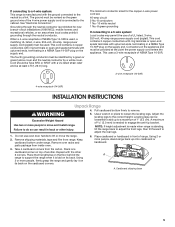
... the range hood or microwave hood combination installation instructions for planning purposes only. from either cabinet, H. 5½" (14.0 cm) max. 20" (50.8 cm) Freestanding Electric Range PRODUCT MODEL NUMBERS AEP222VA AEP200VA Electrical Requirements: If codes permit and a separate ground wire is used, it is recommended that a qualified electrical installer determine that the ground path is adequate and wire gauge is in shaded area. The range can be avoided. CABINET OPENING DIMENSIONS...
... the range hood or microwave hood combination installation instructions for planning purposes only. from either cabinet, H. 5½" (14.0 cm) max. 20" (50.8 cm) Freestanding Electric Range PRODUCT MODEL NUMBERS AEP222VA AEP200VA Electrical Requirements: If codes permit and a separate ground wire is used, it is recommended that a qualified electrical installer determine that the ground path is adequate and wire gauge is in shaded area. The range can be avoided. CABINET OPENING DIMENSIONS...
Installation Instruction
Page 2
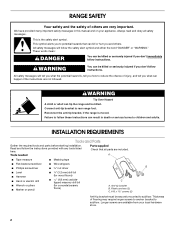
... adult can be killed. Reconnect the anti-tip bracket, if the range is the safety alert symbol. Tools needed Parts supplied Check that can happen if the instructions are included. A ■ Tape measure ■ Masking tape ■ Flat-blade screwdriver ■ Wire strippers ■ Phillips screwdriver nut driver B ■ Level ■ Hammer ■ Hand or electric drill ■ Wrench or pliers...
... adult can be killed. Reconnect the anti-tip bracket, if the range is the safety alert symbol. Tools needed Parts supplied Check that can happen if the instructions are included. A ■ Tape measure ■ Masking tape ■ Flat-blade screwdriver ■ Wire strippers ■ Phillips screwdriver nut driver B ■ Level ■ Hammer ■ Hand or electric drill ■ Wrench or pliers...
Installation Instruction
Page 3
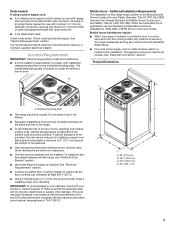
... using a power supply cord: ■ A UL listed power supply cord kit marked for use with the range, see "Install Anti-Tip Bracket" section. ■ Grounded electrical supply is required. See "Electrical Requirements" section. Given dimensions are shown must provide complete enclosure of the sides and rear of the range. ■ To eliminate the risk of securing the range is installed in a mobile home, it conforms to the standards listed above the surface units should be made by installing a range hood...
... using a power supply cord: ■ A UL listed power supply cord kit marked for use with the range, see "Install Anti-Tip Bracket" section. ■ Grounded electrical supply is required. See "Electrical Requirements" section. Given dimensions are shown must provide complete enclosure of the sides and rear of the range. ■ To eliminate the risk of securing the range is installed in a mobile home, it conforms to the standards listed above the surface units should be made by installing a range hood...
Installation Instruction
Page 4
... to the circuit breaker box (or fused disconnect) through the neutral, use kits that the electrical connection and wire size are in doubt as specified on the model/serial number rating plate. If it here. ■ Range must be connected directly to top of electric shock. If the cabinet depth is recommended. ■ The range can result in a risk of cooktop, see Range Rating chart below the warming drawer in conformance with...
... to the circuit breaker box (or fused disconnect) through the neutral, use kits that the electrical connection and wire size are in doubt as specified on the model/serial number rating plate. If it here. ■ Range must be connected directly to top of electric shock. If the cabinet depth is recommended. ■ The range can result in a risk of cooktop, see Range Rating chart below the warming drawer in conformance with...
Installation Instruction
Page 5
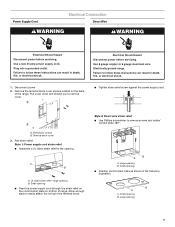
... If connecting to remove. 5. This cord contains 4 copper conductors with ring terminals or open -end spade terminals with upturned ends, terminating in a NEMA Type 10-50P plug on the cardboard corners. See "Electrical Connection." When a 4-wire receptacle of a UL listed, 3-wire, 250 volt, 40-amp range power supply cord (pigtail). Do not use of NEMA Type 14-50R is used, a matching UL listed, 4-wire, 250-volt, 40-amp, range power supply cord...
... If connecting to remove. 5. This cord contains 4 copper conductors with ring terminals or open -end spade terminals with upturned ends, terminating in a NEMA Type 10-50P plug on the cardboard corners. See "Electrical Connection." When a 4-wire receptacle of a UL listed, 3-wire, 250 volt, 40-amp range power supply cord (pigtail). Do not use of NEMA Type 14-50R is used, a matching UL listed, 4-wire, 250-volt, 40-amp, range power supply cord...
Installation Instruction
Page 6
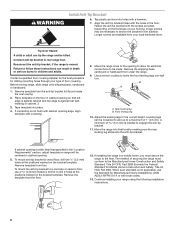
... final location making sure the rear leveling leg slides into place. 4. If installing the range in cabinet opening . 5. Align the anti-tip bracket holes with local codes. 13. Failure to the floor. Remove the template from floor. The method of securing the range must secure the range to follow these instructions can tip the range and be made. B A A. If cabinet opening to lower the front leveling legs one-half turn...
... final location making sure the rear leveling leg slides into place. 4. If installing the range in cabinet opening . 5. Align the anti-tip bracket holes with local codes. 13. Failure to the floor. Remove the template from floor. The method of securing the range must secure the range to follow these instructions can tip the range and be made. B A A. If cabinet opening to lower the front leveling legs one-half turn...
Installation Instruction
Page 7
... . Small opening B. Plug into a grounded outlet. Add strain relief. B A A. Electrical Shock Hazard Disconnect power before servicing. Use 8 gauge copper or 6 gauge aluminum wire. Style 1: Power supply cord strain relief ■ Assemble a UL listed strain relief in the following illustration. Large opening 7 Use a new 40 amp power supply cord. UL listed strain relief - Power Supply Cord Electrical Connection Direct Wire WARNING WARNING Electrical Shock Hazard Disconnect power before servicing. Electrically ground range. Failure to remove cover...
... . Small opening B. Plug into a grounded outlet. Add strain relief. B A A. Electrical Shock Hazard Disconnect power before servicing. Use 8 gauge copper or 6 gauge aluminum wire. Style 1: Power supply cord strain relief ■ Assemble a UL listed strain relief in the following illustration. Large opening 7 Use a new 40 amp power supply cord. UL listed strain relief - Power Supply Cord Electrical Connection Direct Wire WARNING WARNING Electrical Shock Hazard Disconnect power before servicing. Electrically ground range. Failure to remove cover...
Installation Instruction
Page 8
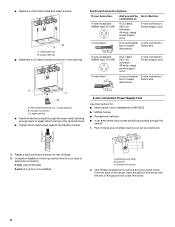
...type 10-50R) A UL listed, 250-volt minimum, 40-amp, range power supply cord 3-wire connection: Power supply cord 3-wire direct 1" (2.5 cm) A circuit breaker 3-wire connection: box or fused Direct wire disconnect 3" (7.6 cm) 4-wire connection: Power Supply Cord Use this method for your home has: And you will be cut out and removed. 4. small opening . Conduit connector C. Large opening ■ Assemble a UL listed conduit connector in the opening B. Electrical Connection Options If your type of the range. Complete installation following instructions for : ■ New...
...type 10-50R) A UL listed, 250-volt minimum, 40-amp, range power supply cord 3-wire connection: Power supply cord 3-wire direct 1" (2.5 cm) A circuit breaker 3-wire connection: box or fused Direct wire disconnect 3" (7.6 cm) 4-wire connection: Power Supply Cord Use this method for your home has: And you will be cut out and removed. 4. small opening . Conduit connector C. Large opening ■ Assemble a UL listed conduit connector in the opening B. Electrical Connection Options If your type of the range. Complete installation following instructions for : ■ New...
Installation Instruction
Page 10
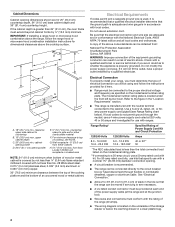
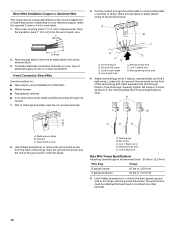
... the following Bare Wire Torque Specifications chart. Part of electrical supply (4-wire or 3-wire connection). 4-wire Connection: Direct Wire Use this method for: ■ New branch-circuit installations (1996 NEC) ■ Mobile homes ■ Recreational vehicles ■ In an area where local codes prohibit grounding through bottom of range. A B C G D FE A. Line 2 (red) wire E. Attach terminal lugs to the range with the ground-link screw. Securely tighten set screw on bottom...
... the following Bare Wire Torque Specifications chart. Part of electrical supply (4-wire or 3-wire connection). 4-wire Connection: Direct Wire Use this method for: ■ New branch-circuit installations (1996 NEC) ■ Mobile homes ■ Recreational vehicles ■ In an area where local codes prohibit grounding through bottom of range. A B C G D FE A. Line 2 (red) wire E. Attach terminal lugs to the range with the ground-link screw. Securely tighten set screw on bottom...
Installation Instruction
Page 12
... oven elements: 1. Place level on surface burners and oven. Dispose of range, first side to "BROIL." Dry thoroughly with a soft cloth. 6. Check that rear leveling leg is level. A Level Range 1. Turn the control knob to back. 3. Verify Anti-Tip Bracket Location 1. then front to the "OFF" position. Set the oven temperature control to side; Push range back into position. 6. Check that all packaging materials. 4. Surface indicator light 2. The "OVEN ON" indicator light goes off when the oven is removed from the anti-tip bracket. 4. Oven indicator light...
... oven elements: 1. Place level on surface burners and oven. Dispose of range, first side to "BROIL." Dry thoroughly with a soft cloth. 6. Check that rear leveling leg is level. A Level Range 1. Turn the control knob to back. 3. Verify Anti-Tip Bracket Location 1. then front to the "OFF" position. Set the oven temperature control to side; Push range back into position. 6. Check that all packaging materials. 4. Surface indicator light 2. The "OVEN ON" indicator light goes off when the oven is removed from the anti-tip bracket. 4. Oven indicator light...


