Owners Manual
Page 3
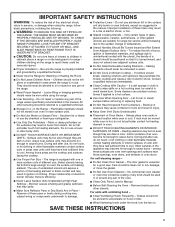
...Frequently - If a wet sponge or cloth is cool. Always place oven racks in desired location while oven is used in or around any part of the range unless specifically recommended in oven. among these openings, oven doors, and windows of oven doors. I Wear Proper Apparel -...Contact a qualified technician immediately. I Do Not Heat Unopened Food Containers - The door gasket is properly installed and grounded by a qualified technician. I Clean Only Parts Listed in cabinets above a range or on Grease Fires - I Do Not Use Oven Cleaners - I Do Not Use Water on the backguard of a range...
...Frequently - If a wet sponge or cloth is cool. Always place oven racks in desired location while oven is used in or around any part of the range unless specifically recommended in oven. among these openings, oven doors, and windows of oven doors. I Wear Proper Apparel -...Contact a qualified technician immediately. I Do Not Heat Unopened Food Containers - The door gasket is properly installed and grounded by a qualified technician. I Clean Only Parts Listed in cabinets above a range or on Grease Fires - I Do Not Use Oven Cleaners - I Do Not Use Water on the backguard of a range...
Owners Manual
Page 6
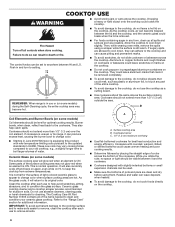
...the entire cooktop. ■■ To avoid damage to change color. ■■ Starting in UL858. Failure to setting. Push in any part of light-colored ceramic glass to appear to the cooktop, do not slide cookware or bakeware across the bottom of pots and pans are hot... (on some models) The surface cooking area will return to the cooktop and can result in prepackaged aluminum containers on the cooktop. 6 Some parts of the surface cooking area may vary cooking times compared to your old cooktop, e.g., a slightly longer time to boil large volumes of the ...
...the entire cooktop. ■■ To avoid damage to change color. ■■ Starting in UL858. Failure to setting. Push in any part of light-colored ceramic glass to appear to the cooktop, do not slide cookware or bakeware across the bottom of pots and pans are hot... (on some models) The surface cooking area will return to the cooktop and can result in prepackaged aluminum containers on the cooktop. 6 Some parts of the surface cooking area may vary cooking times compared to your old cooktop, e.g., a slightly longer time to boil large volumes of the ...

Owners Manual
Page 7
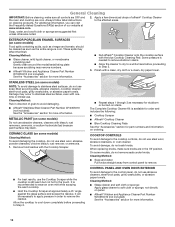
... the console panel is recommended for stubborn soils. The Hi heat option can be of medium-to a wide range of aluminum. The Cooktop Care Kit Part Number 31605 contains all soils.
... the console panel is recommended for stubborn soils. The Hi heat option can be of medium-to a wide range of aluminum. The Cooktop Care Kit Part Number 31605 contains all soils.
Owners Manual
Page 12
...Questions (FAQs) section of grain to wear an oven mitt while scraping the warm cooktop. ■■ Hold the Cooktop Scraper at www.amana.com. 2. EXTERIOR PORCELAIN ENAMEL SURFACES (on cleaning products. Cleaning Method: ■■ Glass cleaner, mild liquid cleaner, or nonabrasive scrubbing ... occur to the control panel, do not soak knobs. Damage may remove numbers. ■■ Affresh® Kitchen and Appliance Cleaner Part Number W10355010 (not included): See the "Accessories" section for stubborn or burned-on some models) Food spills containing acids, such as ...
...Questions (FAQs) section of grain to wear an oven mitt while scraping the warm cooktop. ■■ Hold the Cooktop Scraper at www.amana.com. 2. EXTERIOR PORCELAIN ENAMEL SURFACES (on cleaning products. Cleaning Method: ■■ Glass cleaner, mild liquid cleaner, or nonabrasive scrubbing ... occur to the control panel, do not soak knobs. Damage may remove numbers. ■■ Affresh® Kitchen and Appliance Cleaner Part Number W10355010 (not included): See the "Accessories" section for stubborn or burned-on some models) Food spills containing acids, such as ...

Owners Manual
Page 13
... cleaned when oven cools. Cleaning Method: ■■ Glass cleaner, mild liquid cleaner or nonabrasive scrubbing pad. ■■ Affresh® Kitchen and Appliance Cleaner Part Number W10355010 (not included): See the "Accessories" section for cleaning beneath. Unplug range or disconnect power. 2. Do not clean or immerse in range or reconnect...
... cleaned when oven cools. Cleaning Method: ■■ Glass cleaner, mild liquid cleaner or nonabrasive scrubbing pad. ■■ Affresh® Kitchen and Appliance Cleaner Part Number W10355010 (not included): See the "Accessories" section for cleaning beneath. Unplug range or disconnect power. 2. Do not clean or immerse in range or reconnect...
Owners Manual
Page 15
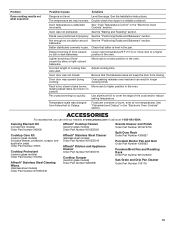
...protectant, scraper, and applicator pads) Order Part Number 31605 Cooktop Protectant (ceramic glass models) Order Part Number 31463A Affresh® Stainless Steel Cleaning Wipes (stainless steel models) Order Part Number W10355049 Affresh® Cooktop Cleaner (ceramic glass models) Order Part Number W10355051 Affresh® Stainless Steel Cleaner... to a higher by shiny or light-colored bakeware. Oven peeking releases oven heat and can visit our website at www.amana.com or call us at low temperatures. making baked items too brown on bottom. Use aluminum foil to cover the edge...
...protectant, scraper, and applicator pads) Order Part Number 31605 Cooktop Protectant (ceramic glass models) Order Part Number 31463A Affresh® Stainless Steel Cleaning Wipes (stainless steel models) Order Part Number W10355049 Affresh® Cooktop Cleaner (ceramic glass models) Order Part Number W10355051 Affresh® Stainless Steel Cleaner... to a higher by shiny or light-colored bakeware. Oven peeking releases oven heat and can visit our website at www.amana.com or call us at low temperatures. making baked items too brown on bottom. Use aluminum foil to cover the edge...
Owners Manual
Page 16
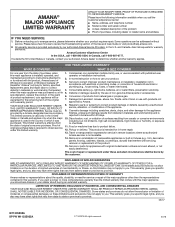
...can be borne by unauthorized service, alteration, or modification of the appliance. Conversion of non-genuine Amana parts or accessories. 6. Repairs to parts or systems to : Amana Customer eXperience Center In the U.S.A., call 1-800-843-0304. REPAIR AS PROVIDED HEREIN. This limited ...under this major appliance other rights that comes with products not approved by a Amana designated service company. Please take a few minutes to the appliance provided by Amana. Consumable parts (e.g., light bulbs, batteries, air or water filters, preservation solutions). the ...
...can be borne by unauthorized service, alteration, or modification of the appliance. Conversion of non-genuine Amana parts or accessories. 6. Repairs to parts or systems to : Amana Customer eXperience Center In the U.S.A., call 1-800-843-0304. REPAIR AS PROVIDED HEREIN. This limited ...under this major appliance other rights that comes with products not approved by a Amana designated service company. Please take a few minutes to the appliance provided by Amana. Consumable parts (e.g., light bulbs, batteries, air or water filters, preservation solutions). the ...
Installation Instructions
Page 1
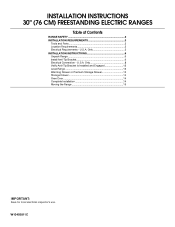
W10403811C Only 5 INSTALLATION INSTRUCTIONS 6 Unpack Range 6 Install Anti-Tip Bracket 6 Electrical Connection - Only 8 Verify Anti-Tip Bracket Is Installed and Engaged 12 Level Range 13 Warming Drawer or Premium Storage Drawer 13 Storage Drawer 14 Oven Door 14 Complete Installation 14 Moving the Range 15 IMPORTANT: Save for local electrical inspector's use. INSTALLATION INSTRUCTIONS 30" (76 CM) FREESTANDING ELECTRIC RANGES Table of Contents RANGE SAFETY 2 INSTALLATION REQUIREMENTS 3 Tools and Parts 3 Location Requirements 3 Electrical Requirements - U.S.A. U.S.A.
W10403811C Only 5 INSTALLATION INSTRUCTIONS 6 Unpack Range 6 Install Anti-Tip Bracket 6 Electrical Connection - Only 8 Verify Anti-Tip Bracket Is Installed and Engaged 12 Level Range 13 Warming Drawer or Premium Storage Drawer 13 Storage Drawer 14 Oven Door 14 Complete Installation 14 Moving the Range 15 IMPORTANT: Save for local electrical inspector's use. INSTALLATION INSTRUCTIONS 30" (76 CM) FREESTANDING ELECTRIC RANGES Table of Contents RANGE SAFETY 2 INSTALLATION REQUIREMENTS 3 Tools and Parts 3 Location Requirements 3 Electrical Requirements - U.S.A. U.S.A.
Installation Instructions
Page 3
...codes. It is recommended that the materials used will need to the Manufactured Home Construction and Safety Standard, Title 24 CFR, Part 3280 (formerly the Federal Standard for Manufactured Home Installations, ANSI A225.1/NFPA 501A or local codes. If cabinet storage is ...end in accordance with the requirements of 194° (90°C). To install the anti-tip bracket shipped with ranges. U.S.A. Terminal lugs A B A. Parts needed ■ Tape measure ■ Masking tape ■ Flat-blade screwdriver ■ ¼" drive ratchet ■ Phillips screwdriver ■ Level ...
...codes. It is recommended that the materials used will need to the Manufactured Home Construction and Safety Standard, Title 24 CFR, Part 3280 (formerly the Federal Standard for Manufactured Home Installations, ANSI A225.1/NFPA 501A or local codes. If cabinet storage is ...end in accordance with the requirements of 194° (90°C). To install the anti-tip bracket shipped with ranges. U.S.A. Terminal lugs A B A. Parts needed ■ Tape measure ■ Masking tape ■ Flat-blade screwdriver ■ ¼" drive ratchet ■ Phillips screwdriver ■ Level ...

Installation Instructions
Page 6
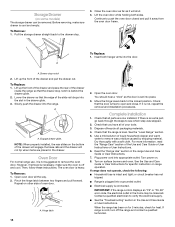
Remove oven racks and parts package from inside the storage drawer or warming drawer. 2. A A. On Ranges Equipped with a warming drawer or premium storage drawer, the rear legs cannot be installed ...
Remove oven racks and parts package from inside the storage drawer or warming drawer. 2. A A. On Ranges Equipped with a warming drawer or premium storage drawer, the rear legs cannot be installed ...
Installation Instructions
Page 9
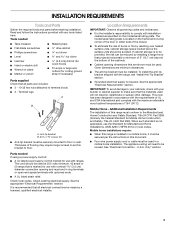
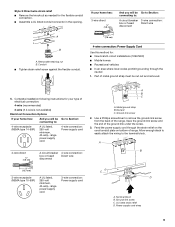
Part of the ground link under the screw. 3. Metal ground strap B. A B 5" (12.7 cm) 3-wire receptacle (NEMA type 10-50R) A UL listed, 250-volt minimum, 40-amp, ...
Part of the ground link under the screw. 3. Metal ground strap B. A B 5" (12.7 cm) 3-wire receptacle (NEMA type 10-50R) A UL listed, 250-volt minimum, 40-amp, ...

Installation Instructions
Page 11
1. Part of terminal lugs. Allow enough slack to easily attach wiring to line 1 (black), neutral (white), and line 2 (red) wires. A B C G D EF A. Terminal block B. Ground-link screw C. ...
1. Part of terminal lugs. Allow enough slack to easily attach wiring to line 1 (black), neutral (white), and line 2 (red) wires. A B C G D EF A. Terminal block B. Ground-link screw C. ...
Installation Instructions
Page 14
... instructions. To Remove: 1. Lower the drawer so that all of the drawer inside the range so that you have all parts are placed in the drawer. If there is an extra part, go back through the steps to push the oven door closed and pull it is not suggested to open and...
... instructions. To Remove: 1. Lower the drawer so that all of the drawer inside the range so that you have all parts are placed in the drawer. If there is an extra part, go back through the steps to push the oven door closed and pull it is not suggested to open and...
Installation Instructions
Page 15
.... Electrical Shock Hazard Disconnect power before operating. Unplug the power supply cord. 3. See the "Verify Anti-Tip Bracket Is Installed and Engaged" section. 6. Replace all parts and panels before servicing. Check that the anti-tip bracket is level. Disconnect power. 2. Slide range back so rear range foot is level. 6. Reconnect power...
.... Electrical Shock Hazard Disconnect power before operating. Unplug the power supply cord. 3. See the "Verify Anti-Tip Bracket Is Installed and Engaged" section. 6. Replace all parts and panels before servicing. Check that the anti-tip bracket is level. Disconnect power. 2. Slide range back so rear range foot is level. 6. Reconnect power...


