Owners Manual
Page 1
.... Model Number Serial Number Para una versión de estas instrucciones en español, visite www.amana.com. These can be found on the label located on the upper right corner of Contents RANGE SAFETY 2 The Anti-Tip Bracket 2 FEATURE GUIDE 4 COOKTOP USE 6 Cookware 7 Home Canning 8 OVEN USE 8 Electronic Oven Controls 8 Sabbath Mode 9 Warm 9 Aluminum Foil 9 Positioning Racks and Bakeware 10 Oven Vent 10 Baking and Roasting 10 Broiling 11 RANGE CARE 11 Self-Cleaning Cycle 11 General Cleaning 12 Oven Light 13 TROUBLESHOOTING 14 ACCESSORIES 15 WARRANTY...
.... Model Number Serial Number Para una versión de estas instrucciones en español, visite www.amana.com. These can be found on the label located on the upper right corner of Contents RANGE SAFETY 2 The Anti-Tip Bracket 2 FEATURE GUIDE 4 COOKTOP USE 6 Cookware 7 Home Canning 8 OVEN USE 8 Electronic Oven Controls 8 Sabbath Mode 9 Warm 9 Aluminum Foil 9 Positioning Racks and Bakeware 10 Oven Vent 10 Baking and Roasting 10 Broiling 11 RANGE CARE 11 Self-Cleaning Cycle 11 General Cleaning 12 Oven Light 13 TROUBLESHOOTING 14 ACCESSORIES 15 WARRANTY...
Owners Manual
Page 3
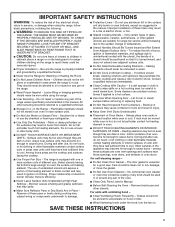
... Range - SAVE THESE INSTRUCTIONS 3 TO CHECK IF THE DEVICES ARE INSTALLED PROPERLY, SLIDE RANGE FORWARD, LOOK FOR ANTI-TIP BRACKET SECURELY ATTACHED TO FLOOR OR WALL, AND SLIDE RANGE BACK SO REAR RANGE FOOT IS UNDER ANTI-TIP BRACKET. I Do Not Clean Door Gasket - I Protective Liners - I Use Only Dry Potholders - I Do Not Heat Unopened Food Containers - I Use Care When Opening Door - I DO NOT TOUCH HEATING ELEMENTS OR INTERIOR SURFACES OF OVEN - I Clean Ventilating Hoods Frequently - Interior surfaces of an oven become hot...
... Range - SAVE THESE INSTRUCTIONS 3 TO CHECK IF THE DEVICES ARE INSTALLED PROPERLY, SLIDE RANGE FORWARD, LOOK FOR ANTI-TIP BRACKET SECURELY ATTACHED TO FLOOR OR WALL, AND SLIDE RANGE BACK SO REAR RANGE FOOT IS UNDER ANTI-TIP BRACKET. I Do Not Clean Door Gasket - I Protective Liners - I Use Only Dry Potholders - I Do Not Heat Unopened Food Containers - I Use Care When Opening Door - I DO NOT TOUCH HEATING ELEMENTS OR INTERIOR SURFACES OF OVEN - I Clean Ventilating Hoods Frequently - Interior surfaces of an oven become hot...
Owners Manual
Page 4
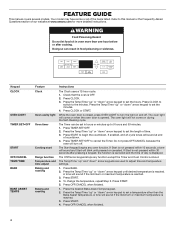
... 10 seconds, a tone will sound and Start will not come on during the Self-Cleaning cycle. Press BAKE. 2. Press OFF/CANCEL when finished. 1. Press START. 4. Refer to set the minutes. 4. Keypad CLOCK OVEN LIGHT TIMER SET•OFF START OFF/CANCEL TEMP/TIME BAKE BAKE ASSIST TEMPS Feature Instructions Clock Oven cavity light Oven timer Cooking start Range function Temperature and time adjust Baking and roasting Baking and roasting The Clock uses a 12-hour cycle. 1. Press CLOCK to switch to cancel the Timer. Press START to 9 hours and 59 minutes...
... 10 seconds, a tone will sound and Start will not come on during the Self-Cleaning cycle. Press BAKE. 2. Press OFF/CANCEL when finished. 1. Press START. 4. Refer to set the minutes. 4. Keypad CLOCK OVEN LIGHT TIMER SET•OFF START OFF/CANCEL TEMP/TIME BAKE BAKE ASSIST TEMPS Feature Instructions Clock Oven cavity light Oven timer Cooking start Range function Temperature and time adjust Baking and roasting Baking and roasting The Clock uses a 12-hour cycle. 1. Press CLOCK to switch to cancel the Timer. Press START to 9 hours and 59 minutes...
Owners Manual
Page 5
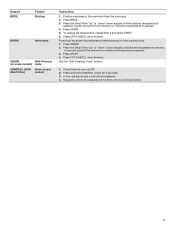
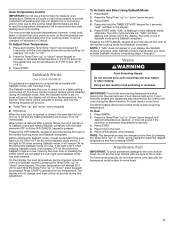
... reached. Position cookware in the warmed oven. 1. Press START. 4. Repeat to unlock. Press BROIL. 3. See the "Self-Cleaning Cycle" section. 1. Press and hold CONTROL LOCK for 3 seconds. 3. A tone will function with the controls locked. 5 Press OFF/CANCEL when finished. Press the Temp/Time "up " or "down " arrow keypad until the desired temperature is reached. 4. Keypad BROIL Feature Broiling WARM Hold warm CLEAN Self-Cleaning (on some models) cycle CONTROL LOCK Oven control (Hold 3 Sec) lockout Instructions 1. Food must be displayed. 4.
... reached. Position cookware in the warmed oven. 1. Press START. 4. Repeat to unlock. Press BROIL. 3. See the "Self-Cleaning Cycle" section. 1. Press and hold CONTROL LOCK for 3 seconds. 3. A tone will function with the controls locked. 5 Press OFF/CANCEL when finished. Press the Temp/Time "up " or "down " arrow keypad until the desired temperature is reached. 4. Keypad BROIL Feature Broiling WARM Hold warm CLEAN Self-Cleaning (on some models) cycle CONTROL LOCK Oven control (Hold 3 Sec) lockout Instructions 1. Food must be displayed. 4.
Owners Manual
Page 6
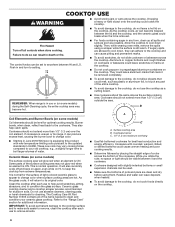
... wearing oven mitts, remove the spills using them. Burner bowls, when clean, reflect heat back to the cooktop, do not use the cooktop as a cutting board. ■■ Use cookware about the same size as plastic or aluminum foil, to remove all controls when done cooking. As the glass cools, it can cause pitting and permanent marks. ■■ To avoid scratches, do not slide cookware or...
... wearing oven mitts, remove the spills using them. Burner bowls, when clean, reflect heat back to the cooktop, do not use the cooktop as a cutting board. ■■ Use cookware about the same size as plastic or aluminum foil, to remove all controls when done cooking. As the glass cools, it can cause pitting and permanent marks. ■■ To avoid scratches, do not slide cookware or...

Owners Manual
Page 7
... keep foods at a low temperature. Cookware with a nonstick finish will take on low heat settings. ■■ May scratch the cooktop. 7 Check for the Melt element. The lowest setting can be used to prepare sauces and to -heavy thickness. Melt option Use the following chart as its base material. Hot Surface Indicator Light On ceramic glass models, the Hot Surface indicator light is located on the display panel. Ideal cookware should have...
... keep foods at a low temperature. Cookware with a nonstick finish will take on low heat settings. ■■ May scratch the cooktop. 7 Check for the Melt element. The lowest setting can be used to prepare sauces and to -heavy thickness. Melt option Use the following chart as its base material. Hot Surface Indicator Light On ceramic glass models, the Hot Surface indicator light is located on the display panel. Ideal cookware should have...
Owners Manual
Page 8
... oven door remains open for too long, the heating elements will continue to change back. To exit mode, press OFF/CANCEL. Demo Mode IMPORTANT: This feature is closed and well-ventilated room. On electric cooktops, canners should not extend more than 1/2" (1.3 cm) beyond the surface cooking area or element. ■■ Do not place canner on 2 surface cooking areas or elements at the same time. ■■ On ceramic glass models, use...
... oven door remains open for too long, the heating elements will continue to change back. To exit mode, press OFF/CANCEL. Demo Mode IMPORTANT: This feature is closed and well-ventilated room. On electric cooktops, canners should not extend more than 1/2" (1.3 cm) beyond the surface cooking area or element. ■■ Do not place canner on 2 surface cooking areas or elements at the same time. ■■ On ceramic glass models, use...
Owners Manual
Page 9
... measure oven temperature. Oven Temperature Control IMPORTANT: Do not use . Press and hold the TIMER SET•OFF keypad for the entire time Sabbath mode is to move freely. 9 The adjustment can be no tones will sound, the display will not show the temperature, the Kitchen Timer mode will be changed at any time returns the oven to reach the desired temperature and then pressing START. Sabbath Mode (on some models) For guidance on in a Bake setting...
... measure oven temperature. Oven Temperature Control IMPORTANT: Do not use . Press and hold the TIMER SET•OFF keypad for the entire time Sabbath mode is to move freely. 9 The adjustment can be no tones will sound, the display will not show the temperature, the Kitchen Timer mode will be changed at any time returns the oven to reach the desired temperature and then pressing START. Sabbath Mode (on some models) For guidance on in a Bake setting...

Owners Manual
Page 10
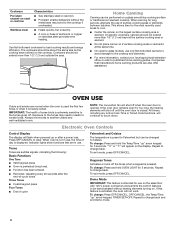
... the oven vent. Temperature Management System The Temperature Management System electronically regulates the oven heat levels during preheat and bake to maintain a precise temperature range for short intervals during Bake to provide the best results. When the preheat temperature is in use . Racks ■■ Position racks before putting food in use the oven light to monitor cooking progress. Use the following illustration as shown. On coil element models, the element can be blocked or covered. On convection range models, the fan...
... the oven vent. Temperature Management System The Temperature Management System electronically regulates the oven heat levels during preheat and bake to maintain a precise temperature range for short intervals during Bake to provide the best results. When the preheat temperature is in use . Racks ■■ Position racks before putting food in use the oven light to monitor cooking progress. Use the following illustration as shown. On coil element models, the element can be blocked or covered. On convection range models, the fan...
Owners Manual
Page 11
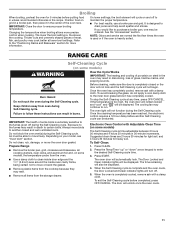
... the oven cools, the Door Locked and Clean indicator lights will not begin. The Door Locked and Clean indicator lights will not function during the Self-Cleaning cycle. The lower the broil setting is completely cooled, remove ash with a damp cloth. Thicker cuts and unevenly shaped pieces of gloss, hairline cracks, and popping sounds. Air must be displayed. The oven light will be able to certain birds. RANGE CARE Self-Cleaning Cycle (on some models) The Self-Cleaning cycle...
... the oven cools, the Door Locked and Clean indicator lights will not begin. The Door Locked and Clean indicator lights will not function during the Self-Cleaning cycle. The lower the broil setting is completely cooled, remove ash with a damp cloth. Thicker cuts and unevenly shaped pieces of gloss, hairline cracks, and popping sounds. Air must be displayed. The oven light will be able to certain birds. RANGE CARE Self-Cleaning Cycle (on some models) The Self-Cleaning cycle...
Owners Manual
Page 12
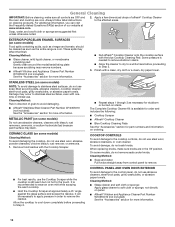
... spills may remove numbers. ■■ Affresh® Kitchen and Appliance Cleaner Part Number W10355010 (not included): See the "Accessories" section for stubborn or burned-on cleaning products. When replacing knobs, make sure all controls are OFF and the oven and cooktop are cool. Cleaning Method: ■■ Soap and water: Pull knobs straight away from control panel to remove. ■■ For best results, use abrasive...
... spills may remove numbers. ■■ Affresh® Kitchen and Appliance Cleaner Part Number W10355010 (not included): See the "Accessories" section for stubborn or burned-on cleaning products. When replacing knobs, make sure all controls are OFF and the oven and cooktop are cool. Cleaning Method: ■■ Soap and water: Pull knobs straight away from control panel to remove. ■■ For best results, use abrasive...
Owners Manual
Page 14
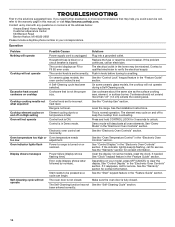
... service. Push in the "Electronic Oven Controls" section. Use cookware about the same size as the surface cooking area, element, or surface burner. Demo mode will not operate Possible Causes Power supply cord is not closed . If the indicator light(s) keep the cooktop from overheating. On some ceramic glass models, the cooktop will not operate during a Self-Cleaning cycle. Household fuse is blown or a circuit breaker is turned on and off to the warranty page in Demo mode. Range is normal operation. Oven temperature needs adjustment. Error code (display...
... service. Push in the "Electronic Oven Controls" section. Use cookware about the same size as the surface cooking area, element, or surface burner. Demo mode will not operate Possible Causes Power supply cord is not closed . If the indicator light(s) keep the cooktop from overheating. On some ceramic glass models, the cooktop will not operate during a Self-Cleaning cycle. Household fuse is blown or a circuit breaker is turned on and off to the warranty page in Demo mode. Range is normal operation. Oven temperature needs adjustment. Error code (display...
Owners Manual
Page 15
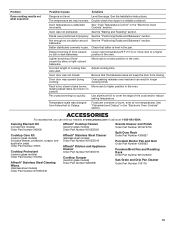
... the Installation Instructions. Oven temperature is not level. Move rack to Celsius. Be sure that batter is too close to bake burner, Move rack to higher position in the oven. making baked items too brown on bottom. Racks were positioned improperly. Incorrect length of food caused by dull or dark bakeware. Adjust cooking time. Oven door was used. See "Fahrenheit and Celsius" in longer cooking times. Canning Element Kit (coil element models) Order Part Number 242905 Cooktop Care Kit (ceramic glass models...
... the Installation Instructions. Oven temperature is not level. Move rack to Celsius. Be sure that batter is too close to bake burner, Move rack to higher position in the oven. making baked items too brown on bottom. Racks were positioned improperly. Incorrect length of food caused by dull or dark bakeware. Adjust cooking time. Oven door was used. See "Fahrenheit and Celsius" in longer cooking times. Canning Element Kit (coil element models) Order Part Number 242905 Cooktop Care Kit (ceramic glass models...
Owners Manual
Page 16
... this warranty. Travel or transportation expenses for service in remote locations where an authorized Amana servicer is intended for service or repair of surfaces resulting from natural gas or propane gas. 7. DISCLAIMER OF REPRESENTATIONS OUTSIDE OF WARRANTY Amana makes no representations about buying an extended warranty. This warranty gives you specific legal rights, and you should ask Amana or your product. 3. All warranty service is installed, operated, and operator, or installation instructions. In-home instruction on...
... this warranty. Travel or transportation expenses for service in remote locations where an authorized Amana servicer is intended for service or repair of surfaces resulting from natural gas or propane gas. 7. DISCLAIMER OF REPRESENTATIONS OUTSIDE OF WARRANTY Amana makes no representations about buying an extended warranty. This warranty gives you specific legal rights, and you should ask Amana or your product. 3. All warranty service is installed, operated, and operator, or installation instructions. In-home instruction on...
Specification Sheet
Page 1
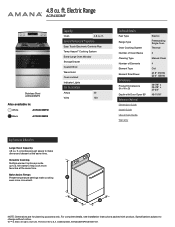
...Oven Lockout Indicator Lights Electrical Details Amps 40 Volts 120 Technical Details Fuel Type Range Type Oven Cooking System Number of Oven Racks Cleaning Type Number of Elements Element Type Element Size/Power Dimensions Product Dimensions (H x W x D) Depth with product. Versatile Cooktop Multiple element options provide up to 2,100 watts to help cook more convenient. For complete details, see Installation Instructions packed with Door Open 90° Reference Material Dimension Guide Install Guide Use & Care Guide Warranty Electric Freestanding Single Oven Thermal 2 Manual Clean...
...Oven Lockout Indicator Lights Electrical Details Amps 40 Volts 120 Technical Details Fuel Type Range Type Oven Cooking System Number of Oven Racks Cleaning Type Number of Elements Element Type Element Size/Power Dimensions Product Dimensions (H x W x D) Depth with product. Versatile Cooktop Multiple element options provide up to 2,100 watts to help cook more convenient. For complete details, see Installation Instructions packed with Door Open 90° Reference Material Dimension Guide Install Guide Use & Care Guide Warranty Electric Freestanding Single Oven Thermal 2 Manual Clean...
DimensionGuide
Page 1
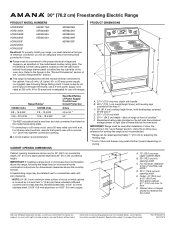
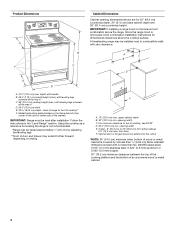
... neutral, use a 4-wire power supply cord rated at 250 volts, 40 or 50 amps and investigated for use with a nominal 13/8" (34.9 mm) diameter connection opening. ■■ A circuit breaker is covered by adjusting the leveling legs. ** Front of door and drawer may be installed next to top of cooktop, see NOTE* D. 301/8" (76.5 cm) min opening width E. A freestanding range may extend further forward depending on styling. Follow the instructions in...
... neutral, use a 4-wire power supply cord rated at 250 volts, 40 or 50 amps and investigated for use with a nominal 13/8" (34.9 mm) diameter connection opening. ■■ A circuit breaker is covered by adjusting the leveling legs. ** Front of door and drawer may be installed next to top of cooktop, see NOTE* D. 301/8" (76.5 cm) min opening width E. A freestanding range may extend further forward depending on styling. Follow the instructions in...
Installation Instructions
Page 3
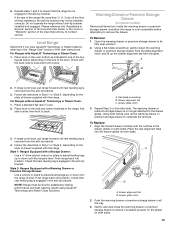
...-wire power supply cord or cable must be made by reaching over heated surface units, cabinet storage space located above the surface units should be used in accordance with the requirements of 194° (90°C). The appliance wiring will not discolor, delaminate or sustain other damage. Anti-tip bracket B. #12 x 1⁵⁄₈" screws (2) ■ Anti-tip bracket must be revised. Only" section. 3 See "Electrical Connection - Additional Installation Requirements The installation...
...-wire power supply cord or cable must be made by reaching over heated surface units, cabinet storage space located above the surface units should be used in accordance with the requirements of 194° (90°C). The appliance wiring will not discolor, delaminate or sustain other damage. Anti-tip bracket B. #12 x 1⁵⁄₈" screws (2) ■ Anti-tip bracket must be revised. Only" section. 3 See "Electrical Connection - Additional Installation Requirements The installation...
Installation Instructions
Page 4
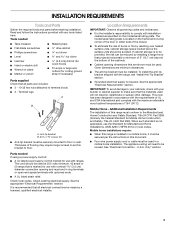
... between the top of the cooking platform and the bottom of cooktop, see NOTE* D. 30¹⁄₈" (76.5 cm) min. back of range to top of an uncovered wood or metal cabinet. 4 opening width C. Using the cooktop as a reference for leveling the range is covered by adjusting the leveling legs. **Front of door and drawer may be level after installation. upper cabinet depth B. 30...
... between the top of the cooking platform and the bottom of cooktop, see NOTE* D. 30¹⁄₈" (76.5 cm) min. back of range to top of an uncovered wood or metal cabinet. 4 opening width C. Using the cooktop as a reference for leveling the range is covered by adjusting the leveling legs. **Front of door and drawer may be level after installation. upper cabinet depth B. 30...
Installation Instructions
Page 13
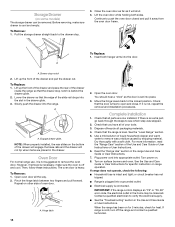
... the User Instructions. then front to side; Drawer alignment tab C. Gently open position. 2. 6. Do not operate the range without AquaLift® Technology or Steam Clean: 1. Place level on the oven bottom as indicated in Style 1 or Style 2, depending on the style of drawer supplied with the notches in the drawer glides on both hands, pick up or down until rear leveling leg is level. Check with a Warming Drawer...
... the User Instructions. then front to side; Drawer alignment tab C. Gently open position. 2. 6. Do not operate the range without AquaLift® Technology or Steam Clean: 1. Place level on the oven bottom as indicated in Style 1 or Style 2, depending on the style of drawer supplied with the notches in the drawer glides on both hands, pick up or down until rear leveling leg is level. Check with a Warming Drawer...
Installation Instructions
Page 14
... the electrical supply. ■ See the "Troubleshooting" section in the home may be removed. If it will not tip when items are now installed. Turn power on surface burners and oven. See the Use and Care Guide or User Instructions for heat. To Replace: 1. Lift up the front of the drawer will engage the base rails and the drawer will shut. 4. Check that you have all packaging materials. 4. Check that the door...
... the electrical supply. ■ See the "Troubleshooting" section in the home may be removed. If it will not tip when items are now installed. Turn power on surface burners and oven. See the Use and Care Guide or User Instructions for heat. To Replace: 1. Lift up the front of the drawer will engage the base rails and the drawer will shut. 4. Check that you have all packaging materials. 4. Check that the door...


