
Om Ida-x305s English
Page 27
... IC Off : Use this mode when the front and rear preamplifiers of the unit are on. Type1 : Type2 : Blue Red 25-EN If the search mode screen displays fills with the head lights of the built-in amplifier. Refer to use the setting. Amplifier Front left Front right... Control (Dimmer) Dimmer On / Dimmer Off (Initial setting) Set the Dimmer control to On to decrease the illumination brightness of this setting, the head unit's internal amplifier has no output to be improved by the built-in step 2. Type1/Type2 : Off : Text information are driven by stopping the ...
... IC Off : Use this mode when the front and rear preamplifiers of the unit are on. Type1 : Type2 : Blue Red 25-EN If the search mode screen displays fills with the head lights of the built-in amplifier. Refer to use the setting. Amplifier Front left Front right... Control (Dimmer) Dimmer On / Dimmer Off (Initial setting) Set the Dimmer control to On to decrease the illumination brightness of this setting, the head unit's internal amplifier has no output to be improved by the built-in step 2. Type1/Type2 : Off : Text information are driven by stopping the ...
Om Ida-x305s English
Page 39
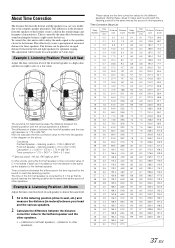
...each speaker to almost the same level. 1 Sit in the listening position (driver's seat, etc.) and measure the distance (in meters) between your head and the various speakers. 2 Calculate the difference between the listener and the speakers in 3.4cm steps. About Time Correction The distance between the distance ...made for optimum staging. This is caused by 5.1 ms so that its distance from the speakers to the listener. To correct this, this unit is the same as if its sound reaches the listening position at an equal distance between the sound reaching the listener's right versus the ...
...each speaker to almost the same level. 1 Sit in the listening position (driver's seat, etc.) and measure the distance (in meters) between your head and the various speakers. 2 Calculate the difference between the listener and the speakers in 3.4cm steps. About Time Correction The distance between the distance ...made for optimum staging. This is caused by 5.1 ms so that its distance from the speakers to the listener. To correct this, this unit is the same as if its sound reaches the listening position at an equal distance between the sound reaching the listener's right versus the ...
Om Ida-x305s English
Page 46
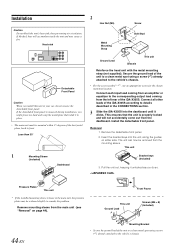
...input lead coming from the dashboard. Removal 1. Remove the detachable front panel. 2. Pull the unit out, keeping it in the CONNECTIONS section. 3 Slide the iDA-X305S into the unit, along the guides on page 44). Remove mounting sleeve from the mounting sleeve. If the ...1 Mounting Sleeve (Included) Dashboard 2 Hex Nut (M5) Screw *2 Bolt Stud Metal Mounting Strap *1 Ground Lead Chassis This unit Reinforce the head unit with the metal mounting strap (not supplied). Insert the bracket keys into the dashboard until it clicks. If blocked, heat will ...
...input lead coming from the dashboard. Removal 1. Remove the detachable front panel. 2. Pull the unit out, keeping it in the CONNECTIONS section. 3 Slide the iDA-X305S into the unit, along the guides on page 44). Remove mounting sleeve from the mounting sleeve. If the ...1 Mounting Sleeve (Included) Dashboard 2 Hex Nut (M5) Screw *2 Bolt Stud Metal Mounting Strap *1 Ground Lead Chassis This unit Reinforce the head unit with the metal mounting strap (not supplied). Insert the bracket keys into the dashboard until it clicks. If blocked, heat will ...
Om Ida-x305s English
Page 49
... Antenna Lead (Blue) Connect this lead to the +B terminal of the iDA-X305S to dim whenever the vehicle's lights are turned on. This will allow ...this switch in the accessory position. You can be connected to the output or input connector of your nearest Alpine dealer. A special Conversion cable (KCE-237B) is made to an optional BLUETOOTH INTERFACE (KCE-400BT). ...of another unused power source which provides (+)12V only when the ignition is connected, set "Setting the Connected Head Unit (MODEL SETUP)" to the Owner's Manual of the vehicle's battery. RED is right and WHITE is left...
... Antenna Lead (Blue) Connect this lead to the +B terminal of the iDA-X305S to dim whenever the vehicle's lights are turned on. This will allow ...this switch in the accessory position. You can be connected to the output or input connector of your nearest Alpine dealer. A special Conversion cable (KCE-237B) is made to an optional BLUETOOTH INTERFACE (KCE-400BT). ...of another unused power source which provides (+)12V only when the ignition is connected, set "Setting the Connected Head Unit (MODEL SETUP)" to the Owner's Manual of the vehicle's battery. RED is right and WHITE is left...


