

Installation Manual
Page 1
... and using the product incorrectly is only expected to lead to injury or property damage. These symbols and their meanings are subject to change without notice for problems that arise as a result of failure to follow the instructions in the manuals. ˜ This manual includes a number of testing. We recommend that you have met compatibility specs at the time of...
... and using the product incorrectly is only expected to lead to injury or property damage. These symbols and their meanings are subject to change without notice for problems that arise as a result of failure to follow the instructions in the manuals. ˜ This manual includes a number of testing. We recommend that you have met compatibility specs at the time of...

Installation Manual
Page 2
... on a cord and take power from the negative terminal of the battery. Forbidden Do not install the product in a location where it will obstruct the driver's forward view; or pose a threat to a 12 VDC negative ground car. Failing to do so could lead to an accident or injury. Mandatory Before you begin wiring, remove the ground wire from another device. Forbidden If...
... on a cord and take power from the negative terminal of the battery. Forbidden Do not install the product in a location where it will obstruct the driver's forward view; or pose a threat to a 12 VDC negative ground car. Failing to do so could lead to an accident or injury. Mandatory Before you begin wiring, remove the ground wire from another device. Forbidden If...

Installation Manual
Page 3
.... Caution Connect the product properly according to touch protrusions. Forbidden Use the accessories according to an accident or damage equipment. Have the product installed and wired by the store that they don't interfere with the operation of the...making a hole in the vehicle body, be exposed to water or in a place with high levels of humidity or dust. Doing so could lead to electric shock or fire. Wrapping cords around the steering wheel, gearshift, brake pedal, or the like . Resulting breaks or shorts could interfere with driving. Forbidden The installation and wiring...
.... Caution Connect the product properly according to touch protrusions. Forbidden Use the accessories according to an accident or damage equipment. Have the product installed and wired by the store that they don't interfere with the operation of the...making a hole in the vehicle body, be exposed to water or in a place with high levels of humidity or dust. Doing so could lead to electric shock or fire. Wrapping cords around the steering wheel, gearshift, brake pedal, or the like . Resulting breaks or shorts could interfere with driving. Forbidden The installation and wiring...

Installation Manual
Page 4
Tools Required Panel Removing Tool #2 Phillips Screwdriver 10mm Socket 7mm Chevrolet/GMC FULL SIZE TRUCK ˜ 4/17 Pliers T15 Torx Screwdriver 7mm Screwdriver Wire Cutters Extension Ratchet
Tools Required Panel Removing Tool #2 Phillips Screwdriver 10mm Socket 7mm Chevrolet/GMC FULL SIZE TRUCK ˜ 4/17 Pliers T15 Torx Screwdriver 7mm Screwdriver Wire Cutters Extension Ratchet
Installation Manual
Page 7
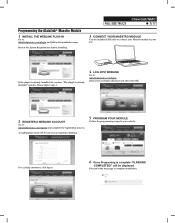
... installation. will be displayed. Review the System Requirements before installing. If the plugin is already installed, the caution, "The plugin is complete "FLASHING COMPLETED!" For existing customers, click log in. 6 Once Programing is already installed" appears. Programming the iDatalink® Maestro Module 1 INSTALL THE WEBLINK PLUG-IN Go to : idatalinkmaestro.com/register and complete the registration process. Enter your username and password...
... installation. will be displayed. Review the System Requirements before installing. If the plugin is already installed, the caution, "The plugin is complete "FLASHING COMPLETED!" For existing customers, click log in. 6 Once Programing is already installed" appears. Programming the iDatalink® Maestro Module 1 INSTALL THE WEBLINK PLUG-IN Go to : idatalinkmaestro.com/register and complete the registration process. Enter your username and password...

Installation Manual
Page 8
... from factory panel. (This will later be installed into the restyle bezel). Use a pair of the battery. Factory Radio Removal Procedure 1 Disconnect the ground wire from the negative terminal of pliers to remove the FM and SXM antenna connectors. RADIO MEDIA A/C BACK MENU TEMP 6 Extract (2) T15 Torx screws and unsnap the knee cover on the driver side. Remove the CD player by extracting (2) 7mm factory screws. 2 Unsnap and remove center dash...
... from factory panel. (This will later be installed into the restyle bezel). Use a pair of the battery. Factory Radio Removal Procedure 1 Disconnect the ground wire from the negative terminal of pliers to remove the FM and SXM antenna connectors. RADIO MEDIA A/C BACK MENU TEMP 6 Extract (2) T15 Torx screws and unsnap the knee cover on the driver side. Remove the CD player by extracting (2) 7mm factory screws. 2 Unsnap and remove center dash...

Installation Manual
Page 9
... wheel column. Factory Radio Removal Procedure 7 Unsnap the steering wheel lever and remove the lower cover from the HMI box and connect it to connect properly.) 9 Unclip the USB cable from the metal bar support and disconnect the green connector from the HMI box. (may not be available on the green USB connector using a razor blade. (This will allow the OEM USB adapter to the...
... wheel column. Factory Radio Removal Procedure 7 Unsnap the steering wheel lever and remove the lower cover from the HMI box and connect it to connect properly.) 9 Unclip the USB cable from the metal bar support and disconnect the green connector from the HMI box. (may not be available on the green USB connector using a razor blade. (This will allow the OEM USB adapter to the...
Installation Manual
Page 10
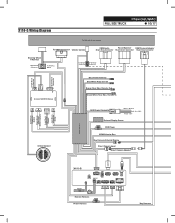
... Wheel To Climate Controller 10-pin Gray Connector 10-pin Black Connector 18-pin Black Connector iDatalink MAESTRO Module Chime Speaker Blue Power Antenna Blue/White Amp Turn-on Brown Rear Mon. Acc 12V+ Yellow -12V+ External Display Power DVD Player HDMI Selector Box Key Harness External Display Direct Camera Input Direct Camera Adapter 3-pin Black Connector (Audio) 10-pin Green Connector (Vehicle signals) 3-pin Black Connector (Power) 4-pin Black Connector (Data) Main Harness X110-G ANTENNA GPS CAN I/F SXM/DAB USB HDMI IN DISP. Remote In AUX Power Connector Black - OUT HDMI...
... Wheel To Climate Controller 10-pin Gray Connector 10-pin Black Connector 18-pin Black Connector iDatalink MAESTRO Module Chime Speaker Blue Power Antenna Blue/White Amp Turn-on Brown Rear Mon. Acc 12V+ Yellow -12V+ External Display Power DVD Player HDMI Selector Box Key Harness External Display Direct Camera Input Direct Camera Adapter 3-pin Black Connector (Audio) 10-pin Green Connector (Vehicle signals) 3-pin Black Connector (Power) 4-pin Black Connector (Data) Main Harness X110-G ANTENNA GPS CAN I/F SXM/DAB USB HDMI IN DISP. Remote In AUX Power Connector Black - OUT HDMI...

Installation Manual
Page 11
... BUTTONS CLIMATE CONTROLLER BRKT MONITOR LWR 10GM Chevrolet/GMC FULL SIZE TRUCK ˜ 11/17 KCX-630HD (Optional) HDMI Selector Interface POWER HDMI OUT HDMI IN 1 HDMI IN 2 USB POWER DVE-5300X DVD PLAYER Opt. Out HDMI Out Remote In Cut loop when connecting HDMI interface box. (Optional) iPhone Connection (Sold Separately) KCU-610HD HDMI Cable (Sold by Apple) Lightning Digital AV Adapter...
... BUTTONS CLIMATE CONTROLLER BRKT MONITOR LWR 10GM Chevrolet/GMC FULL SIZE TRUCK ˜ 11/17 KCX-630HD (Optional) HDMI Selector Interface POWER HDMI OUT HDMI IN 1 HDMI IN 2 USB POWER DVE-5300X DVD PLAYER Opt. Out HDMI Out Remote In Cut loop when connecting HDMI interface box. (Optional) iPhone Connection (Sold Separately) KCU-610HD HDMI Cable (Sold by Apple) Lightning Digital AV Adapter...
Installation Manual
Page 12
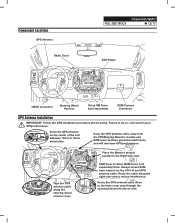
... steering wheel column cover. Component Locations GPS Antenna Radio Tuner Chevrolet/GMC FULL SIZE TRUCK ˜ 12/17 DVD Player OBDII Connector Steering Wheel Harness Sirius XM Tuner (sold separately) Note: Always mount SXM tuner away from the FPD(Display),Maestro module and SXM tuner as these generate interference and will result in poor GPSperformance. SXM Tuner Tape the GPS antenna cable along the right side vent...
... steering wheel column cover. Component Locations GPS Antenna Radio Tuner Chevrolet/GMC FULL SIZE TRUCK ˜ 12/17 DVD Player OBDII Connector Steering Wheel Harness Sirius XM Tuner (sold separately) Note: Always mount SXM tuner away from the FPD(Display),Maestro module and SXM tuner as these generate interference and will result in poor GPSperformance. SXM Tuner Tape the GPS antenna cable along the right side vent...
Installation Manual
Page 13
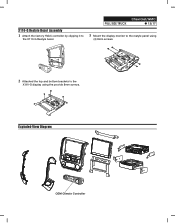
Exploded-View Diagram A/C TEMP OEM Climate Controller X110-G Restyle Bezel Assembly 1 Attach the factory HVAC controller by clipping it to the X110-G display using the provide 8mm screws. Chevrolet/GMC FULL SIZE TRUCK ˜ 13/17 3 Mount the display monitor to the restyle panel using (4) 8mm screws. 2 Attached the top and bottom brackets to the X110-G Restyle bezel.
Exploded-View Diagram A/C TEMP OEM Climate Controller X110-G Restyle Bezel Assembly 1 Attach the factory HVAC controller by clipping it to the X110-G display using the provide 8mm screws. Chevrolet/GMC FULL SIZE TRUCK ˜ 13/17 3 Mount the display monitor to the restyle panel using (4) 8mm screws. 2 Attached the top and bottom brackets to the X110-G Restyle bezel.
Installation Manual
Page 14
... T-Harness OBDII Connector 2 Slide the X110-G radio tuner into the factory tuner location and connect it to the main harness. 5 Mount the DVD player it using (2) 7mm factory screws. 3 Attached the updated Maestro module to the main harness and plug the main harness to the radio location. Installation Instructions 1 Connect the steering wheel T-harness/OBDII connector extension and route the cable to the vehicle. 6 Connect the HVAC controller T-harness. Chevrolet/GMC FULL SIZE TRUCK ˜ 14/17 4 Connect the DVD player power harness and HDMI cable...
... T-Harness OBDII Connector 2 Slide the X110-G radio tuner into the factory tuner location and connect it to the main harness. 5 Mount the DVD player it using (2) 7mm factory screws. 3 Attached the updated Maestro module to the main harness and plug the main harness to the radio location. Installation Instructions 1 Connect the steering wheel T-harness/OBDII connector extension and route the cable to the vehicle. 6 Connect the HVAC controller T-harness. Chevrolet/GMC FULL SIZE TRUCK ˜ 14/17 4 Connect the DVD player power harness and HDMI cable...

Installation Manual
Page 15
Display Cable Power 11 Connect the battery terminal and begin the X110-G setup. Chevrolet/GMC FULL SIZE TRUCK ˜ 15/17 10 Attach the side vent covers. MENU CAM WAV A/C 8 Connect the X110-G display and snap into place. Installation Instructions 7 Connect the X110-G to the main harness and antenna connections. Climate Control Key Harness 9 Secure the X110-G restyle bezel using (4) 7mm factory screws.
Display Cable Power 11 Connect the battery terminal and begin the X110-G setup. Chevrolet/GMC FULL SIZE TRUCK ˜ 15/17 10 Attach the side vent covers. MENU CAM WAV A/C 8 Connect the X110-G display and snap into place. Installation Instructions 7 Connect the X110-G to the main harness and antenna connections. Climate Control Key Harness 9 Secure the X110-G restyle bezel using (4) 7mm factory screws.

Installation Manual
Page 16
... turn it off in the AUDIO MENU (MENU/SETUP/SOUND/MUTE WHILE BACKING UP) 7 Set the DVD player. (MENU/SETUP/SOURCE/HDMI) 8 When the KCX-630HD (HDMI SELECTOR) is present be sure to turn it ON in the SETUP MENU. (MENU/ SYSTEM/EXTERNAL ACCESSORIES/HDMI SELECTOR) 9 When the KAC-001 (External Accessory Control Module) is present be sure to ACC. 2 Turn ON the X110-SLV by pressing any key. 3 Select the user...
... turn it off in the AUDIO MENU (MENU/SETUP/SOUND/MUTE WHILE BACKING UP) 7 Set the DVD player. (MENU/SETUP/SOURCE/HDMI) 8 When the KCX-630HD (HDMI SELECTOR) is present be sure to turn it ON in the SETUP MENU. (MENU/ SYSTEM/EXTERNAL ACCESSORIES/HDMI SELECTOR) 9 When the KAC-001 (External Accessory Control Module) is present be sure to ACC. 2 Turn ON the X110-SLV by pressing any key. 3 Select the user...
Installation Manual
Page 17
.... sensitive. Ensure DVD is ON in HDMI SETUP menu and remote loop was cut on the wire harness. 7 Sound mutes when vehicle Mute on reverse is not plugged in Change Mute on in . Ensure the recommeded GPS antenna route was used . Flash Maestro with correct serial number. 4 pin Maestro data cable is invalid. the vehicle may not be in iDatalink database. the SOUND menu. 8 Only the front speakers are only status...
.... sensitive. Ensure DVD is ON in HDMI SETUP menu and remote loop was cut on the wire harness. 7 Sound mutes when vehicle Mute on reverse is not plugged in Change Mute on in . Ensure the recommeded GPS antenna route was used . Flash Maestro with correct serial number. 4 pin Maestro data cable is invalid. the vehicle may not be in iDatalink database. the SOUND menu. 8 Only the front speakers are only status...


