Owners Manual
Page 4
...iPod Search Mode Setting 22 HD Radio Setting (Only when HD Radio is connected) HD Radio Station Call Setting 22 Digital Seek On/Off Setting 22 SAT Radio Receiver (Optional) How to View ...the Display 23 Receiving Channels with the SAT Radio Receiver (Optional 23 Checking the SAT Radio... 26 Channel/Artist/Song Search mode 26 Receiving Weather or Traffic Information from SAT Radio 26 Instant Replay Function (SIRIUS only) ......... 26 Changing the Display 27 Setting ...
...iPod Search Mode Setting 22 HD Radio Setting (Only when HD Radio is connected) HD Radio Station Call Setting 22 Digital Seek On/Off Setting 22 SAT Radio Receiver (Optional) How to View ...the Display 23 Receiving Channels with the SAT Radio Receiver (Optional 23 Checking the SAT Radio... 26 Channel/Artist/Song Search mode 26 Receiving Weather or Traffic Information from SAT Radio 26 Instant Replay Function (SIRIUS only) ......... 26 Changing the Display 27 Setting ...

Owners Manual
Page 5
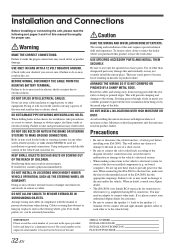
...not be installed in a location subjected to: • Direct sun and heat • High humidity and water • Excessive dust • Excessive vibrations Protecting the USB connector • Only an iPod or USB memory can be connected to your authorized Alpine dealer or the nearest Alpine Service ...serious injury or death. HALT USE IMMEDIATELY IF A PROBLEM APPEARS. For more severe stains, please dampen the cloth with your Alpine dealer or the nearest Alpine Service Station for repairing. Return it to the USB connector on this unit. USE THE CORRECT AMPERE RATING WHEN REPLACING FUSES....
...not be installed in a location subjected to: • Direct sun and heat • High humidity and water • Excessive dust • Excessive vibrations Protecting the USB connector • Only an iPod or USB memory can be connected to your authorized Alpine dealer or the nearest Alpine Service ...serious injury or death. HALT USE IMMEDIATELY IF A PROBLEM APPEARS. For more severe stains, please dampen the cloth with your Alpine dealer or the nearest Alpine Service Station for repairing. Return it to the USB connector on this unit. USE THE CORRECT AMPERE RATING WHEN REPLACING FUSES....
Owners Manual
Page 34
...(like the seat rails) or sharp or pointed edges. If so, please contact your Alpine dealer. • The iDA-X001 uses female RCA-type jacks for installations or ground connections. Installation and Connections Before installing or connecting the unit, please read the following and pages 3 and 4 of this ...passes through a hole in hazards or product failure. When connecting the iDA-X001 to the unit and/or the vehicle. SERIAL NUMBER: INSTALLATION DATE: INSTALLATION TECHNICIAN: PLACE OF PURCHASE: 32-EN USE ONLY IN CARS WITH A 12 VOLT NEGATIVE GROUND. (Check with your dealer if you...
...(like the seat rails) or sharp or pointed edges. If so, please contact your Alpine dealer. • The iDA-X001 uses female RCA-type jacks for installations or ground connections. Installation and Connections Before installing or connecting the unit, please read the following and pages 3 and 4 of this ...passes through a hole in hazards or product failure. When connecting the iDA-X001 to the unit and/or the vehicle. SERIAL NUMBER: INSTALLATION DATE: INSTALLATION TECHNICIAN: PLACE OF PURCHASE: 32-EN USE ONLY IN CARS WITH A 12 VOLT NEGATIVE GROUND. (Check with your dealer if you...
Owners Manual
Page 35
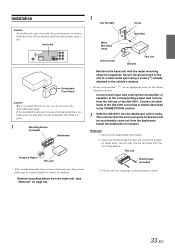
...a fire. Insert the bracket keys into the dashboard until it in place. 1 Mounting Sleeve (Included) Dashboard Pressure Plates* This unit * If the installed mounting sleeve is properly locked and will accumulate inside the unit and may be removed from the dashboard. Remove mounting sleeve from the left rear... spot using a screw (*1) already attached to details described in your car, do so. 33-EN Pull the unit out, keeping it unlocked as you install this unit in the CONNECTlONS section. 3 Slide the iDA-X001 into the unit, along the guides on page 33). 2 Hex Nut (M5) Screw ...
...a fire. Insert the bracket keys into the dashboard until it in place. 1 Mounting Sleeve (Included) Dashboard Pressure Plates* This unit * If the installed mounting sleeve is properly locked and will accumulate inside the unit and may be removed from the dashboard. Remove mounting sleeve from the left rear... spot using a screw (*1) already attached to details described in your car, do so. 33-EN Pull the unit out, keeping it unlocked as you install this unit in the CONNECTlONS section. 3 Slide the iDA-X001 into the unit, along the guides on page 33). 2 Hex Nut (M5) Screw ...
Owners Manual
Page 39
... OTHER LIABILITY IN CONNECTION WITH THE SALE OF THE PRODUCT. IN CANADA ONLY: This Warranty is not valid unless your Alpine car audio product has been installed in effect for your purchase of the telephone numbers listed below. PRODUCTS COVERED: This Warranty covers Car Audio Products and...warranty, and if the product was shipped to offer this warranty stamped upon installation by Alpine within the United States, Puerto Rico or Canada. If the repairs are pleased to an Authorized Alpine Service Center or Alpine, Alpine will , at ; Call the toll free telephone number or visit the ...
... OTHER LIABILITY IN CONNECTION WITH THE SALE OF THE PRODUCT. IN CANADA ONLY: This Warranty is not valid unless your Alpine car audio product has been installed in effect for your purchase of the telephone numbers listed below. PRODUCTS COVERED: This Warranty covers Car Audio Products and...warranty, and if the product was shipped to offer this warranty stamped upon installation by Alpine within the United States, Puerto Rico or Canada. If the repairs are pleased to an Authorized Alpine Service Center or Alpine, Alpine will , at ; Call the toll free telephone number or visit the ...


