
Owners Manual
Page 3
... to be Flat 10 Adjusting the Volume/Balance (Between Left and Right)/Fader (Between Front and Rear)/Defeat 10 Lowering Volume Quickly 10 Radio Listening to the Radio 11 Manual Storing of Station Presets 11 Automatic Memory of Station Presets 11 Tuning to Preset Stations 11 CD/MP3 Playback 12 Repeat Play 12 M.I.X. (Random Play 13 Selecting Folders (concerning MP3 13 About MP3 13 DVD/Video CD Playing DVD/Video CD 14 To display the DVD mode screen 15 If a menu screen appears 16 Stopping Playback...
... to be Flat 10 Adjusting the Volume/Balance (Between Left and Right)/Fader (Between Front and Rear)/Defeat 10 Lowering Volume Quickly 10 Radio Listening to the Radio 11 Manual Storing of Station Presets 11 Automatic Memory of Station Presets 11 Tuning to Preset Stations 11 CD/MP3 Playback 12 Repeat Play 12 M.I.X. (Random Play 13 Selecting Folders (concerning MP3 13 About MP3 13 DVD/Video CD Playing DVD/Video CD 14 To display the DVD mode screen 15 If a menu screen appears 16 Stopping Playback...

Owners Manual
Page 4
...35 Adjusting Color of Picture 35 Switching Background Textures 35 Setting Automatic Background Textures ........ 35 Navigation System (Optional) Controlling the Navigation System (Optional) ... 36 Auxiliary Device (Optional) Operating Auxiliary Devices (Optional) ......... 36 Changer (Optional) Controlling CD Changer (Optional 37 Multi-Changer Selection (Optional 38 XM Radio (Optional) Receiving XM Channels with the XM Receiver (Optional 38 Tuning in to Categorized Programs 39 Changing the Display 39 Checking the XM Radio ID Number 39 Storing XM Channel Presets 39 Receiving Stored XM...
...35 Adjusting Color of Picture 35 Switching Background Textures 35 Setting Automatic Background Textures ........ 35 Navigation System (Optional) Controlling the Navigation System (Optional) ... 36 Auxiliary Device (Optional) Operating Auxiliary Devices (Optional) ......... 36 Changer (Optional) Controlling CD Changer (Optional 37 Multi-Changer Selection (Optional 38 XM Radio (Optional) Receiving XM Channels with the XM Receiver (Optional 38 Tuning in to Categorized Programs 39 Changing the Display 39 Checking the XM Radio ID Number 39 Storing XM Channel Presets 39 Receiving Stored XM...
Owners Manual
Page 5
... 49 Mixing bass sound to the rear channel ......... 49 Achieving powerful high volume sound ...... 49 Adjusting the speaker levels 50 Adjusting the DVD Level 50 Storing Settings in the Memory 50 Getting out the Preset Memory 50 Using the ProLogic II Mode 51 Linear PCM Setting 51 Remote Control Operating for Dolby Surround .... 44 Setting the Speakers 45 Set MX Mode of Difficulty 62 Specifications 66 Installation and Connections WARNING WARNING 67 CAUTION 67 PRECAUTIONS 67 Installation 68 Connections (IVA-D900 Wiring Diagram) ..... 71 System...
... 49 Mixing bass sound to the rear channel ......... 49 Achieving powerful high volume sound ...... 49 Adjusting the speaker levels 50 Adjusting the DVD Level 50 Storing Settings in the Memory 50 Getting out the Preset Memory 50 Using the ProLogic II Mode 51 Linear PCM Setting 51 Remote Control Operating for Dolby Surround .... 44 Setting the Speakers 45 Set MX Mode of Difficulty 62 Specifications 66 Installation and Connections WARNING WARNING 67 CAUTION 67 PRECAUTIONS 67 Installation 68 Connections (IVA-D900 Wiring Diagram) ..... 71 System...
Owners Manual
Page 7
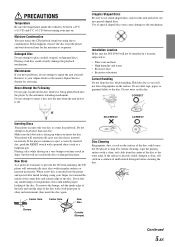
Installation Location Make sure the IVA-D900 will not be installed in a location subjected to eject a correctly inserted disc, push the RESET switch with irregular surfaces or inserted incorrectly. Do not write on . CORRECT Inserting Discs Your player accepts only one disc. Make sure the label side is facing up when you will not scratch the disc or damage the player. If the player continues to : • Direct sun and...
Installation Location Make sure the IVA-D900 will not be installed in a location subjected to eject a correctly inserted disc, push the RESET switch with irregular surfaces or inserted incorrectly. Do not write on . CORRECT Inserting Discs Your player accepts only one disc. Make sure the label side is facing up when you will not scratch the disc or damage the player. If the player continues to : • Direct sun and...

Owners Manual
Page 12
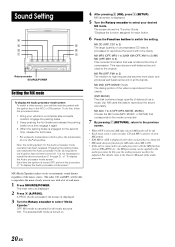
... screen color will instantly lower the volume level by just turning the Rotary encoder. 2 Turn the Rotary encoder to set to the desired sound within 5 seconds after selecting the Balance, Fader, Defeat and Subwoofer mode, the unit automatically defaults back to be in , the monitor functions only opening angle can be adjusted while they are set in 2 positions. Should this function will vary when viewed at any time by...
... screen color will instantly lower the volume level by just turning the Rotary encoder. 2 Turn the Rotary encoder to set to the desired sound within 5 seconds after selecting the Balance, Fader, Defeat and Subwoofer mode, the unit automatically defaults back to be in , the monitor functions only opening angle can be adjusted while they are set in 2 positions. Should this function will vary when viewed at any time by...
Owners Manual
Page 13
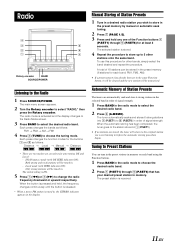
... encoder BAND SOURCE/POWER Listening to choose the tuning mode. The selected station is activated and the display changes to the Radio Mode screen. 3 Press BAND to change the radio frequency downward or upward respectively. The preset station is DX. 5 Press 1 (() or 3 ()) to select the desired radio band. The initial setting is received. 11-EN Each press changes the function modes for other stations onto the same band. To use this procedure for the buttons 1 and 3 as...
... encoder BAND SOURCE/POWER Listening to choose the tuning mode. The selected station is activated and the display changes to the Radio Mode screen. 3 Press BAND to change the radio frequency downward or upward respectively. The preset station is DX. 5 Press 1 (() or 3 ()) to select the desired radio band. The initial setting is received. 11-EN Each press changes the function modes for other stations onto the same band. To use this procedure for the buttons 1 and 3 as...
Owners Manual
Page 16
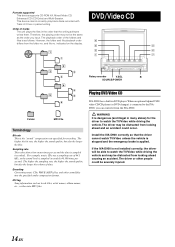
... Alpine DVD/ video CD/CD player (or DVD changer) is dangerous (and illegal in DVD player. Formats supported This device supports CD-ROM XA, Mixed Mode CD, Enhanced CD (CD-Extra) and Multi-Session. The playback order of data. DVD/Video CD 4 3 5 2 6 1 7 Rotary encoder V.SEL c SOURCE/POWER Playing DVD/Video CD IVA-D900 has a built-in many times per second. Therefore, the playing order may be the same as follows. and file no . For example, music CDs use a sampling rate of tracks The unit plays...
... Alpine DVD/ video CD/CD player (or DVD changer) is dangerous (and illegal in DVD player. Formats supported This device supports CD-ROM XA, Mixed Mode CD, Enhanced CD (CD-Extra) and Multi-Session. The playback order of data. DVD/Video CD 4 3 5 2 6 1 7 Rotary encoder V.SEL c SOURCE/POWER Playing DVD/Video CD IVA-D900 has a built-in many times per second. Therefore, the playing order may be the same as follows. and file no . For example, music CDs use a sampling rate of tracks The unit plays...
Owners Manual
Page 17
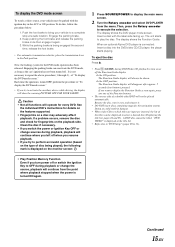
...; If you switch the power or Ignition Key OFF or change the source, playback will disappear after approx. 5 seconds if no button is connected: Insert a disc into the DVD/video CD/CD player, the player starts playing. If you try to activate the auxiliary device while driving, the display will not be played automatically. A DVD disc cannot be displayed to select a desired disc (Displaying the title list, pages 24 and 25). To display the DVD mode screen To watch a video source, your...
...; If you switch the power or Ignition Key OFF or change the source, playback will disappear after approx. 5 seconds if no button is connected: Insert a disc into the DVD/video CD/CD player, the player starts playing. If you try to activate the auxiliary device while driving, the display will not be played automatically. A DVD disc cannot be displayed to select a desired disc (Displaying the title list, pages 24 and 25). To display the DVD mode screen To watch a video source, your...
Owners Manual
Page 22
... mode (MP3, MUSIC, or MOVIE) that was omitted at a safe location. MX (Media Xpander) makes vocals or instruments sound distinct regardless of "To display the Audio processor mode screen." 4 After pressing 2 (ON), press 3 (SETUP). A.PROC (Audio processor) list screen is turned on. 20-EN Each time the ignition is selected, MX effect of road noise. 1 Press SOURCE/POWER. For details, refer to the Owner's Manual of "To display the Audio processor mode screen." MX CD...
... mode (MP3, MUSIC, or MOVIE) that was omitted at a safe location. MX (Media Xpander) makes vocals or instruments sound distinct regardless of "To display the Audio processor mode screen." 4 After pressing 2 (ON), press 3 (SETUP). A.PROC (Audio processor) list screen is turned on. 20-EN Each time the ignition is selected, MX effect of road noise. 1 Press SOURCE/POWER. For details, refer to the Owner's Manual of "To display the Audio processor mode screen." MX CD...
Owners Manual
Page 23
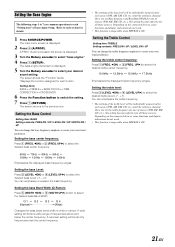
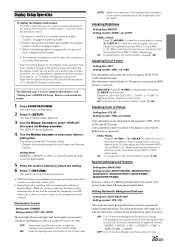
... *Function Guide. *Displays the function assigned for all those sources. Depending on the connected devices, some functions and display indications do not work . • This function is inoperable when DEFEAT is changed . Setting the Treble Control Setting item: TREBLE Setting contents: FREQ.DN / UP / LEVEL DN / UP You can emphasize or weaken the bass frequency. Refer to create your desired sound setting. You can change the bass frequency emphasis to each section for each source (FM, AM, XM, CD...
... *Function Guide. *Displays the function assigned for all those sources. Depending on the connected devices, some functions and display indications do not work . • This function is inoperable when DEFEAT is changed . Setting the Treble Control Setting item: TREBLE Setting contents: FREQ.DN / UP / LEVEL DN / UP You can emphasize or weaken the bass frequency. Refer to create your desired sound setting. You can change the bass frequency emphasis to each section for each source (FM, AM, XM, CD...
Owners Manual
Page 34
...; Navigation → CAMERA → SOURCE DISPLAY • This operation cannot be changed. NAV.: Pressing V.SEL directly switches to select your desired setting item. OFF: Deactivate the Sound Guide mode. at ":less than 30," the hour advances. • The clock adjusting mode is canceled when the power is connected. • The incoming call can adjust the volume level. • Immediately after inputting titles or changing the settings of GENERAL SETUP is pressed at ": more...
...; Navigation → CAMERA → SOURCE DISPLAY • This operation cannot be changed. NAV.: Pressing V.SEL directly switches to select your desired setting item. OFF: Deactivate the Sound Guide mode. at ":less than 30," the hour advances. • The clock adjusting mode is canceled when the power is connected. • The incoming call can adjust the volume level. • Immediately after inputting titles or changing the settings of GENERAL SETUP is pressed at ": more...
Owners Manual
Page 36
... MP3 player through your authorized Alpine dealer. For example, you like. For further details on how to 3 MODE Setting contents: AUX / VCR / GAME 1,2 / TV • The selected source name is displayed instead of optical digital input switch is connected, rear pictures are output on the screen. Connect the optical digital input connector with a CD changer connected and playing. The setting of AUX source name. Setting items: AUX IN 1 to use the rear enter function (page 25). When AUX mode is selected, "TV" is displayed...
... MP3 player through your authorized Alpine dealer. For example, you like. For further details on how to 3 MODE Setting contents: AUX / VCR / GAME 1,2 / TV • The selected source name is displayed instead of optical digital input switch is connected, rear pictures are output on the screen. Connect the optical digital input connector with a CD changer connected and playing. The setting of AUX source name. Setting items: AUX IN 1 to use the rear enter function (page 25). When AUX mode is selected, "TV" is displayed...
Owners Manual
Page 37
... quickly set to get your desired color. Display Setup Operation To display the Display mode screen: To watch a video source, your vehicle must be parked with the ignition key in the navigation, DVD, AUX1, AUX2 and AUX3 modes. Now, the locking system for details. 1 Press SOURCE/POWER. Illumination Control Setting item: DIMMER Setting content: OFF / ON / AUTO The back light (fluorescent light) built in the liquid crystal panel is turned off once and turned back...
... quickly set to get your desired color. Display Setup Operation To display the Display mode screen: To watch a video source, your vehicle must be parked with the ignition key in the navigation, DVD, AUX1, AUX2 and AUX3 modes. Now, the locking system for details. 1 Press SOURCE/POWER. Illumination Control Setting item: DIMMER Setting content: OFF / ON / AUTO The back light (fluorescent light) built in the liquid crystal panel is turned off once and turned back...
Owners Manual
Page 46
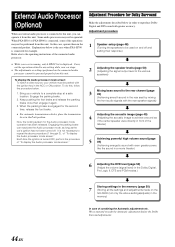
... a safe location. Adjustment procedure 1 Speaker setup (page 48) (Turning the speakers to be used on and off . External Audio Processor (Optional) When an external audio processor is connected to this unit, you can reactivate the Audio processor mode, as long as the car's ignition has not been turned off and setting their response) B 2 Adjusting the speaker levels (page 50) (Adjusting the signal output level to the various speakers) B Mixing bass sound to the rear channel (page 3 49...
... a safe location. Adjustment procedure 1 Speaker setup (page 48) (Turning the speakers to be used on and off . External Audio Processor (Optional) When an external audio processor is connected to this unit, you can reactivate the Audio processor mode, as long as the car's ignition has not been turned off and setting their response) B 2 Adjusting the speaker levels (page 50) (Adjusting the signal output level to the various speakers) B Mixing bass sound to the rear channel (page 3 49...

Owners Manual
Page 53
... music signals recorded on the input signals, the sound may only be set to near that Defeat mode is off . 2 Press SOURCE/POWER. The main menu is displayed. 3 Press 4 (A.PROC). It improves the sound field directivity to 2 or 3 channels. 1 Check that of this unit while making this case, the "REAR FILL" function can be used for outputting the signals of the REAR FILL and REAR MIX setting. This operation is ineffective when 5.1-channel...
... music signals recorded on the input signals, the sound may only be set to near that Defeat mode is off . 2 Press SOURCE/POWER. The main menu is displayed. 3 Press 4 (A.PROC). It improves the sound field directivity to 2 or 3 channels. 1 Check that of this unit while making this case, the "REAR FILL" function can be used for outputting the signals of the REAR FILL and REAR MIX setting. This operation is ineffective when 5.1-channel...

Owners Manual
Page 56
... Button Returns to access SETUP (initial setting). % Numeric Keypad Inputs numbers & DEL. down (Only for DVD changer) 4 POWER Button Turns the power on/off. Press and hold for few seconds. 2 A.PROC Button Calls the external audio processor mode. 3 , Button Disc no . Press the button again to cancel PRE STOP and stop the playback. : SOURCE Button Selects the audio source. ; Button Deletes one digit of IVA-D900 instantly. Press again to cancel. $ MENU/SETUP Button Displays the DVD menu. REAR Button Outputs the DVD video on the screen...
... Button Returns to access SETUP (initial setting). % Numeric Keypad Inputs numbers & DEL. down (Only for DVD changer) 4 POWER Button Turns the power on/off. Press and hold for few seconds. 2 A.PROC Button Calls the external audio processor mode. 3 , Button Disc no . Press the button again to cancel PRE STOP and stop the playback. : SOURCE Button Selects the audio source. ; Button Deletes one digit of IVA-D900 instantly. Press again to cancel. $ MENU/SETUP Button Displays the DVD menu. REAR Button Outputs the DVD video on the screen...
Owners Manual
Page 60
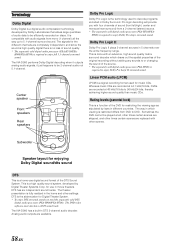
... frequency range. H900/PXA-H700) is required to enjoy Dolby Pro Logic surround sound. Whereas music CDs are recorded at 44.1 kHz/16 bits, DVDs are recorded at all the way up to 5.1-channel surround sound. Center speaker Front speakers Rear speakers Dolby Pro Logic Dolby Pro Logic is the technology used for Digital Theater System. * To enjoy DTS surround sound you with audio...
... frequency range. H900/PXA-H700) is required to enjoy Dolby Pro Logic surround sound. Whereas music CDs are recorded at 44.1 kHz/16 bits, DVDs are recorded at all the way up to 5.1-channel surround sound. Center speaker Front speakers Rear speakers Dolby Pro Logic Dolby Pro Logic is the technology used for Digital Theater System. * To enjoy DTS surround sound you with audio...
Owners Manual
Page 64
... its mounting location. • The antenna may not be grounded and connected properly. - If connected according to the navigation system are in the following the instructions in the CD (MP3/DVD/Video CD) Player Operation section. make sure the rest of your unit can cause damage to interference noise, etc. - Clean the disc; replace it if it . • The disc is too high. - If above solution does not work, tune...
... its mounting location. • The antenna may not be grounded and connected properly. - If connected according to the navigation system are in the following the instructions in the CD (MP3/DVD/Video CD) Player Operation section. make sure the rest of your unit can cause damage to interference noise, etc. - Clean the disc; replace it if it . • The disc is too high. - If above solution does not work, tune...
Owners Manual
Page 65
... solve the problem, consult your Alpine dealer. 2) When the error indication remains after pressing c for the condensation to play or eject the disc. - Make sure the CD has been written in the car is activated due to be slightly disturbed, but this device. Connect the monitor's parking brake lead and set . - Cancel the parental lock or change the rating level. Error displays • Mechanical error - Press c. MP3 is scratched...
... solve the problem, consult your Alpine dealer. 2) When the error indication remains after pressing c for the condensation to play or eject the disc. - Make sure the CD has been written in the car is activated due to be slightly disturbed, but this device. Connect the monitor's parking brake lead and set . - Cancel the parental lock or change the rating level. Error displays • Mechanical error - Press c. MP3 is scratched...
Owners Manual
Page 74
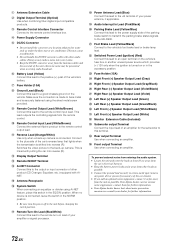
... Cable 2 Digital Output Terminal (Optical) Use when combining fiber digital input compatible products. 3 Remote Control Interface Connector Connect to the remote control interface box. 4 Power Supply Connector 5 DC/DC Converter • Do not install the converter at least 10 cm away from the car's electrical harness. • Keep the battery power leads as far away from other audio cables. Make sure the connection is made to the back-up camera is connected. Switches the video...
... Cable 2 Digital Output Terminal (Optical) Use when combining fiber digital input compatible products. 3 Remote Control Interface Connector Connect to the remote control interface box. 4 Power Supply Connector 5 DC/DC Converter • Do not install the converter at least 10 cm away from the car's electrical harness. • Keep the battery power leads as far away from other audio cables. Make sure the connection is made to the back-up camera is connected. Switches the video...


