Owners Manual
Page 6
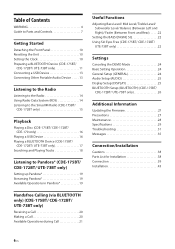
Table of Contents WARNING 4 Guide to Parts and Controls 7 Getting Started Detaching the Front Panel 10 Resetting the Unit 10 Setting the Clock 10 Preparing a BLUETOOTH Device (CDE-175BT/ CDE-172BT/ UTE-73BT only 11 Connecting a USB Device 13 Connecting Other Portable Audio Device . . . . . 13 Listening to the Radio Listening to the Radio 14 Using...
Table of Contents WARNING 4 Guide to Parts and Controls 7 Getting Started Detaching the Front Panel 10 Resetting the Unit 10 Setting the Clock 10 Preparing a BLUETOOTH Device (CDE-175BT/ CDE-172BT/ UTE-73BT only 11 Connecting a USB Device 13 Connecting Other Portable Audio Device . . . . . 13 Listening to the Radio Listening to the Radio 14 Using...
Owners Manual
Page 10
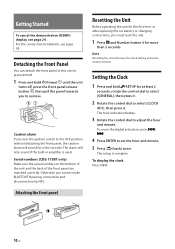
...The setup is used. For the connection/installation, see page 24. The alarm will only sound if the built-in amplifier is complete. Serial numbers (CDE-175BT only) Make sure the serial numbers on the bottom of the unit and the back of this unit to prevent theft. 1 Press and hold...alarm If you to the OFF position without detaching the front panel, the caution alarm will erase the clock setting and some stored contents. Note Resetting the unit will sound for the first time, or after replacing the car battery or changing connections, you cannot make BLUETOOTH pairing, connection and ...
...The setup is used. For the connection/installation, see page 24. The alarm will only sound if the built-in amplifier is complete. Serial numbers (CDE-175BT only) Make sure the serial numbers on the bottom of the unit and the back of this unit to prevent theft. 1 Press and hold...alarm If you to the OFF position without detaching the front panel, the caution alarm will erase the clock setting and some stored contents. Note Resetting the unit will sound for the first time, or after replacing the car battery or changing connections, you cannot make BLUETOOTH pairing, connection and ...
Owners Manual
Page 24
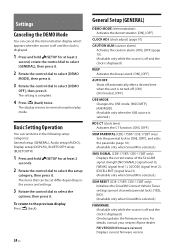
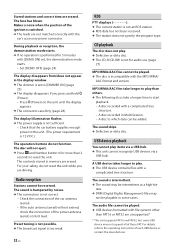
...your nearest Alpine dealer. The setting is displayed. 1 Press and hold /SETUP for at least 2 seconds. 2 Rotate the control dial to [ON], [OFF], and edits the passcode (page 16). (Available only when SiriusXM is selected.) SMX SIGNAL (CDE-175BT/ CDE-172BT only) ...level 0), [WEAK] (signal level 1), [GOOD] (signal level 2), [EXCELLENT] (signal level 3). (Available only when SiriusXM is selected.) SXM RESET (CDE-175BT/ CDE-172BT only) Initializes the SiriusXM Connect Vehicle Tuner settings (preset channels/parental lock): [YES], [NO]. (Available only when SiriusXM is selected.) FIRMWARE ...
...your nearest Alpine dealer. The setting is displayed. 1 Press and hold /SETUP for at least 2 seconds. 2 Rotate the control dial to [ON], [OFF], and edits the passcode (page 16). (Available only when SiriusXM is selected.) SMX SIGNAL (CDE-175BT/ CDE-172BT only) ...level 0), [WEAK] (signal level 1), [GOOD] (signal level 2), [EXCELLENT] (signal level 3). (Available only when SiriusXM is selected.) SXM RESET (CDE-175BT/ CDE-172BT only) Initializes the SiriusXM Connect Vehicle Tuner settings (preset channels/parental lock): [YES], [NO]. (Available only when SiriusXM is selected.) FIRMWARE ...
Owners Manual
Page 32
...-R/CD-RW is not possible. MP3/WMA/AAC files take a longer time to play items via a USB hub. The following discs take longer to reset the unit. During playback or reception, the demonstration mode starts. Press (Power) on the unit until the display appears. For your safety, do not.... - The connectors are erased. The power supply is set , the demonstration mode starts. - The connection is 12 V DC.) The operation buttons do not reset the unit while you press and hold (Power). - RDS data has not been received. A disc recorded in some USB device may not support all of...
...-R/CD-RW is not possible. MP3/WMA/AAC files take a longer time to play items via a USB hub. The following discs take longer to reset the unit. During playback or reception, the demonstration mode starts. Press (Power) on the unit until the display appears. For your safety, do not.... - The connectors are erased. The power supply is set , the demonstration mode starts. - The connection is 12 V DC.) The operation buttons do not reset the unit while you press and hold (Power). - RDS data has not been received. A disc recorded in some USB device may not support all of...

Owners Manual
Page 44
Detaching and attaching the front panel For details, see "Resetting the Unit" (page 10). 44-EN Resetting the unit For details, see "Detaching the Front Panel" (page 10). NISSAN to dashboard/center console Bracket Existing parts supplied with your car Bracket Note To prevent malfunction, install only with the supplied screws .
Detaching and attaching the front panel For details, see "Resetting the Unit" (page 10). 44-EN Resetting the unit For details, see "Detaching the Front Panel" (page 10). NISSAN to dashboard/center console Bracket Existing parts supplied with your car Bracket Note To prevent malfunction, install only with the supplied screws .


