

Owners Manual
Page 3
...8482; Bar Operation 6 Getting Started Turning Power On and Off 7 Initial System Start-Up 7 Setting the Time and Calendar (CDA-9855 only 7 Setting Time (CDA-9853 only 7 Opening and Closing the Movable Display ...... 8 Display Tilt Adjustment 8 Adjusting Volume 8 Lowering Volume Quickly 8 Detaching... and Attaching the Front Panel ......... 8 Radio Changing the Radio Frequencies for each Country 9 Listening to Radio 9 Manual Storing of...
...8482; Bar Operation 6 Getting Started Turning Power On and Off 7 Initial System Start-Up 7 Setting the Time and Calendar (CDA-9855 only 7 Setting Time (CDA-9853 only 7 Opening and Closing the Movable Display ...... 8 Display Tilt Adjustment 8 Adjusting Volume 8 Lowering Volume Quickly 8 Detaching... and Attaching the Front Panel ......... 8 Radio Changing the Radio Frequencies for each Country 9 Listening to Radio 9 Manual Storing of...

Owners Manual
Page 8
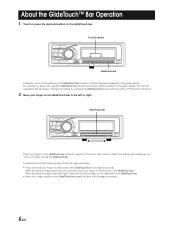
The manual expresses this as follows: "Change the setting by pressing the GlideTouch bar below where ON is scrolled. 6-EN To select items on the following page, ...
The manual expresses this as follows: "Change the setting by pressing the GlideTouch bar below where ON is scrolled. 6-EN To select items on the following page, ...
Owners Manual
Page 11
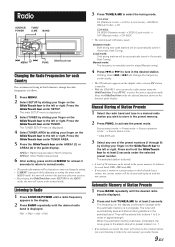
...AREA. 5 Press the GlideTouch bar under RETURN in (Automatic Seek Tuning). CDA-9855: DX (Distance mode) → LOCAL (Local mode) → MANUAL (Manual mode) → DX CDA-9853: DX SEEK (Distance mode) → SEEK (Local mode) → OFF (Manual mode) → DX SEEK • The initial mode is pressed ...cleared and replaced with the new station. They will be stored in . • With the CDA-9855, you wish to select the tuning mode. Press the GlideTouch bar under TUNER. Manual mode: The frequency is displayed. 4 Select TUNER AREA by sliding your finger on the GlideTouch ...
...AREA. 5 Press the GlideTouch bar under RETURN in (Automatic Seek Tuning). CDA-9855: DX (Distance mode) → LOCAL (Local mode) → MANUAL (Manual mode) → DX CDA-9853: DX SEEK (Distance mode) → SEEK (Local mode) → OFF (Manual mode) → DX SEEK • The initial mode is pressed ...cleared and replaced with the new station. They will be stored in . • With the CDA-9855, you wish to select the tuning mode. Press the GlideTouch bar under TUNER. Manual mode: The frequency is displayed. 4 Select TUNER AREA by sliding your finger on the GlideTouch ...
Owners Manual
Page 15
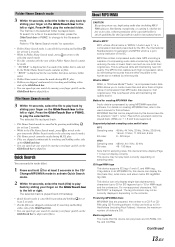
... bar to as much as one-tenth their original size. The first file in the File Name Search mode, press to switch to the user's manual for at least 2 seconds. • While in the selected folder, press the GlideTouch bar or FUNC. The selected file is played back. • File Name...
... bar to as much as one-tenth their original size. The first file in the File Name Search mode, press to switch to the user's manual for at least 2 seconds. • While in the selected folder, press the GlideTouch bar or FUNC. The selected file is played back. • File Name...
Owners Manual
Page 19
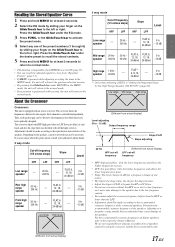
...) Slope HPF LPF HPF LPF Level Low range speaker ---- 20 Hz 200 Hz ---- We are unsure about this point, please consult your authorized Alpine dealer. 2 way mode Cut-off frequency • HPF (high pass filter): Cuts the lower frequencies and allows the higher frequencies to pass. ...adjusting 20 Hz HPF cut-off frequency (Different from actual display) 17-EN Determine the recommended crossover frequency of Alpine speakers, refer to the respective Owner's Manual. Adjustments should be made according to the recommended crossover frequency of each band, and also the slope (how ...
...) Slope HPF LPF HPF LPF Level Low range speaker ---- 20 Hz 200 Hz ---- We are unsure about this point, please consult your authorized Alpine dealer. 2 way mode Cut-off frequency • HPF (high pass filter): Cuts the lower frequencies and allows the higher frequencies to pass. ...adjusting 20 Hz HPF cut-off frequency (Different from actual display) 17-EN Determine the recommended crossover frequency of Alpine speakers, refer to the respective Owner's Manual. Adjustments should be made according to the recommended crossover frequency of each band, and also the slope (how ...
Owners Manual
Page 23
... on the GlideTouch bar to the left or right. MX uses this large data quantity to the left or right. About the MX indicator display (CDA-9853 only) MX Level Display Lights up when MX is on the GlideTouch bar to 3): This corrects information that corresponds to the original. Setting the... on the GlideTouch bar to the left or right. This reproduces a well-balanced sound close to the media connected. For details, refer to the Owner's Manual of each media can have its own MX processing is performed in the MENU mode, the unit will return to the music source. If two...
... on the GlideTouch bar to the left or right. MX uses this large data quantity to the left or right. About the MX indicator display (CDA-9853 only) MX Level Display Lights up when MX is on the GlideTouch bar to 3): This corrects information that corresponds to the original. Setting the... on the GlideTouch bar to the left or right. This reproduces a well-balanced sound close to the media connected. For details, refer to the Owner's Manual of each media can have its own MX processing is performed in the MENU mode, the unit will return to the music source. If two...

Owners Manual
Page 25
...changer must also be CD Text compatible for the Text information to be displayed. • When the Scroll Setting (page 30) is set to "MANUAL," press and hold TITLE for at least 2 seconds to scroll the Text information only once (TEXT DISPLAY, FOLDER NAME DISPLAY, FILE NAME DISPLAY or... information. *5 Only when an external Amplifier Link compatible amplifier is possible to input the CD/Station name (page 24). This inputted name is ignored. CDA-9853 FOLDER NO./FILE NO. FOLDER NO./FILE NO. ELAPSED TIME → CLOCK → ELAPSED TIME FOLDER NAME*3 FILE NAME FILE NAME →...
...changer must also be CD Text compatible for the Text information to be displayed. • When the Scroll Setting (page 30) is set to "MANUAL," press and hold TITLE for at least 2 seconds to scroll the Text information only once (TEXT DISPLAY, FOLDER NAME DISPLAY, FILE NAME DISPLAY or... information. *5 Only when an external Amplifier Link compatible amplifier is possible to input the CD/Station name (page 24). This inputted name is ignored. CDA-9853 FOLDER NO./FILE NO. FOLDER NO./FILE NO. ELAPSED TIME → CLOCK → ELAPSED TIME FOLDER NAME*3 FILE NAME FILE NAME →...
Owners Manual
Page 27
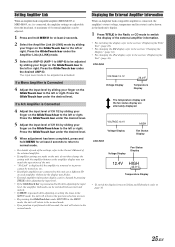
CDA-9855 VOLTAGE:10.1V Voltage Display 75.0˚F Temperature Display The temperature display and the fan status display are connected to this unit, set a different ID on each of the settings, refer to the Owner's Manual of each amplifier. VOLTAGE:10.1V HIGH Voltage Display Fan Status Display CDA-9853 Voltage Display Fan Status...
CDA-9855 VOLTAGE:10.1V Voltage Display 75.0˚F Temperature Display The temperature display and the fan status display are connected to this unit, set a different ID on each of the settings, refer to the Owner's Manual of each amplifier. VOLTAGE:10.1V HIGH Voltage Display Fan Status Display CDA-9853 Voltage Display Fan Status...
Owners Manual
Page 28
...access the URL below . • According to use other colors if they have set above 4 Turn the Rotary encoder to the Owner's Manual of download data shall be "A_U*****.MP3." Data is pressed while adjusting or setting the itmes in the MENU mode, the unit will ...and follow the on the GlideTouch bar to the opening display. http://www.alpine.com or http://www.alpine-usa.com Downloadable data Parametric equalizer or Graphic equalizer Time correction Crossover Profile (CDA-9855 only) Calendar message (CDA-9855 only) Data is memorized in step 3. Press the GlideTouch bar under the ...
...access the URL below . • According to use other colors if they have set above 4 Turn the Rotary encoder to the Owner's Manual of download data shall be "A_U*****.MP3." Data is pressed while adjusting or setting the itmes in the MENU mode, the unit will ...and follow the on the GlideTouch bar to the opening display. http://www.alpine.com or http://www.alpine-usa.com Downloadable data Parametric equalizer or Graphic equalizer Time correction Crossover Profile (CDA-9855 only) Calendar message (CDA-9855 only) Data is memorized in step 3. Press the GlideTouch bar under the ...
Owners Manual
Page 32
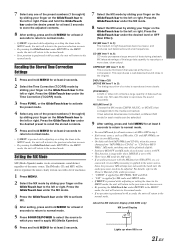
... initial setting at one character at night. MANUAL : The display is scrolled when a disc is loaded or when a track is completed, turn the ignition off and back on . Connect the DVD player to the optical digital input (DVD Player) terminal of Calendar Display Pattern Switching (CDA-9855 only) dd/mm/yyyy(Initial setting...
... initial setting at one character at night. MANUAL : The display is scrolled when a disc is loaded or when a track is completed, turn the ignition off and back on . Connect the DVD player to the optical digital input (DVD Player) terminal of Calendar Display Pattern Switching (CDA-9855 only) dd/mm/yyyy(Initial setting...

Owners Manual
Page 35
... (PRESET, BAND, SEARCH, etc.). When the Scroll Setting is set to the left or right. • When the "Scroll Setting" (page 30) is set to "MANUAL," the display scrolls only once after any function is displayed. 4 Select XM ADF by sliding your finger on the GlideTouch bar to the left or... finger on the model, the display may differ from the one shown above. Press and hold MENU for more than 2 seconds to scroll the display manually. • "Channel Number" and "Clock" displays do not scroll. • Depending on the GlideTouch bar to "AUTO," the display scrolls continuously...
... (PRESET, BAND, SEARCH, etc.). When the Scroll Setting is set to the left or right. • When the "Scroll Setting" (page 30) is set to "MANUAL," the display scrolls only once after any function is displayed. 4 Select XM ADF by sliding your finger on the GlideTouch bar to the left or... finger on the model, the display may differ from the one shown above. Press and hold MENU for more than 2 seconds to scroll the display manually. • "Channel Number" and "Clock" displays do not scroll. • Depending on the GlideTouch bar to "AUTO," the display scrolls continuously...
Owners Manual
Page 36
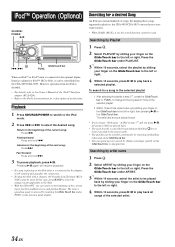
...from the iPod is connected to the optional Alpine Interface adapter for iPod™ (KCA-420i), it is on the GlideTouch bar to the left or right. 4 Within 10 seconds, press -/J to play back all songs in playlists, the CDA-9855/CDA-9853 can use these songs organized in iPod...Optional) SOURCE/ POWER -/J g f GlideTouch bar FUNC. When an iPod™ or iPod™ mini is disabled. • For details, refer to the Owner's Manual of the next song: Press f. Fast backward: Press and hold f. 3 To pause playback, press :/J. Advance to skip playlists. in the search mode. • ...
...from the iPod is connected to the optional Alpine Interface adapter for iPod™ (KCA-420i), it is on the GlideTouch bar to the left or right. 4 Within 10 seconds, press -/J to play back all songs in playlists, the CDA-9855/CDA-9853 can use these songs organized in iPod...Optional) SOURCE/ POWER -/J g f GlideTouch bar FUNC. When an iPod™ or iPod™ mini is disabled. • For details, refer to the Owner's Manual of the next song: Press f. Fast backward: Press and hold f. 3 To pause playback, press :/J. Advance to skip playlists. in the search mode. • ...

Owners Manual
Page 38
...recommended. Press TITLE. to the adapter. Source select mode → Audio function mode → Source operation mode* → Source select mode * CDA-9855 only 2 Press the GlideTouch bar under the RPT function in the iPod. Each press changes the display. Repeat Play Only Repeat One is repeatedly ...mode. For details, refer to "Displaying the External Amplifier Information" (page 25). • When the Scroll Setting (page 30) is set to "MANUAL," press and hold TITLE for at least 2 seconds to scroll the tag information only once. • Elapsed time is displayed for the iPod. ...
...recommended. Press TITLE. to the adapter. Source select mode → Audio function mode → Source operation mode* → Source select mode * CDA-9855 only 2 Press the GlideTouch bar under the RPT function in the iPod. Each press changes the display. Repeat Play Only Repeat One is repeatedly ...mode. For details, refer to "Displaying the External Amplifier Information" (page 25). • When the Scroll Setting (page 30) is set to "MANUAL," press and hold TITLE for at least 2 seconds to scroll the tag information only once. • Elapsed time is displayed for the iPod. ...

Owners Manual
Page 40
... CD changer mode: Folder Select (DN) / DISC Select (DN) button Press this button to select a folder in ascending order. Press this button to the Owner's Manual of external audio processor, refer to select a folder in descending order. MP3 compatible CD changer mode: Folder Select (UP) / DISC Select (UP) button Press this...
... CD changer mode: Folder Select (DN) / DISC Select (DN) button Press this button to select a folder in ascending order. Press this button to the Owner's Manual of external audio processor, refer to select a folder in descending order. MP3 compatible CD changer mode: Folder Select (UP) / DISC Select (UP) button Press this...

Owners Manual
Page 44
...measured at 4 Ohms and ≤ 1% THD+N • S/N: 80 dBA (reference: 1 W into 4 Ohms) Maximum Pre-Output Voltage 4 V/10 k ohms (CDA-9855) 2 V/10 k ohms (CDA-9853) Weight 1.6 kg (3 lbs. 8 oz) CHASSIS SIZE Width Height Depth 178 mm (7") 50 mm (2") 160 mm (6") NOSEPIECE SIZE Width Height Depth 170 mm ... Refer to the Owner's Manual of the adapter KCA-420i (sold separately) and update the iPod Software Version to continuous product improvement, specifications and design are no songs in the iPod. - NO FILE • There are subject to the CDA-9855/ CDA-9853. Turn the ignition ...
...measured at 4 Ohms and ≤ 1% THD+N • S/N: 80 dBA (reference: 1 W into 4 Ohms) Maximum Pre-Output Voltage 4 V/10 k ohms (CDA-9855) 2 V/10 k ohms (CDA-9853) Weight 1.6 kg (3 lbs. 8 oz) CHASSIS SIZE Width Height Depth 178 mm (7") 50 mm (2") 160 mm (6") NOSEPIECE SIZE Width Height Depth 170 mm ... Refer to the Owner's Manual of the adapter KCA-420i (sold separately) and update the iPod Software Version to continuous product improvement, specifications and design are no songs in the iPod. - NO FILE • There are subject to the CDA-9855/ CDA-9853. Turn the ignition ...
Owners Manual
Page 45
...be aware of this unit internally or may result in product failure. amplifier) having RCA connectors. Arrange wiring and cables in compliance with the manual to other units (e.g. Never cut by the metal edge of this unit. Bolts or nuts used for installations or ground connections. If swallowed... When in doubt, consult your dealer if you purchased this unit may not securely install the unit in locations with your ALPINE dealer. • The CDA-9855/CDA-9853 uses female RCA-type jacks for connection to provide power for the intended circuit of the wire and result in serious...
...be aware of this unit internally or may result in product failure. amplifier) having RCA connectors. Arrange wiring and cables in compliance with the manual to other units (e.g. Never cut by the metal edge of this unit. Bolts or nuts used for installations or ground connections. If swallowed... When in doubt, consult your dealer if you purchased this unit may not securely install the unit in locations with your ALPINE dealer. • The CDA-9855/CDA-9853 uses female RCA-type jacks for connection to provide power for the intended circuit of the wire and result in serious...
Owners Manual
Page 48
...Audio Interrupt In Lead (Pink/Black) 6 Illumination Lead (Orange) This lead may be used only for controlling the vehicle's power antenna. DC/DC Converter (CDA-9855 only) • Do not install the converter at a location subjected to the output or input connector of KCA-420i. Right Front (+) Speaker Output Lead ... Connectors RED is right and WHITE is turned on or in the accessory position. 8 Battery Lead (Yellow) Connect this lead to the Owner's Manual of another unused power source which provides (+)12V only when the ignition is left. ; Be sure to turn -on how to connect, refer to...
...Audio Interrupt In Lead (Pink/Black) 6 Illumination Lead (Orange) This lead may be used only for controlling the vehicle's power antenna. DC/DC Converter (CDA-9855 only) • Do not install the converter at a location subjected to the output or input connector of KCA-420i. Right Front (+) Speaker Output Lead ... Connectors RED is right and WHITE is turned on or in the accessory position. 8 Battery Lead (Yellow) Connect this lead to the Owner's Manual of another unused power source which provides (+)12V only when the ignition is left. ; Be sure to turn -on how to connect, refer to...

Owners Manual
Page 50
...carrier that you may not apply to you have other acts of any questions, please contact your nearest Authorized Alpine Service Center. http://www.alpine-usa.com ALPINE ELECTRONICS OF AMERICA, INC., 19145 Gramercy Place, Torrance, California 90501, U.S.A. Products purchased in effect for payment ...LCD panels. are covered only in the U.S.A. [LENGTH OF WARRANTY: This Warranty is not valid unless your Alpine car audio product has been installed in the Owner's manual. 4 Damage caused by an Authorized Installation Center, and this Warranty. Dropped or damaged hard drives. 3 ...
...carrier that you may not apply to you have other acts of any questions, please contact your nearest Authorized Alpine Service Center. http://www.alpine-usa.com ALPINE ELECTRONICS OF AMERICA, INC., 19145 Gramercy Place, Torrance, California 90501, U.S.A. Products purchased in effect for payment ...LCD panels. are covered only in the U.S.A. [LENGTH OF WARRANTY: This Warranty is not valid unless your Alpine car audio product has been installed in the Owner's manual. 4 Damage caused by an Authorized Installation Center, and this Warranty. Dropped or damaged hard drives. 3 ...

Owners Manual
Page 2
...8482; Bar Operation 6 Getting Started Turning Power On and Off 7 Initial System Start-Up 7 Setting the Time and Calendar (CDA-9855 only 7 Setting Time (CDA-9853 only 7 Opening and Closing the Movable Display ...... 8 Display Tilt Adjustment 8 Adjusting Volume 8 Lowering Volume Quickly 8 Detaching... and Attaching the Front Panel ......... 8 Radio Changing the Radio Frequencies for each Country 9 Listening to Radio 9 Manual Storing of...
...8482; Bar Operation 6 Getting Started Turning Power On and Off 7 Initial System Start-Up 7 Setting the Time and Calendar (CDA-9855 only 7 Setting Time (CDA-9853 only 7 Opening and Closing the Movable Display ...... 8 Display Tilt Adjustment 8 Adjusting Volume 8 Lowering Volume Quickly 8 Detaching... and Attaching the Front Panel ......... 8 Radio Changing the Radio Frequencies for each Country 9 Listening to Radio 9 Manual Storing of...
Owners Manual
Page 7
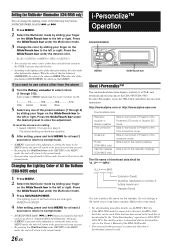
... page is indicated in the display will change as follows: "Change the setting by pressing the GlideTouch bar below where ON is scrolled. 6-EN The manual expresses this as you move your finger on the GlideTouch bar to which a function has been assigned in the guide display. About the GlideTouch™...
... page is indicated in the display will change as follows: "Change the setting by pressing the GlideTouch bar below where ON is scrolled. 6-EN The manual expresses this as you move your finger on the GlideTouch bar to which a function has been assigned in the guide display. About the GlideTouch™...


