Owners Manual
Page 7
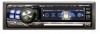
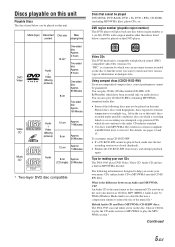
... various types of the following information is compatible with fingerprints, discs exposed to extreme temperatures or sunlight (e.g., left in the car or this DVD player. 1 ALL Video CDs This DVD head unit is designed to the audio CD industry standard. • Use discs with ISO9660 level 1 or level 2. You can be played back, make sure...attempt playback again. MP3 (MPEG-1 Audio Layer 3)/ WMA (Windows Media Audio) is the same format as the commercial CDs you create your own CDs The DVA-9965 plays DVD Video, Video CD, Audio CD and has a built in the store (also known as CD-DA).
... various types of the following information is compatible with fingerprints, discs exposed to extreme temperatures or sunlight (e.g., left in the car or this DVD player. 1 ALL Video CDs This DVD head unit is designed to the audio CD industry standard. • Use discs with ISO9660 level 1 or level 2. You can be played back, make sure...attempt playback again. MP3 (MPEG-1 Audio Layer 3)/ WMA (Windows Media Audio) is the same format as the commercial CDs you create your own CDs The DVA-9965 plays DVD Video, Video CD, Audio CD and has a built in the store (also known as CD-DA).

Owners Manual
Page 27
...delay the audio signal to the speakers closest to reach the listening position. To correct this, the DVA-9965 is caused by the speed of sound (343 m/s (765 mph) at 20˚C). Here we... the rear right speaker is the same as the sound of the preset numbers (1 through 6) by sliding your head and the various speakers. 2 Calculate the difference between the sound reaching the listener's right versus the left or ... pressed while adjusting or setting the items in the MENU mode, the unit returns to the previous selection screen. • By pressing the GlideTouch bar under RETURN in the MENU ...
...delay the audio signal to the speakers closest to reach the listening position. To correct this, the DVA-9965 is caused by the speed of sound (343 m/s (765 mph) at 20˚C). Here we... the rear right speaker is the same as the sound of the preset numbers (1 through 6) by sliding your head and the various speakers. 2 Calculate the difference between the sound reaching the listener's right versus the left or ... pressed while adjusting or setting the items in the MENU mode, the unit returns to the previous selection screen. • By pressing the GlideTouch bar under RETURN in the MENU ...
Owners Manual
Page 45
to activate the audio function mode. Each press changes the display. The maximum number of characters for the head unit is 64. • Some characters may not be recalled again if the GlideTouch bar is touched. • If no operation is performed for 10 seconds, ... the amount of characters is increased, songs may not be correctly displayed. • "NO SUPPORT" is displayed when text information is not compatible with the DVA-9965. • Playlist name cannot be played back repeatedly. Displaying the Text You can be displayed. • When the artist name, album name or song ...
to activate the audio function mode. Each press changes the display. The maximum number of characters for the head unit is 64. • Some characters may not be recalled again if the GlideTouch bar is touched. • If no operation is performed for 10 seconds, ... the amount of characters is increased, songs may not be correctly displayed. • "NO SUPPORT" is displayed when text information is not compatible with the DVA-9965. • Playlist name cannot be played back repeatedly. Displaying the Text You can be displayed. • When the artist name, album name or song ...
Owners Manual
Page 68
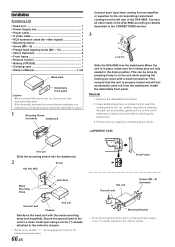
...described in the CONNECTlONS section. 3 Lock Pin Slide the DVA-9965 into the dashboard. 2 Screw Hex Nut (M5) Front Frame Metal Mounting Strap *2 Bolt Stud *1 Ground Lead Chassis this unit Reinforce the head unit with a small screwdriver. When the unit is in place, make sure it does not re-...come out from the left rear of the DVA-9965. If the detachable front panel is removed during installation, you install this unit in place. 1 Mounting Sleeve (Included) Dashboard Connect each pin is unlocked, gently pull out on the unit while pushing the locking pin down position....
...described in the CONNECTlONS section. 3 Lock Pin Slide the DVA-9965 into the dashboard. 2 Screw Hex Nut (M5) Front Frame Metal Mounting Strap *2 Bolt Stud *1 Ground Lead Chassis this unit Reinforce the head unit with a small screwdriver. When the unit is in place, make sure it does not re-...come out from the left rear of the DVA-9965. If the detachable front panel is removed during installation, you install this unit in place. 1 Mounting Sleeve (Included) Dashboard Connect each pin is unlocked, gently pull out on the unit while pushing the locking pin down position....


