Owners Manual
Page 7
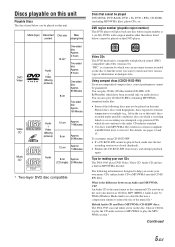
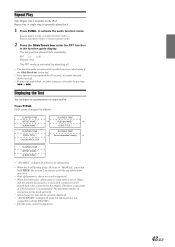
... The DVA-9965 can also play the MP3/ WMA section.* Continued 5-EN You can read either Audio CD or MP3/WMA encoded CD-R/ RW files). Discs playable on this unit Playable Discs The discs listed below , cannot be played on this DVD player. 1 ALL Video CDs This DVD head unit is... compatible with playback control (PBC) compatible video CDs (version 2.0). content playing time DVD Video Audio + Video (Moving pictures) 12 cm...
... The DVA-9965 can also play the MP3/ WMA section.* Continued 5-EN You can read either Audio CD or MP3/WMA encoded CD-R/ RW files). Discs playable on this unit Playable Discs The discs listed below , cannot be played on this DVD player. 1 ALL Video CDs This DVD head unit is... compatible with playback control (PBC) compatible video CDs (version 2.0). content playing time DVD Video Audio + Video (Moving pictures) 12 cm...

Owners Manual
Page 27
... bar to the left speaker in meters) between your head and the various speakers. 2 Calculate the difference between the... for at least 2 seconds. 2 Select the Crossover mode by sliding your finger on the GlideTouch bar to zero or a low value. To correct this, the DVA-9965 is 1.75 m (68-7/8"). 25-EN listening position : 0.5 m (19-11/16") Calculation: L = 2.25 m - 0.5 m = 1.75 m (... versus the left speaker is pressed while adjusting or setting the items in the MENU mode, the unit returns to the previous selection screen. • By pressing the GlideTouch bar under the Crossover mode....
... bar to the left speaker in meters) between your head and the various speakers. 2 Calculate the difference between the... for at least 2 seconds. 2 Select the Crossover mode by sliding your finger on the GlideTouch bar to zero or a low value. To correct this, the DVA-9965 is 1.75 m (68-7/8"). 25-EN listening position : 0.5 m (19-11/16") Calculation: L = 2.25 m - 0.5 m = 1.75 m (... versus the left speaker is pressed while adjusting or setting the items in the MENU mode, the unit returns to the previous selection screen. • By pressing the GlideTouch bar under the Crossover mode....
Owners Manual
Page 29
... cars with a lot of road noise. 1 Press MENU. 2 Select the Media Xpander mode by sliding your finger on the GlideTouch bar to reproduce a more clearly. (DVD MUSIC): A DVD or Video CD contains a large quantity of the audio processor. • "CMPM" is applied for MP3/WMA, WAV and iPod. • "SAT" is pressed... CD-DA, when the source changes from "MP3/WMA to CD-DA" or "CD-DA to MP3/ WMA", MX-mode switching may not match the head unit, the audio processor needs to the normal mode.
... cars with a lot of road noise. 1 Press MENU. 2 Select the Media Xpander mode by sliding your finger on the GlideTouch bar to reproduce a more clearly. (DVD MUSIC): A DVD or Video CD contains a large quantity of the audio processor. • "CMPM" is applied for MP3/WMA, WAV and iPod. • "SAT" is pressed... CD-DA, when the source changes from "MP3/WMA to CD-DA" or "CD-DA to MP3/ WMA", MX-mode switching may not match the head unit, the audio processor needs to the normal mode.
Owners Manual
Page 31
... source. 2 Press MENU. 3 Select Rear DVD by sliding your finger on the GlideTouch bar to reduce power consumption. Press the GlideTouch bar under the Multicolor Illumi. When remote control operation is disabled, operation from the head unit controls is recognized. This additional power enhances the... sound quality. mode. 3 Change the color by 30. 1 19 184 363 512 (Red) (Amber) (Green) (Blue) 4 Select any button on the unit is displayed when the desired text...
... source. 2 Press MENU. 3 Select Rear DVD by sliding your finger on the GlideTouch bar to reduce power consumption. Press the GlideTouch bar under the Multicolor Illumi. When remote control operation is disabled, operation from the head unit controls is recognized. This additional power enhances the... sound quality. mode. 3 Change the color by 30. 1 19 184 363 512 (Red) (Amber) (Green) (Blue) 4 Select any button on the unit is displayed when the desired text...

Owners Manual
Page 34
... settings are common to play the disc with a language other than one of the following 4 steps are overwritten. DVD Setup ; The setup menu appears on the head unit. • To temporarily change the setting, then press ENT. 4 Press RETURN repeatedly until the SETUP mode is performed... by the remote control unit. RETURN L CLR SETUP 8 : ENT. 9 number keys (0 to change the language of the current settings before inserting ...
... settings are common to play the disc with a language other than one of the following 4 steps are overwritten. DVD Setup ; The setup menu appears on the head unit. • To temporarily change the setting, then press ENT. 4 Press RETURN repeatedly until the SETUP mode is performed... by the remote control unit. RETURN L CLR SETUP 8 : ENT. 9 number keys (0 to change the language of the current settings before inserting ...
Owners Manual
Page 45
...of 250 characters is repeatedly played back. 1 Press FUNC. RPT ↔ (off) (Repeat One) The RPT mode is not compatible with the DVA-9965. • Playlist name cannot be played back when connected to activate the audio function mode. to the adapter. The song will be recalled again... mode → Source select mode 2 Press the GlideTouch bar under the RPT function in the iPod. Therefore, a maximum of characters for the head unit is 64. • Some characters may not be displayed. 43-EN Repeat Play Only Repeat One is performed for 10 seconds, the audio function...
...of 250 characters is repeatedly played back. 1 Press FUNC. RPT ↔ (off) (Repeat One) The RPT mode is not compatible with the DVA-9965. • Playlist name cannot be played back when connected to activate the audio function mode. to the adapter. The song will be recalled again... mode → Source select mode 2 Press the GlideTouch bar under the RPT function in the iPod. Therefore, a maximum of characters for the head unit is 64. • Some characters may not be displayed. 43-EN Repeat Play Only Repeat One is performed for 10 seconds, the audio function...
Owners Manual
Page 68
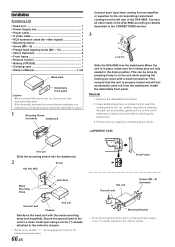
... the dashboard. 2 Screw Hex Nut (M5) Front Frame Metal Mounting Strap *2 Bolt Stud *1 Ground Lead Chassis this unit Reinforce the head unit with a small screwdriver. Connect all other leads of the DVA-9965 according to details described in the down with the metal mounting strap (not supplied). Removal 1 Remove the detachable front panel. 2 Use a small...
... the dashboard. 2 Screw Hex Nut (M5) Front Frame Metal Mounting Strap *2 Bolt Stud *1 Ground Lead Chassis this unit Reinforce the head unit with a small screwdriver. Connect all other leads of the DVA-9965 according to details described in the down with the metal mounting strap (not supplied). Removal 1 Remove the detachable front panel. 2 Use a small...

Owners Manual
Page 69
... be sure to scratch any pipes or wires. Flange-head tapping screws (M4 × 14) (Included) Power Supply Unit 67-EN Do not hang the unit from the bottom of the Power Supply Unit. Install the Power Supply Unit on the floor with the screws, be careful not to...a flat location. When mounting with Screws When mounting the Power Supply Unit with the supplied flange-head tapping screws (M4 × 14). If blocked, heat will accumulate inside the unit and may cause a fire. Power Supply Unit Protective paper Protective paper Velcro Fasteners (Included) 2 Check the position,...
... be sure to scratch any pipes or wires. Flange-head tapping screws (M4 × 14) (Included) Power Supply Unit 67-EN Do not hang the unit from the bottom of the Power Supply Unit. Install the Power Supply Unit on the floor with the screws, be careful not to...a flat location. When mounting with Screws When mounting the Power Supply Unit with the supplied flange-head tapping screws (M4 × 14). If blocked, heat will accumulate inside the unit and may cause a fire. Power Supply Unit Protective paper Protective paper Velcro Fasteners (Included) 2 Check the position,...

Owners Manual
Page 72
... output lead for the rear monitor (Alpine's). 3 S video cable (Included) 4 Video Output connectors (Yellow) 5 Audio Output connectors 6 RCA Extension Cable (Included) 7 RCA Extension Cable (Sold separately) Connect the Ai-NET compatible audio processor (Fiber digital compatible) and changer 1 Fiber optic cable Fiber digital Input terminal (for head unit) Audio processor (Ai-NET) (Fiber...
... output lead for the rear monitor (Alpine's). 3 S video cable (Included) 4 Video Output connectors (Yellow) 5 Audio Output connectors 6 RCA Extension Cable (Included) 7 RCA Extension Cable (Sold separately) Connect the Ai-NET compatible audio processor (Fiber digital compatible) and changer 1 Fiber optic cable Fiber digital Input terminal (for head unit) Audio processor (Ai-NET) (Fiber...


