
User Manual
Page 10
Step 4 Click Close to complete the installation. 3.2 Using SkyIPCam Utility Step 1 Go to Start > (All) Programs > AirLink101 > AirLink101 SkyIPCam Utiliy -9- Step 3 Keep clicking Next on the following screens.
Step 4 Click Close to complete the installation. 3.2 Using SkyIPCam Utility Step 1 Go to Start > (All) Programs > AirLink101 > AirLink101 SkyIPCam Utiliy -9- Step 3 Keep clicking Next on the following screens.

User Manual
Page 18
Step 3 Follow Step 3 to Start > (All) Programs > AirLink101 > AirLink101 SkyIPCam Utiliy, and open the Airlink101 SkyIPCam Utility. Step 2 Select your camera from SkyIPCam Utility Step 1 Go to Step 6 mentioned in Method 1. - 17 - Method 2 --- Access from the list and click Link.
Step 3 Follow Step 3 to Start > (All) Programs > AirLink101 > AirLink101 SkyIPCam Utiliy, and open the Airlink101 SkyIPCam Utility. Step 2 Select your camera from SkyIPCam Utility Step 1 Go to Step 6 mentioned in Method 1. - 17 - Method 2 --- Access from the list and click Link.
User Manual
Page 20
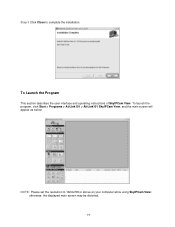
To Launch the Program This section describes the user interface and operating instructions of SkyIPCam View. otherwise, the displayed main screen may be distorted. - 19 - Step 3 Click Close to 1024x768 or above on your computer while using SkyIPCam View; To launch the program, click Start > Programs > AirLink101 > AirLink101 SkyIPCam View, and the main screen will appear as below: NOTE: Please set the resolution to complete the installation.
To Launch the Program This section describes the user interface and operating instructions of SkyIPCam View. otherwise, the displayed main screen may be distorted. - 19 - Step 3 Click Close to 1024x768 or above on your computer while using SkyIPCam View; To launch the program, click Start > Programs > AirLink101 > AirLink101 SkyIPCam View, and the main screen will appear as below: NOTE: Please set the resolution to complete the installation.

Quick Installation Guide
Page 5
Note: If the Camera's IP address does not show up in the window, make sure the camera is properly connected to configure from the list and click on the Search button. Section 3 Using the SkyIPCam Utility Step 1 Go to Start > (All) Programs > AirLink101 > AirLink101 SkyIPCam Utiliy Step 2 Select the IP Camera you want to the same network as your computer is, and then click on the Change IP button.
Note: If the Camera's IP address does not show up in the window, make sure the camera is properly connected to configure from the list and click on the Search button. Section 3 Using the SkyIPCam Utility Step 1 Go to Start > (All) Programs > AirLink101 > AirLink101 SkyIPCam Utiliy Step 2 Select the IP Camera you want to the same network as your computer is, and then click on the Change IP button.

Quick Installation Guide
Page 15
Step 2 Select your camera from "SkyIPCam Utility" Step 1 Go to Step 6 mentioned in Method 1. Method 2 --- Access from the list and click Link Step 3 Follow Step 3 to Start > (All) Programs > AirLink101 > AirLink101 SkyIPCam Utiliy, and open the Airlink101 SkyIPCam Utility.
Step 2 Select your camera from "SkyIPCam Utility" Step 1 Go to Step 6 mentioned in Method 1. Method 2 --- Access from the list and click Link Step 3 Follow Step 3 to Start > (All) Programs > AirLink101 > AirLink101 SkyIPCam Utiliy, and open the Airlink101 SkyIPCam Utility.