User Manual
Page 2
... Utility 7 3.2 Using SkyIPCam Utility 8 3.3 Viewing Images 13 3.4 Using SkyIPCam View 15 CHAPTER 4 ...32 CONFIGURATION ...32 4.1 Using the Web Configuration 32 4.2 Basic Setup ...32 4.3 Network Settings 34 4.4 Setting up Video & Audio 36 4.5 Event Server Configuration 39 4.6 Motion Detect ...40 4.7 Event Configuration 41 4.8 Tools...43 4.9 Information...44 CHAPTER 5 ...46 APPENDIX ...46 A.1 Specification ...46 A.2 Glossary...
... Utility 7 3.2 Using SkyIPCam Utility 8 3.3 Viewing Images 13 3.4 Using SkyIPCam View 15 CHAPTER 4 ...32 CONFIGURATION ...32 4.1 Using the Web Configuration 32 4.2 Basic Setup ...32 4.3 Network Settings 34 4.4 Setting up Video & Audio 36 4.5 Event Server Configuration 39 4.6 Motion Detect ...40 4.7 Event Configuration 41 4.8 Tools...43 4.9 Information...44 CHAPTER 5 ...46 APPENDIX ...46 A.1 Specification ...46 A.2 Glossary...
User Manual
Page 4
... the camera in order to supply power to connect the camera stand. when it is available. The users are also allowed to the factory's default settings. Screw Hole is used to the camera. DC Power Connector is used to connect the power adapter, in a mixed operating system environment, such as Windows...
... the camera in order to supply power to connect the camera stand. when it is available. The users are also allowed to the factory's default settings. Screw Hole is used to the camera. DC Power Connector is used to connect the power adapter, in a mixed operating system environment, such as Windows...

User Manual
Page 12
You can receive in the below window, and click Next. Step 9 If you would like to set up at a later time, click Next. - 11 - If you can get this up email alerts that you want to set this information from your email information here. Step 8 You may also change the camera's IP settings in the future, Please enter your internet service provider.
You can receive in the below window, and click Next. Step 9 If you would like to set up at a later time, click Next. - 11 - If you can get this up email alerts that you want to set this information from your email information here. Step 8 You may also change the camera's IP settings in the future, Please enter your internet service provider.

User Manual
Page 13
Step 10 Confirm your settings at the last window. If everything is correct, click Apply and the configuration is complete. - 12 -
Step 10 Confirm your settings at the last window. If everything is correct, click Apply and the configuration is complete. - 12 -

User Manual
Page 18
To launch the program, click Start > Programs > AirLink101 > AirLink101 SkyIPCam View, and the main screen will appear as below: NOTE Please set the resolution to 1024x768 or above on the main screen: - 17 - otherwise, the displayed main screen may be distorted. To Launch the Program This section describes the user interface and operating instructions of each item on your computer while using SkyIPCam View; Item Features The following describes the function of SkyIPCam View.
To launch the program, click Start > Programs > AirLink101 > AirLink101 SkyIPCam View, and the main screen will appear as below: NOTE Please set the resolution to 1024x768 or above on the main screen: - 17 - otherwise, the displayed main screen may be distorted. To Launch the Program This section describes the user interface and operating instructions of each item on your computer while using SkyIPCam View; Item Features The following describes the function of SkyIPCam View.

User Manual
Page 19
...default, the ID and Password boxes are "blank." Click again to stop recording and save the files in SETTING > Account, you will be asked to enter the required information to enter the Setting screen of lock/unlock function. - 18 - PLAY: Click to resume controls for example, Windows Media Player...cameras. If you connect only one camera, this button's function is the same as the RECORD button. Click SETTING > Account to the main screen of SkyIPCam View. - When you have set ID and Password in the computer. Click again to return to change the ID and password of SkyIPCam View...
...default, the ID and Password boxes are "blank." Click again to stop recording and save the files in SETTING > Account, you will be asked to enter the required information to enter the Setting screen of lock/unlock function. - 18 - PLAY: Click to resume controls for example, Windows Media Player...cameras. If you connect only one camera, this button's function is the same as the RECORD button. Click SETTING > Account to the main screen of SkyIPCam View. - When you have set ID and Password in the computer. Click again to return to change the ID and password of SkyIPCam View...

User Manual
Page 20
...cameras, click this button to switch the video view to display the video views as the main window in the Time interval of scanning, click SETTING > Other and then adjust the time from 1 to the next camera. SCAN: When you connect multiple cameras, click this button to the ...previous camera. - View mode buttons: SkyIPCam View provides multiple view modes, including 1/4/9/16 windows and Full screen mode. - TIP To set the time interval of scan option. - 19 - „ VIEW SELECTION Panel - NEXT: When you connect multiple cameras, click this button to switch the...
...cameras, click this button to switch the video view to display the video views as the main window in the Time interval of scanning, click SETTING > Other and then adjust the time from 1 to the next camera. SCAN: When you connect multiple cameras, click this button to the ...previous camera. - View mode buttons: SkyIPCam View provides multiple view modes, including 1/4/9/16 windows and Full screen mode. - TIP To set the time interval of scan option. - 19 - „ VIEW SELECTION Panel - NEXT: When you connect multiple cameras, click this button to switch the...
User Manual
Page 23
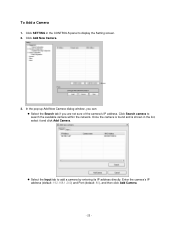
To Add a Camera 1. Click Search camera to display the Setting screen. 2. Click Add New Camera. 3. In the pop-up Add New Camera dialog window, you can: z Select the Search tab if you are not sure of the camera's IP address. Enter the camera's IP address (default: 192.168.1.240) and Port (default: 80), and then click Add Camera. - 22 - Click SETTING in the list, select it and click Add Camera. Once the camera is found and is shown in the CONTROLS panel to search the available camera within the network. z Select the Input tab to add a camera by entering its IP address directly.
To Add a Camera 1. Click Search camera to display the Setting screen. 2. Click Add New Camera. 3. In the pop-up Add New Camera dialog window, you can: z Select the Search tab if you are not sure of the camera's IP address. Enter the camera's IP address (default: 192.168.1.240) and Port (default: 80), and then click Add Camera. - 22 - Click SETTING in the list, select it and click Add Camera. Once the camera is found and is shown in the CONTROLS panel to search the available camera within the network. z Select the Input tab to add a camera by entering its IP address directly.

User Manual
Page 24
The connected camera will be displayed in the CONTROLS panel to the Video View Window. To Remove a Camera 1. The video view of the selected camera will be displayed now. Click SETTING in the Camera List. 5. Select a camera from the list and click Delete Camera. Enter the User name and Password for the camera, and then click OK. Click SETTING to return to display the Setting screen. 2. Select a camera - 23 - 4.
The connected camera will be displayed in the CONTROLS panel to the Video View Window. To Remove a Camera 1. The video view of the selected camera will be displayed now. Click SETTING in the Camera List. 5. Select a camera from the list and click Delete Camera. Enter the User name and Password for the camera, and then click OK. Click SETTING to return to display the Setting screen. 2. Select a camera - 23 - 4.

User Manual
Page 25
...methods to record video clips: one is to stop. the second is enabled, you can configure the camera to record by the motion detected. Click SETTING > Motion Configuration, and then select the Recording option to enable the selected camera to start recording triggered by motion detection. - 24 - z ... the selected camera. z Manually recording Click RECORD/ALL RECORD and it starts recording. To Link to the Web Page of the Camera Click SETTING > Camera List > Camera Configuration and then Link web page to launch the Web browser that displays live view image and Web Configuration of...
...methods to record video clips: one is to stop. the second is enabled, you can configure the camera to record by the motion detected. Click SETTING > Motion Configuration, and then select the Recording option to enable the selected camera to start recording triggered by motion detection. - 24 - z ... the selected camera. z Manually recording Click RECORD/ALL RECORD and it starts recording. To Link to the Web Page of the Camera Click SETTING > Camera List > Camera Configuration and then Link web page to launch the Web browser that displays live view image and Web Configuration of...

User Manual
Page 26
z Schedule recording This recording method will work after you have completed the required settings in Schedule Recording Configuration. Then, click Add to set the Start/Stop date and time and then click OK to add the recording schedule to save the settings. - 25 - The recording schedule can be defined by Schedule Period or Recording Time. - Click Apply to the list. Schedule Period: First, select the camera from the pull-down list.
z Schedule recording This recording method will work after you have completed the required settings in Schedule Recording Configuration. Then, click Add to set the Start/Stop date and time and then click OK to add the recording schedule to save the settings. - 25 - The recording schedule can be defined by Schedule Period or Recording Time. - Click Apply to the list. Schedule Period: First, select the camera from the pull-down list.
User Manual
Page 27
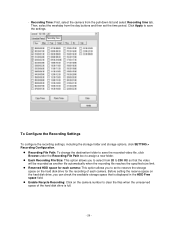
... as another file automatically when the recording file reaches the specified size limit. To Configure the Recording Settings To configure the recording settings, including the storage folder and storage options, click SETTING > Recording Configuration. Recording Time: First, select the camera from 20 to clear the files when ...allows you to select from the pull-down list and select Recording time tab. - Then, select the weekday from the day buttons and then set to reserve the storage space on the camera number to 200 MB so that is full. - 26 - z Enable Recycle Recording: Click ...
... as another file automatically when the recording file reaches the specified size limit. To Configure the Recording Settings To configure the recording settings, including the storage folder and storage options, click SETTING > Recording Configuration. Recording Time: First, select the camera from 20 to clear the files when ...allows you to select from the pull-down list and select Recording time tab. - Then, select the weekday from the day buttons and then set to reserve the storage space on the camera number to 200 MB so that is full. - 26 - z Enable Recycle Recording: Click ...
User Manual
Page 29
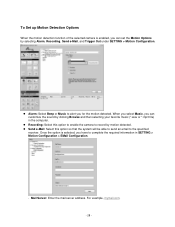
... Send e-Mail: Select this option to enable the camera to record by clicking Browse and then selecting your favorite music (*.wav or *.mp3 file) in SETTING > Motion Configuration > EMail Configuration. - Mail Server: Enter the mail server address. When you select Music, you for the motion detected. z Recording:... example, mymail.com. - 28 - Once the option is enabled, you have to complete the required information in the computer. To Set up Motion Detection Options When the motion detection function of the selected camera is selected, you can customize the sound by motion detected. ...
... Send e-Mail: Select this option to enable the camera to record by clicking Browse and then selecting your favorite music (*.wav or *.mp3 file) in SETTING > Motion Configuration > EMail Configuration. - Mail Server: Enter the mail server address. When you select Music, you for the motion detected. z Recording:... example, mymail.com. - 28 - Once the option is enabled, you have to complete the required information in the computer. To Set up Motion Detection Options When the motion detection function of the selected camera is selected, you can customize the sound by motion detected. ...

User Manual
Page 30
Account You can set a username and password for the notification email. Mail To: Enter the email address of the user who will send the email. User Name: Enter the user name to login the mail server. - Subject: Enter a subject for the camera here. - 29 - Mail From: Enter the email address of the user who will receive the email. - - For example, [email protected]. - Password: Enter the password to login the mail server. -
Account You can set a username and password for the notification email. Mail To: Enter the email address of the user who will send the email. User Name: Enter the user name to login the mail server. - Subject: Enter a subject for the camera here. - 29 - Mail From: Enter the email address of the user who will receive the email. - - For example, [email protected]. - Password: Enter the password to login the mail server. -

User Manual
Page 31
Other Allows you to set the rotation interval if monitoring multiple cameras. - 30 -
Other Allows you to set the rotation interval if monitoring multiple cameras. - 30 -

User Manual
Page 32
Information Click SETTING > About to display the information of the software application. - 31 -
Information Click SETTING > About to display the information of the software application. - 31 -
User Manual
Page 33
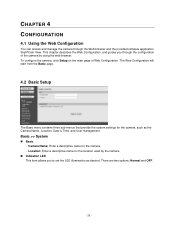
Basic >> System „ Basic - This chapter describes the Web Configuration, and guides you to set the LED illumination as the Camera Name, Location, Date & Time, and User management. There are two options: Normal and OFF. - 32 - To configure the camera... the web browser. The Web Configuration will start from the Basic page. 4.2 Basic Setup The Basic menu contains three sub-menus that provide the system settings for the camera. - CHAPTER 4 CONFIGURATION 4.1 Using the Web Configuration You can access and manage the camera through the configuration of Web Configuration. Camera Name:...
Basic >> System „ Basic - This chapter describes the Web Configuration, and guides you to set the LED illumination as the Camera Name, Location, Date & Time, and User management. There are two options: Normal and OFF. - 32 - To configure the camera... the web browser. The Web Configuration will start from the Basic page. 4.2 Basic Setup The Basic menu contains three sub-menus that provide the system settings for the camera. - CHAPTER 4 CONFIGURATION 4.1 Using the Web Configuration You can access and manage the camera through the configuration of Web Configuration. Camera Name:...

User Manual
Page 34
... User - Synchronize with the NTP Server. You need to use this option and the time will be synchronized with NTP Server: Select this option to set the date and time manually. TimeZone: Select the proper time zone for the new user. - 33 - Basic >> Date & Time „ Date & Time - Synchronize with the... You can use the camera. - Password: Enter the password for the region from the pull-down menu. - Manual: Select this option and the date & time settings of the server and select the update interval in the following two boxes. -
... User - Synchronize with the NTP Server. You need to use this option and the time will be synchronized with NTP Server: Select this option to set the date and time manually. TimeZone: Select the proper time zone for the new user. - 33 - Basic >> Date & Time „ Date & Time - Synchronize with the... You can use the camera. - Password: Enter the password for the region from the pull-down menu. - Manual: Select this option and the date & time settings of the server and select the update interval in the following two boxes. -
User Manual
Page 35
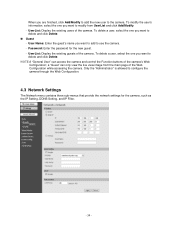
... you are finished, click Add/Modify to add the new user to the camera. Password: Enter the password for the camera, such as the IP Setting, DDNS Setting, and IP Filter. - 34 - NOTE A "General User" can only view the live view image from UserList and click Add/Modify. - a "Guest... while accessing the camera. Only the "Administrator" is allowed to configure the camera through the Web Configuration. 4.3 Network Settings The Network menu contains three sub-menus that provide the network settings for the new guest. - When you want to add to use the camera. - To delete a user, select...
... you are finished, click Add/Modify to add the new user to the camera. Password: Enter the password for the camera, such as the IP Setting, DDNS Setting, and IP Filter. - 34 - NOTE A "General User" can only view the live view image from UserList and click Add/Modify. - a "Guest... while accessing the camera. Only the "Administrator" is allowed to configure the camera through the Web Configuration. 4.3 Network Settings The Network menu contains three sub-menus that provide the network settings for the new guest. - When you want to add to use the camera. - To delete a user, select...

User Manual
Page 36
...so that you NOT use the DDNS function in your connecting type, you have to you. Select the Enable option to -device interoperability. To set of your router. IP Subnet Mask Default Gateway Primary/ Secondary DNS Enter the IP address of the camera. Check with a router, the DDNS...the IP address for DDNS service with the service provider first. Enter the Default Gateway of the camera. You should instead use SkyIPCam Utility to set up , it is ONLY used if you have a PPPoE account from the DHCP server automatically. When the camera starts up the related configuration....
...so that you NOT use the DDNS function in your connecting type, you have to you. Select the Enable option to -device interoperability. To set of your router. IP Subnet Mask Default Gateway Primary/ Secondary DNS Enter the IP address of the camera. Check with a router, the DDNS...the IP address for DDNS service with the service provider first. Enter the Default Gateway of the camera. You should instead use SkyIPCam Utility to set up , it is ONLY used if you have a PPPoE account from the DHCP server automatically. When the camera starts up the related configuration....
