
User Manual
Page 3
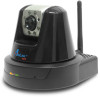
CHAPTER 1 INTRODUCTION TO YOUR CAMERA 1.1 Checking the Package Contents Check the items contained in the package carefully. You should have the following: One Wireless N Night Vision Pan/Tilt Network Camera One 2dBi Antenna One AC Power Adapter One Wall Mount Kit One GPIO Connector One Ethernet Cable (RJ-45 type) One Installation CD One Quick Installation Guide - 2 -
CHAPTER 1 INTRODUCTION TO YOUR CAMERA 1.1 Checking the Package Contents Check the items contained in the package carefully. You should have the following: One Wireless N Night Vision Pan/Tilt Network Camera One 2dBi Antenna One AC Power Adapter One Wall Mount Kit One GPIO Connector One Ethernet Cable (RJ-45 type) One Installation CD One Quick Installation Guide - 2 -
User Manual
Page 9
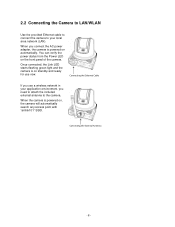
You can verify the power status from the Power LED on standby and ready for use a wireless network in your local area network (LAN). Connecting the External Antenna - 8 - Once connected, the Link LED starts flashing green light and the camera is on ...
You can verify the power status from the Power LED on standby and ready for use a wireless network in your local area network (LAN). Connecting the External Antenna - 8 - Once connected, the Link LED starts flashing green light and the camera is on ...
User Manual
Page 16
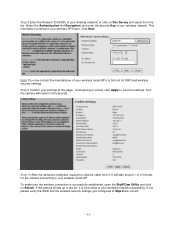
... is restarted, unplug the network cable from the list. If not, please verify the SSID and the wireless security settings you configured at this page. Step 9 Confirm your wireless network, or click on Search. If everything is correct, click Apply to save the settings, then the camera will take around 1 ...or 2 minutes for the camera connecting to your wireless router/AP. Step 8 Enter the Network ID (SSID) of your settings at Step 8 are correct. - 15 - Click Next. Step 10 After the ...
... is restarted, unplug the network cable from the list. If not, please verify the SSID and the wireless security settings you configured at this page. Step 9 Confirm your wireless network, or click on Search. If everything is correct, click Apply to save the settings, then the camera will take around 1 ...or 2 minutes for the camera connecting to your wireless router/AP. Step 8 Enter the Network ID (SSID) of your settings at Step 8 are correct. - 15 - Click Next. Step 10 After the ...

User Manual
Page 23
... related configuration. - It is recommended that you to assign the IP address for the camera, such as the IP Setting, DDNS Setting, IP Filter, and Wireless Network. Static IP: Select this option when your network uses the DHCP server. Enter the Subnet Mask of the camera. You can use DCHP. The...
... related configuration. - It is recommended that you to assign the IP address for the camera, such as the IP Setting, DDNS Setting, IP Filter, and Wireless Network. Static IP: Select this option when your network uses the DHCP server. Enter the Subnet Mask of the camera. You can use DCHP. The...
User Manual
Page 26
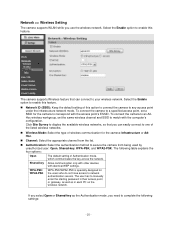
...Authentication: Select the authentication method to secure the camera from the list. The camera supports Wireless feature that you use the wireless network. Network ID (SSID): Keep the default setting of the listed wireless networks. The following settings: - 25 - If you select Open or Shared-key as ...-PSK/WPA2-PSK is specially designed for the camera to match with the computer's configuration. Click Site Survey to display the available wireless networks, so that can easily connect to one of this option to connect the camera to enable this feature. Select the Enable ...
...Authentication: Select the authentication method to secure the camera from the list. The camera supports Wireless feature that you use the wireless network. Network ID (SSID): Keep the default setting of the listed wireless networks. The following settings: - 25 - If you select Open or Shared-key as ...-PSK/WPA2-PSK is specially designed for the camera to match with the computer's configuration. Click Site Survey to display the available wireless networks, so that can easily connect to one of this option to connect the camera to enable this feature. Select the Enable ...

User Manual
Page 27
.../AP. TKIP (Temporal Key Integrity Protocol) changes the temporal key every 10,000 packets to secure the camera within the wireless network. - WEP Key 1/2/3/4: Enter the WEP key(s) in hexadecimal (base 16) notation. - - Key Length: Select the WEP key length you need to be ...interpreted as the Authentication mode, you use: 64 bits or 128 bits. - Pre-Shared Key: Enter your wireless network key into the box, and this must match the Preshared key value configured for digital information. Format: Once you enable the Encryption feature, you...
.../AP. TKIP (Temporal Key Integrity Protocol) changes the temporal key every 10,000 packets to secure the camera within the wireless network. - WEP Key 1/2/3/4: Enter the WEP key(s) in hexadecimal (base 16) notation. - - Key Length: Select the WEP key length you need to be ...interpreted as the Authentication mode, you use: 64 bits or 128 bits. - Pre-Shared Key: Enter your wireless network key into the box, and this must match the Preshared key value configured for digital information. Format: Once you enable the Encryption feature, you...
User Manual
Page 28
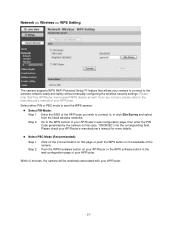
...this page or push the WPS button on this case, "00639392") into the corresponding field. Within 2 minutes, the camera will be wirelessly associated with your camera to connect to the manufacturer's manual of the camera. Select either PIN or PBC mode to start the WPS... AP/Router you are not sure, please refer to the wireless network easily and safely without manually configuring the wireless security settings. Step 2 Go to , or click Site Survey and select from the listed wireless networks. Network >> Wireless >> WPS Setting The camera supports WPS (WiFi Protected Setup&#...
...this page or push the WPS button on this case, "00639392") into the corresponding field. Within 2 minutes, the camera will be wirelessly associated with your camera to connect to the manufacturer's manual of the camera. Select either PIN or PBC mode to start the WPS... AP/Router you are not sure, please refer to the wireless network easily and safely without manually configuring the wireless security settings. Step 2 Go to , or click Site Survey and select from the listed wireless networks. Network >> Wireless >> WPS Setting The camera supports WPS (WiFi Protected Setup&#...

User Manual
Page 74
... content. 1 2 Technical Support E-mail: [email protected] Toll Free: 1-888-746-3238 Web Site: www.airlink101.com * Theoretical maximum wireless signal rate derived from other manufactures is not guaranteed. Photo of wireless products used, radio frequency interference (e.g., cordless telephones and microwaves) as well as network overhead lower actual data throughput rate. Copyright...
... content. 1 2 Technical Support E-mail: [email protected] Toll Free: 1-888-746-3238 Web Site: www.airlink101.com * Theoretical maximum wireless signal rate derived from other manufactures is not guaranteed. Photo of wireless products used, radio frequency interference (e.g., cordless telephones and microwaves) as well as network overhead lower actual data throughput rate. Copyright...
