User Manual
Page 2
Using the Setup Wizard ...11 5. Viewing Videos from External Network 45 9. Introduction...3 2. Getting Started ...7 3. Viewing Images ...14 6. IPView Pro...48 9.1 Installing IPView Pro...48 9.2 Starting IPView Pro ...50 9.2.1 Adding Camera using ... Wizard...9 4. Enabling and Installing ActiveX 16 7. Web Configuration Utility ...19 7.1 Main Menu...20 7.2 Preset Menu ...22 7.3 Record Video and Capture Image 23 7.4 Setting Menu...24 7.5 Multiview Mode...25 7.6 Advanced Setting ...26 7.6.1 Camera Setting...26 7.6.2 Security Setting...29 7.6.3 Network Setting ...32 7.6.4 System ...
Using the Setup Wizard ...11 5. Viewing Videos from External Network 45 9. Introduction...3 2. Getting Started ...7 3. Viewing Images ...14 6. IPView Pro...48 9.1 Installing IPView Pro...48 9.2 Starting IPView Pro ...50 9.2.1 Adding Camera using ... Wizard...9 4. Enabling and Installing ActiveX 16 7. Web Configuration Utility ...19 7.1 Main Menu...20 7.2 Preset Menu ...22 7.3 Record Video and Capture Image 23 7.4 Setting Menu...24 7.5 Multiview Mode...25 7.6 Advanced Setting ...26 7.6.1 Camera Setting...26 7.6.2 Security Setting...29 7.6.3 Network Setting ...32 7.6.4 System ...
User Manual
Page 3
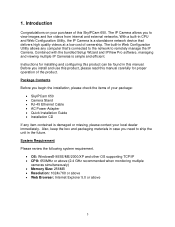
... any computer that delivers high quality videos at a low cost of the product. Also, keep the box and packaging materials in case you to view images and live videos from internal and external networks. Combined with the bundled Setup Wizard and IPView Pro software, managing and viewing multiple IP Cameras is...
... any computer that delivers high quality videos at a low cost of the product. Also, keep the box and packaging materials in case you to view images and live videos from internal and external networks. Combined with the bundled Setup Wizard and IPView Pro software, managing and viewing multiple IP Cameras is...
User Manual
Page 5
...flash light from the USB port by connecting a USB storage device via scheduled settings. USB Port The USB port allows you to capture video images even in normal mode. The Camera will be Category 5 twisted-pair cable). The camera stops monitoring in either direction. 5. LAN Port ...This RJ-45 connector is used to expand the storage medium by pressing and holding this button for 5 seconds until the image is in either clockwise or counterclockwise direction until the camera activates the buzzer. 9. The port supports the NWay protocol, allowing the camera to ...
...flash light from the USB port by connecting a USB storage device via scheduled settings. USB Port The USB port allows you to capture video images even in normal mode. The Camera will be Category 5 twisted-pair cable). The camera stops monitoring in either direction. 5. LAN Port ...This RJ-45 connector is used to expand the storage medium by pressing and holding this button for 5 seconds until the image is in either clockwise or counterclockwise direction until the camera activates the buzzer. 9. The port supports the NWay protocol, allowing the camera to ...
User Manual
Page 14
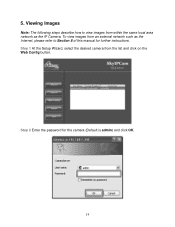
Step 2 Enter the password for further instructions. Step 1 At the Setup Wizard, select the desired camera from within the same local area network as the Internet, please refer to view images from the list and click on the Web Config button. Viewing Images Note: The following steps describe how to Section 8 of this manual for the camera (Default is admin) and click OK. 14 5. To view images from an external network such as the IP Camera.
Step 2 Enter the password for further instructions. Step 1 At the Setup Wizard, select the desired camera from within the same local area network as the Internet, please refer to view images from the list and click on the Web Config button. Viewing Images Note: The following steps describe how to Section 8 of this manual for the camera (Default is admin) and click OK. 14 5. To view images from an external network such as the IP Camera.

User Manual
Page 16
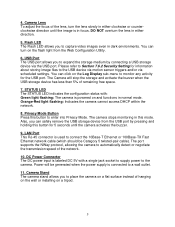
6. Enabling and Installing ActiveX If no image appears on Custom Level. 16 Step 2 Select the Security tab and click on the web browser (Internet Explorer), follow the steps below to enable and install ActiveX Step 1 Open Internet Explorer and go to Tools > Internet Options.
6. Enabling and Installing ActiveX If no image appears on Custom Level. 16 Step 2 Select the Security tab and click on the web browser (Internet Explorer), follow the steps below to enable and install ActiveX Step 1 Open Internet Explorer and go to Tools > Internet Options.

User Manual
Page 20
The index page displays the menu bar, information bar, and the live video. 7.1 Main Menu Digital Zoom In/Out In the Main menu, click the Digital Zoom Bar to zoom in and out of the displayed image by 1X, 2X, or 4X. 20
The index page displays the menu bar, information bar, and the live video. 7.1 Main Menu Digital Zoom In/Out In the Main menu, click the Digital Zoom Bar to zoom in and out of the displayed image by 1X, 2X, or 4X. 20

User Manual
Page 21
... of the Web Configuration Utility. The camera will move the lens to the selected sound in Buzzer setting of the live video to capture clear images in the Main menu. Flash LED On/Off The camera is equipped with a powerful Flash LED that allows you to test the internal buzzer of...
... of the Web Configuration Utility. The camera will move the lens to the selected sound in Buzzer setting of the live video to capture clear images in the Main menu. Flash LED On/Off The camera is equipped with a powerful Flash LED that allows you to test the internal buzzer of...

User Manual
Page 23
... the file name for the recorded video clip. You can use the Browse button to browse to capture and save a still image. Click OK when done. 23 7.3 Record Video and Capture Image In the Live Video Area, you can click the Record button ( ) to record and save a video clip, or click the...
... the file name for the recorded video clip. You can use the Browse button to browse to capture and save a still image. Click OK when done. 23 7.3 Record Video and Capture Image In the Live Video Area, you can click the Record button ( ) to record and save a video clip, or click the...

User Manual
Page 24
... by selecting Low, Med, or High. Quality: You can set the image quality by selecting 176x144, 320x240, or 640x480. Advanced Setting: Displays the Advanced Setting menu. 24 Horizontal degree(s): Allows you to enable/disable the camera's microphone. ...
... by selecting Low, Med, or High. Quality: You can set the image quality by selecting 176x144, 320x240, or 640x480. Advanced Setting: Displays the Advanced Setting menu. 24 Horizontal degree(s): Allows you to enable/disable the camera's microphone. ...

User Manual
Page 26
... level ranging from 1 to 128. Contrast: Adjust the contrast level ranging from 1 to 12. 26 Quality: Select the desired image quality from three formats: 176x144, 320x240, and 640x480. Image size: Select the desired image resolution from three levels: Low, Med, and High. Color: Adjust the color level ranging from 1 to 128. Sharpness: Adjust...
... level ranging from 1 to 128. Contrast: Adjust the contrast level ranging from 1 to 12. 26 Quality: Select the desired image quality from three formats: 176x144, 320x240, and 640x480. Image size: Select the desired image resolution from three levels: Low, Med, and High. Color: Adjust the color level ranging from 1 to 128. Sharpness: Adjust...
User Manual
Page 27
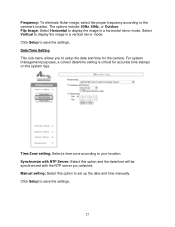
...your location. Manual setting: Select this option and the date/time will be synchronized with the NTP server you to display the image in a vertical mirror mode. Flip Image: Select Horizontal to setup the date and time for accurate time stamps on the system logs. Date/Time Setting This sub-menu... allows you selected. Click Setup to display the image in a horizontal mirror mode. Select Vertical to save the settings. Time Zone setting: Select a time zone according to set up the date and ...
...your location. Manual setting: Select this option and the date/time will be synchronized with the NTP server you to display the image in a vertical mirror mode. Flip Image: Select Horizontal to setup the date and time for accurate time stamps on the system logs. Date/Time Setting This sub-menu... allows you selected. Click Setup to display the image in a horizontal mirror mode. Select Vertical to save the settings. Time Zone setting: Select a time zone according to set up the date and ...
User Manual
Page 29
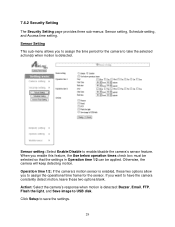
...: Select Enable/Disable to save the settings. 29 Operation time 1/2: If the camera's motion sensor is detected: Buzzer, Email, FTP, Flash the light, and Save image to take the selected action(s) when motion is detected. If you enable this feature, the Use below operation times check box must be selected so...
...: Select Enable/Disable to save the settings. 29 Operation time 1/2: If the camera's motion sensor is detected: Buzzer, Email, FTP, Flash the light, and Save image to take the selected action(s) when motion is detected. If you enable this feature, the Use below operation times check box must be selected so...
User Manual
Page 30
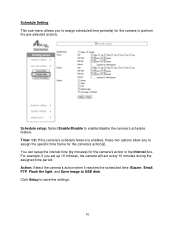
... to perform the pre-selected actions. Action: Select the camera's action when it reaches the scheduled time: Buzzer, Email, FTP, Flash the light, and Save image to save the settings. 30 Click Setup to USB disk. Schedule setup: Select Enable/Disable to enable/disable the camera's schedule feature. For example, if...
... to perform the pre-selected actions. Action: Select the camera's action when it reaches the scheduled time: Buzzer, Email, FTP, Flash the light, and Save image to save the settings. 30 Click Setup to USB disk. Schedule setup: Select Enable/Disable to enable/disable the camera's schedule feature. For example, if...
User Manual
Page 31
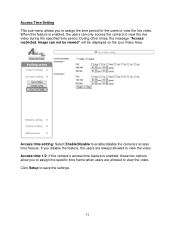
... the video. When this feature is enabled, these two options allow you to assign the time period for the users to view the live video. Image can only access the camera to view the live video during the specified time period. Access time setting: Select Enable/Disable to save the settings...
... the video. When this feature is enabled, these two options allow you to assign the time period for the users to view the live video. Image can only access the camera to view the live video during the specified time period. Access time setting: Select Enable/Disable to save the settings...
User Manual
Page 36
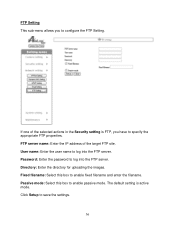
... actions in the Security setting is active mode. User name: Enter the user name to enable passive mode. Directory: Enter the directory for uploading the images. Passive mode: Select this box to save the settings. 36 Password: Enter the password to specify the appropriate FTP properties. If one of the target...
... actions in the Security setting is active mode. User name: Enter the user name to enable passive mode. Directory: Enter the directory for uploading the images. Passive mode: Select this box to save the settings. 36 Password: Enter the password to specify the appropriate FTP properties. If one of the target...

User Manual
Page 39
The following explains the various user levels: Admin: Have full control and access to the camera Power: Allowed to use some basic functions of the camera such as Zoom In/Out, Buzzer, Flash LED, camera's lens position, Preset menu, and switching to view live video, and record/capture the video/image by using the Record/Snapshot buttons. Power User View Guest: Allowed to multiview mode. Guest View 39
The following explains the various user levels: Admin: Have full control and access to the camera Power: Allowed to use some basic functions of the camera such as Zoom In/Out, Buzzer, Flash LED, camera's lens position, Preset menu, and switching to view live video, and record/capture the video/image by using the Record/Snapshot buttons. Power User View Guest: Allowed to multiview mode. Guest View 39
User Manual
Page 47
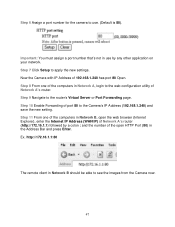
... one of the computers in Network A, login to the web configuration utility of port 80 to apply the new settings. Step 9 Navigate to see the images from the Camera now. 47 Ex. Step 7 Click Setup to the Camera's IP Address (192.168.1.240) and save the new setting.
... one of the computers in Network A, login to the web configuration utility of port 80 to apply the new settings. Step 9 Navigate to see the images from the Camera now. 47 Ex. Step 7 Click Setup to the Camera's IP Address (192.168.1.240) and save the new setting.

User Manual
Page 54
You should now see live images from the camera. Note: If you must add the camera using the Input IP method described below. 54 Step 8 Click on the System Configuration button to add a camera located on a remote network (through the Internet), you want to close the System Configuration Window.
You should now see live images from the camera. Note: If you must add the camera using the Input IP method described below. 54 Step 8 Click on the System Configuration button to add a camera located on a remote network (through the Internet), you want to close the System Configuration Window.

User Manual
Page 58
Rotate Image Angle: Rotates the angle of the camera. 58 Zoom Mode: Adjusts the zoom setting of the video. When you click on this button, a window will appear asking you to control the camera's various functions. Audio: Audio On/Off. Use the Camera Buttons to specify the image name and the save location. From left to right: Connect/Disconnect: Connects or disconnects the video signals from the selected camera. Snapshot: Takes a snapshot image of the current video.
Rotate Image Angle: Rotates the angle of the camera. 58 Zoom Mode: Adjusts the zoom setting of the video. When you click on this button, a window will appear asking you to control the camera's various functions. Audio: Audio On/Off. Use the Camera Buttons to specify the image name and the save location. From left to right: Connect/Disconnect: Connects or disconnects the video signals from the selected camera. Snapshot: Takes a snapshot image of the current video.

User Manual
Page 77
...is an Network Camera used outdoors? No, the camera is an all-in that it is not recommended. It provides high-quality video images for users. The camera is a Network Camera? Q: Can the camera be applied to various web browser and application software without the ...need to compress the digital image? Frequently Asked Questions Network Camera Features Q: What is not weatherproof. It differs from any PC/Notebook over the Intranet or Internet via a web...
...is an Network Camera used outdoors? No, the camera is an all-in that it is not recommended. It provides high-quality video images for users. The camera is a Network Camera? Q: Can the camera be applied to various web browser and application software without the ...need to compress the digital image? Frequently Asked Questions Network Camera Features Q: What is not weatherproof. It differs from any PC/Notebook over the Intranet or Internet via a web...