
User Guide
Page 2
... Started Page 3 Toolbox Page 5 Organizing the Document Page 7 Column Specifications Page 8 Rulers Page 9 Guides Page 10 Inserting/Formatting Text Page 11 Type Menu Page 12 Using Colors Page 13 Working With Objects (Images, Graphics, and Elements Page 14 Placing Images Page 15 Enabling Text Wraps Page 16 Layers and Arranging Page 17 Grouping Page 18 Locking Page 19 Saving Page 20 Exporting To PDF Page 21 Adobe InDesign CS4 2 NOTE: This tutorial is a page-layout software...
... Started Page 3 Toolbox Page 5 Organizing the Document Page 7 Column Specifications Page 8 Rulers Page 9 Guides Page 10 Inserting/Formatting Text Page 11 Type Menu Page 12 Using Colors Page 13 Working With Objects (Images, Graphics, and Elements Page 14 Placing Images Page 15 Enabling Text Wraps Page 16 Layers and Arranging Page 17 Grouping Page 18 Locking Page 19 Saving Page 20 Exporting To PDF Page 21 Adobe InDesign CS4 2 NOTE: This tutorial is a page-layout software...

User Guide
Page 3
... margin guides, matching the column settings you will be horizontal and double-sided. On a Mac, click Macintosh HD > Application > Adobe InDesign CS4 > InDesign CS4, or click the InDesign icon in a double-page spread. Options include, but are not limited to: Number of Pages Type a value for the total number of paper or want objects to InDesign CS4 on the desktop. To create a new document, click File > New > Document. Master Text Frame Select this option to the master. Adobe InDesign CS4 3 This...
... margin guides, matching the column settings you will be horizontal and double-sided. On a Mac, click Macintosh HD > Application > Adobe InDesign CS4 > InDesign CS4, or click the InDesign icon in a double-page spread. Options include, but are not limited to: Number of Pages Type a value for the total number of paper or want objects to InDesign CS4 on the desktop. To create a new document, click File > New > Document. Master Text Frame Select this option to the master. Adobe InDesign CS4 3 This...
User Guide
Page 4
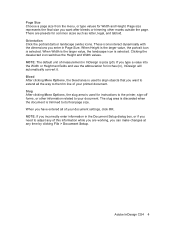
... portrait (tall) or landscape (wide) icons. When Height is the larger value, the portrait icon is used to extend all of measurement in Page Size. There are working, you want to align objects that you type a value into the Width or Height text fields and use the abbreviation for Width and Height. NOTE: The default unit of your document. Adobe InDesign CS4 4
... portrait (tall) or landscape (wide) icons. When Height is the larger value, the portrait icon is used to extend all of measurement in Page Size. There are working, you want to align objects that you type a value into the Width or Height text fields and use the abbreviation for Width and Height. NOTE: The default unit of your document. Adobe InDesign CS4 4
User Guide
Page 5
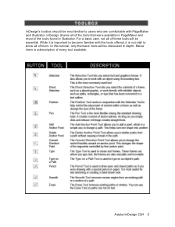
InDesign shares all of the tools that were available in PageMaker and most of the tools found in depth. For a basic user, not all of every tool available. Below there is a description of these tools will be discussed in Illustrator. Adobe InDesign CS4 5 In this tutorial, only the basic tools will be essential. While it is not vital to become familiar with PageMaker and Illustrator. InDesign's toolbox should be very familiar to users who are comfortable with the tools offered, it is important to know all of them.
InDesign shares all of the tools that were available in PageMaker and most of the tools found in depth. For a basic user, not all of every tool available. Below there is a description of these tools will be discussed in Illustrator. Adobe InDesign CS4 5 In this tutorial, only the basic tools will be essential. While it is not vital to become familiar with PageMaker and Illustrator. InDesign's toolbox should be very familiar to users who are comfortable with the tools offered, it is important to know all of them.
User Guide
Page 6
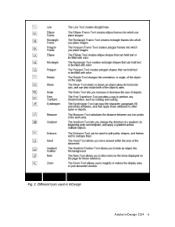
Fig. 2 Different tools used in InDesign Adobe InDesign CS4 6
Fig. 2 Different tools used in InDesign Adobe InDesign CS4 6
User Guide
Page 7
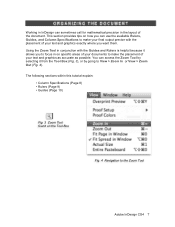
... sections within this tutorial explain: • Column Specifications (Page 8) • Rulers (Page 9) • Guides (Page 10) Fig. 3 Zoom Tool found on the Tool Box Fig. 4 Navigation to make your final output precise with the Guides and Rulers is helpful because it from the Tool Box (Fig. 3), or by going to View > Zoom In or View > Zoom Out (Fig. 4). Using the Zoom Tool in conjunction...
... sections within this tutorial explain: • Column Specifications (Page 8) • Rulers (Page 9) • Guides (Page 10) Fig. 3 Zoom Tool found on the Tool Box Fig. 4 Navigation to make your final output precise with the Guides and Rulers is helpful because it from the Tool Box (Fig. 3), or by going to View > Zoom In or View > Zoom Out (Fig. 4). Using the Zoom Tool in conjunction...
User Guide
Page 8
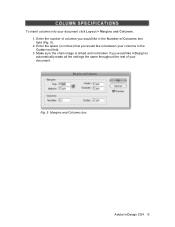
Enter the space (in inches) that you would like InDesign to ..........automatically make all the settings the same throughout the rest of Columns text field (Fig. 5). 2. Make sure the chain image is linked and not broken if you would like in between your columns in the Number of your document click Layout > Margins and Columns. 1. Enter the number of columns you would like in the Gutter text field. 3. Fig. 5 Margins and Columns box Adobe InDesign CS4 8 To insert columns into your ..........document.
Enter the space (in inches) that you would like InDesign to ..........automatically make all the settings the same throughout the rest of Columns text field (Fig. 5). 2. Make sure the chain image is linked and not broken if you would like in between your columns in the Number of your document click Layout > Margins and Columns. 1. Enter the number of columns you would like in the Gutter text field. 3. Fig. 5 Margins and Columns box Adobe InDesign CS4 8 To insert columns into your ..........document.
User Guide
Page 9
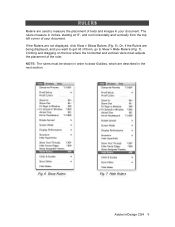
... If the Rulers are described in your document. Or, if the Rulers are being displayed, and you want to get rid of the ruler. Fig. 6 Show Rulers Fig. 7 Hide Rulers Adobe InDesign CS4 9 NOTE: The rulers must be shown in order to View > Hide Rulers (Fig. 7). Clicking and... dragging on the box where the horizontal and vertical rulers meet adjusts the placement of them, go to draw Guides, which are not displayed, click View > Show Rulers (Fig. ...
... If the Rulers are described in your document. Or, if the Rulers are being displayed, and you want to get rid of the ruler. Fig. 6 Show Rulers Fig. 7 Hide Rulers Adobe InDesign CS4 9 NOTE: The rulers must be shown in order to View > Hide Rulers (Fig. 7). Clicking and... dragging on the box where the horizontal and vertical rulers meet adjusts the placement of them, go to draw Guides, which are not displayed, click View > Show Rulers (Fig. ...
User Guide
Page 10
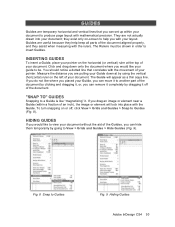
... like "magnetizing" it off , click View > Grids and Guides > Snap to Guides Fig. 9 Hiding Guides Adobe InDesign CS4 10 Click and drag down at the top of your document; If you do not like to view your document to help keep all parts of the document. To turn snapping on -screen to produce page layout with mathematical precision. Guides are useful because they assist when measuring with...
... like "magnetizing" it off , click View > Grids and Guides > Snap to Guides Fig. 9 Hiding Guides Adobe InDesign CS4 10 Click and drag down at the top of your document; If you do not like to view your document to help keep all parts of the document. To turn snapping on -screen to produce page layout with mathematical precision. Guides are useful because they assist when measuring with...
User Guide
Page 11
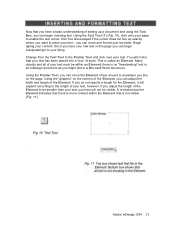
... the Element of sorts. Change from the Text Tool to the Pointer Tool and click over your text will not be discouraged if the cursor does not line up a document and using the Tool Box, you can begin manipulating it will notice that your text - Using the Pointer Tool, you can move and format your text later. Once you have a basic understanding of setting up...
... the Element of sorts. Change from the Text Tool to the Pointer Tool and click over your text will not be discouraged if the cursor does not line up a document and using the Tool Box, you can begin manipulating it will notice that your text - Using the Pointer Tool, you can move and format your text later. Once you have a basic understanding of setting up...

User Guide
Page 12
... basic and self-explanatory (such as font, size, style, etc.), however, there are given nine options of the text Element. You are other more versatile and precise. Notice that if you may want to center your text will notice the first few items under the Type Menu. ALIGNMENT Next you select Center, for type Fig. 13 Paragraph Box from Type Menu Adobe InDesign CS4 12
... basic and self-explanatory (such as font, size, style, etc.), however, there are given nine options of the text Element. You are other more versatile and precise. Notice that if you may want to center your text will notice the first few items under the Type Menu. ALIGNMENT Next you select Center, for type Fig. 13 Paragraph Box from Type Menu Adobe InDesign CS4 12
User Guide
Page 13
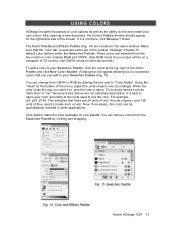
... the top of the window. Fig. 15 Swatches Palette Fig. 14 Color and Effects Palette Adobe InDesign CS4 13 These colors are 24 units of red, 18 units of green, and 136 units of the Color Palette and click New Color Swatch. Click Add to your Swatches Palette (Fig. 15). Use CMYK colors for print documents.) To add a color to make the color available on a computer or TV screen.
... the top of the window. Fig. 15 Swatches Palette Fig. 14 Color and Effects Palette Adobe InDesign CS4 13 These colors are 24 units of red, 18 units of green, and 136 units of the Color Palette and click New Color Swatch. Click Add to your Swatches Palette (Fig. 15). Use CMYK colors for print documents.) To add a color to make the color available on a computer or TV screen.
User Guide
Page 14
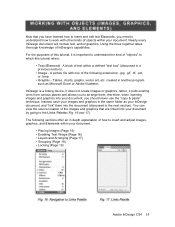
... program such as your InDesign document, and "link" them ; InDesign is important to Links Palette Fig. 17 Links Palette Adobe InDesign CS4 14 You can view the source location of the images and graphics that you have learned how to insert and edit text Elements, you need to understand how to work with one of "objects" to insert and adjust images, graphics, and Elements within your document. The following extensions: .jpg...
... program such as your InDesign document, and "link" them ; InDesign is important to Links Palette Fig. 17 Links Palette Adobe InDesign CS4 14 You can view the source location of the images and graphics that you have learned how to insert and edit text Elements, you need to understand how to work with one of "objects" to insert and adjust images, graphics, and Elements within your document. The following extensions: .jpg...
User Guide
Page 15
... function used to Microsoft Word's "Insert Picture from its current location (as previously mentioned). little black squares - Make sure the Pointer Tool is selected. (If the Text Tool is selected when placing an image, the image will change into your document, it using the "grippers" - Your cursor will insert within Elements are difficult to drop the image and click the mouse once. It is "linked" to...
... function used to Microsoft Word's "Insert Picture from its current location (as previously mentioned). little black squares - Make sure the Pointer Tool is selected. (If the Text Tool is selected when placing an image, the image will change into your document, it using the "grippers" - Your cursor will insert within Elements are difficult to drop the image and click the mouse once. It is "linked" to...
User Guide
Page 16
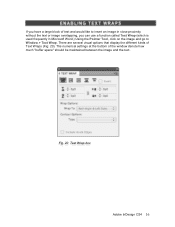
The numerical settings at the bottom of text and would like to insert an image in close proximity without the text or image overlapping, you can use a function called Text Wrap (which is used frequently in Microsoft Word.) Using the Pointer Tool, click on the image and go to Window > Text Wrap. Fig. 20 Text Wrap box Adobe InDesign CS4 16 If you have a large block of the window denote how much "buffer space" should be maintained between the image and the text. There are several visual options that display the different kinds of Text Wraps (Fig. 20).
The numerical settings at the bottom of text and would like to insert an image in close proximity without the text or image overlapping, you can use a function called Text Wrap (which is used frequently in Microsoft Word.) Using the Pointer Tool, click on the image and go to Window > Text Wrap. Fig. 20 Text Wrap box Adobe InDesign CS4 16 If you have a large block of the window denote how much "buffer space" should be maintained between the image and the text. There are several visual options that display the different kinds of Text Wraps (Fig. 20).

User Guide
Page 17
...). InDesign uses Layers like many other Layers), or to the very back (below all other current software programs. Layers allow you create a new object, a new Layer is created. This particular image contains five Layers: a yellow background box, a red box, a blue box, a green ellipse, and the text Element. To move an object forwards or backwards within the Layers, select the object you to overlap objects within a document. Fig. 21 Shows how the different shapes...
...). InDesign uses Layers like many other Layers), or to the very back (below all other current software programs. Layers allow you create a new object, a new Layer is created. This particular image contains five Layers: a yellow background box, a red box, a blue box, a green ellipse, and the text Element. To move an object forwards or backwards within the Layers, select the object you to overlap objects within a document. Fig. 21 Shows how the different shapes...
User Guide
Page 18
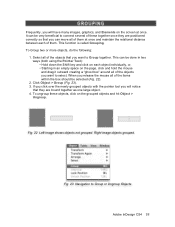
... many images, graphics, and Elements on the grouped objects and hit Object > Ungroup. Select all of them at once. Fig. 23 Navigation to Group together. It can move all of them . This function is called Grouping. Fig. 22 Left image shows objects not grouped. When you release the mouse all of the items within the box should be very beneficial to connect several...
... many images, graphics, and Elements on the grouped objects and hit Object > Ungroup. Select all of them at once. Fig. 23 Navigation to Group together. It can move all of them . This function is called Grouping. Fig. 22 Left image shows objects not grouped. When you release the mouse all of the items within the box should be very beneficial to connect several...

User Guide
Page 19
.... To Lock objects, select them using the Pointer Tool and click Object > Lock Position (Fig. 24). Fig. 24 Locking an Object Fig. 25 Unlocking an Object Adobe InDesign CS4 19 When an object is Locked, it accidentally if you are not careful.) Therefore, InDesign has a function called Locking to help you avoid such accidents. NOTE: As with Grouping, you can hold down the Shift key to select multiple objects. To unlock the object(s), click Object...
.... To Lock objects, select them using the Pointer Tool and click Object > Lock Position (Fig. 24). Fig. 24 Locking an Object Fig. 25 Unlocking an Object Adobe InDesign CS4 19 When an object is Locked, it accidentally if you are not careful.) Therefore, InDesign has a function called Locking to help you avoid such accidents. NOTE: As with Grouping, you can hold down the Shift key to select multiple objects. To unlock the object(s), click Object...

User Guide
Page 20
... the Save button in the Save As box Adobe InDesign CS4 20 Navigate to the place you would like your document to make sure that your document is saved in the place you have been doing. 1. Fig. 26 Save your file in the desired place in the lower right corner...document in InDesign. The Save As dialogue box will appear (Fig. 26). 3. Check to be a habit when working in the Save As text field. 5. To save your InDesign document go to File > Save As. 2. Enter the name of losing the work you intended. Saving your document should be saved by using the drop-down menu and navigation window...
... the Save button in the Save As box Adobe InDesign CS4 20 Navigate to the place you would like your document to make sure that your document is saved in the place you have been doing. 1. Fig. 26 Save your file in the desired place in the lower right corner...document in InDesign. The Save As dialogue box will appear (Fig. 26). 3. Check to be a habit when working in the Save As text field. 5. To save your InDesign document go to File > Save As. 2. Enter the name of losing the work you intended. Saving your document should be saved by using the drop-down menu and navigation window...

User Guide
Page 21
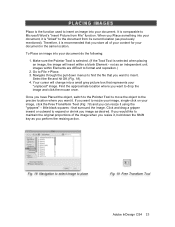
... new file (without the common hassles of the elements required to view and print a document that matches the original design in multiple ways to save (Fig. 27); These files are ready to the original application that you want changed in the way it . WHAT IS A PDF? Portable Document Format (PDF) files are not fully editable, without access to create the PDF file take the following actions: 1. NOTE: InDesign differs from Adobe Acrobat Reader, software...
... new file (without the common hassles of the elements required to view and print a document that matches the original design in multiple ways to save (Fig. 27); These files are ready to the original application that you want changed in the way it . WHAT IS A PDF? Portable Document Format (PDF) files are not fully editable, without access to create the PDF file take the following actions: 1. NOTE: InDesign differs from Adobe Acrobat Reader, software...


