User Guide
Page 2
... VIOLATING THE LAW WHICH COULD RESULT IN DAMAGES OR OTHER REMEDIES. ii Trademarks Adaptec, the Adaptec logo, and GameBridge are the property of Nintendo. All other countries, used under license. Adaptec reserves the right to its accuracy, Adaptec, Inc. Copyright © 2005 Adaptec, Inc. assumes no liability resulting from the use of Sony Computer Entertainment, Inc...
... VIOLATING THE LAW WHICH COULD RESULT IN DAMAGES OR OTHER REMEDIES. ii Trademarks Adaptec, the Adaptec logo, and GameBridge are the property of Nintendo. All other countries, used under license. Adaptec reserves the right to its accuracy, Adaptec, Inc. Copyright © 2005 Adaptec, Inc. assumes no liability resulting from the use of Sony Computer Entertainment, Inc...

User Guide
Page 8
In this Guide Introduction 2 Installing GameBridge 5 Configuring InterVideo Home Theater 17 Navigating InterVideo Home Theater 19 Playing and Recording Console Games on Your PC 20 Recording Videos 25 Getting Help 26 Technical Specifications 30 1
In this Guide Introduction 2 Installing GameBridge 5 Configuring InterVideo Home Theater 17 Navigating InterVideo Home Theater 19 Playing and Recording Console Games on Your PC 20 Recording Videos 25 Getting Help 26 Technical Specifications 30 1
User Guide
Page 9
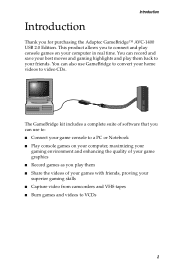
Introduction Introduction Thank you play them back to your friends. The GameBridge kit includes a complete suite of software that you can use GameBridge to convert your superior gaming skills ■ Capture video from camcorders and VHS tapes ■ Burn games and videos to VCDs 2 You can record and ... friends, proving your home videos to a PC or Notebook ■ Play console games on your game graphics ■ Record games as you for purchasing the Adaptec GameBridge™ AVC-1400 USB 2.0 Edition.
Introduction Introduction Thank you play them back to your friends. The GameBridge kit includes a complete suite of software that you can use GameBridge to convert your superior gaming skills ■ Capture video from camcorders and VHS tapes ■ Burn games and videos to VCDs 2 You can record and ... friends, proving your home videos to a PC or Notebook ■ Play console games on your game graphics ■ Record games as you for purchasing the Adaptec GameBridge™ AVC-1400 USB 2.0 Edition.
User Guide
Page 10
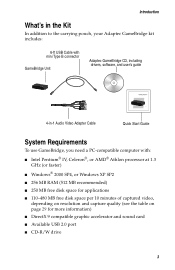
Introduction What's in the Kit In addition to the carrying pouch, your Adaptec GameBridge kit includes: 6-ft USB Cable with mini Type B connector GameBridge Unit Adaptec GameBridge CD, including drivers, software, and user's guide 4-in-1 Audio Video Adapter Cable Quick Start Guide System Requirements To use GameBridge, you need a PC-compatible computer with: ■ Intel Pentium®... on resolution and capture quality (see the table on page 29 for more information) ■ DirectX 9 compatible graphic accelerator and sound card ■ Available USB 2.0 port ■ CD-R/W drive 3
Introduction What's in the Kit In addition to the carrying pouch, your Adaptec GameBridge kit includes: 6-ft USB Cable with mini Type B connector GameBridge Unit Adaptec GameBridge CD, including drivers, software, and user's guide 4-in-1 Audio Video Adapter Cable Quick Start Guide System Requirements To use GameBridge, you need a PC-compatible computer with: ■ Intel Pentium®... on resolution and capture quality (see the table on page 29 for more information) ■ DirectX 9 compatible graphic accelerator and sound card ■ Available USB 2.0 port ■ CD-R/W drive 3

User Guide
Page 11
Your GameBridge Unit LED Introduction Mini USB Port 4-in-1 Audio/Video Connector Power LED Status The LED on the top of operation: LED Color Off Green Green Condition Steady Blinking Description Device is being transferred. 4 Data is off. Device is ready to indicate the status of GameBridge lights up to use.
Your GameBridge Unit LED Introduction Mini USB Port 4-in-1 Audio/Video Connector Power LED Status The LED on the top of operation: LED Color Off Green Green Condition Steady Blinking Description Device is being transferred. 4 Data is off. Device is ready to indicate the status of GameBridge lights up to use.
User Guide
Page 12
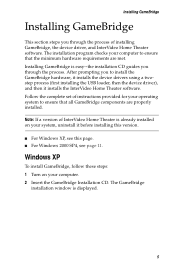
... are properly installed. Follow the complete set of instructions provided for your computer to install the GameBridge hardware, it installs the device drivers using a twostep process (first installing the USB loader, then the device driver), and then it before installing this version. ■ For Windows... XP, see this page. ■ For Windows 2000 SP4, see page 11. Note: If a version of installing GameBridge, the device driver, and InterVideo Home...
... are properly installed. Follow the complete set of instructions provided for your computer to install the GameBridge hardware, it installs the device drivers using a twostep process (first installing the USB loader, then the device driver), and then it before installing this version. ■ For Windows... XP, see this page. ■ For Windows 2000 SP4, see page 11. Note: If a version of installing GameBridge, the device driver, and InterVideo Home...

User Guide
Page 13
Installing GameBridge 3 Click Install GameBridge. If the following message pops up, make sure GameBridge is not plugged into your computer, then click Continue. Note: If you click Cancel in this window, you must restart the installation process. 6
Installing GameBridge 3 Click Install GameBridge. If the following message pops up, make sure GameBridge is not plugged into your computer, then click Continue. Note: If you click Cancel in this window, you must restart the installation process. 6

User Guide
Page 14
If you plug GameBridge into a non-hi-speed USB hub. 7 At this time, you 'll see the following message during driver installation indicating that GameBridge will run at a reduced (USB 1.1) speed: A hi-speed USB device is plugged into a USB 1.1 port, you will connect all the equipment. 5 Connect GameBridge to your computer using the provided USB cable. Installing GameBridge 4 The Install GameBridge window opens, alerting you to connect GameBridge to your computer's USB 2.0 port. Note: To operate properly, GameBridge requires USB 2.0.
If you plug GameBridge into a non-hi-speed USB hub. 7 At this time, you 'll see the following message during driver installation indicating that GameBridge will run at a reduced (USB 1.1) speed: A hi-speed USB device is plugged into a USB 1.1 port, you will connect all the equipment. 5 Connect GameBridge to your computer using the provided USB cable. Installing GameBridge 4 The Install GameBridge window opens, alerting you to connect GameBridge to your computer's USB 2.0 port. Note: To operate properly, GameBridge requires USB 2.0.

User Guide
Page 15
Connect white audio plug to white audio port and red audio plug to analog video input port (if available). Connect gray S-video plug to red audio port. Connect yellow video plug to PlayStation® 2, Xbox®, or GameCube® consoles. GameBridge can be connected to yellow video port. Note: To record videos, connect GameBridge to your game console using the provided 4in-1 Audio Video cable. Installing GameBridge 6 Connect GameBridge to a camcorder or VHS the same way . 7 When the Found New Hardware Wizard opens, select No, not at this time and click Next. 8
Connect white audio plug to white audio port and red audio plug to analog video input port (if available). Connect gray S-video plug to red audio port. Connect yellow video plug to PlayStation® 2, Xbox®, or GameCube® consoles. GameBridge can be connected to yellow video port. Note: To record videos, connect GameBridge to your game console using the provided 4in-1 Audio Video cable. Installing GameBridge 6 Connect GameBridge to a camcorder or VHS the same way . 7 When the Found New Hardware Wizard opens, select No, not at this time and click Next. 8
User Guide
Page 16
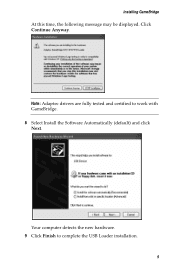
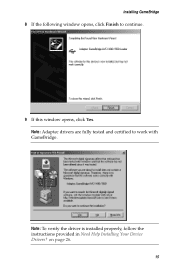
Installing GameBridge At this time, the following message may be displayed. Click Continue Anyway. Your computer detects the new hardware. 9 Click Finish to work with GameBridge. 8 Select Install the Software Automatically (default) and click Next. Note: Adaptec drivers are fully tested and certified to complete the USB Loader installation. 9
Installing GameBridge At this time, the following message may be displayed. Click Continue Anyway. Your computer detects the new hardware. 9 Click Finish to work with GameBridge. 8 Select Install the Software Automatically (default) and click Next. Note: Adaptec drivers are fully tested and certified to complete the USB Loader installation. 9

User Guide
Page 17
Follow the on page 26. 11 The InterVideo Home Theater software installer launches automatically. on -screen instructions. 10 Installing GameBridge 10 The Found New Hardware Wizard opens again, repeat Step 7 through Step 9 to install the device drivers Note: To check if the driver is installed properly, see Need Help Installing Your Device Drivers?
Follow the on page 26. 11 The InterVideo Home Theater software installer launches automatically. on -screen instructions. 10 Installing GameBridge 10 The Found New Hardware Wizard opens again, repeat Step 7 through Step 9 to install the device drivers Note: To check if the driver is installed properly, see Need Help Installing Your Device Drivers?

User Guide
Page 18
Windows 2000 SP4 To install GameBridge, follow these steps: 1 Turn on page 17. The GameBridge installation window is complete, click Yes, I want to restart my computer now. 13 After the computer restarts, you are ready to set up InterVideo Home Theater and then play and record games. See Configuring InterVideo Home Theater on your computer. 2 Insert the GameBridge Installation CD. Installing GameBridge 12 After the installation is displayed. 11
Windows 2000 SP4 To install GameBridge, follow these steps: 1 Turn on page 17. The GameBridge installation window is complete, click Yes, I want to restart my computer now. 13 After the computer restarts, you are ready to set up InterVideo Home Theater and then play and record games. See Configuring InterVideo Home Theater on your computer. 2 Insert the GameBridge Installation CD. Installing GameBridge 12 After the installation is displayed. 11

User Guide
Page 19
Installing GameBridge 3 Click Install GameBridge. If your computer does not have DirectX 9.0 installed, the following message pops up, make sure GameBridge is unplugged from the computer, then click Continue. Click OK to continue and follow the on-screen instructions. If the following window opens. Your computer reboots after DirectX 9.0 has been installed. 12 Note: If you click Cancel in the following window, you must restart the installation process.
Installing GameBridge 3 Click Install GameBridge. If your computer does not have DirectX 9.0 installed, the following message pops up, make sure GameBridge is unplugged from the computer, then click Continue. Click OK to continue and follow the on-screen instructions. If the following window opens. Your computer reboots after DirectX 9.0 has been installed. 12 Note: If you click Cancel in the following window, you must restart the installation process.

User Guide
Page 20
Installing GameBridge 4 The Install GameBridge window opens, alerting you will connect all the equipment. 5 Connect GameBridge to your computer using the provided USB cable. 13 At this time, you to connect GameBridge to your computer's USB 2.0 port.
Installing GameBridge 4 The Install GameBridge window opens, alerting you will connect all the equipment. 5 Connect GameBridge to your computer using the provided USB cable. 13 At this time, you to connect GameBridge to your computer's USB 2.0 port.

User Guide
Page 21
Connect yellow video plug to analog video input port (if available). Connect gray S-video plug to yellow video port. Installing GameBridge 6 Connect GameBridge to red audio port. Connect white audio plug to white audio port and red audio plug to your game console using the provided 4in-1 Audio Video cable. GameBridge can be connected to complete the USB Loader installation. 14 Note: To record videos, connect GameBridge to a camcorder or VHS the same way . 7 Click Finish to PlayStation® 2, Xbox®, or GameCube® consoles.
Connect yellow video plug to analog video input port (if available). Connect gray S-video plug to yellow video port. Installing GameBridge 6 Connect GameBridge to red audio port. Connect white audio plug to white audio port and red audio plug to your game console using the provided 4in-1 Audio Video cable. GameBridge can be connected to complete the USB Loader installation. 14 Note: To record videos, connect GameBridge to a camcorder or VHS the same way . 7 Click Finish to PlayStation® 2, Xbox®, or GameCube® consoles.
User Guide
Page 22
on page 26. 15 Note: Adaptec drivers are fully tested and certified to continue. 9 If this window opens, click Yes. Note: To verify the driver is installed properly, follow the instructions provided in Need Help Installing Your Device Drivers? Installing GameBridge 8 If the following window opens, click Finish to work with GameBridge.
on page 26. 15 Note: Adaptec drivers are fully tested and certified to continue. 9 If this window opens, click Yes. Note: To verify the driver is installed properly, follow the instructions provided in Need Help Installing Your Device Drivers? Installing GameBridge 8 If the following window opens, click Finish to work with GameBridge.

User Guide
Page 23
Installing GameBridge 10 The InterVideo Home Theater software installer launches automatically. See Configuring InterVideo Home Theater on -screen instructions. 11 After the installation is complete, restart your computer. 12 After the computer restarts, you are ready to set up InterVideo Home Theater and then play and record games. Follow the on page 17. 16
Installing GameBridge 10 The InterVideo Home Theater software installer launches automatically. See Configuring InterVideo Home Theater on -screen instructions. 11 After the installation is complete, restart your computer. 12 After the computer restarts, you are ready to set up InterVideo Home Theater and then play and record games. Follow the on page 17. 16

User Guide
Page 24
... Then, open the Configuration window by going to set various configuration settings for InterVideo Home Theater: 1 Make sure GameBridge is not running so that the GameBridge LED indicator is solid green. To do so, make sure InterVideo Home Theatre is connected to your game console and... your computer, and that you should also have installed the software and connected GameBridge, you can adjust your video settings. 2 Select the Color tab in the Configuration window. 17 The following window opens: Navigate through...
... Then, open the Configuration window by going to set various configuration settings for InterVideo Home Theater: 1 Make sure GameBridge is not running so that the GameBridge LED indicator is solid green. To do so, make sure InterVideo Home Theatre is connected to your game console and... your computer, and that you should also have installed the software and connected GameBridge, you can adjust your video settings. 2 Select the Color tab in the Configuration window. 17 The following window opens: Navigate through...

User Guide
Page 27
...and Recording Console Games on Your PC Playing and Recording Console Games on Your PC With GameBridge, you can start playing games. 1 From your computer's desktop, double-click the InterVideo Home Theater icon . 2 Select the GameBridge option. 20 You can: ■ Play console games on Your Computer Once you have ...installed the InterVideo Home Theater software and connected GameBridge to a Video-CD (see page 23). ■ Burn a video of your game console, you are playing (see page 24). Playing Games on your ...
...and Recording Console Games on Your PC Playing and Recording Console Games on Your PC With GameBridge, you can start playing games. 1 From your computer's desktop, double-click the InterVideo Home Theater icon . 2 Select the GameBridge option. 20 You can: ■ Play console games on Your Computer Once you have ...installed the InterVideo Home Theater software and connected GameBridge to a Video-CD (see page 23). ■ Burn a video of your game console, you are playing (see page 24). Playing Games on your ...

User Guide
Page 28
Note: To play the game using full screen, double-click the game in the main GameBridge window. It immediately starts in the window. See Customizing the GameBridge Settings on Your PC Note: The first time you can define the basic settings for more information. 3 Insert a game into your game console. To return to the smaller view, click the Back icon , located in the upper left corner of the window. 21 Playing and Recording Console Games on page 22 for video and recording. Using this window, you open GameBridge, the Settings window is displayed.
Note: To play the game using full screen, double-click the game in the main GameBridge window. It immediately starts in the window. See Customizing the GameBridge Settings on Your PC Note: The first time you can define the basic settings for more information. 3 Insert a game into your game console. To return to the smaller view, click the Back icon , located in the upper left corner of the window. 21 Playing and Recording Console Games on page 22 for video and recording. Using this window, you open GameBridge, the Settings window is displayed.