
User Guide
Page 1
Table of Contents Precautions ...2 Special notes on LCD monitors 2 Package contents 3 Installation instructions 3 Assembling the monitor 3 Adjusting the viewing angle 4 Connecting the devices 5 Switching the power 6 Adjusting display settings 6 External controls 6 OSD options...7 OSD menu ...7 Troubleshooting 10 General specifications 11 1
Table of Contents Precautions ...2 Special notes on LCD monitors 2 Package contents 3 Installation instructions 3 Assembling the monitor 3 Adjusting the viewing angle 4 Connecting the devices 5 Switching the power 6 Adjusting display settings 6 External controls 6 OSD options...7 OSD menu ...7 Troubleshooting 10 General specifications 11 1
User Guide
Page 2
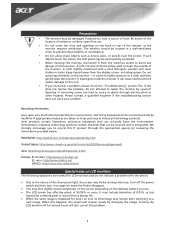
... to make the flicker disappear. • You may find slightly uneven brightness on the screen depending on LCD monitors The following symptoms are taken to lightly spray on the monitor - Such products contain hazardous, poisonous substances that is always lit). • When the same image is best to treat and recycle industrial technology products. it from the display screen, including sprays. Opening or removing covers...
... to make the flicker disappear. • You may find slightly uneven brightness on the screen depending on LCD monitors The following symptoms are taken to lightly spray on the monitor - Such products contain hazardous, poisonous substances that is always lit). • When the same image is best to treat and recycle industrial technology products. it from the display screen, including sprays. Opening or removing covers...
User Guide
Page 3
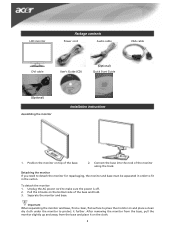
... monitor from the base, pull the monitor slightly up and away from the base and place it further. Connect the base into the neck of the monitor along the track. Detaching the monitor If you need to detach the monitor for repackaging, the monitor and base must be separated in order to fit in the carton. LCD monitor Package contents Power cord Audio cable VGA cable DVI cable User's Guide (CD) (Optional) Quick Start Guide (Optional) Assembling the monitor Installation instructions...
... monitor from the base, pull the monitor slightly up and away from the base and place it further. Connect the base into the neck of the monitor along the track. Detaching the monitor If you need to detach the monitor for repackaging, the monitor and base must be separated in order to fit in the carton. LCD monitor Package contents Power cord Audio cable VGA cable DVI cable User's Guide (CD) (Optional) Quick Start Guide (Optional) Assembling the monitor Installation instructions...

User Guide
Page 5
... the power supply. 1 Power cord Attach the monitor to the power cord, and then insert the power cord into . Connecting the devices Caution: Make sure that none of the socket it is inserted into a properly grounded electrical socket. WARNING! VGA DVI-D 5 Also check that the computer and the monitor are bent or otherwise damaged. Check the VGA card of the graphics card on the computer. Connect the signal cable to the VGA input socket...
... the power supply. 1 Power cord Attach the monitor to the power cord, and then insert the power cord into . Connecting the devices Caution: Make sure that none of the socket it is inserted into a properly grounded electrical socket. WARNING! VGA DVI-D 5 Also check that the computer and the monitor are bent or otherwise damaged. Check the VGA card of the graphics card on the computer. Connect the signal cable to the VGA input socket...

User Guide
Page 6
... green light on Orange: in the OSD. Adjusting display settings External controls 1 Auto If the OSD is active, press Auto to enter a selection in the OSD. Power on/off 5 Power Green: power on the power button or a video signal, check the connections. Press again to exit a selection in sleep mode 6 If OSD is ready for the video signal to view the OSD. When you do not see the LED on monitor's control panel. If the OSD is inactive, press Auto and the monitor will automatically optimize...
... green light on Orange: in the OSD. Adjusting display settings External controls 1 Auto If the OSD is active, press Auto to enter a selection in the OSD. Power on/off 5 Power Green: power on the power button or a video signal, check the connections. Press again to exit a selection in sleep mode 6 If OSD is ready for the video signal to view the OSD. When you do not see the LED on monitor's control panel. If the OSD is inactive, press Auto and the monitor will automatically optimize...

User Guide
Page 7
... adjusts the vertical. 7 Press Menu again to open the OSD menu. 2. OSD menu Contrast: This adjusts dark and light shades of color relative to exit the OSD. It also changes the size of the picture on the screen. H-Position: This adjusts the horizontal. OSD options Please refer to "External controls" on the background of the screen, this renders them less noticeable by minimizing their size. To adjust the OSD settings: 1. When you have finished adjusting the OSD settings, press the Auto button...
... adjusts the vertical. 7 Press Menu again to open the OSD menu. 2. OSD menu Contrast: This adjusts dark and light shades of color relative to exit the OSD. It also changes the size of the picture on the screen. H-Position: This adjusts the horizontal. OSD options Please refer to "External controls" on the background of the screen, this renders them less noticeable by minimizing their size. To adjust the OSD settings: 1. When you have finished adjusting the OSD settings, press the Auto button...
User Guide
Page 8
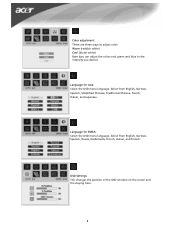
Color adjustment: There are three ways to adjust color: Warm (reddish white) Cool (bluish white) User (you can adjust the colors red, green and blue to the intensity you desire) Language for EMEA: Select the OSD menu language. Language for Asia: Select the OSD menu language. OSD Settings: This changes the position of the OSD window on the screen and the staying time. 8 Select from English, German, Spanish, Simplified Chinese, Traditional Chinese, French, Italian, and Japanese. Select from English, German, Spanish, Russia, Nederlands, French, Italian, and Finnish.
Color adjustment: There are three ways to adjust color: Warm (reddish white) Cool (bluish white) User (you can adjust the colors red, green and blue to the intensity you desire) Language for EMEA: Select the OSD menu language. Language for Asia: Select the OSD menu language. OSD Settings: This changes the position of the OSD window on the screen and the staying time. 8 Select from English, German, Spanish, Simplified Chinese, Traditional Chinese, French, Italian, and Japanese. Select from English, German, Spanish, Russia, Nederlands, French, Italian, and Finnish.
User Guide
Page 10
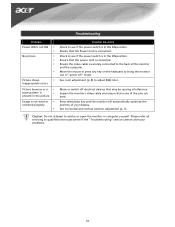
... the monitor's video cable and ensure that the Power Cord is connected. See horizontal and vertical position adjustment (p. 7). Troubleshooting Problem Power LED is not ON y y No picture y y y y Picture shows y inappropriate colors Picture bounces or a y wave pattern is y present in the picture Image is not sized or y centered properly y Possible Solutions Check to see if the power switch is in the ON position. Move the mouse or press any key on the keyboard to bring the monitor...
... the monitor's video cable and ensure that the Power Cord is connected. See horizontal and vertical position adjustment (p. 7). Troubleshooting Problem Power LED is not ON y y No picture y y y y Picture shows y inappropriate colors Picture bounces or a y wave pattern is y present in the picture Image is not sized or y centered properly y Possible Solutions Check to see if the power switch is in the ON position. Move the mouse or press any key on the keyboard to bring the monitor...

User Guide
Page 11
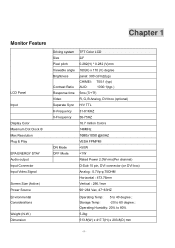
...;50 / 60 Hz 31.00W 0.80W 0.70W 44.00W 0.80W 0.70W 513.8x417.7x203.8mm (with stand) 5.2kg / 7.4 kg Lamp disposal Lamp(s) inside this product contain mercury and must be recycled or disposed of vertical External controls Power Button Control Buttons OSD Function Contrast/Brightness Focus/Clock Position Color Language OSD setting Auto config / Input signal Information Reset Exit Video Interface Video Sync Audio Plug & Play Power Power source Power consumption [Energy Star] On. Stand by OFF Power consumption Max.
...;50 / 60 Hz 31.00W 0.80W 0.70W 44.00W 0.80W 0.70W 513.8x417.7x203.8mm (with stand) 5.2kg / 7.4 kg Lamp disposal Lamp(s) inside this product contain mercury and must be recycled or disposed of vertical External controls Power Button Control Buttons OSD Function Contrast/Brightness Focus/Clock Position Color Language OSD setting Auto config / Input signal Information Reset Exit Video Interface Video Sync Audio Plug & Play Power Power source Power consumption [Energy Star] On. Stand by OFF Power consumption Max.
Service Guide
Page 5
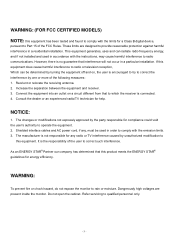
... harmful interference in accordance with the limits for compliance could void the user's authority to operate the equipment. 2. Shielded interface cables and AC power cord, if any radio or TV interference caused by one or more of the FCC Rules. These limits are present inside the monitor. Refer servicing to rain or moisture. The manufacturer is connected. 4.
... harmful interference in accordance with the limits for compliance could void the user's authority to operate the equipment. 2. Shielded interface cables and AC power cord, if any radio or TV interference caused by one or more of the FCC Rules. These limits are present inside the monitor. Refer servicing to rain or moisture. The manufacturer is connected. 4.
Service Guide
Page 6
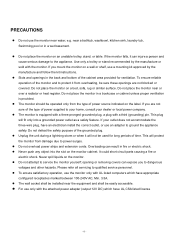
... a three-pronged grounded plug, a plug with the monitor. It could short circuit parts causing a fire or electric shock. z Do not attempt to qualified service personnel. If you are not blocked or covered. If your dealer or local power company. z The wall socket shall be installed near water, e.g. z To ensure satisfactory operation, use the monitor only with the attached power adapter (output 12V DC...
... a three-pronged grounded plug, a plug with the monitor. It could short circuit parts causing a fire or electric shock. z Do not attempt to qualified service personnel. If you are not blocked or covered. If your dealer or local power company. z The wall socket shall be installed near water, e.g. z To ensure satisfactory operation, use the monitor only with the attached power adapter (output 12V DC...
Service Guide
Page 7
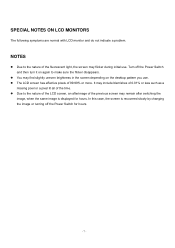
... LCD MONITORS The following symptoms are normal with LCD monitor and do not indicate a problem. NOTES z Due to the nature of the previous screen may remain after switching the image, when the same image is recovered slowly by changing the image or turning off the Power Switch for hours. Turn off the Power Switch and then turn it on the desktop pattern you use . In this case, the screen is displayed...
... LCD MONITORS The following symptoms are normal with LCD monitor and do not indicate a problem. NOTES z Due to the nature of the previous screen may remain after switching the image, when the same image is recovered slowly by changing the image or turning off the Power Switch for hours. Turn off the Power Switch and then turn it on the desktop pattern you use . In this case, the screen is displayed...
Service Guide
Page 9
Chapter 1 Monitor Feature LCD Panel Input Display Color Maximum Dot Clock ® Max Resolution Plug & Play EPA ENERGY STAY Audio output Input Connector Input Video Signal Screen Size (Active) Power Source Environmental Considerations Weight (N.W.) Dimension Driving system Size Pixel pitch Viewable angle Brightness Contrast Ratio Response time Video Separate Sync H-Frequency V-Frequency ON Mode OFF Mode TFT Color LCD 22" 0.282(H) * 0.282 (V)mm 160(H) x 170 (V) degree panel: 300 cd/m2(typ) CHIMEI: 700:1 (typ) AUO: 1000:1(typ.) 5ms (Tr+Tf) R, G, B Analog, DVI box (optional) H/V TTL...
Chapter 1 Monitor Feature LCD Panel Input Display Color Maximum Dot Clock ® Max Resolution Plug & Play EPA ENERGY STAY Audio output Input Connector Input Video Signal Screen Size (Active) Power Source Environmental Considerations Weight (N.W.) Dimension Driving system Size Pixel pitch Viewable angle Brightness Contrast Ratio Response time Video Separate Sync H-Frequency V-Frequency ON Mode OFF Mode TFT Color LCD 22" 0.282(H) * 0.282 (V)mm 160(H) x 170 (V) degree panel: 300 cd/m2(typ) CHIMEI: 700:1 (typ) AUO: 1000:1(typ.) 5ms (Tr+Tf) R, G, B Analog, DVI box (optional) H/V TTL...

Service Guide
Page 26
Function Press again to view OSD. If OSD is inactive, press once, then press the buttons marked or to adjust the volume. OPERATING INSTRUCTIONS Chapter 2 Front Panel Definition This Section defines the front panel User Interface for Led Indictor and Key function. If OSD ○3 UP/ PLUS is ○5 AUTO inactive, press and the monitor will automatically optimize the position, focus and clock of your display. - 26 - Key...
Function Press again to view OSD. If OSD is inactive, press once, then press the buttons marked or to adjust the volume. OPERATING INSTRUCTIONS Chapter 2 Front Panel Definition This Section defines the front panel User Interface for Led Indictor and Key function. If OSD ○3 UP/ PLUS is ○5 AUTO inactive, press and the monitor will automatically optimize the position, focus and clock of your display. - 26 - Key...

Service Guide
Page 27
... changes the size of color relative to each other to achieve a comfortable contrast. Brightness: This adjusts the brightness of the screen this renders them less noticeable by minimizing their size. H-Position: This adjusts the horizontal screen position. Clock: If there are any horizontal distortion and makes the picture clear and sharp. V-Position: This adjusts the vertical screen position. Color temp: There are three ways of adjusting color: Warm (Reddish white) Cool (Bluish white) User : You can adjust the colors red, green and blue...
... changes the size of color relative to each other to achieve a comfortable contrast. Brightness: This adjusts the brightness of the screen this renders them less noticeable by minimizing their size. H-Position: This adjusts the horizontal screen position. Clock: If there are any horizontal distortion and makes the picture clear and sharp. V-Position: This adjusts the vertical screen position. Color temp: There are three ways of adjusting color: Warm (Reddish white) Cool (Bluish white) User : You can adjust the colors red, green and blue...

Service Guide
Page 28
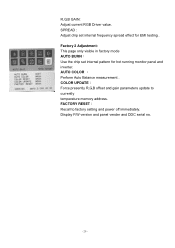
.... Option Auto Config. : System runs auto -configuration. Position OSD Time-out This changes the position of the OSD window on the screen. Factory1 Adjustment: R,G,B OFFSET : Adjust current RGB cut off level - 28 - OSD H. Position OSD V. Analog Input: Setting Language: Select the OSD menu language from English, French, German, Italian, Spanish, Simplified Chinese, Traditional Chinese, Japanese and Russian. Factory Mode You can entry into factory mode when press "Auto" and then press"Power" Key(LED light),it is successful if Power LED Light is amber...
.... Option Auto Config. : System runs auto -configuration. Position OSD Time-out This changes the position of the OSD window on the screen. Factory1 Adjustment: R,G,B OFFSET : Adjust current RGB cut off level - 28 - OSD H. Position OSD V. Analog Input: Setting Language: Select the OSD menu language from English, French, German, Italian, Spanish, Simplified Chinese, Traditional Chinese, Japanese and Russian. Factory Mode You can entry into factory mode when press "Auto" and then press"Power" Key(LED light),it is successful if Power LED Light is amber...
Service Guide
Page 29
... to currently temperature memory address. COLOR UPDATE: Force presently R,G,B offset and gain parameters update to factory setting and power off immediately. Display F/W version and panel vender and DDC serial no. - 29 - Factory 2 Adjustment: This page only visible in factory mode AUTO BURN: Use the chip set internal frequency spread effect for hot running monitor panel and inverter. SPREAD : Adjust chip set internal pattern for EMI testing . R,G,B GAIN: Adjust current RGB Driver value.
... to currently temperature memory address. COLOR UPDATE: Force presently R,G,B offset and gain parameters update to factory setting and power off immediately. Display F/W version and panel vender and DDC serial no. - 29 - Factory 2 Adjustment: This page only visible in factory mode AUTO BURN: Use the chip set internal frequency spread effect for hot running monitor panel and inverter. SPREAD : Adjust chip set internal pattern for EMI testing . R,G,B GAIN: Adjust current RGB Driver value.
Service Guide
Page 31
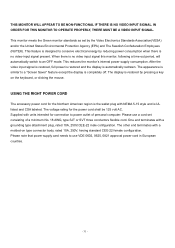
... a key on type connector body, rated 10A, 250V, having standard CEE-22 female configuration. This monitor meets the Green monitor standards as set consisting of personal computer: Please use VDE 0602, 0625, 0821 approval power cord in European counties. - 31 - The appearance is no video input signal this monitor, following a time-out period, will automatically switch to use a cord set by the Video Electronics Standards Association(VESA) and/or...
... a key on type connector body, rated 10A, 250V, having standard CEE-22 female configuration. This monitor meets the Green monitor standards as set consisting of personal computer: Please use VDE 0602, 0625, 0821 approval power cord in European counties. - 31 - The appearance is no video input signal this monitor, following a time-out period, will automatically switch to use a cord set by the Video Electronics Standards Association(VESA) and/or...

Service Guide
Page 42
CHECKING THE COLLOID OF OUTSIDE OF LCD WHETHER FIRMED CHECKING THE CABLE OF BUTTON/B AND SPEAKER & LAMP CABLE WHETHER SETTLED FIRMED THE AL FOIL TURN OVER LCD AND CHECKIN WHETHER ANY DIRTY CHECKING THE REAR COVER AND PUT IT TO THE BEZEL STICK 1*PCS OF CODE ON THE LOCATION OF REAR COVER FROM FLOW CARD AS LEFT SHOW CHECKING REAR COVER AND MAKING SURE WHETHER SETTLED LOCK UP2*PCS SCREWS ON THE REAR COVER CHECKING THE STAND AND PUT IT TO PRODUCTION LINE
CHECKING THE COLLOID OF OUTSIDE OF LCD WHETHER FIRMED CHECKING THE CABLE OF BUTTON/B AND SPEAKER & LAMP CABLE WHETHER SETTLED FIRMED THE AL FOIL TURN OVER LCD AND CHECKIN WHETHER ANY DIRTY CHECKING THE REAR COVER AND PUT IT TO THE BEZEL STICK 1*PCS OF CODE ON THE LOCATION OF REAR COVER FROM FLOW CARD AS LEFT SHOW CHECKING REAR COVER AND MAKING SURE WHETHER SETTLED LOCK UP2*PCS SCREWS ON THE REAR COVER CHECKING THE STAND AND PUT IT TO PRODUCTION LINE

Service Guide
Page 43
CHECKING THE SCREWS OF REAR COVER WHETHER UNLOCKED PUT THE STAND TO THE LOCATION OF REAR COVER LOCK UP 4*PCS ON SCREWS ON THE STAND FOR RIVETING INSERT THE VGA SIGNAL CABLE TO THE SINK OF LCD PUT THE BASE ON THE STAND OF LCD STAND UP THE LCD INSERT THE POWER CABLE TO THE POWER SINK AND TURN ON IT STICK THE FLOW CARD ON THE RIGHT OF BEZEL DOWNSIDE
CHECKING THE SCREWS OF REAR COVER WHETHER UNLOCKED PUT THE STAND TO THE LOCATION OF REAR COVER LOCK UP 4*PCS ON SCREWS ON THE STAND FOR RIVETING INSERT THE VGA SIGNAL CABLE TO THE SINK OF LCD PUT THE BASE ON THE STAND OF LCD STAND UP THE LCD INSERT THE POWER CABLE TO THE POWER SINK AND TURN ON IT STICK THE FLOW CARD ON THE RIGHT OF BEZEL DOWNSIDE


